This post may contain affiliate links. Please read our disclosure policy.

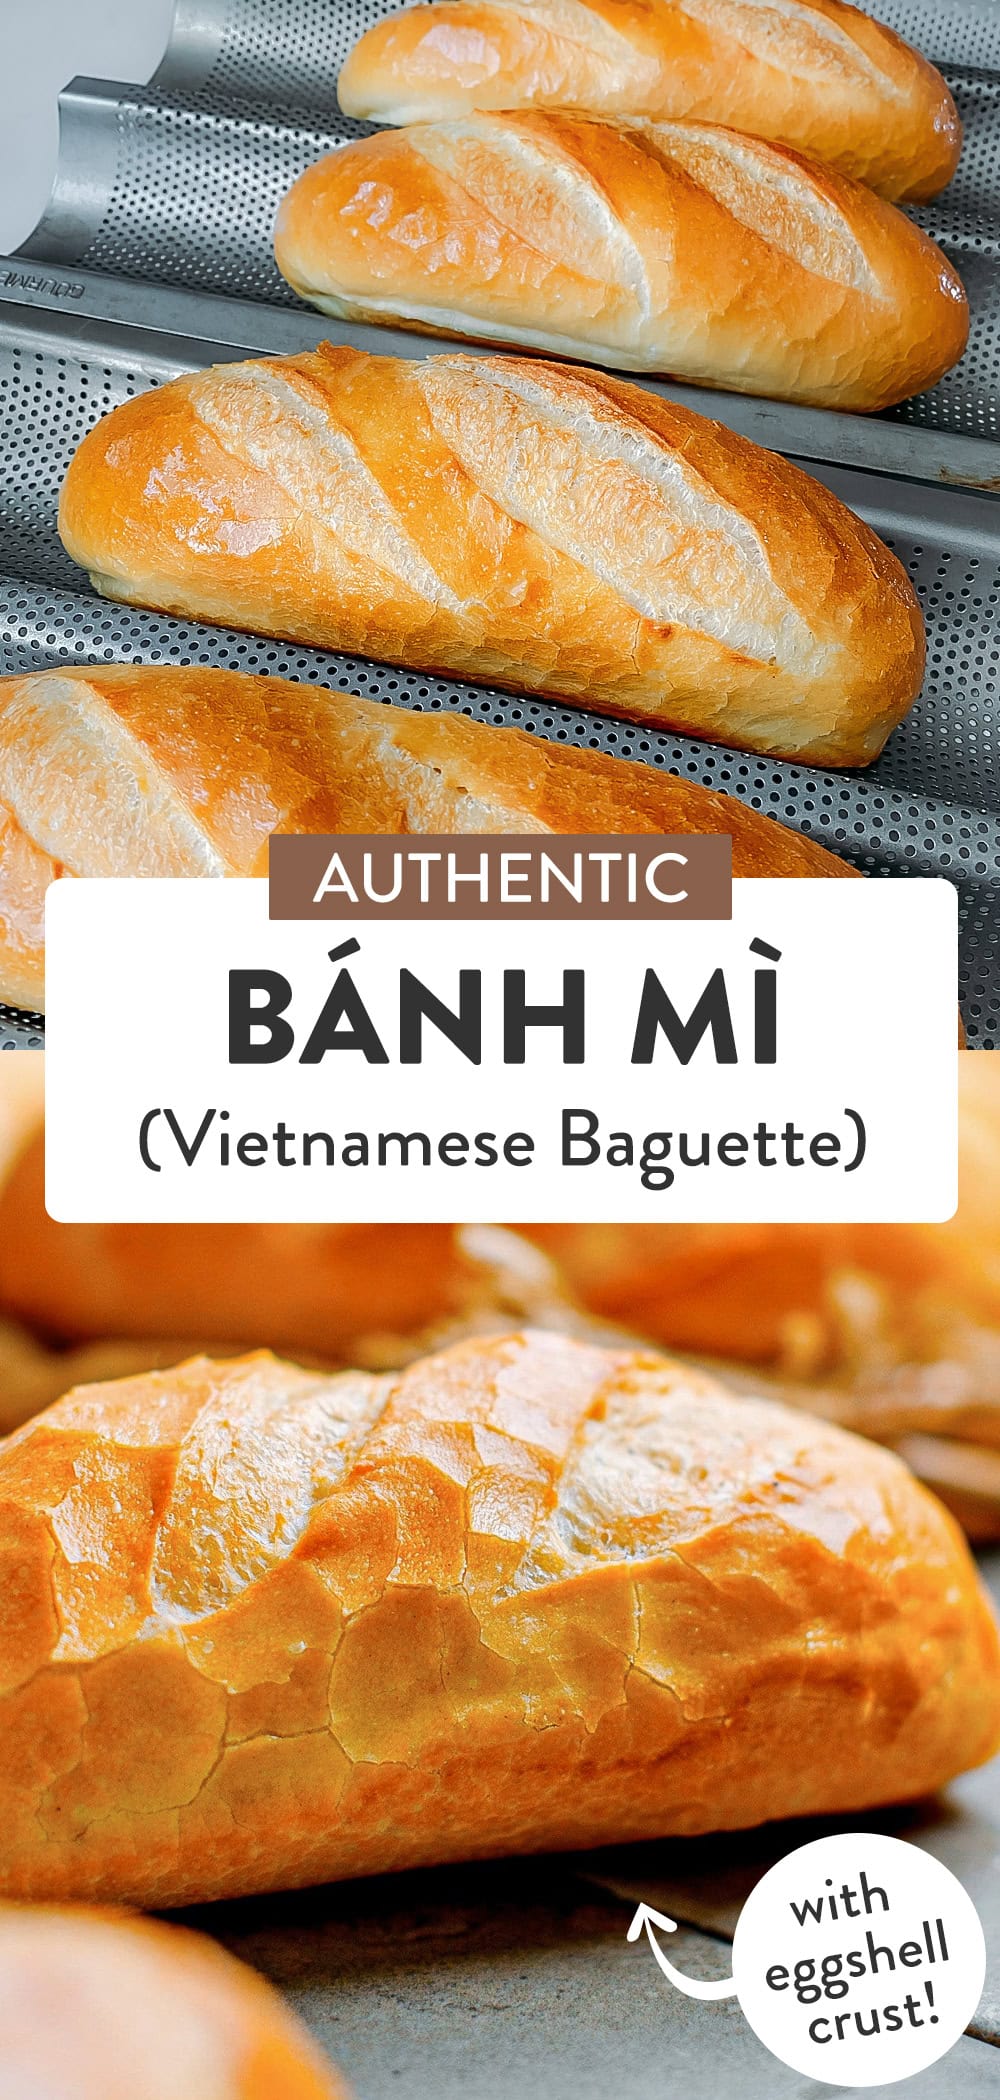
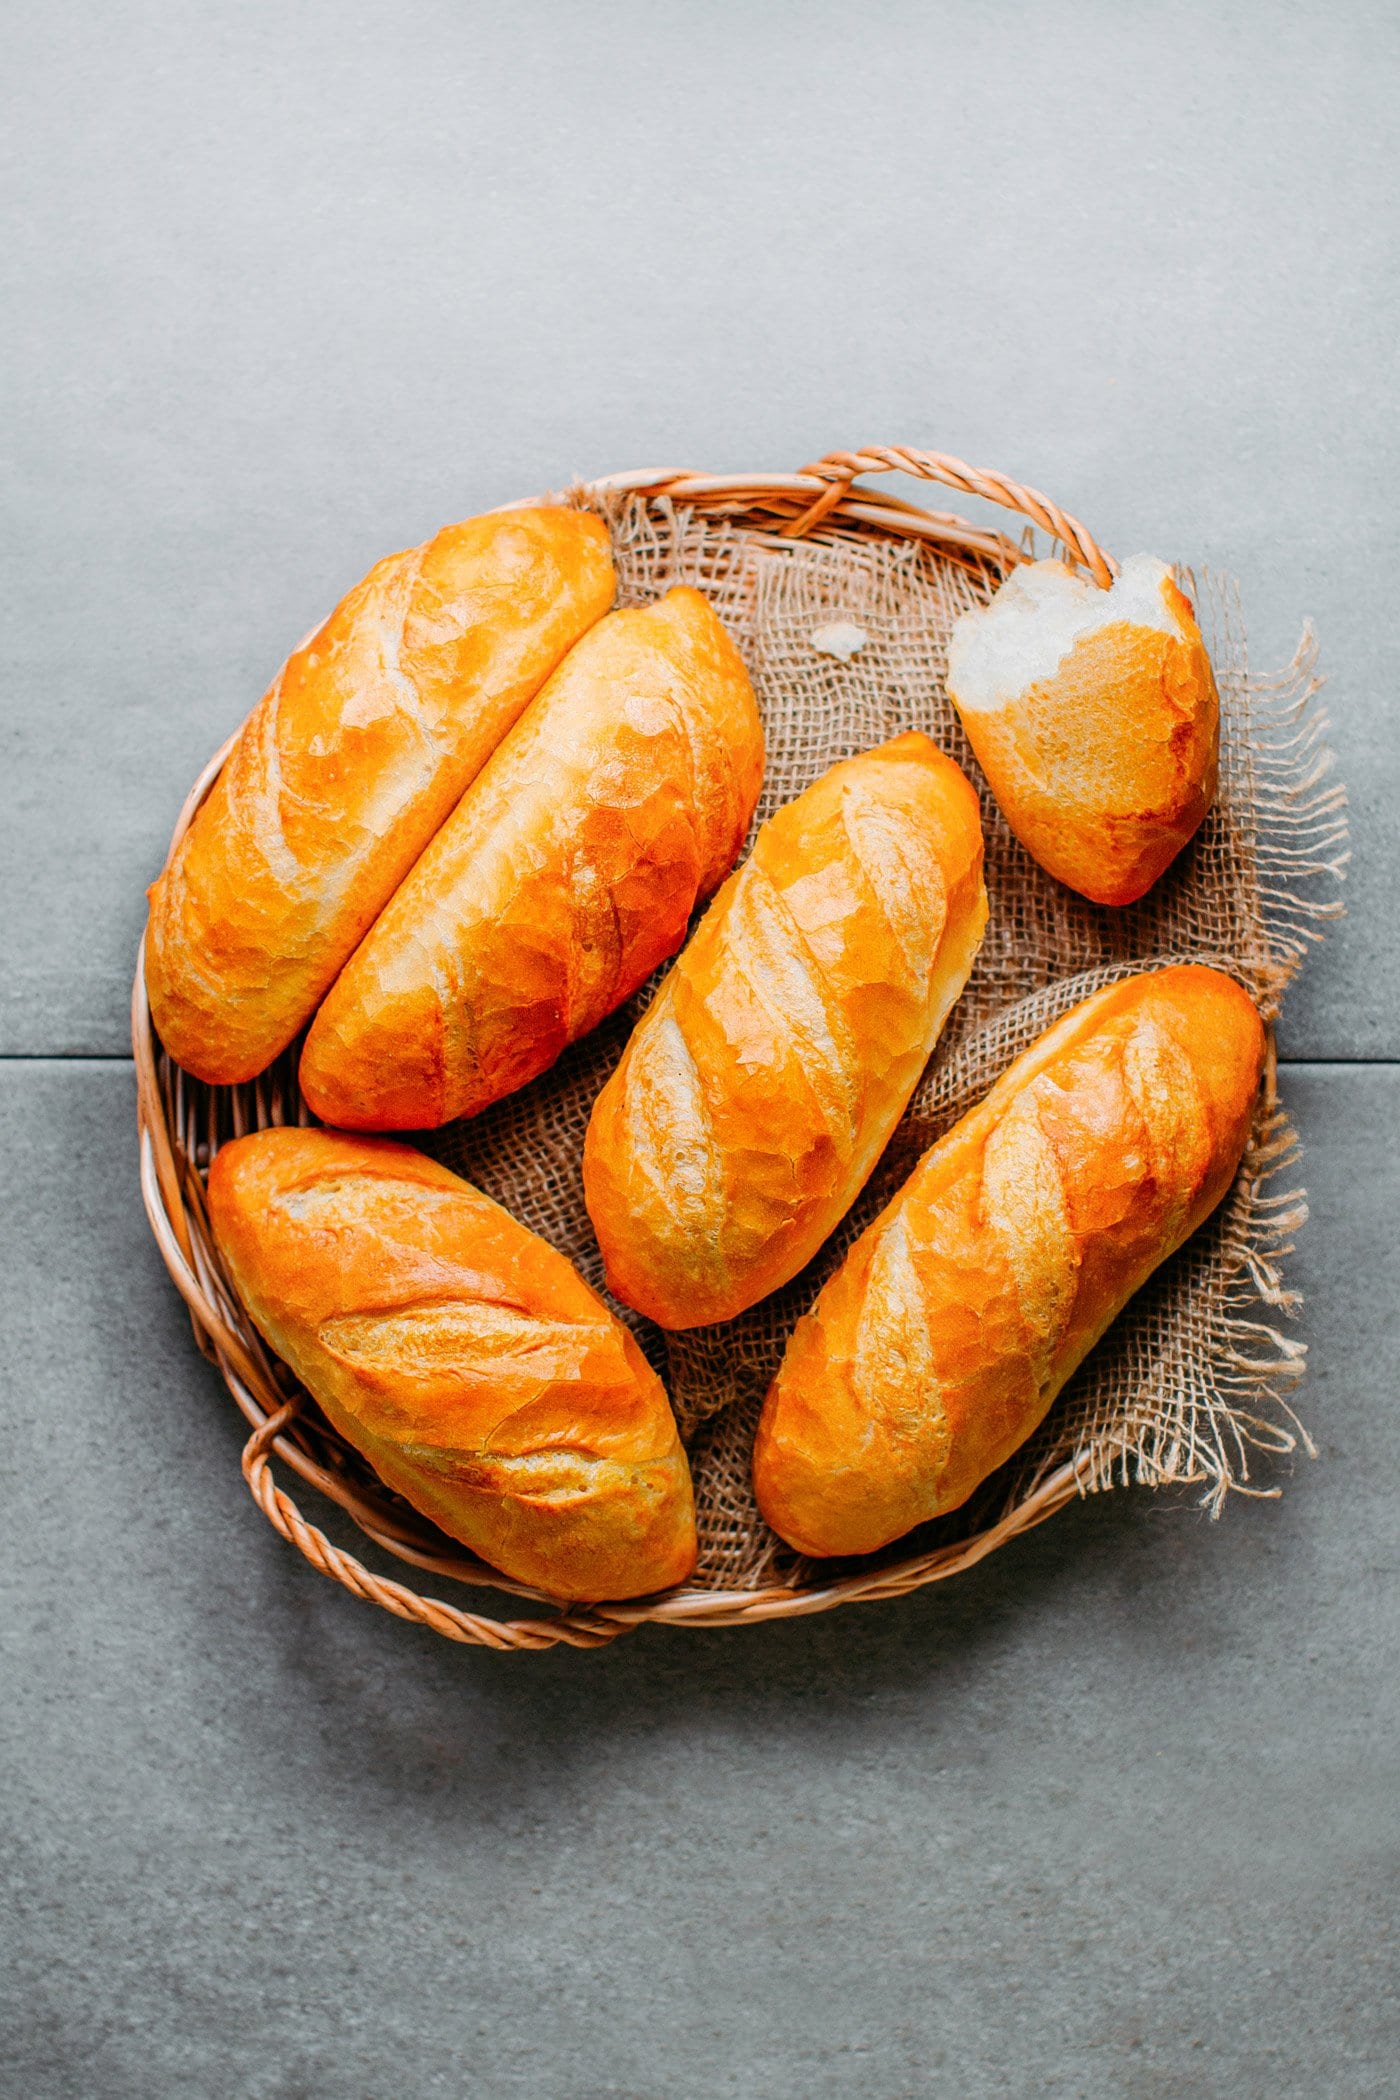
Learn how to make the VERY BEST Vietnamese baguette! These bánh mì have the perfect light and cottony crumb with a super crispy crust! This recipe is the result of a ton of trials and help from Vietnamese friends to reach the perfect texture and flavor. Look no further for an authentic recipe!
My quest to make authentic Bánh Mì is finally over! After hundreds of tests and tweaks, I’m super excited to finally share my recipe to make these super light Vietnamese baguettes! Let’s bake!
While most so-called Vietnamese baguette recipes that can be found online yield nice results, they all lack the lightness of real bánh mì. After a lot of research, an insane amount of trials, and invaluable help from my Vietnamese wife, I finally nailed it! If you are looking for an authentic bánh mì that is as light as a feather with a cracked eggshell crust, this recipe surely won’t disappoint.
It tastes just like the ones I tried and loved in Vietnam, and since I spend half of the year there, I think I know what I’m talking about. In fact, my recipe is based on real recipes we gathered from local bakeries in Saigon, Vietnam. Talk about authenticity!
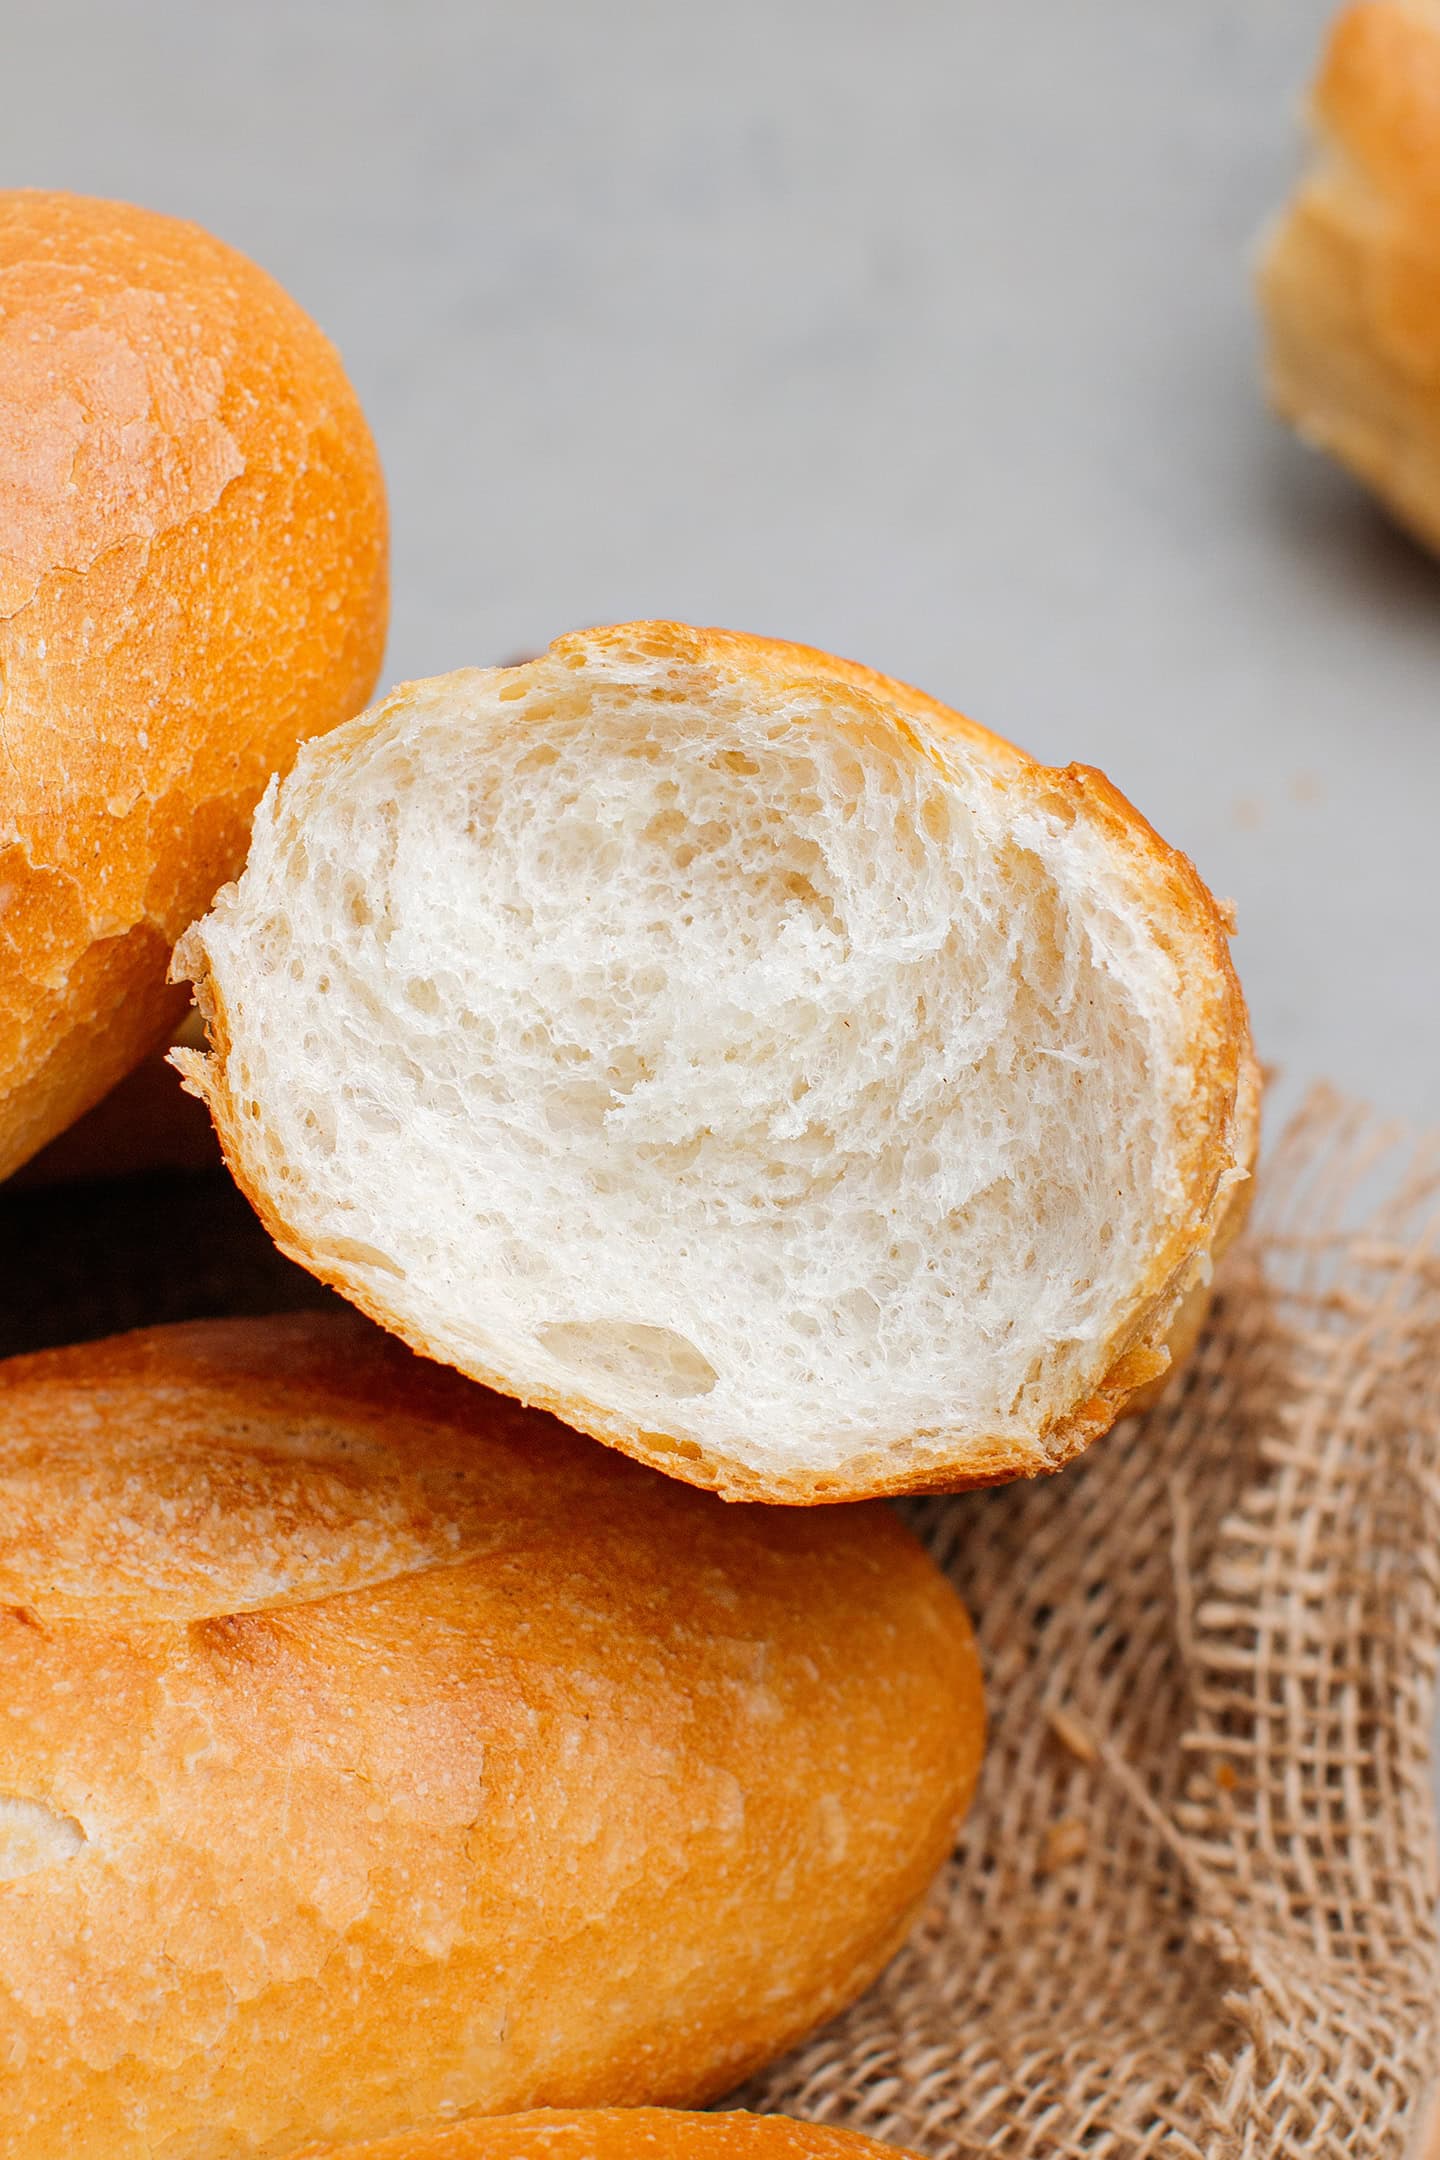
If you have tried authentic Bánh Mì before, you know how light and airy the crumb is. This recipe replicates precisely that!
📙 Why This Recipe Works
What is the secret to getting this extremely light texture and thin crust? Well, there is not one single answer to that. It’s all about food science and the combination of multiple things:
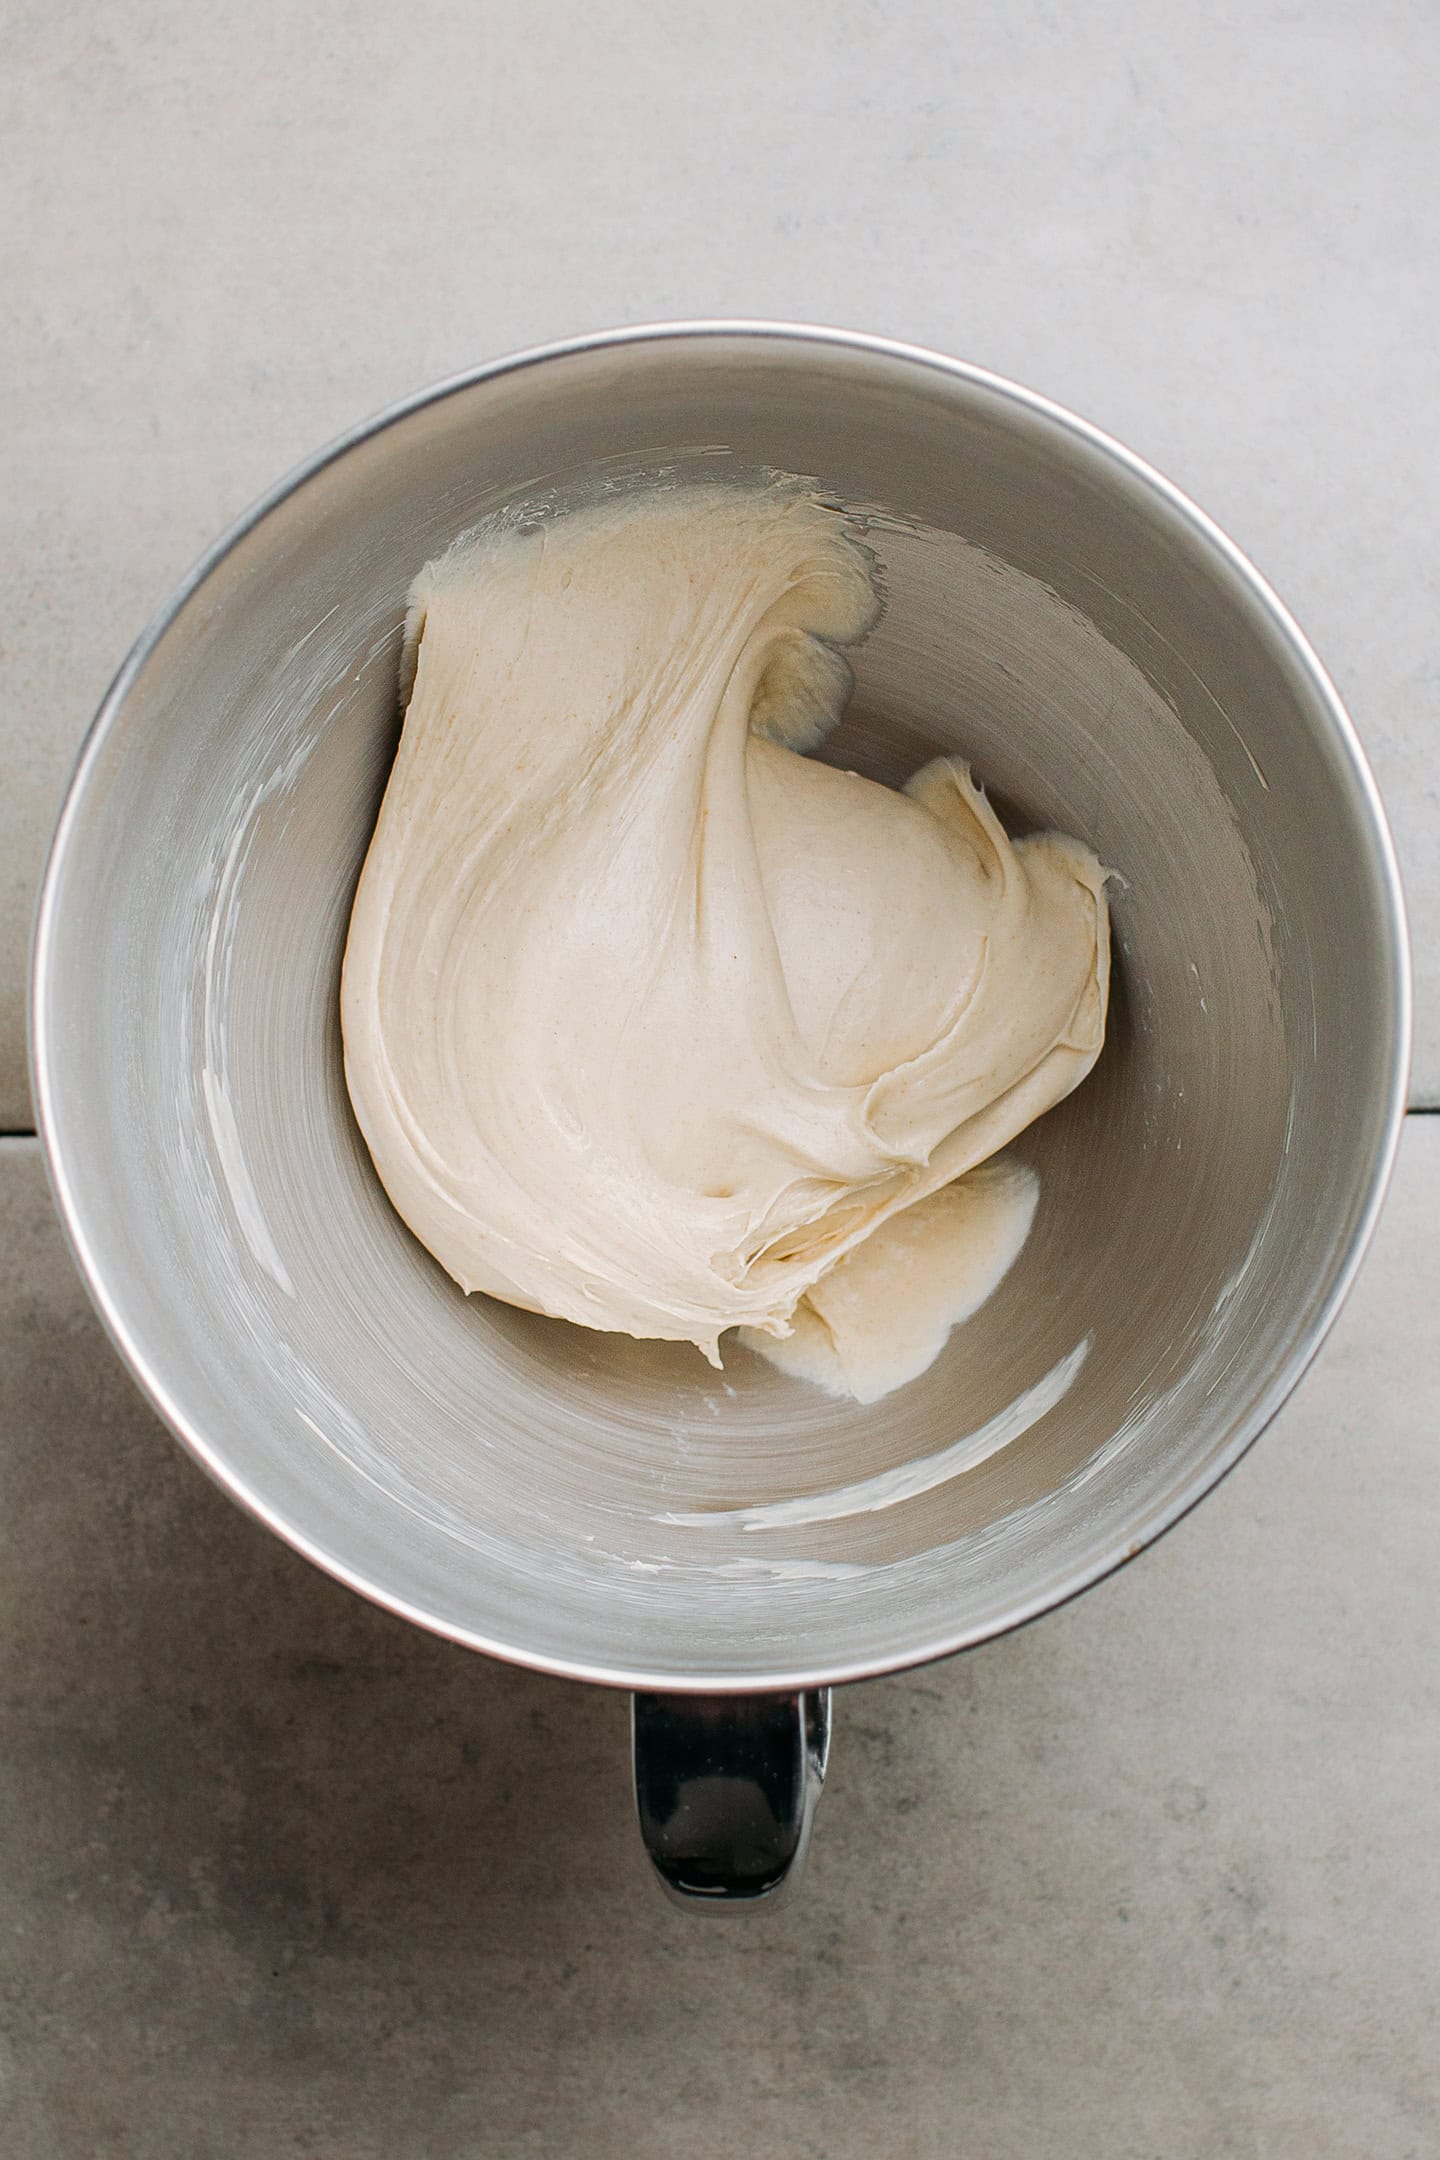
- A high-hydration dough. This dough contains more moisture than most bread dough. In fact, it’s so sticky that you will need to work with oiled hands when handling the dough.
- A high-protein flour. Using wheat flour with a high protein content is critical. I tested this recipe with all-purpose flour (8% protein), and the results were meh. The crumb was just too dense. I will explain more about which flour to pick in the Ingredient Notes section.
- The addition of bread improver. It’s impossible to achieve the airy crumb without using any bread improver. It helps increase the volume, prevents the dough from overproofing, and enhances the shape of your baguettes.
- A high-speed kneading. For this recipe, you will need a stand mixer that you will run at high speed to develop the gluten.
- A long rising time. You want to let your baguettes rise for about two hours in a warm and humid environment (note that the rising time can be shorter if the temperature is very warm). Thanks to the addition of the bread improver and the vitamin C, the baguettes will quadruple in size.
- A lot of steam in the oven. This will allow the crust to develop cracks and stay thin and super crispy.
Don, a reader, said: “This proved to be the best Vietnamese bread recipe we have found. Text and photos were excellent. Instructions are clear, accurate, and complete. Could not wait. Ate while still warm. ★★★★★”
📘 What is Bánh Mì
Bánh Mì is a Vietnamese bread that appeared during the French colonization, around 1880. French colonists brought bread, as well as paté, coffee, crème caramel, yogurt, and more, influencing Vietnamese cuisine. Vietnamese tweaked the bread by filling it with paté, carrot and radish pickles, fresh herbs, and all sorts of meat. It is now considered one of the best sandwiches in the world.
Bánh Mì, which translates to “wheat cake,” is the name of the bread itself, but also the filled sandwich.
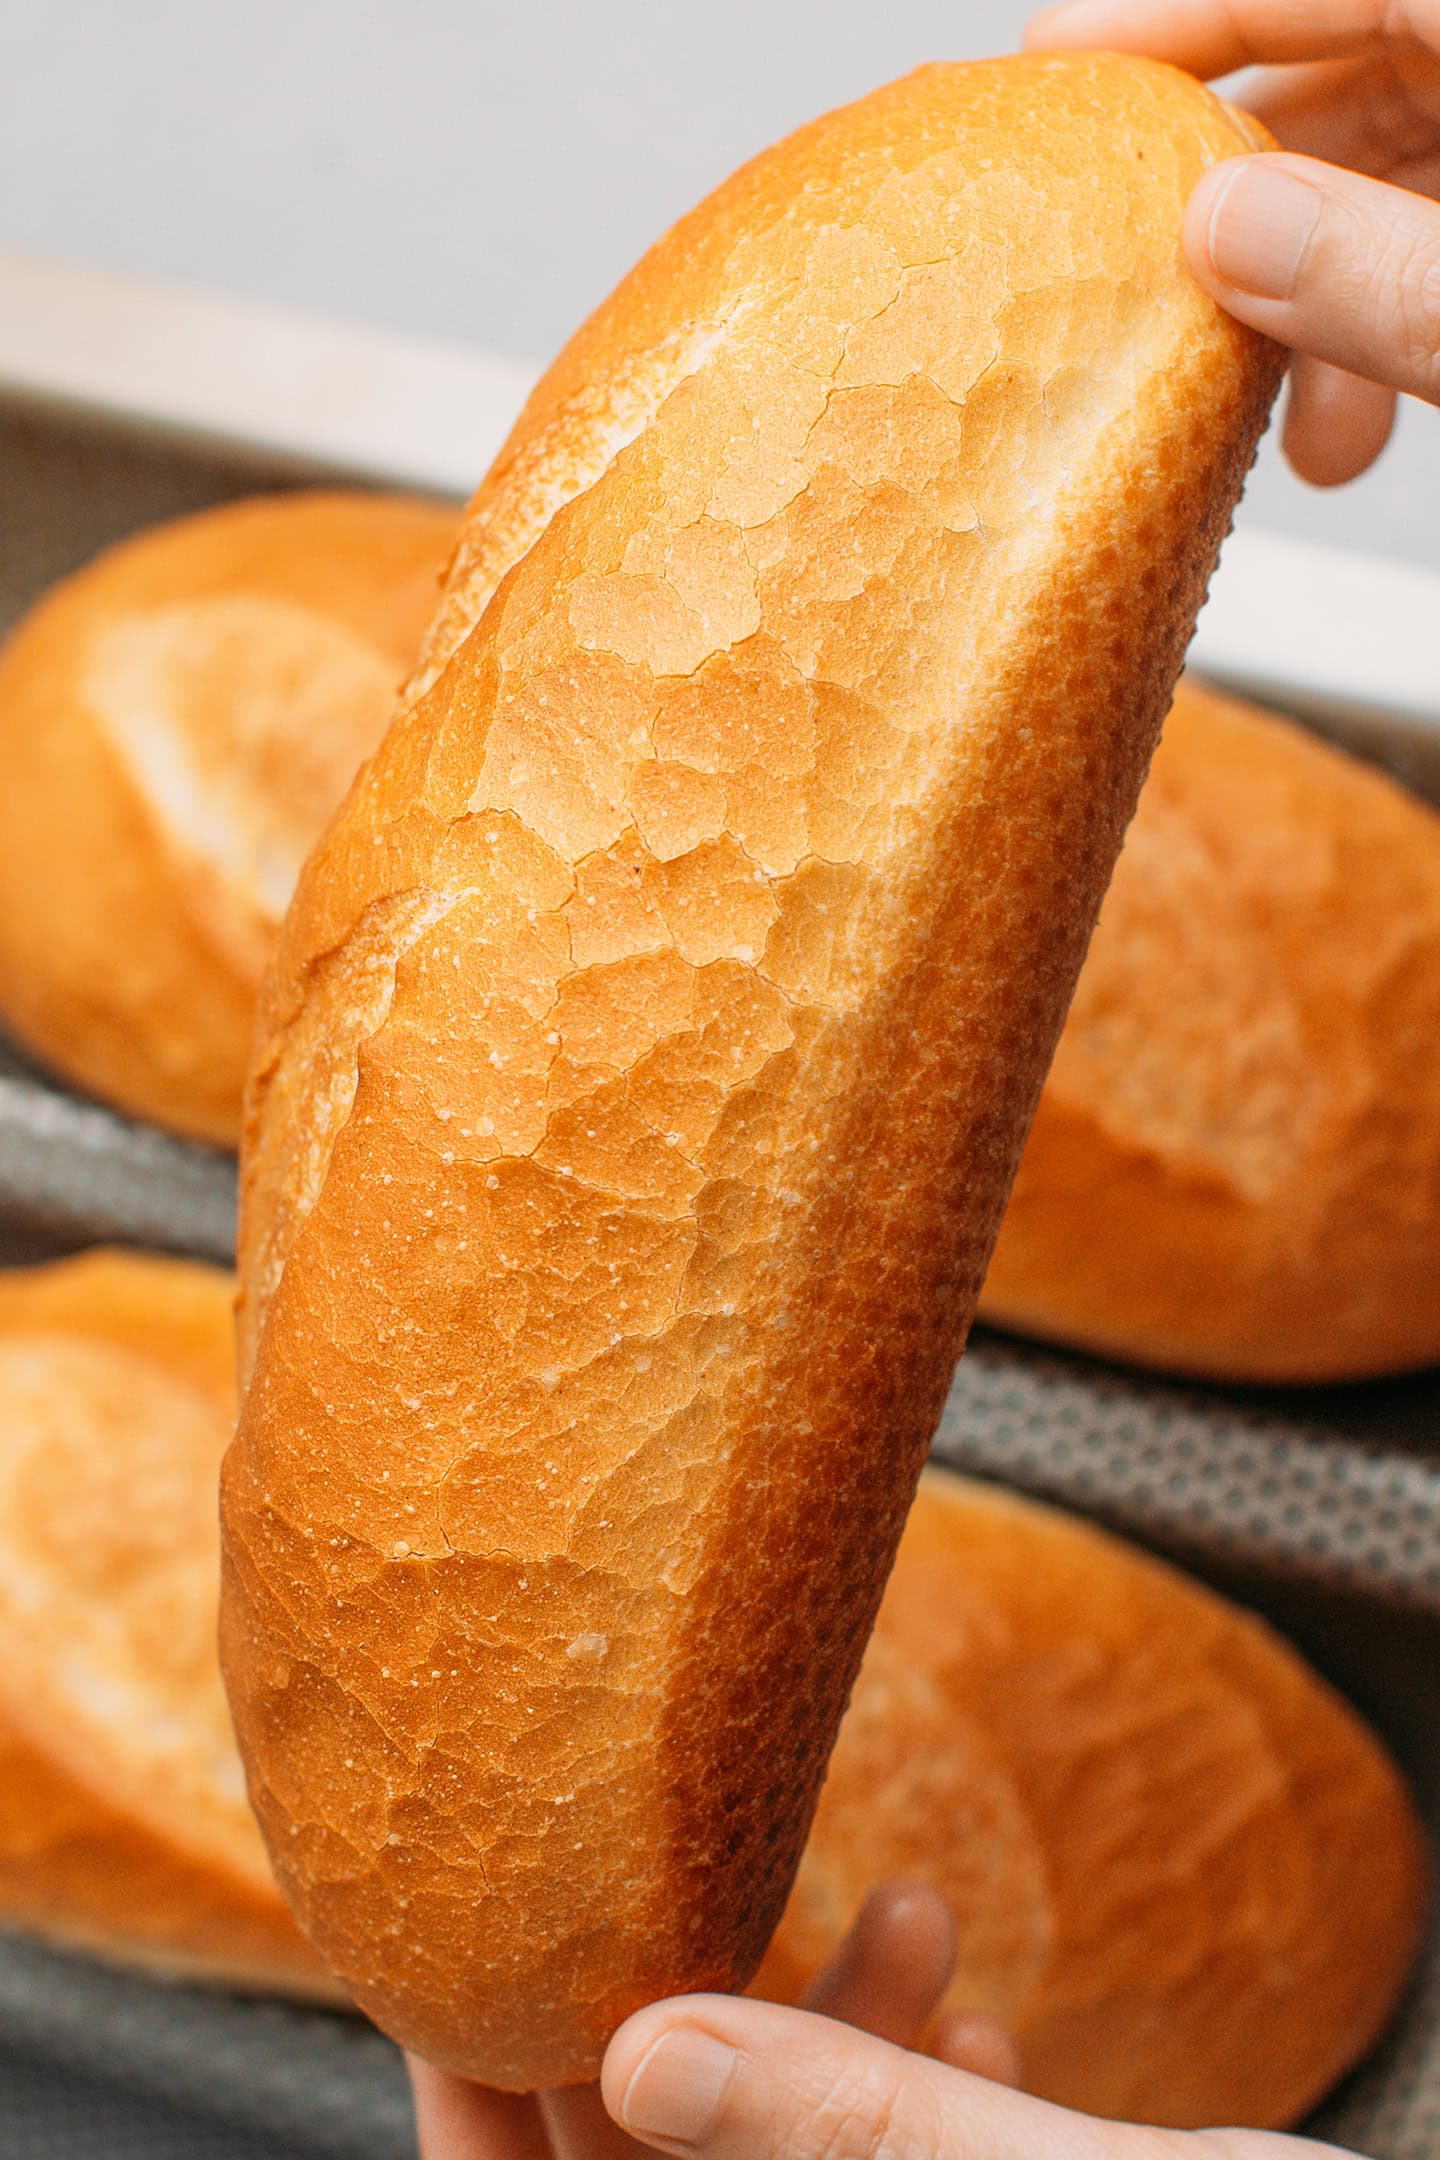
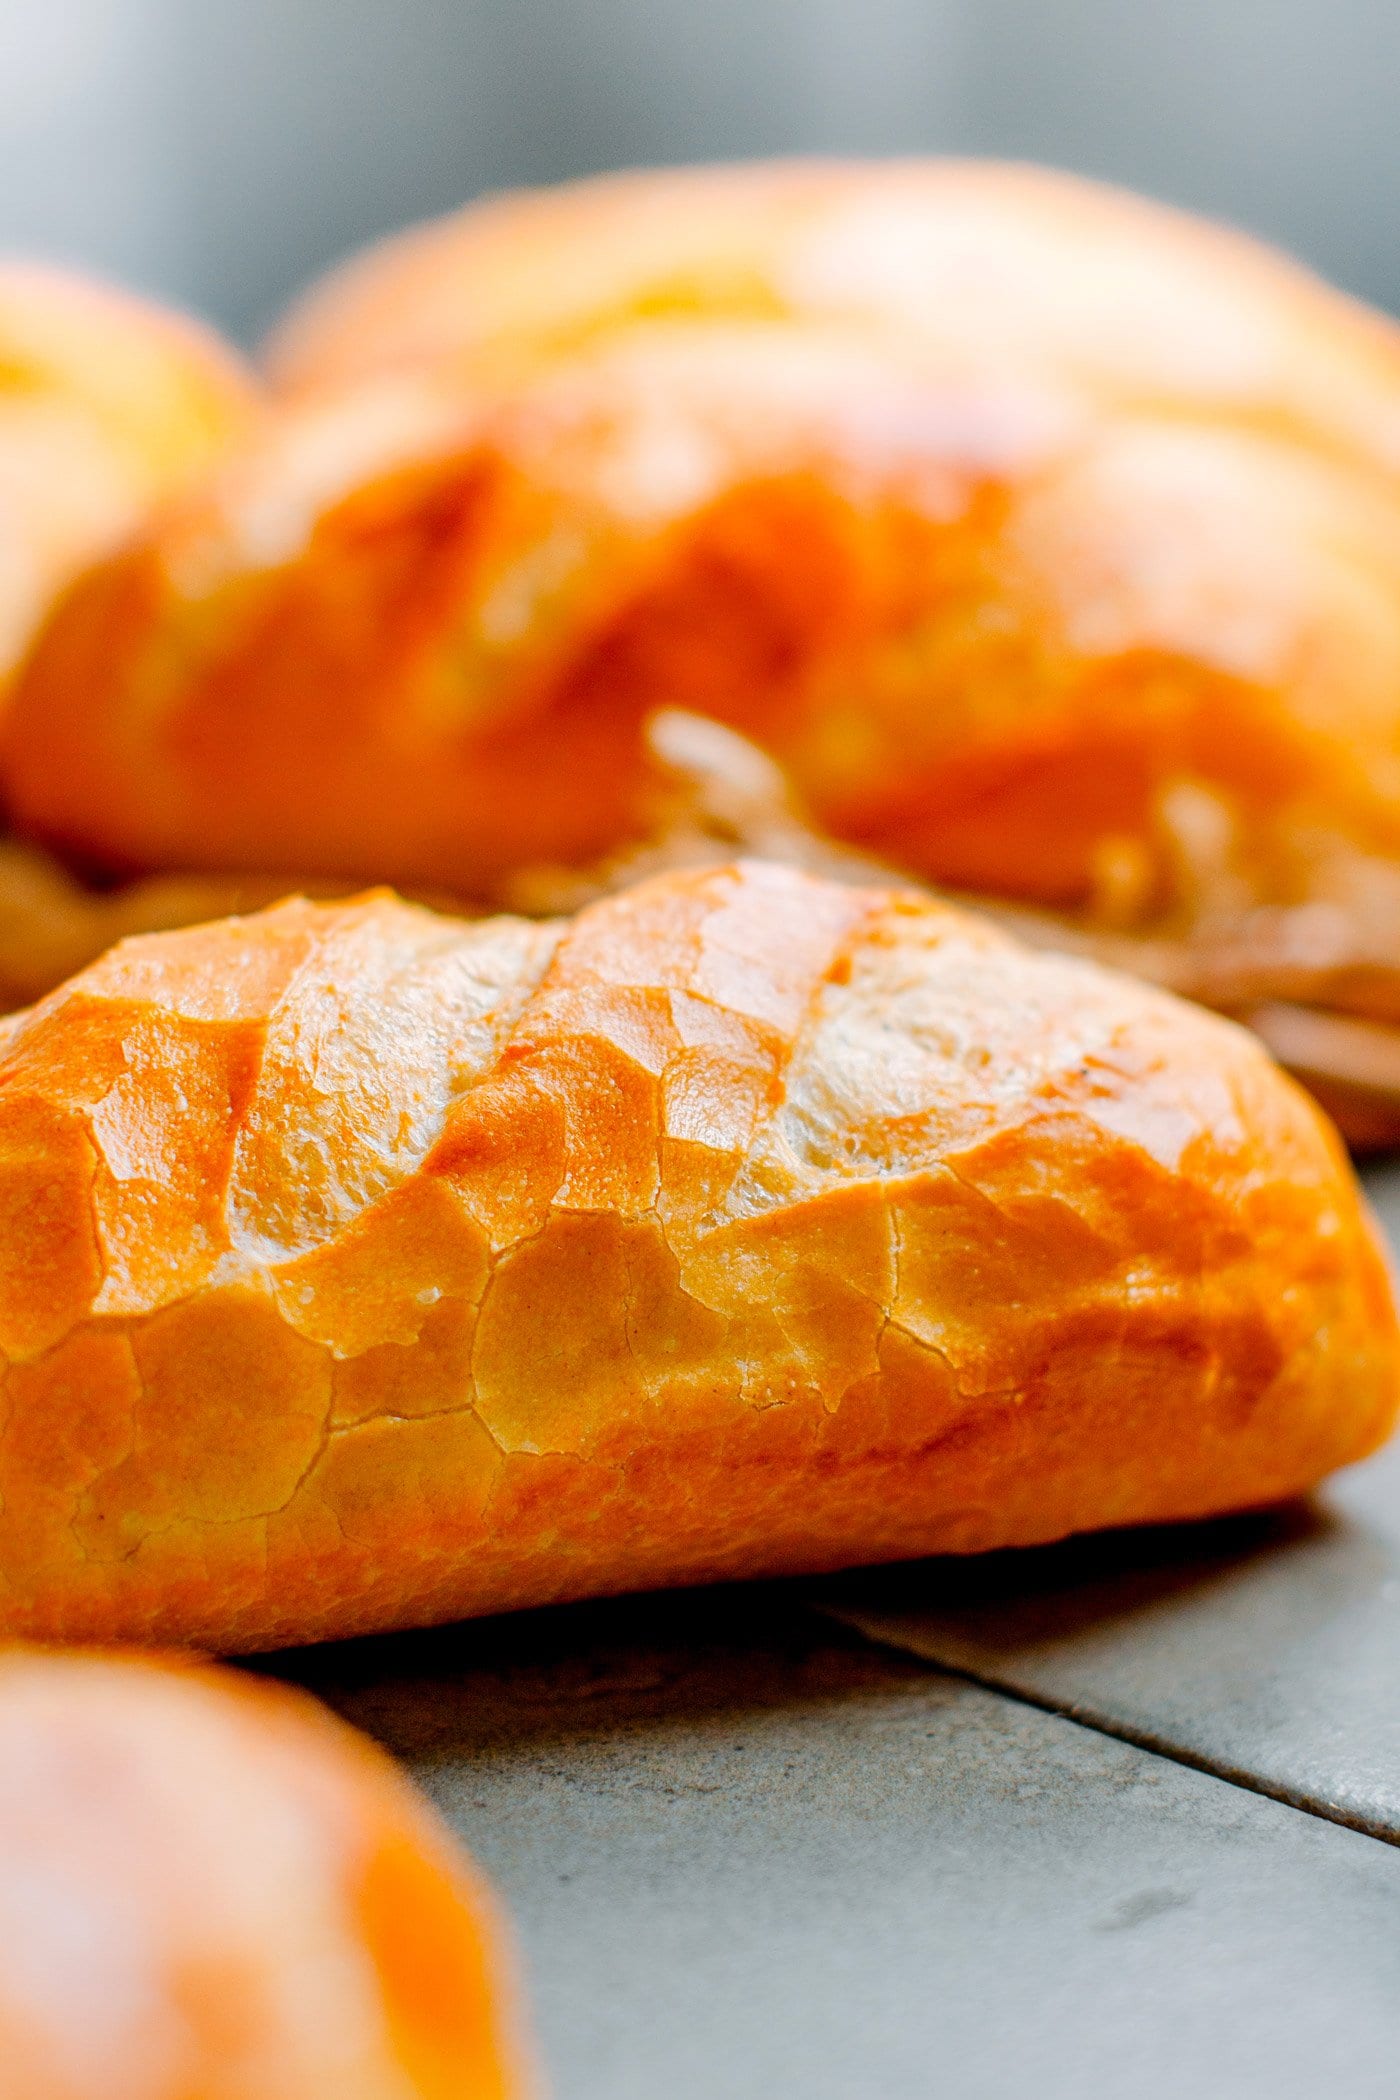
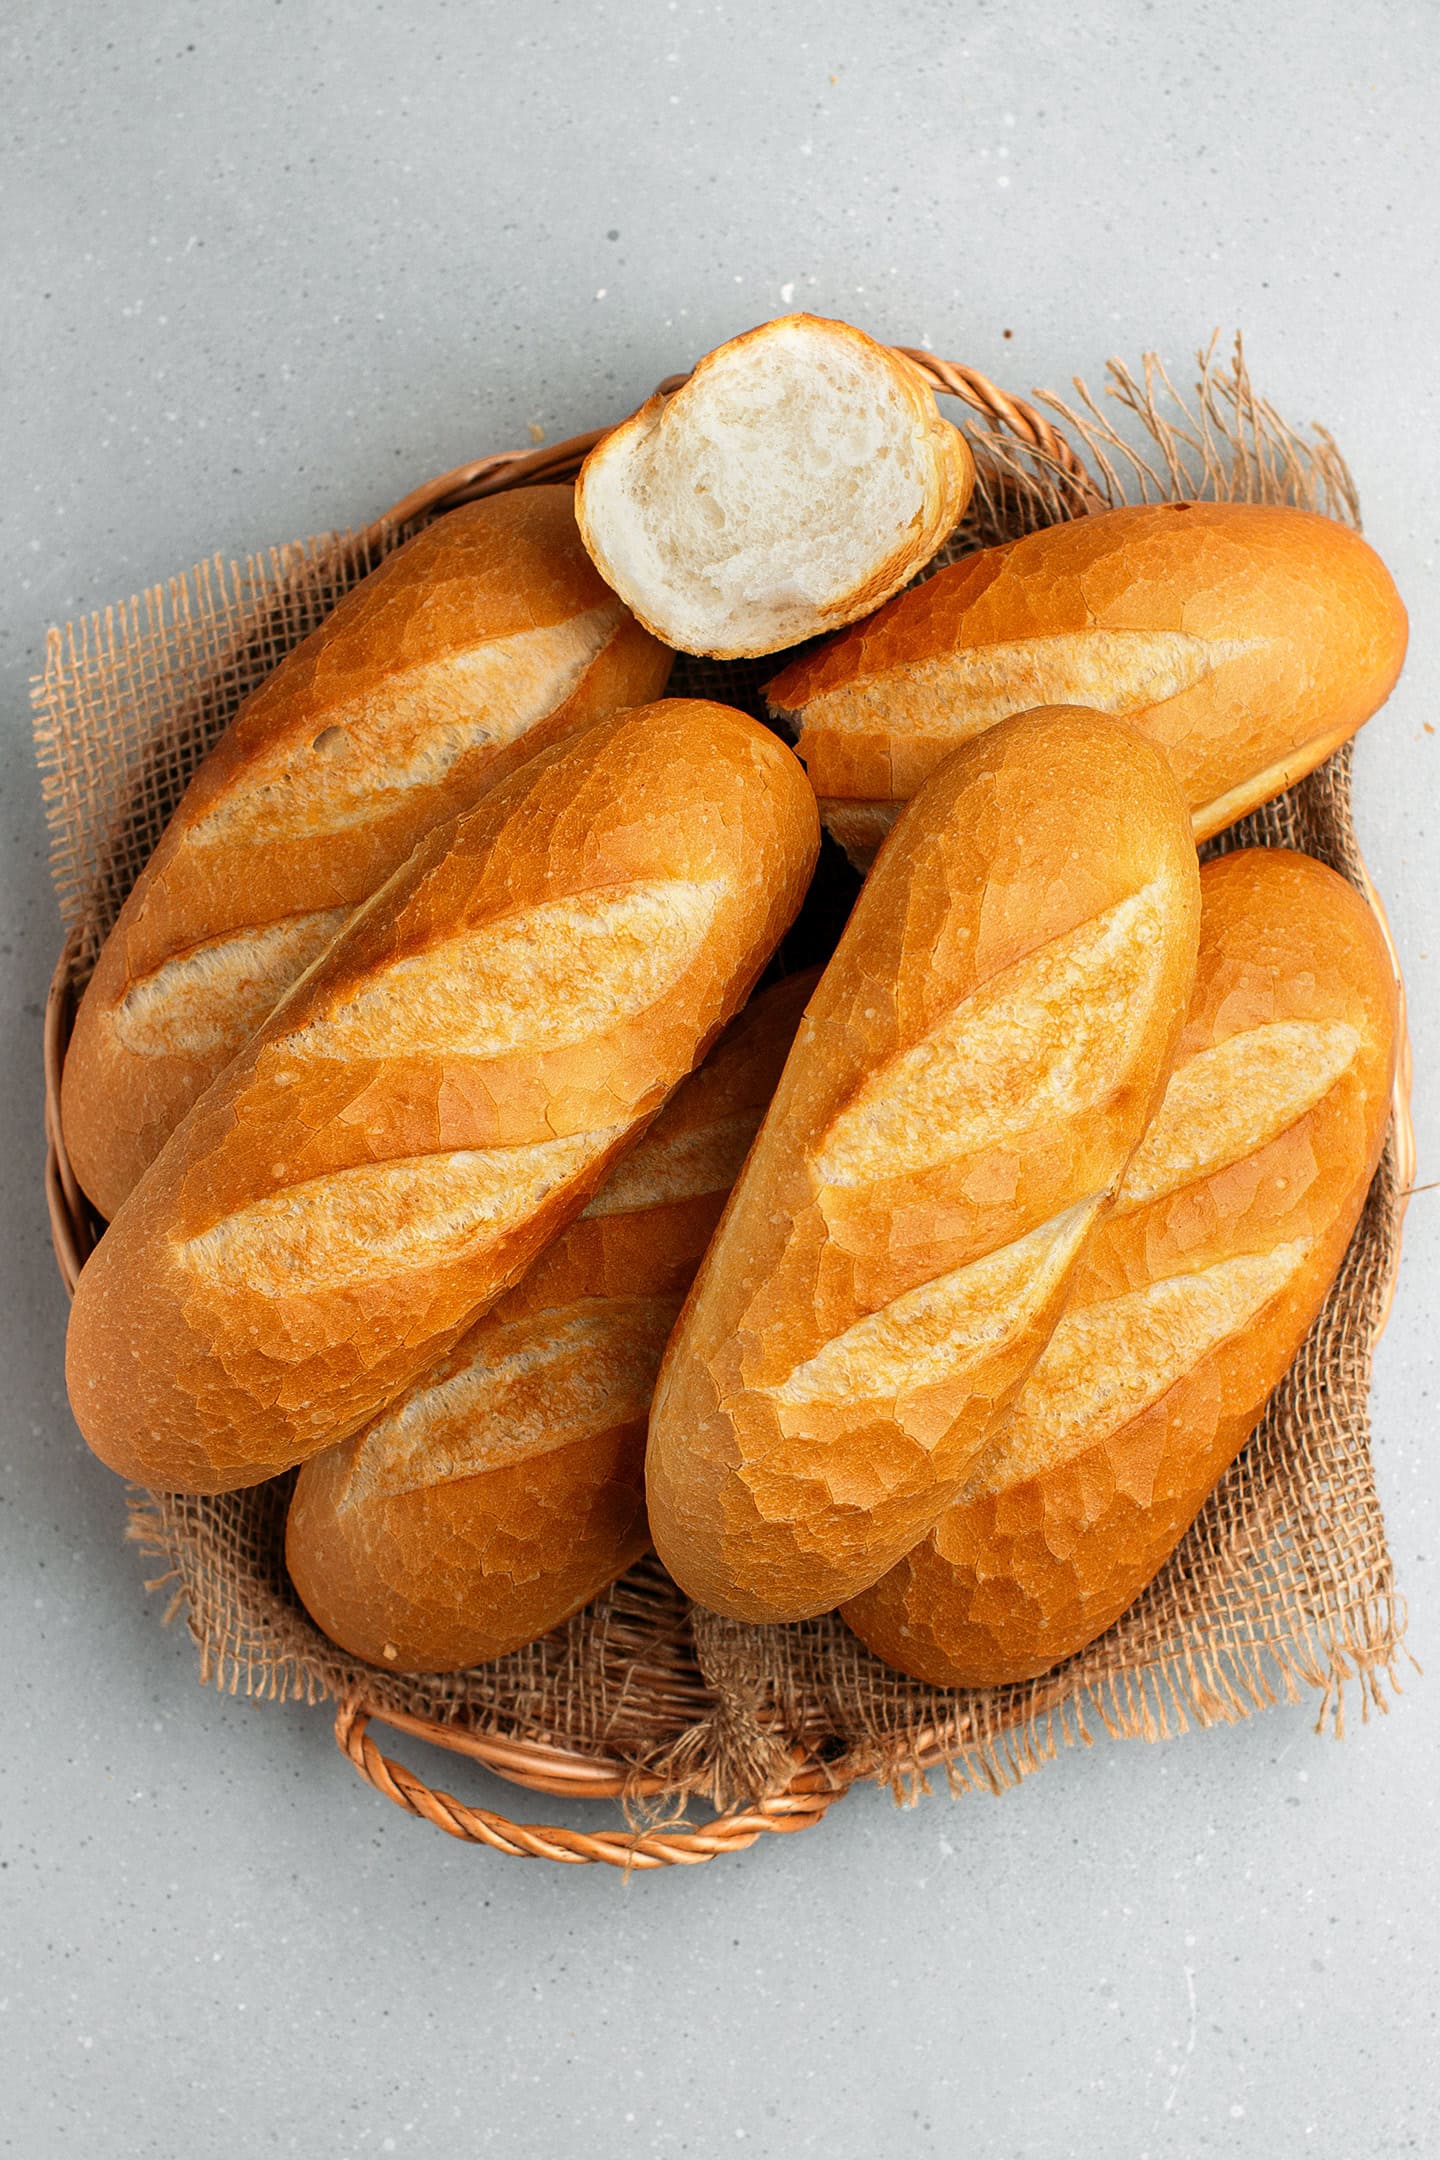
So, what’s so special about bánh mì bread? The uniqueness of this bread is that it is extremely light. The inside is so airy that it almost looks like candy floss, and the crust is super thin and crispy with visible cracks on it. As opposed to baguette, for example, bánh mì tends to become soft and chewy the next day. It doesn’t really dry out.
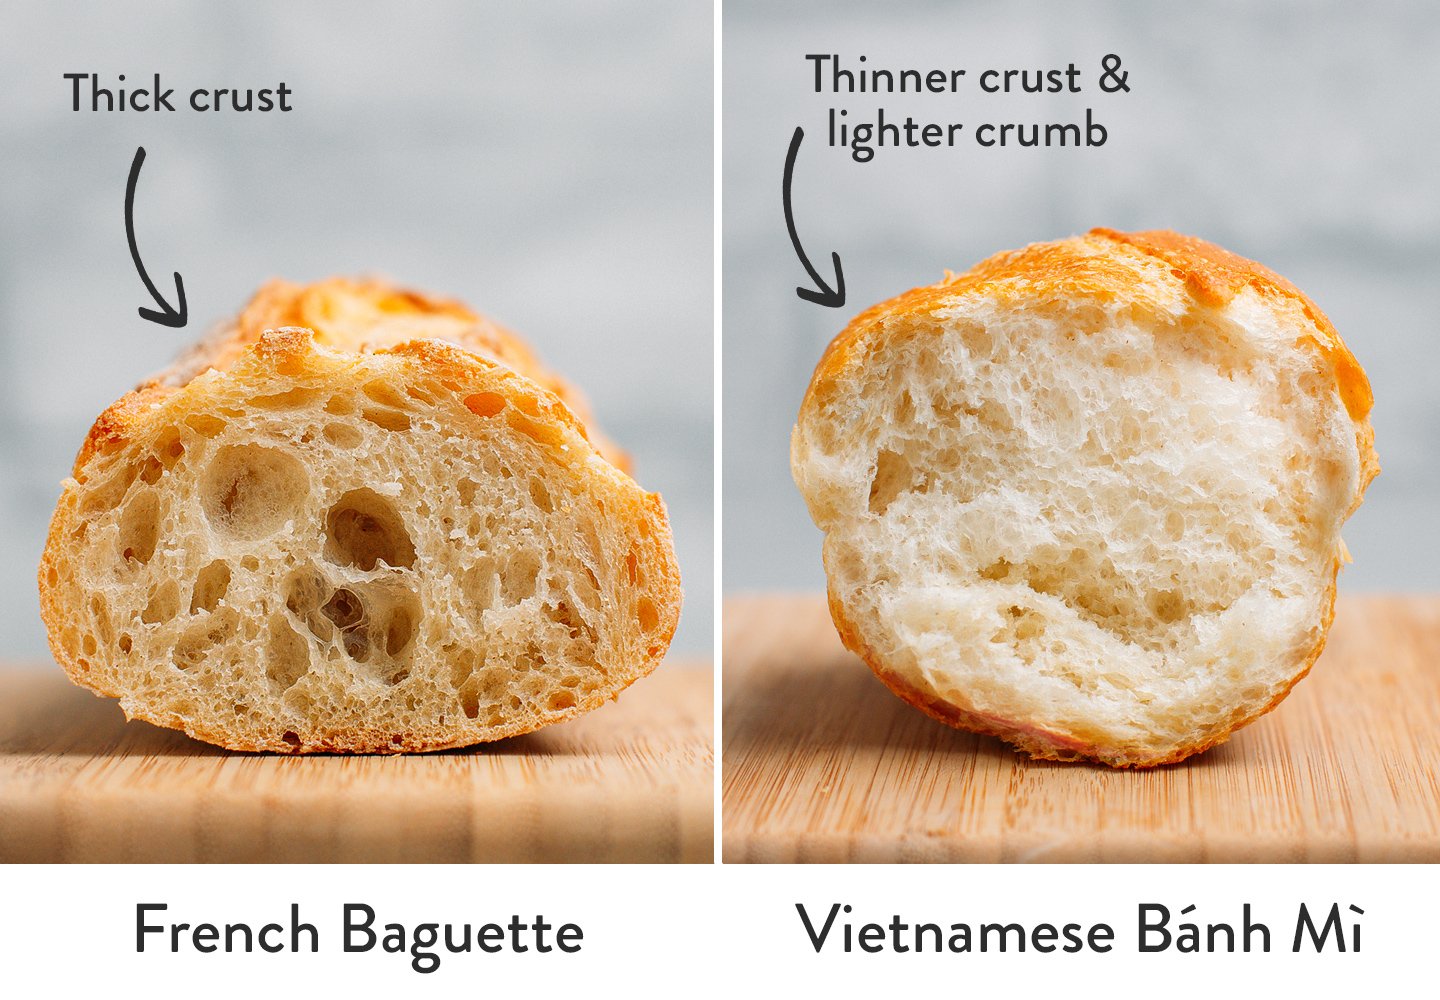
To me, preparing a Bánh Mì sandwich starts with the perfect bread. French baguettes just don’t compare. As you can see in the photo above, traditional French baguettes have a much thicker crust and a chewier/tougher crumb, so the weight-to-volume ratio is much higher. Bánh Mì is lighter (with a more airy crumb), making it easier to digest, and perfect for stuffing with a ton of fillings!
🌾 Ingredient Notes
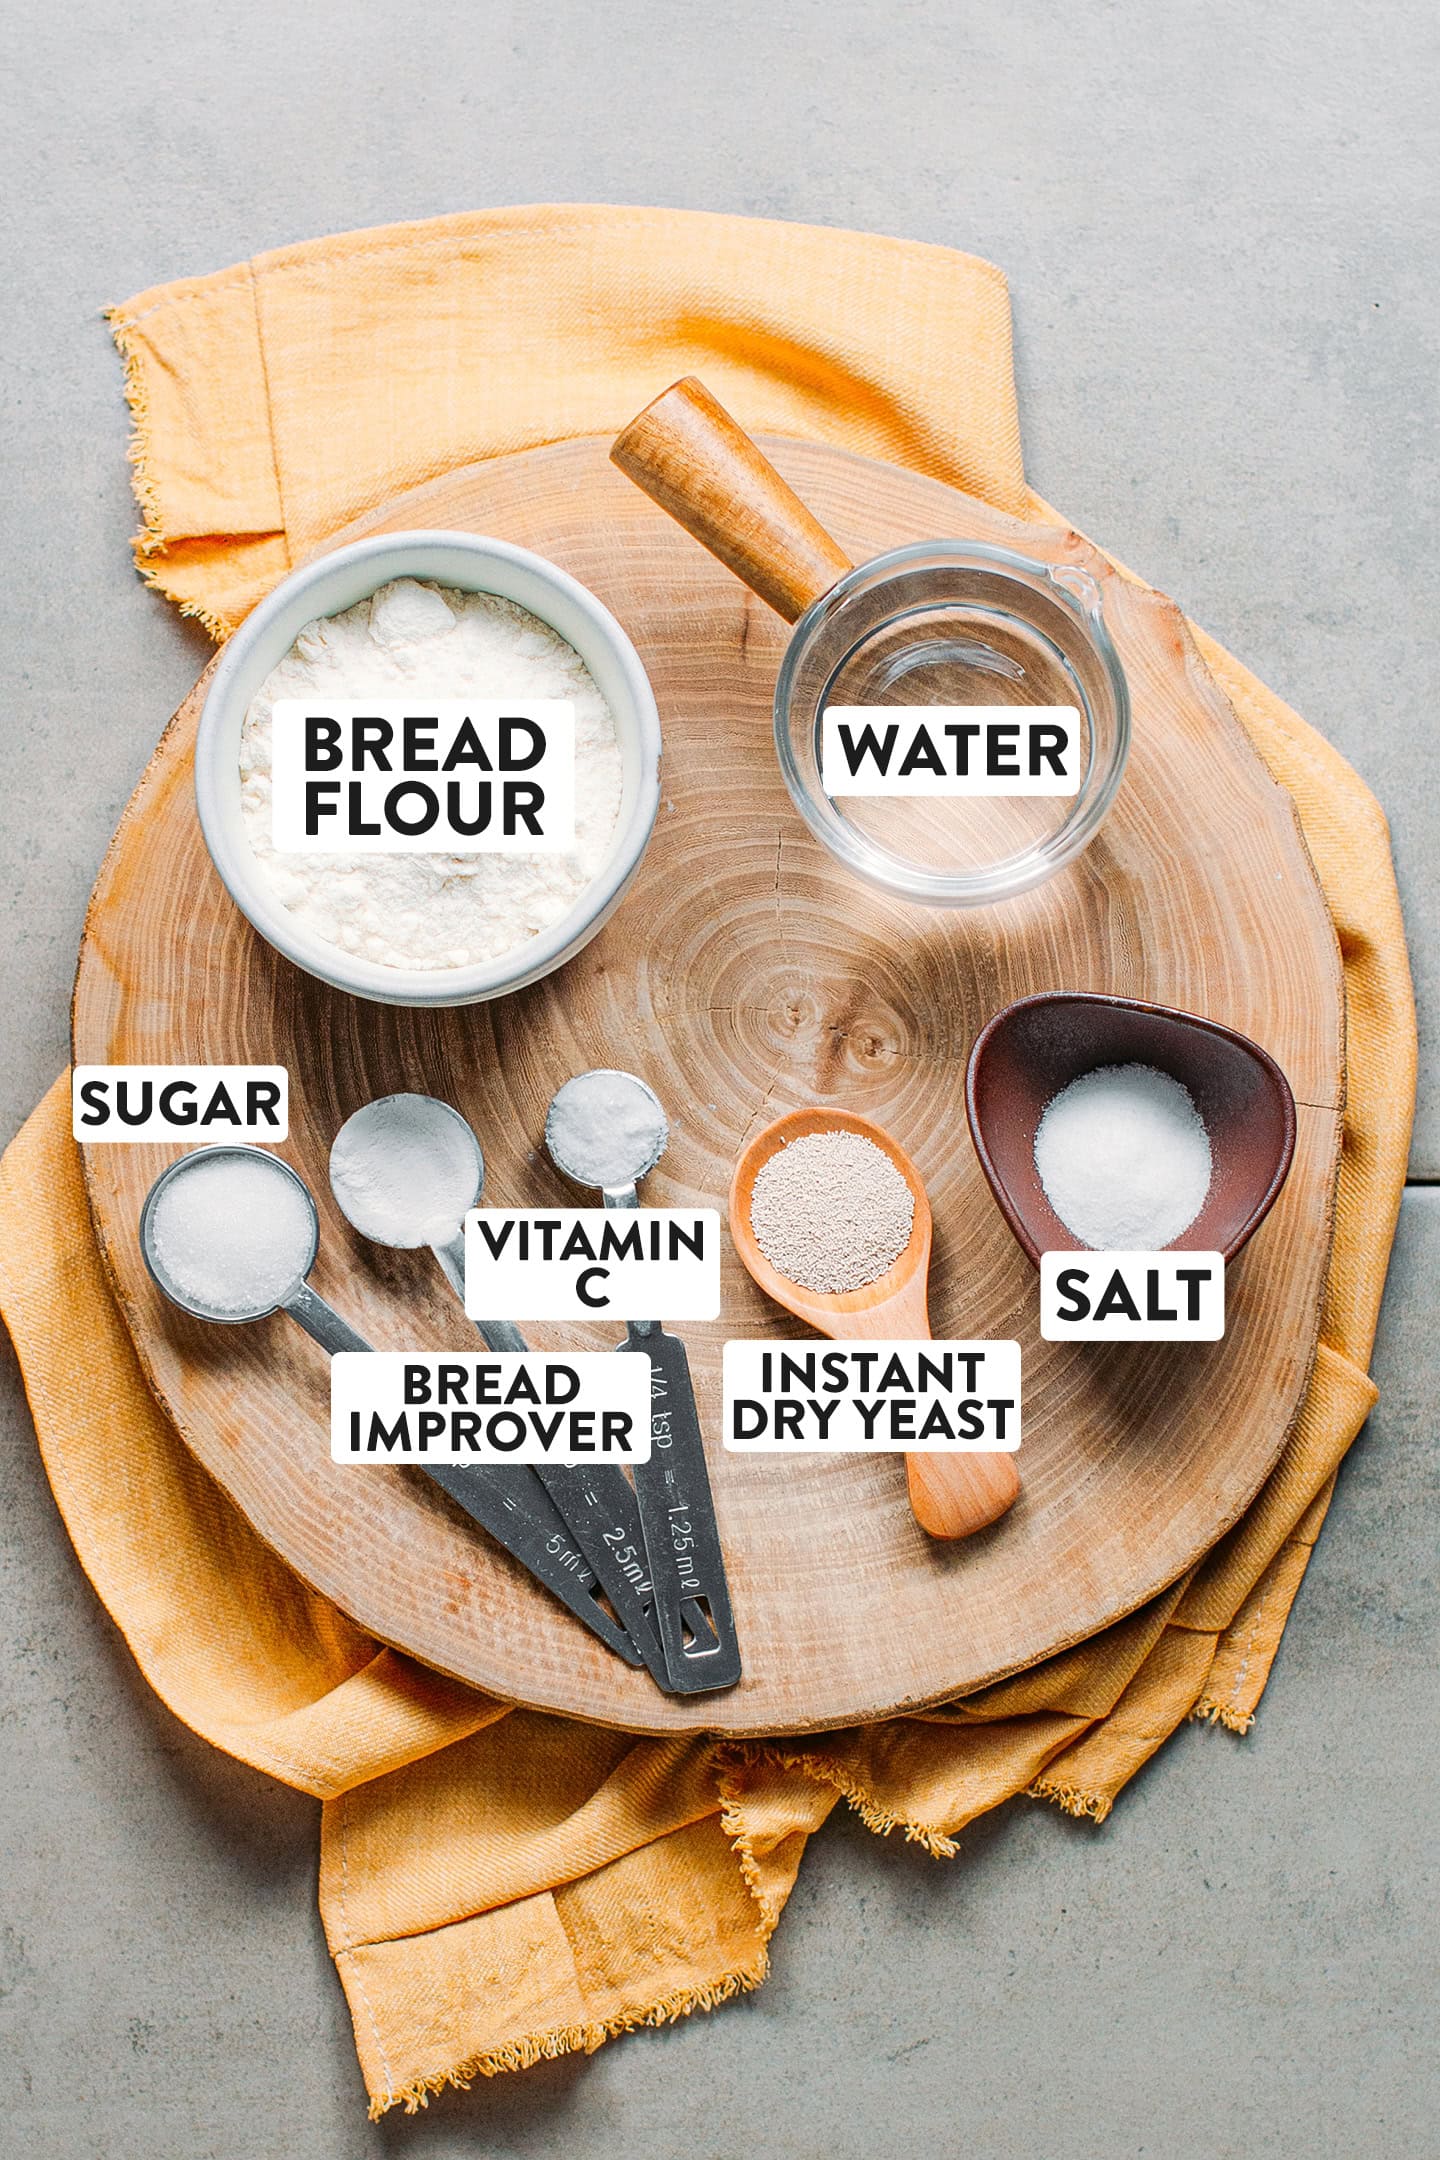
Here are the ingredients you will need to make Vietnamese baguettes at home. If you want the best results, do not omit or substitute any ingredient.
High-protein flour
Aim for wheat flour with 11-12% protein. If you only have all-purpose flour (8% protein) on hand, don’t try this recipe, as you will be disappointed by the results. The high amount of gluten allows the dough to get a light and elastic consistency and a better rise. You can find high-protein flour here.
Quick note: Bánh mì dough doesn’t contain any rice flour nowadays. Unfortunately, there is a lot of misinformation about that (Wikipedia included). IT IS NOT the secret to its light texture, nor is the shaping/rolling of the dough.
Yeast
To help the baguettes rise. I use instant yeast, which is easier to find and can be stored in the pantry. If you only have active dry yeast on hand, allow it to rehydrate in the water before mixing it with the flour.
Fresh yeast will also work! If using fresh yeast, you will need to use about 3g and dissolve it in 3 tablespoons of lukewarm water. Remember to subtract that amount of water from the recipe to get the correct ratio of flour to water.
Bread improver
An essential ingredient! The addition of bread improver allows the dough to rise for a longer period, giving it a fluffier texture. It is mostly responsible for the airy and cottony crumb. I bought my bread improver online, but you may try asking a bakery if they can sell you some (they usually have it).
Which type of bread improver should I use?
Most bread improvers will work here. However, each brand will yield slightly different results, and I cannot predict how each will work. For your information, there are three main brands of bread improvers used by bakeries in Vietnam. These are Puratos, Mauri, and Baker 999.
I have tried this recipe with “S500 Bánh Mì Plus” from Puratos and “Phụ gia bánh mì” from Baker 999. Both yield very similar results. Now, just for information, because many asked me, here are the ingredients listed in both of these brands:
- Puratos: It contains starch (75%), dextrose, emulsifier (E472e), anti-oxidants (E300), enzymes: amylases: E1100.
- Baker 999: It contains wheat flour (27.5% to 32%), acidity regulator, tapioca starch, enzyme, salt, sunflower oil, and antioxidant.
Keep in mind that these are just my recommendations. This recipe should work with other brands as well.
Vitamin C
Also known as ascorbic acid, vitamin C acts as a boost for the yeast. I use one vitamin C tablet of 150mg for one batch of 6 loaves.
Note: You can use vitamin C powder or a crushed tablet. Try to use an amount similar to 150mg, give or take. This brand of vitamin C, for example, contains 500mg per tablet. Break a tablet into four pieces and use only one piece for each batch.
Salt and sugar
Salt is there for flavor, while sugar gives the yeast a little boost. Regarding the type of sugar to use, I recommend sticking to regular granulated sugar.
🥣 How to Make Bánh Mì
Equipment Needed
Before starting, you will need a few essential tools:
- A high-speed stand mixer. This one is a must. I do not recommend kneading by hand for this recipe.
- A perforated baguette pan. If you want round and good-looking baguettes, a baguette pan will definitely help. It also helps the heat distribute better, giving the baguettes a more uniform, golden brown color.
- A bread lame. For scoring the loaves before baking. You don’t need the handle, just a standard razor blade works well.
- A spray bottle. To spray the baguettes before baking.
- And a good oven!
1. Prepare the dough
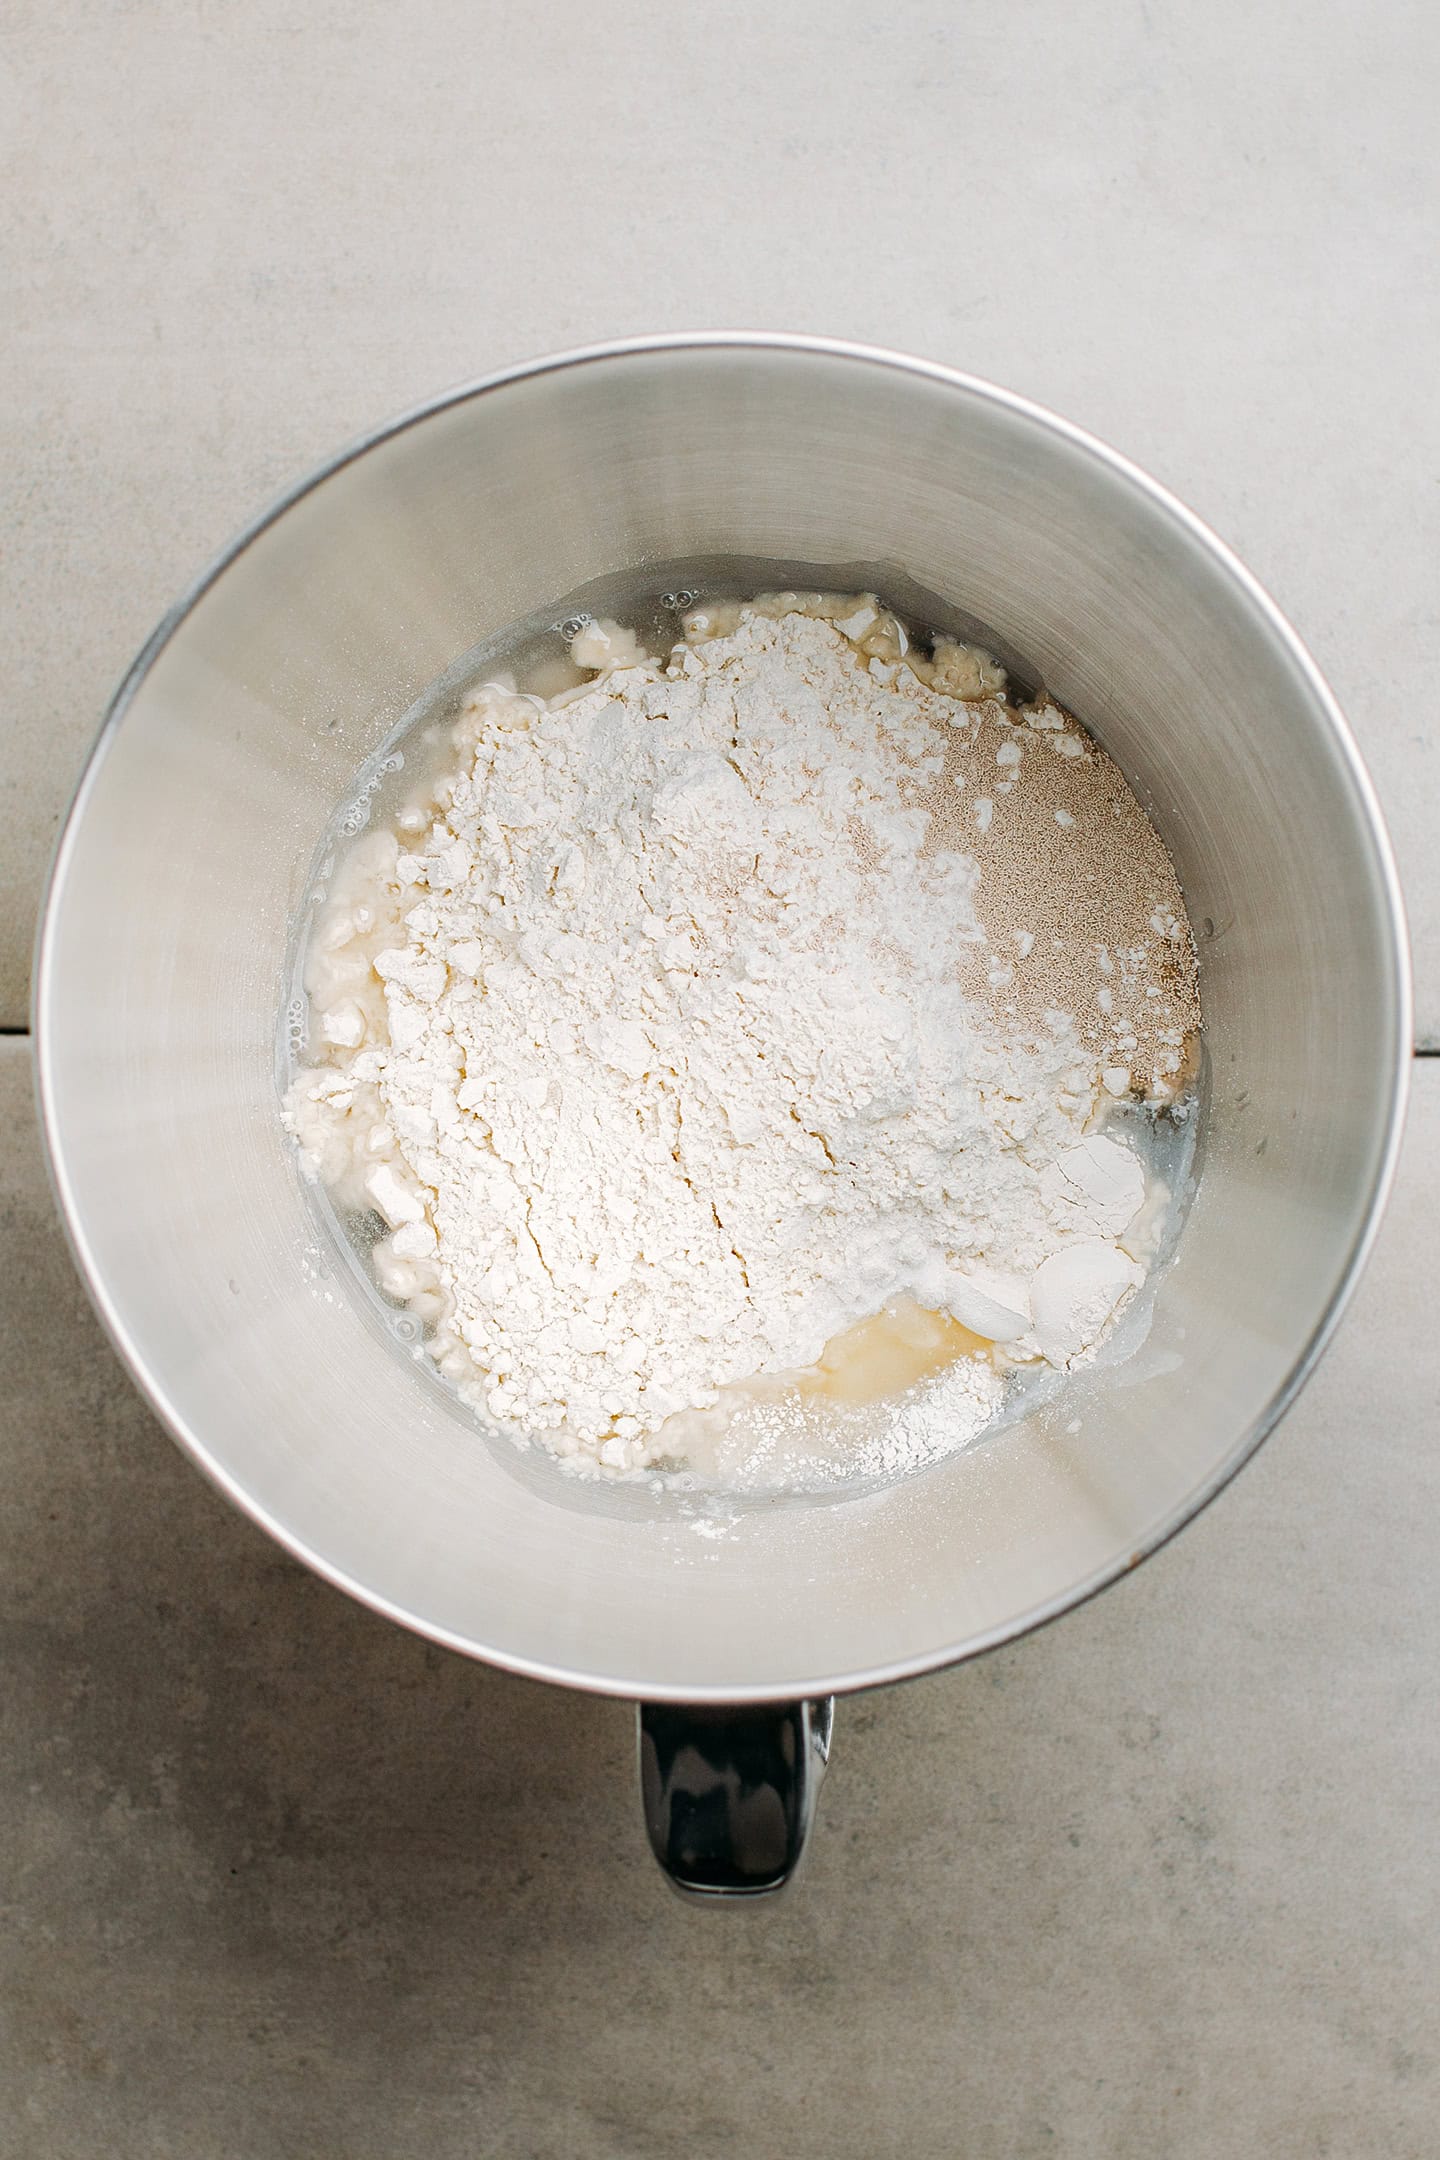
- Combine all of the ingredients. To the bowl of a stand mixer fitted with the dough hook, add the water, bread flour, sugar, bread improver, vitamin C, and instant dry yeast.
- Knead. Then, knead on speed 2 for about one minute, or until everything is combined. Add the salt and increase the speed to 8. Knead for another 7-8 minutes. The dough should be silky smooth and slightly sticky.
- Grease your pans. Lightly grease two baguette pans with either butter or oil.
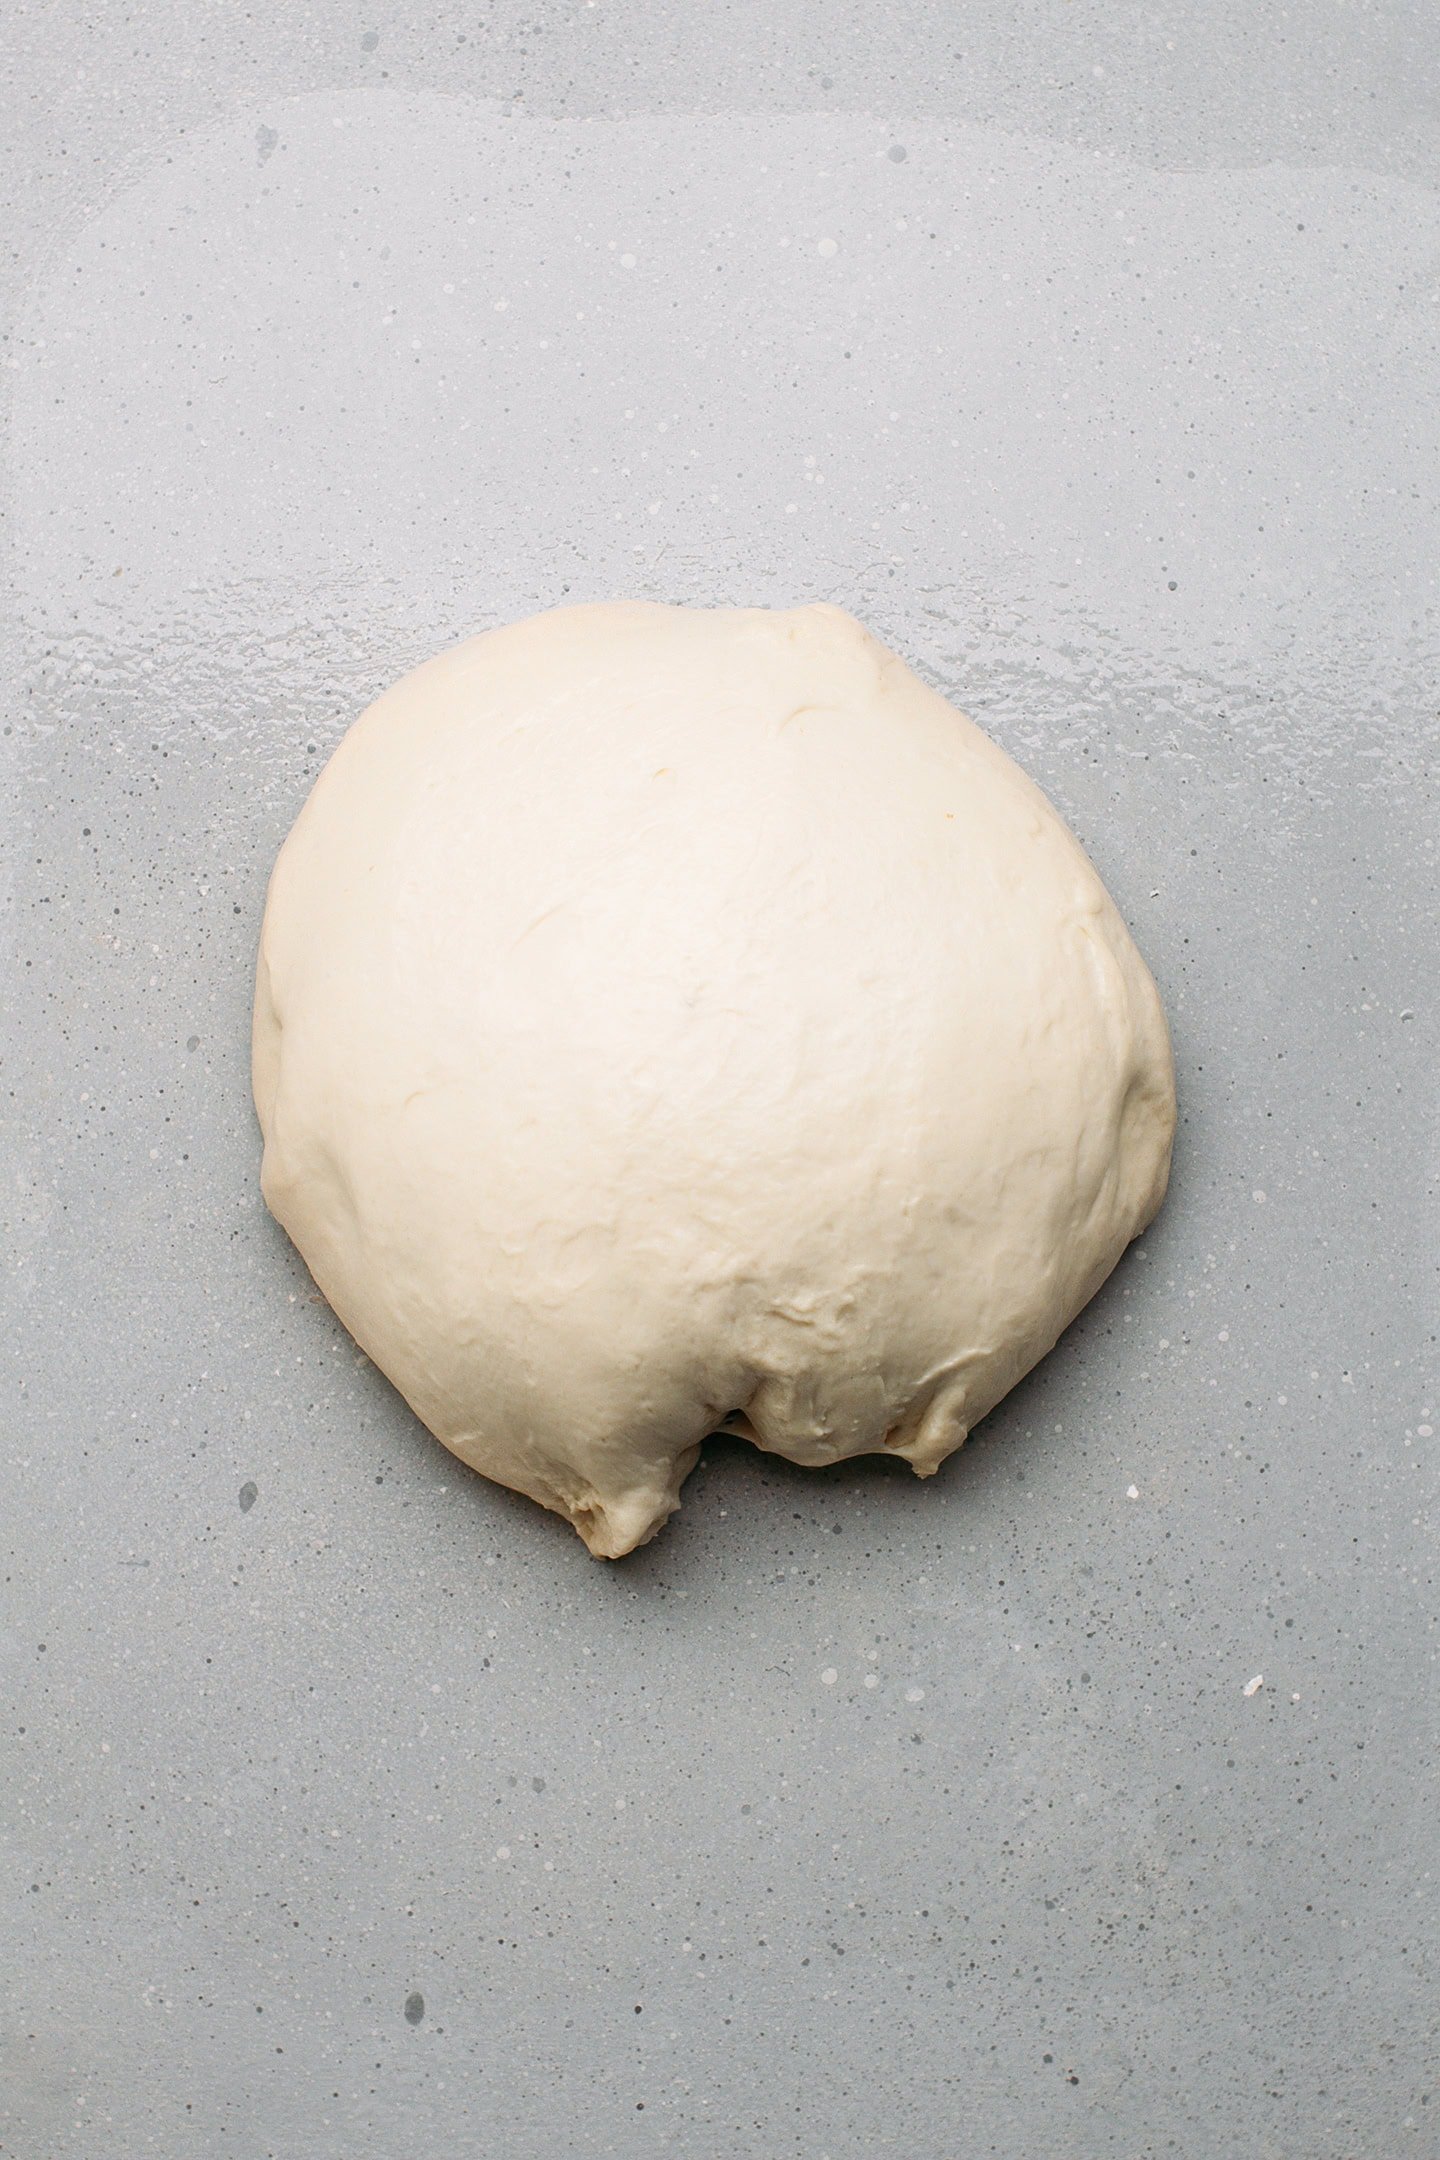
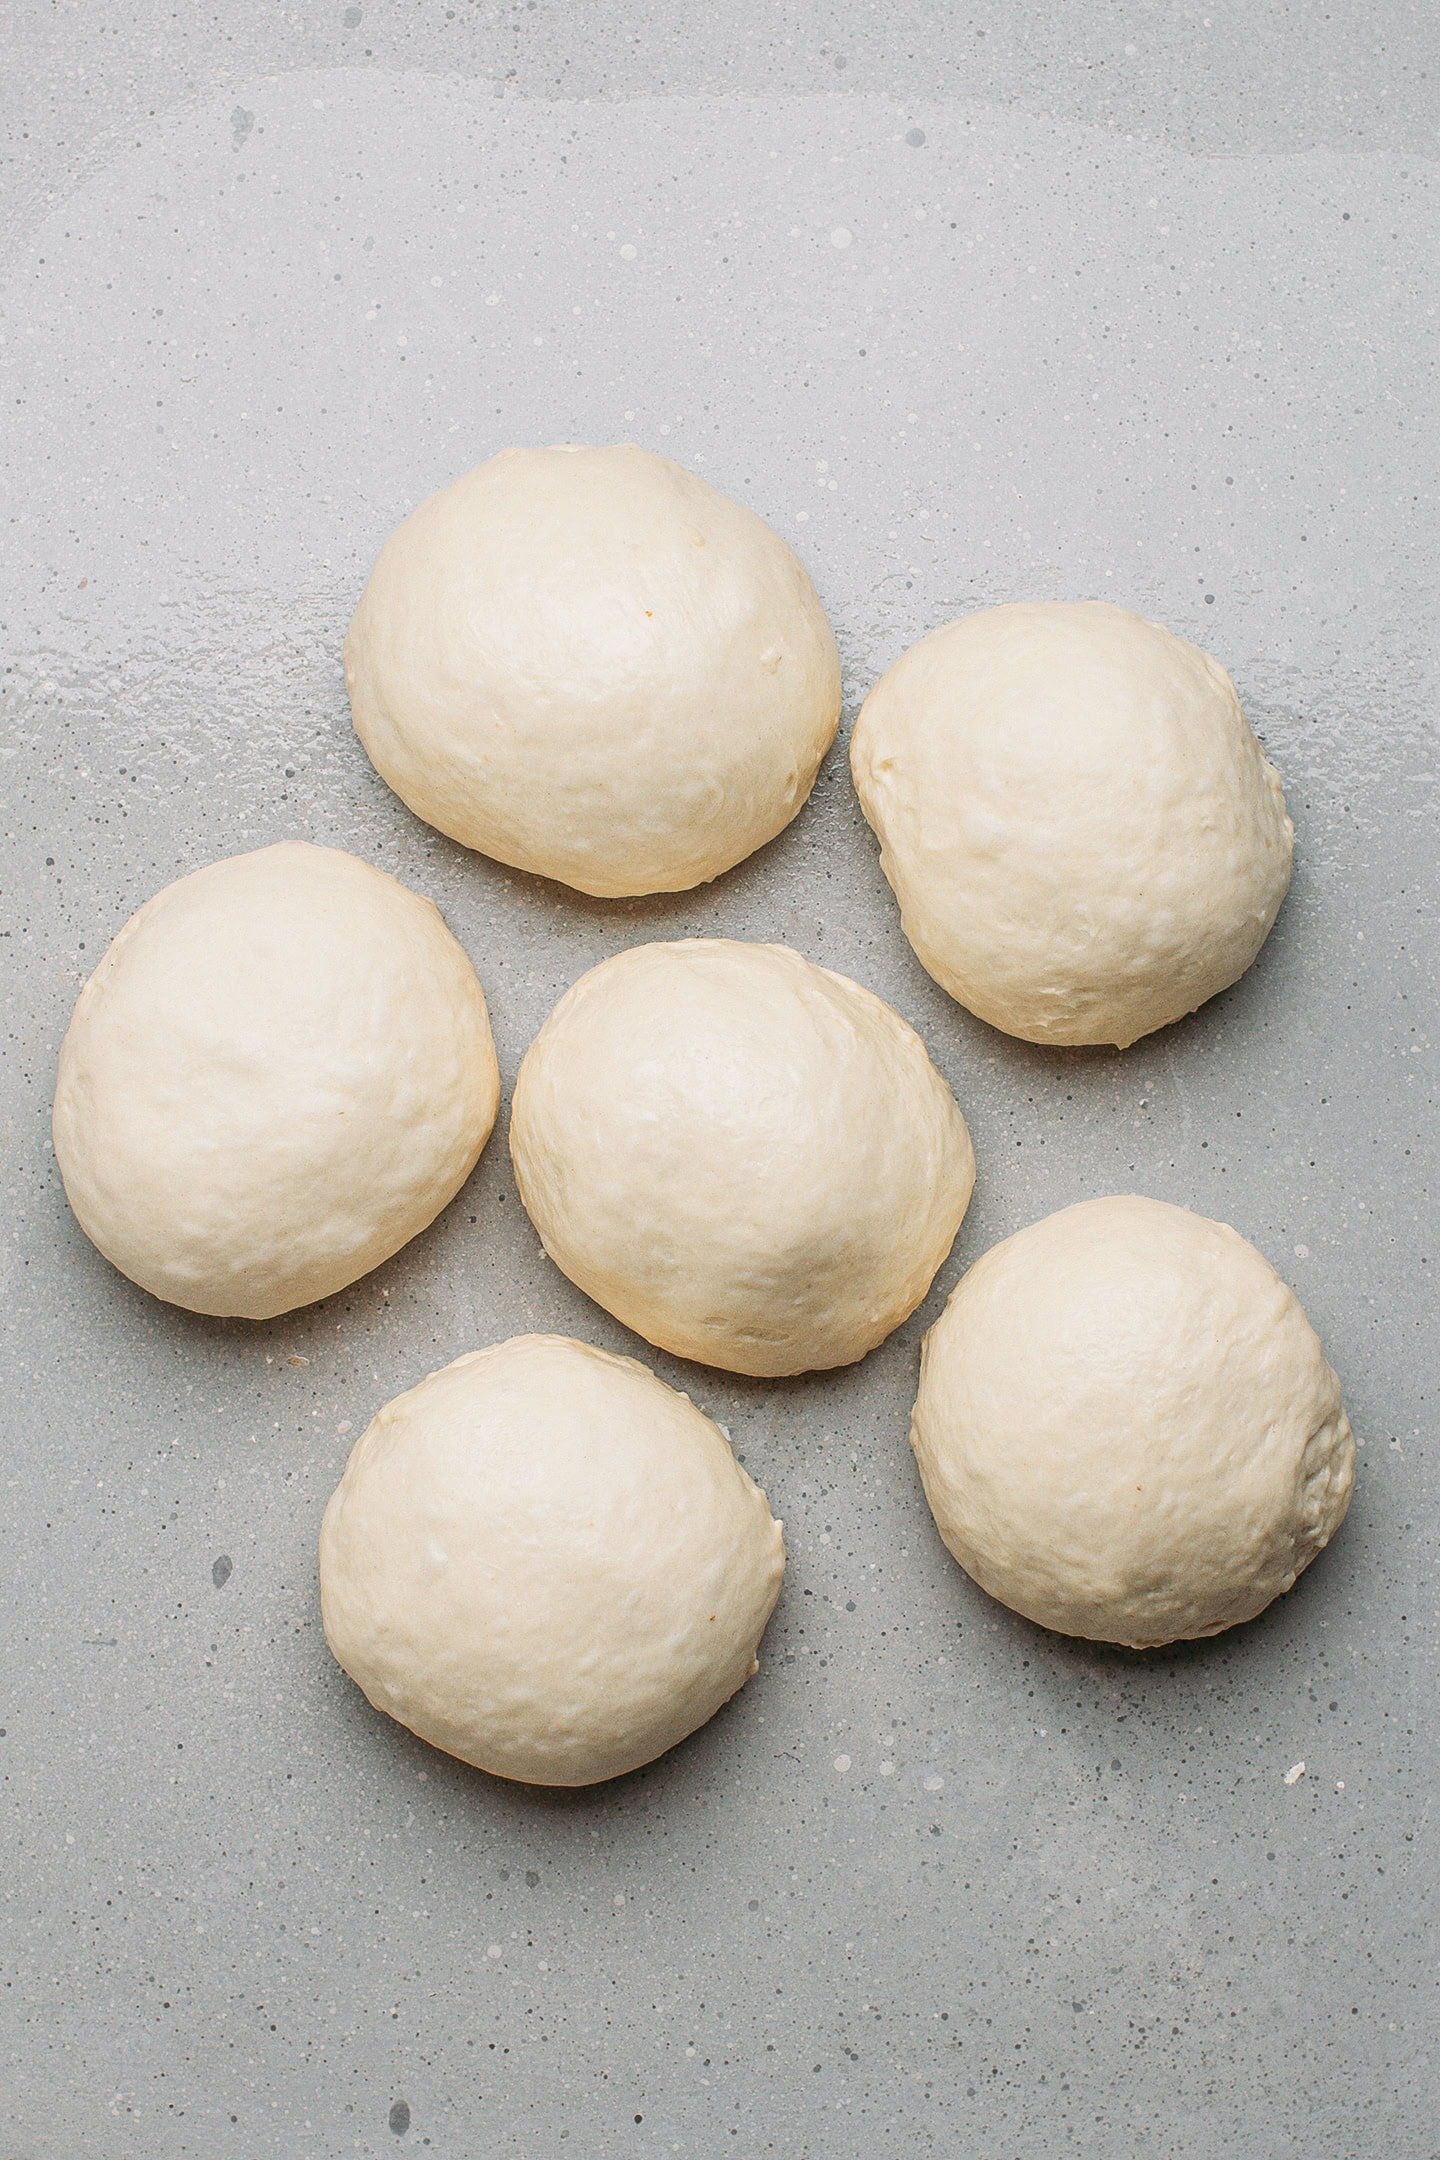
- Divide into balls. Then, divide the dough into six pieces of about 100g.
Bánh Mì Size
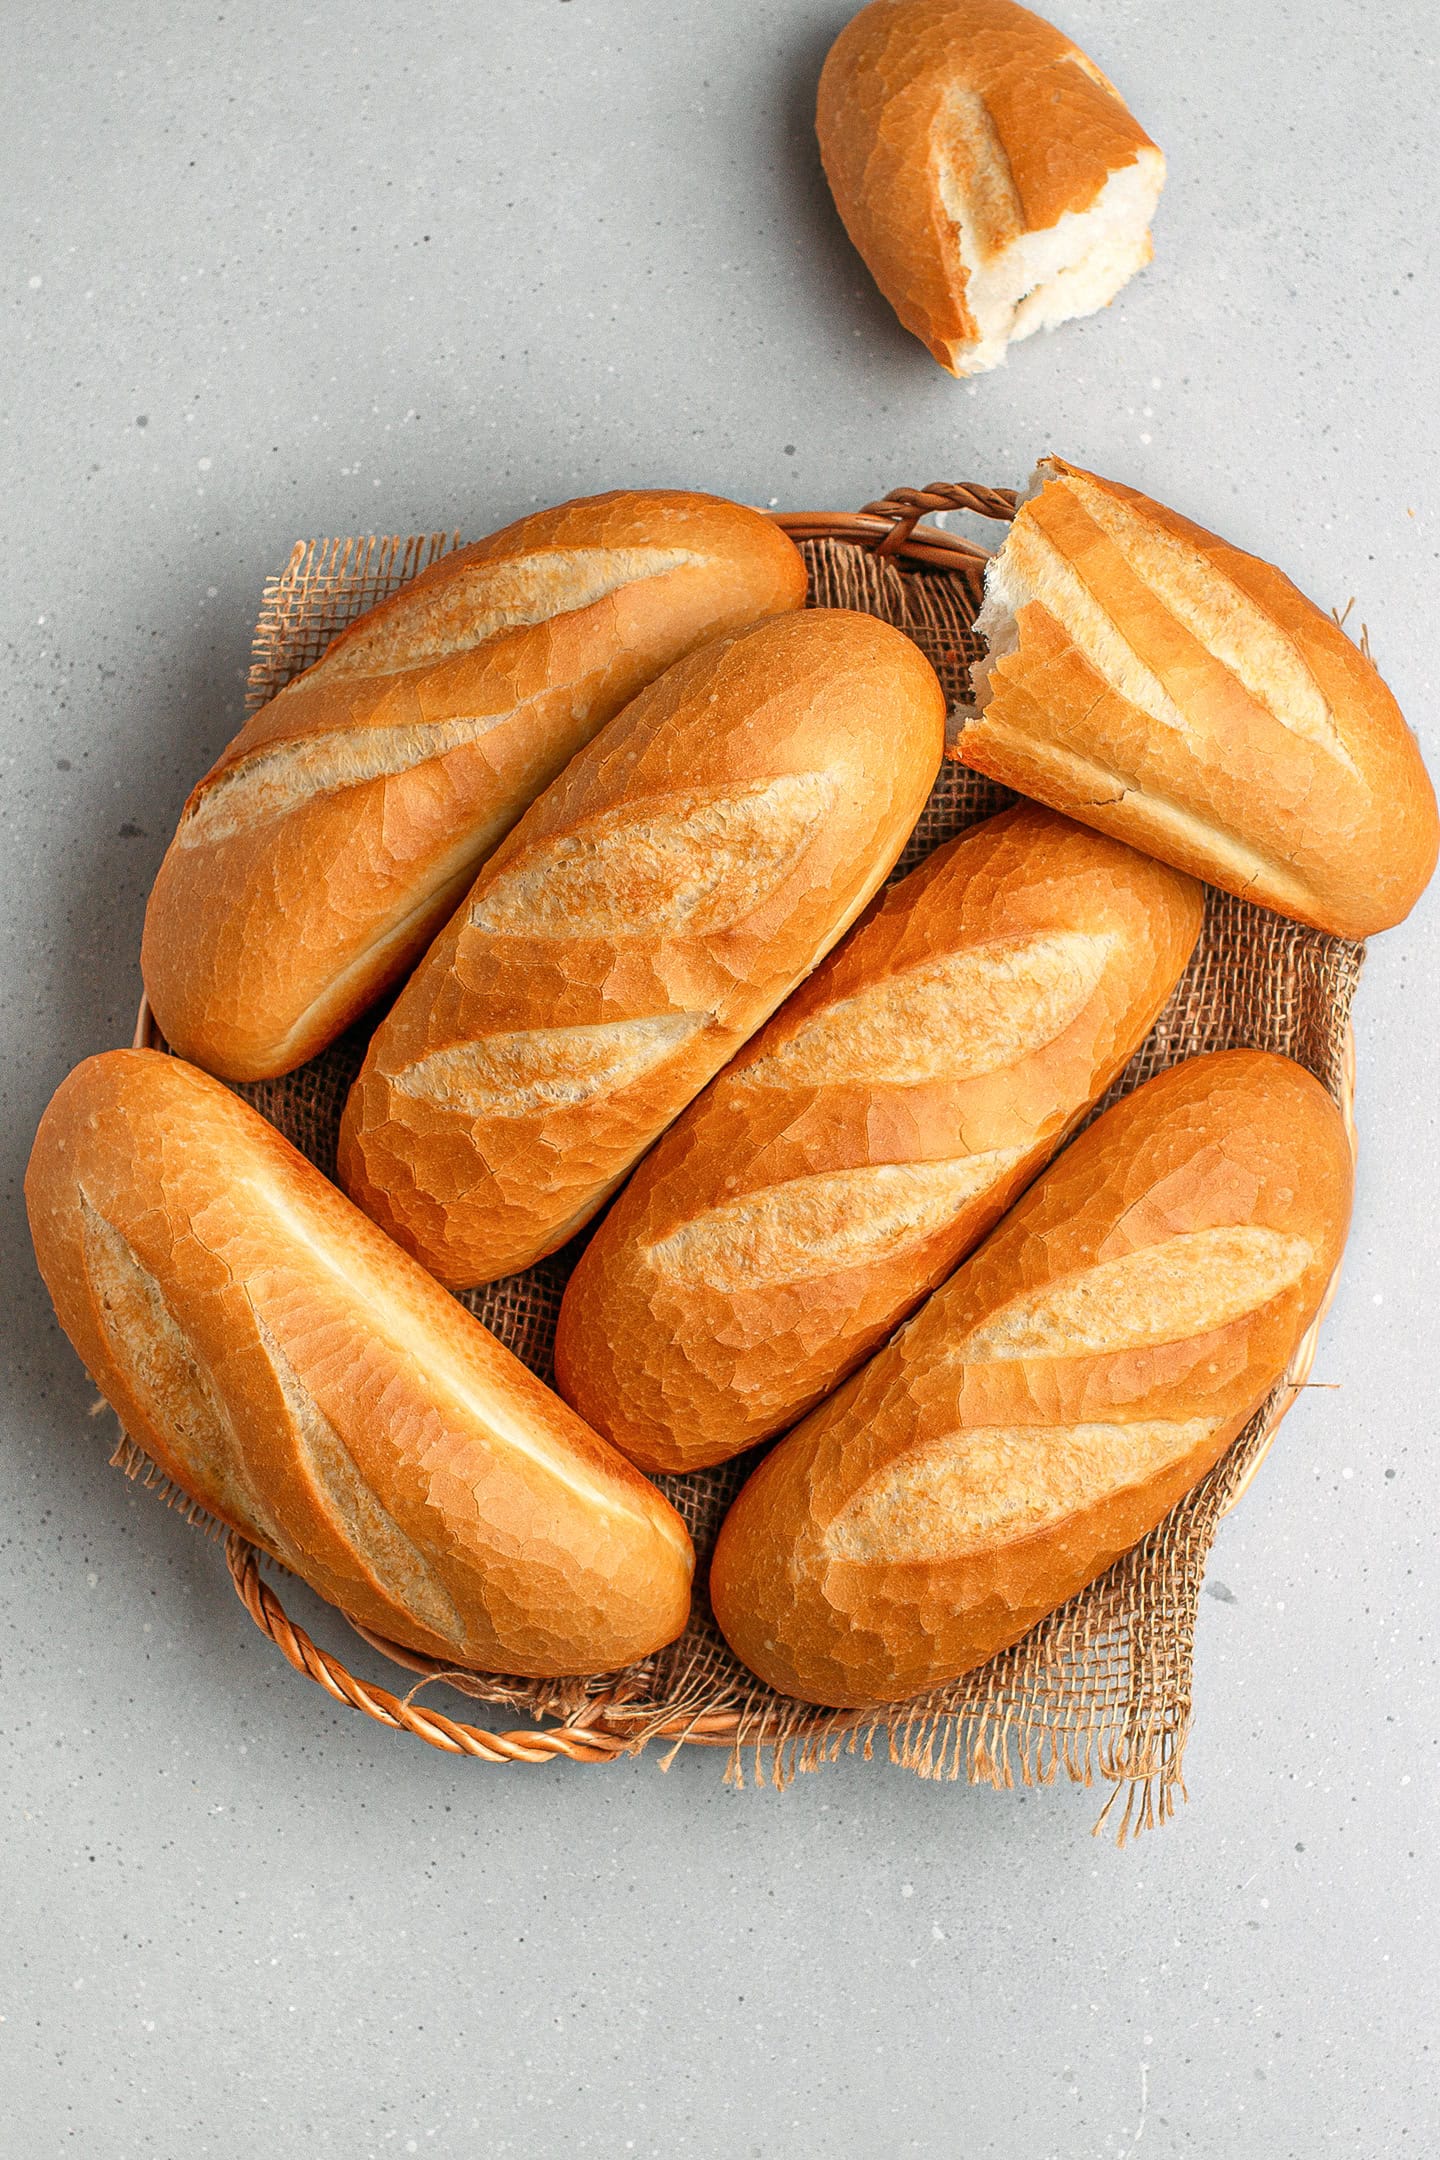
There is a lot of confusion regarding the size of bánh mì. Some people believe that it has a standard size. This is not true. If you have ever been to Vietnam, you probably noticed that depending on the bakery, the size of bánh mì can be considerably different, going from 6 inches (15cm) to 25 inches (65cm), which is the standard size of a French baguette.
I have noticed that the most popular size of the bánh mì used to make sandwiches is 7-8 inches (18-20cm). Hence, I recommend dividing the dough into 6 pieces if you want that length. Otherwise, feel free to make smaller or longer baguettes – that is up to you.
2. Shape it
It’s now time to shape the baguettes!
For the shaping, I recommend checking our video to get an idea of how to do it. Before shaping your baguettes, ensure that your working surface is lightly oiled. This will prevent the dough from sticking to it. There are different ways to shape your baguettes:
- Slap the dough: You can slap the dough into a long trapezoid, flatten it, and then roll it into a log.
- Flatten with your hands: Or, you can simply flatten the dough into a rectangle using your hands and then roll it into a log.
Note: Don’t be too hard on yourself. The shaping will not have a huge impact on the overall texture of your bread. Try to do your best, though. But don’t worry – it’s pretty forgiving once it rises, as you can see below.
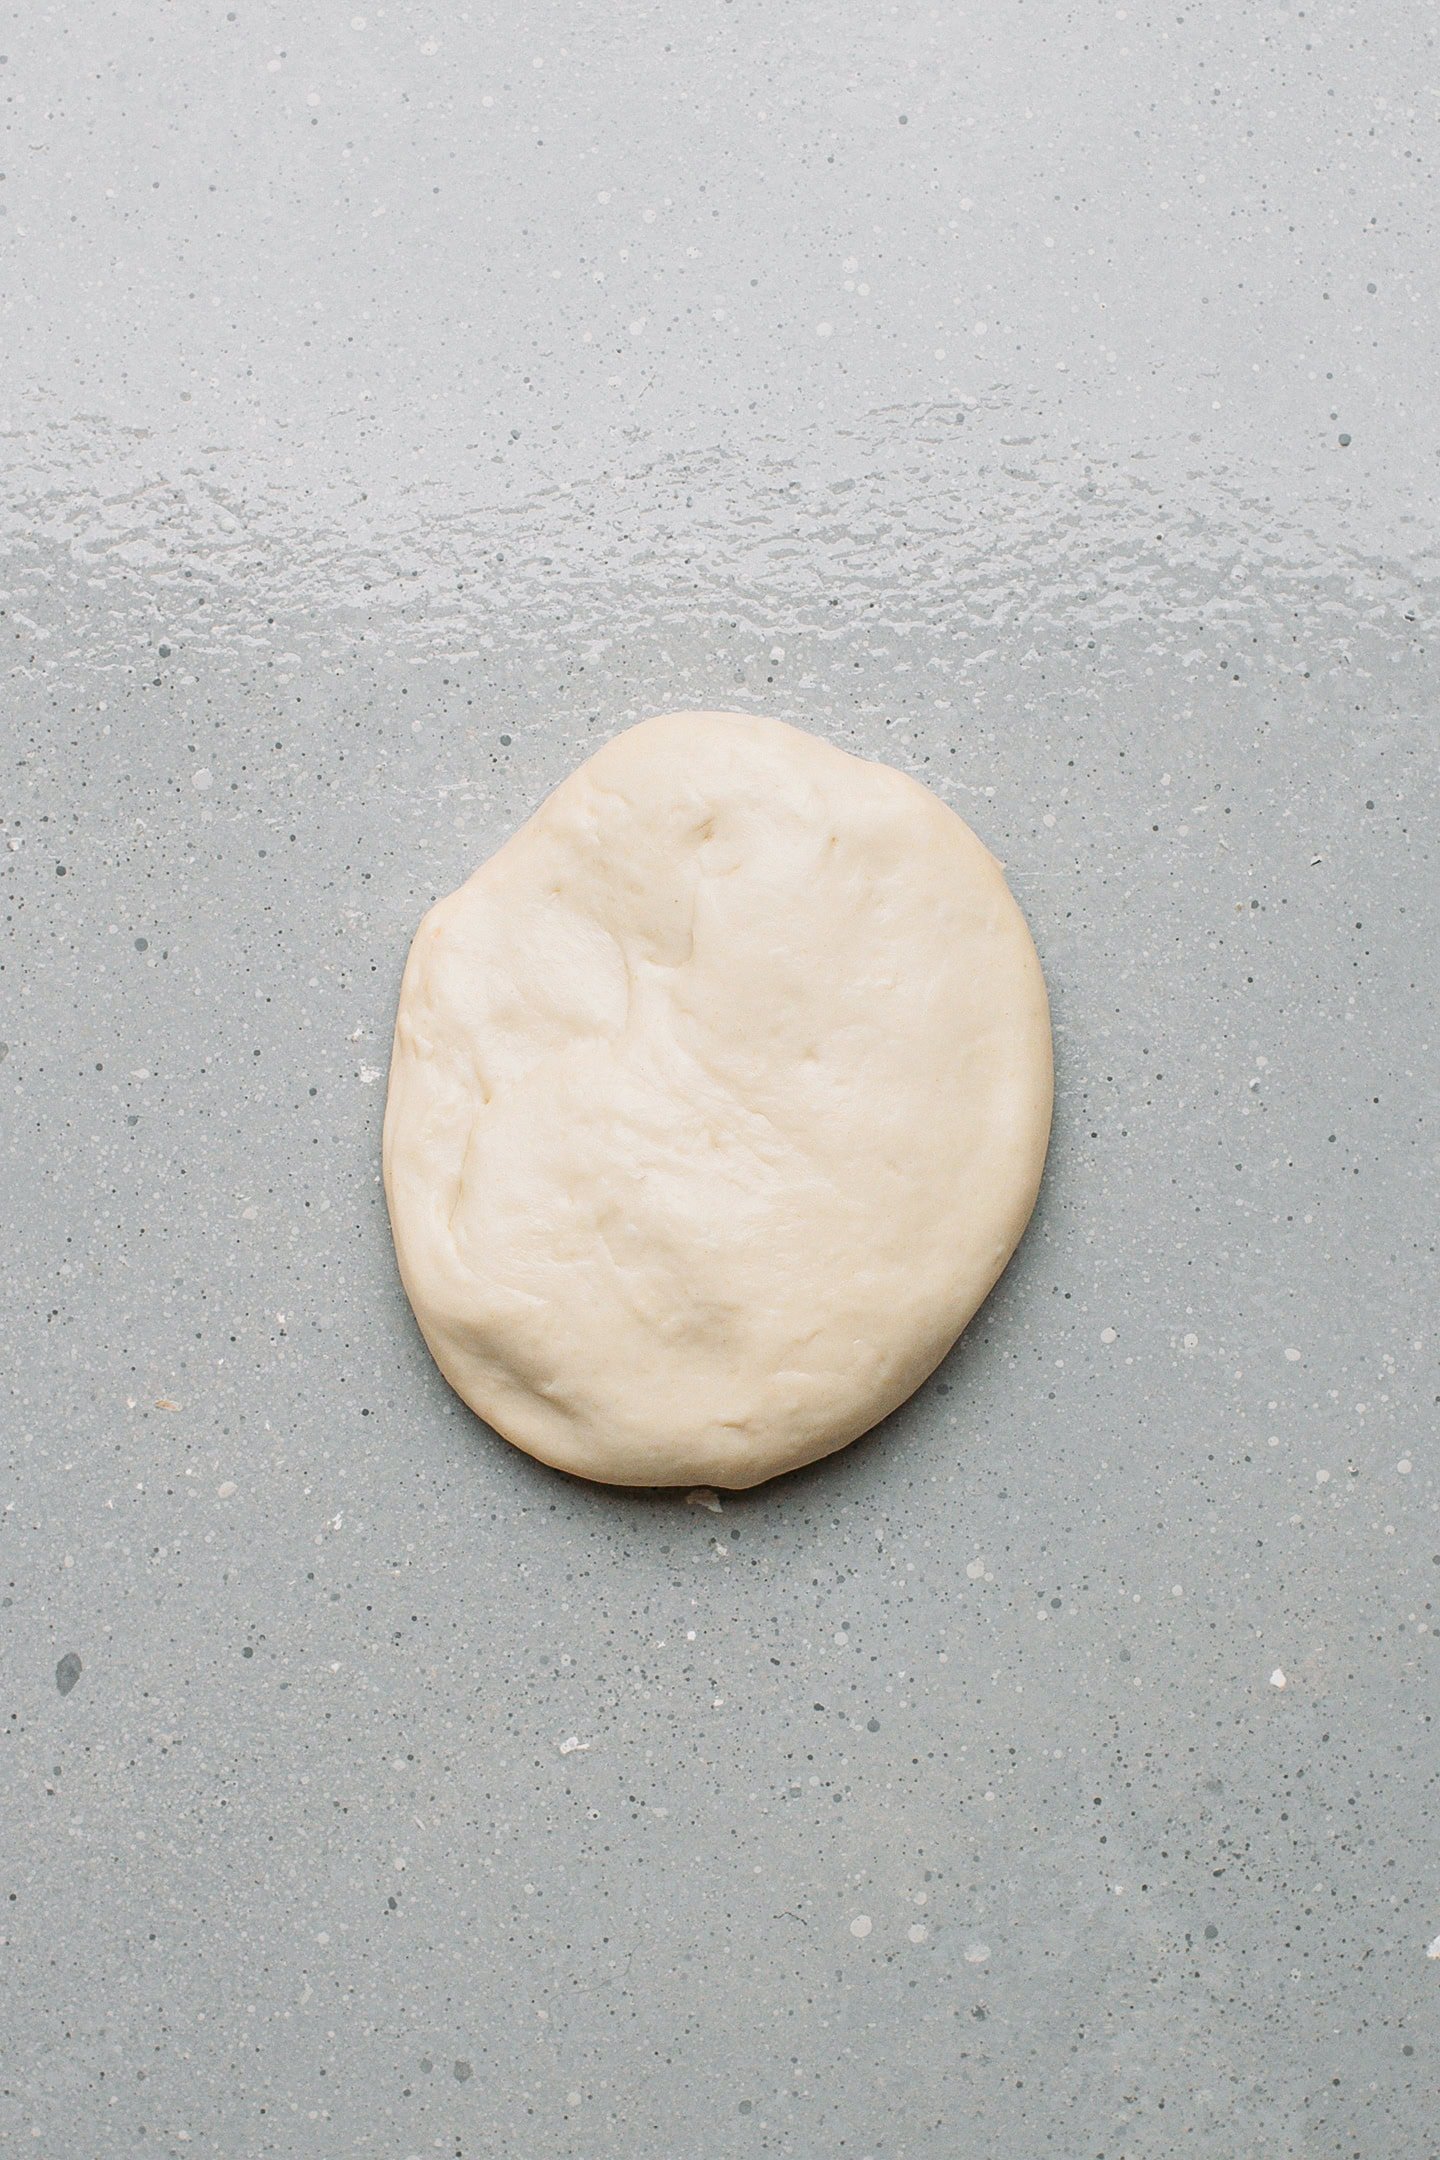
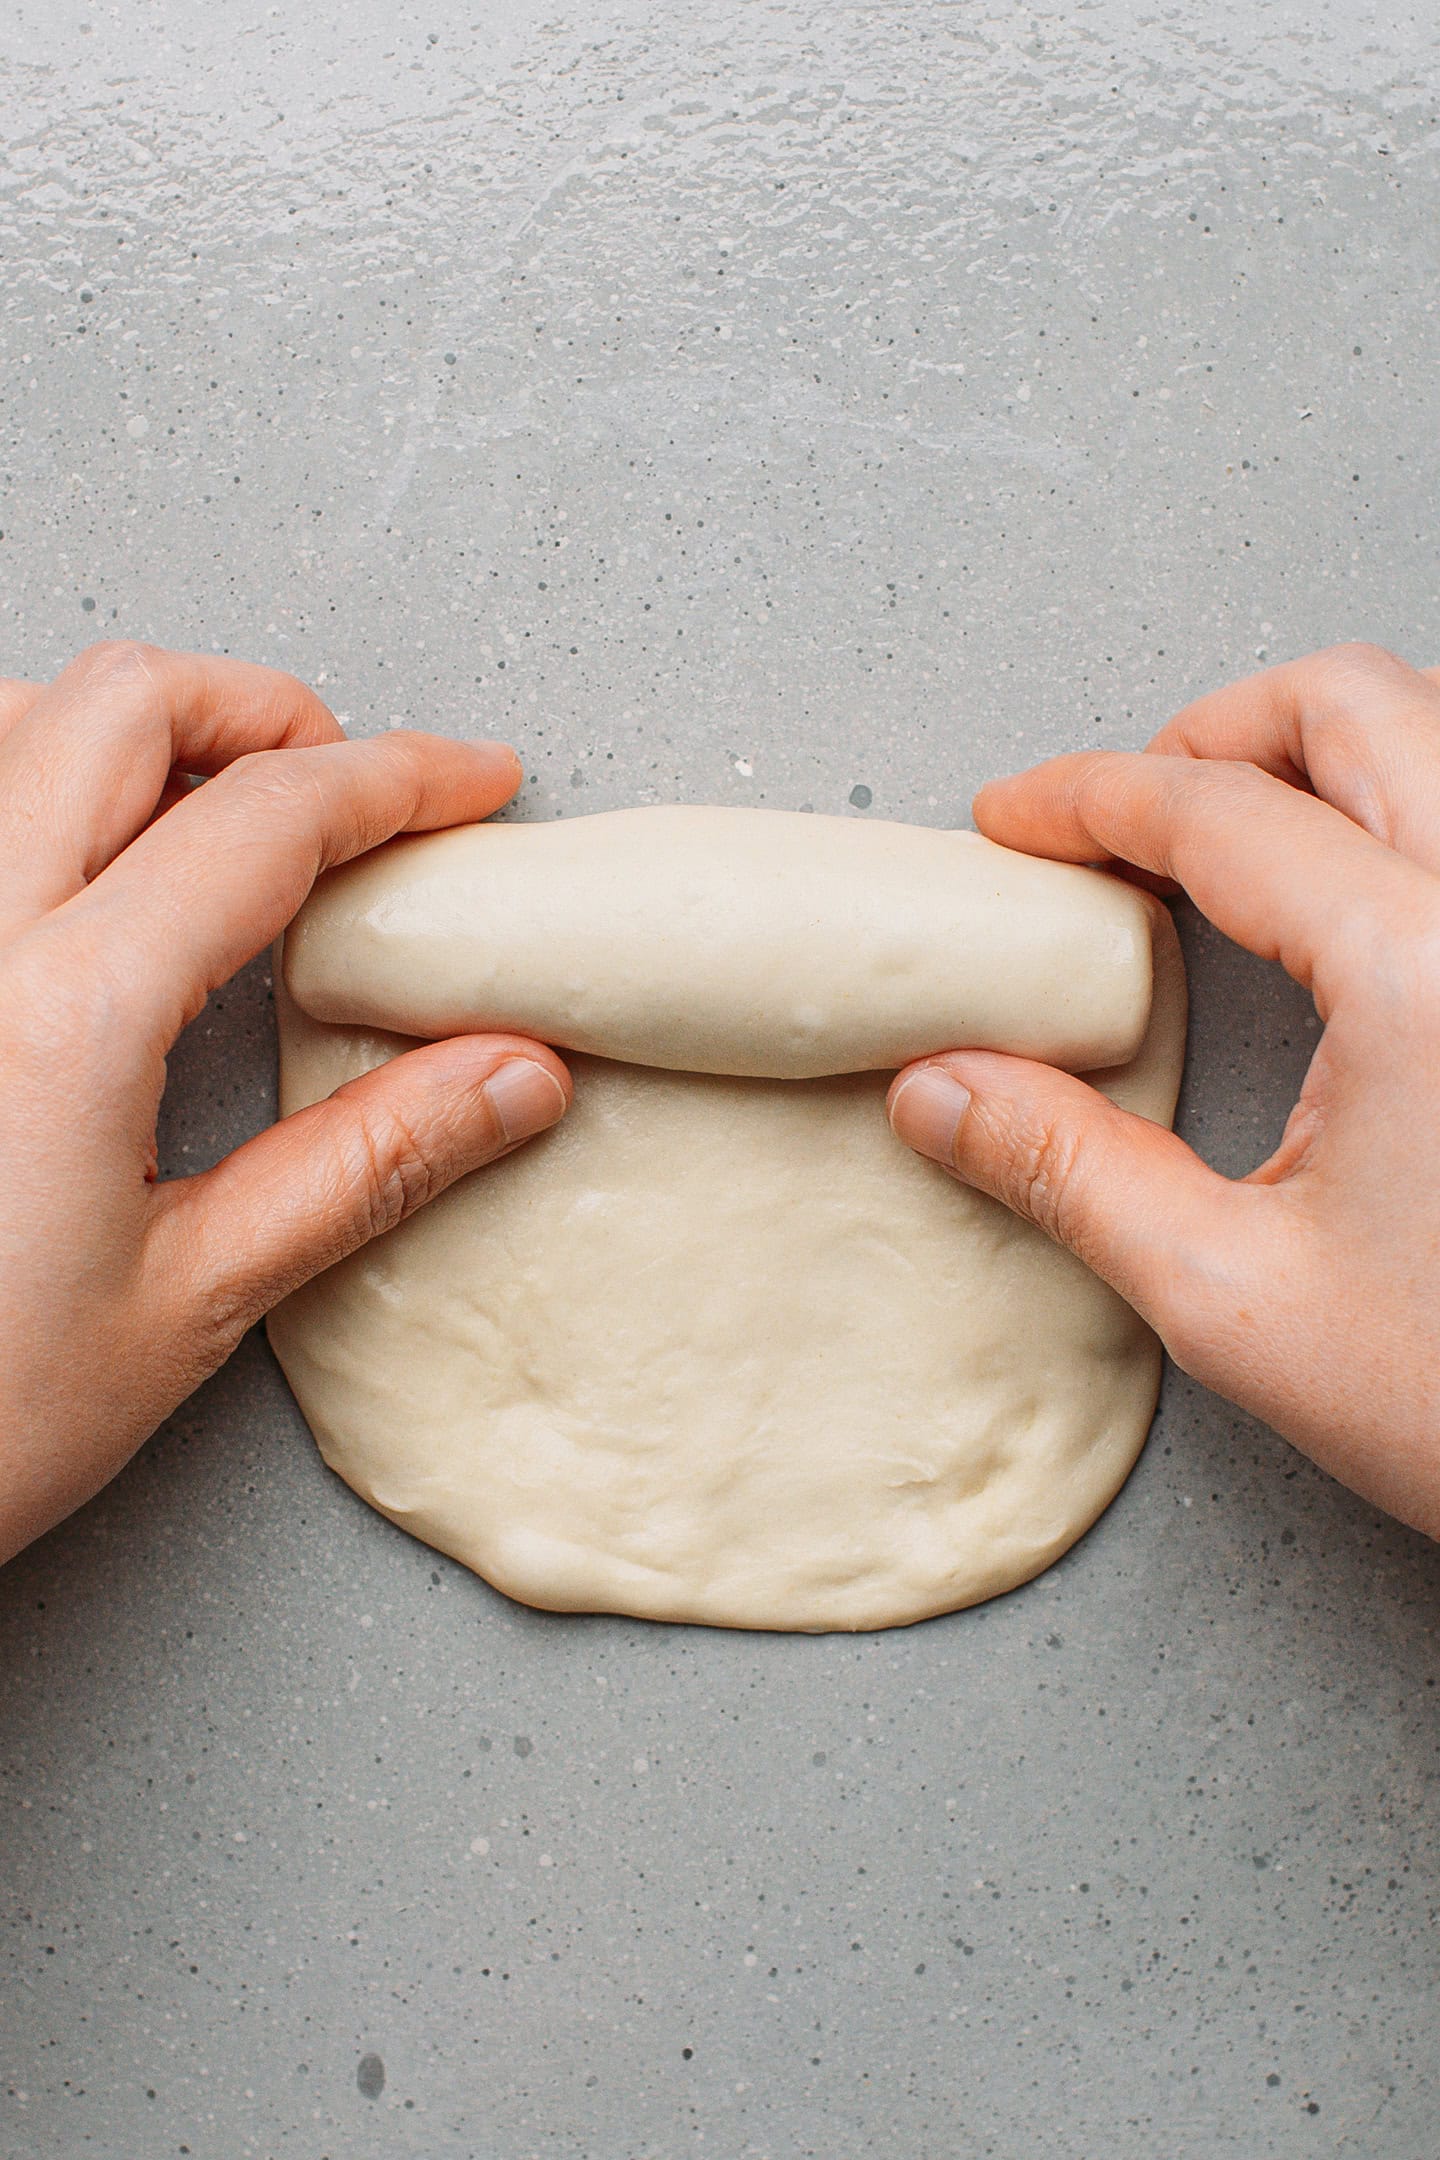
- Flatten the ball. Place one ball of dough on your greased working surface and flatten it using the palm of your hand.
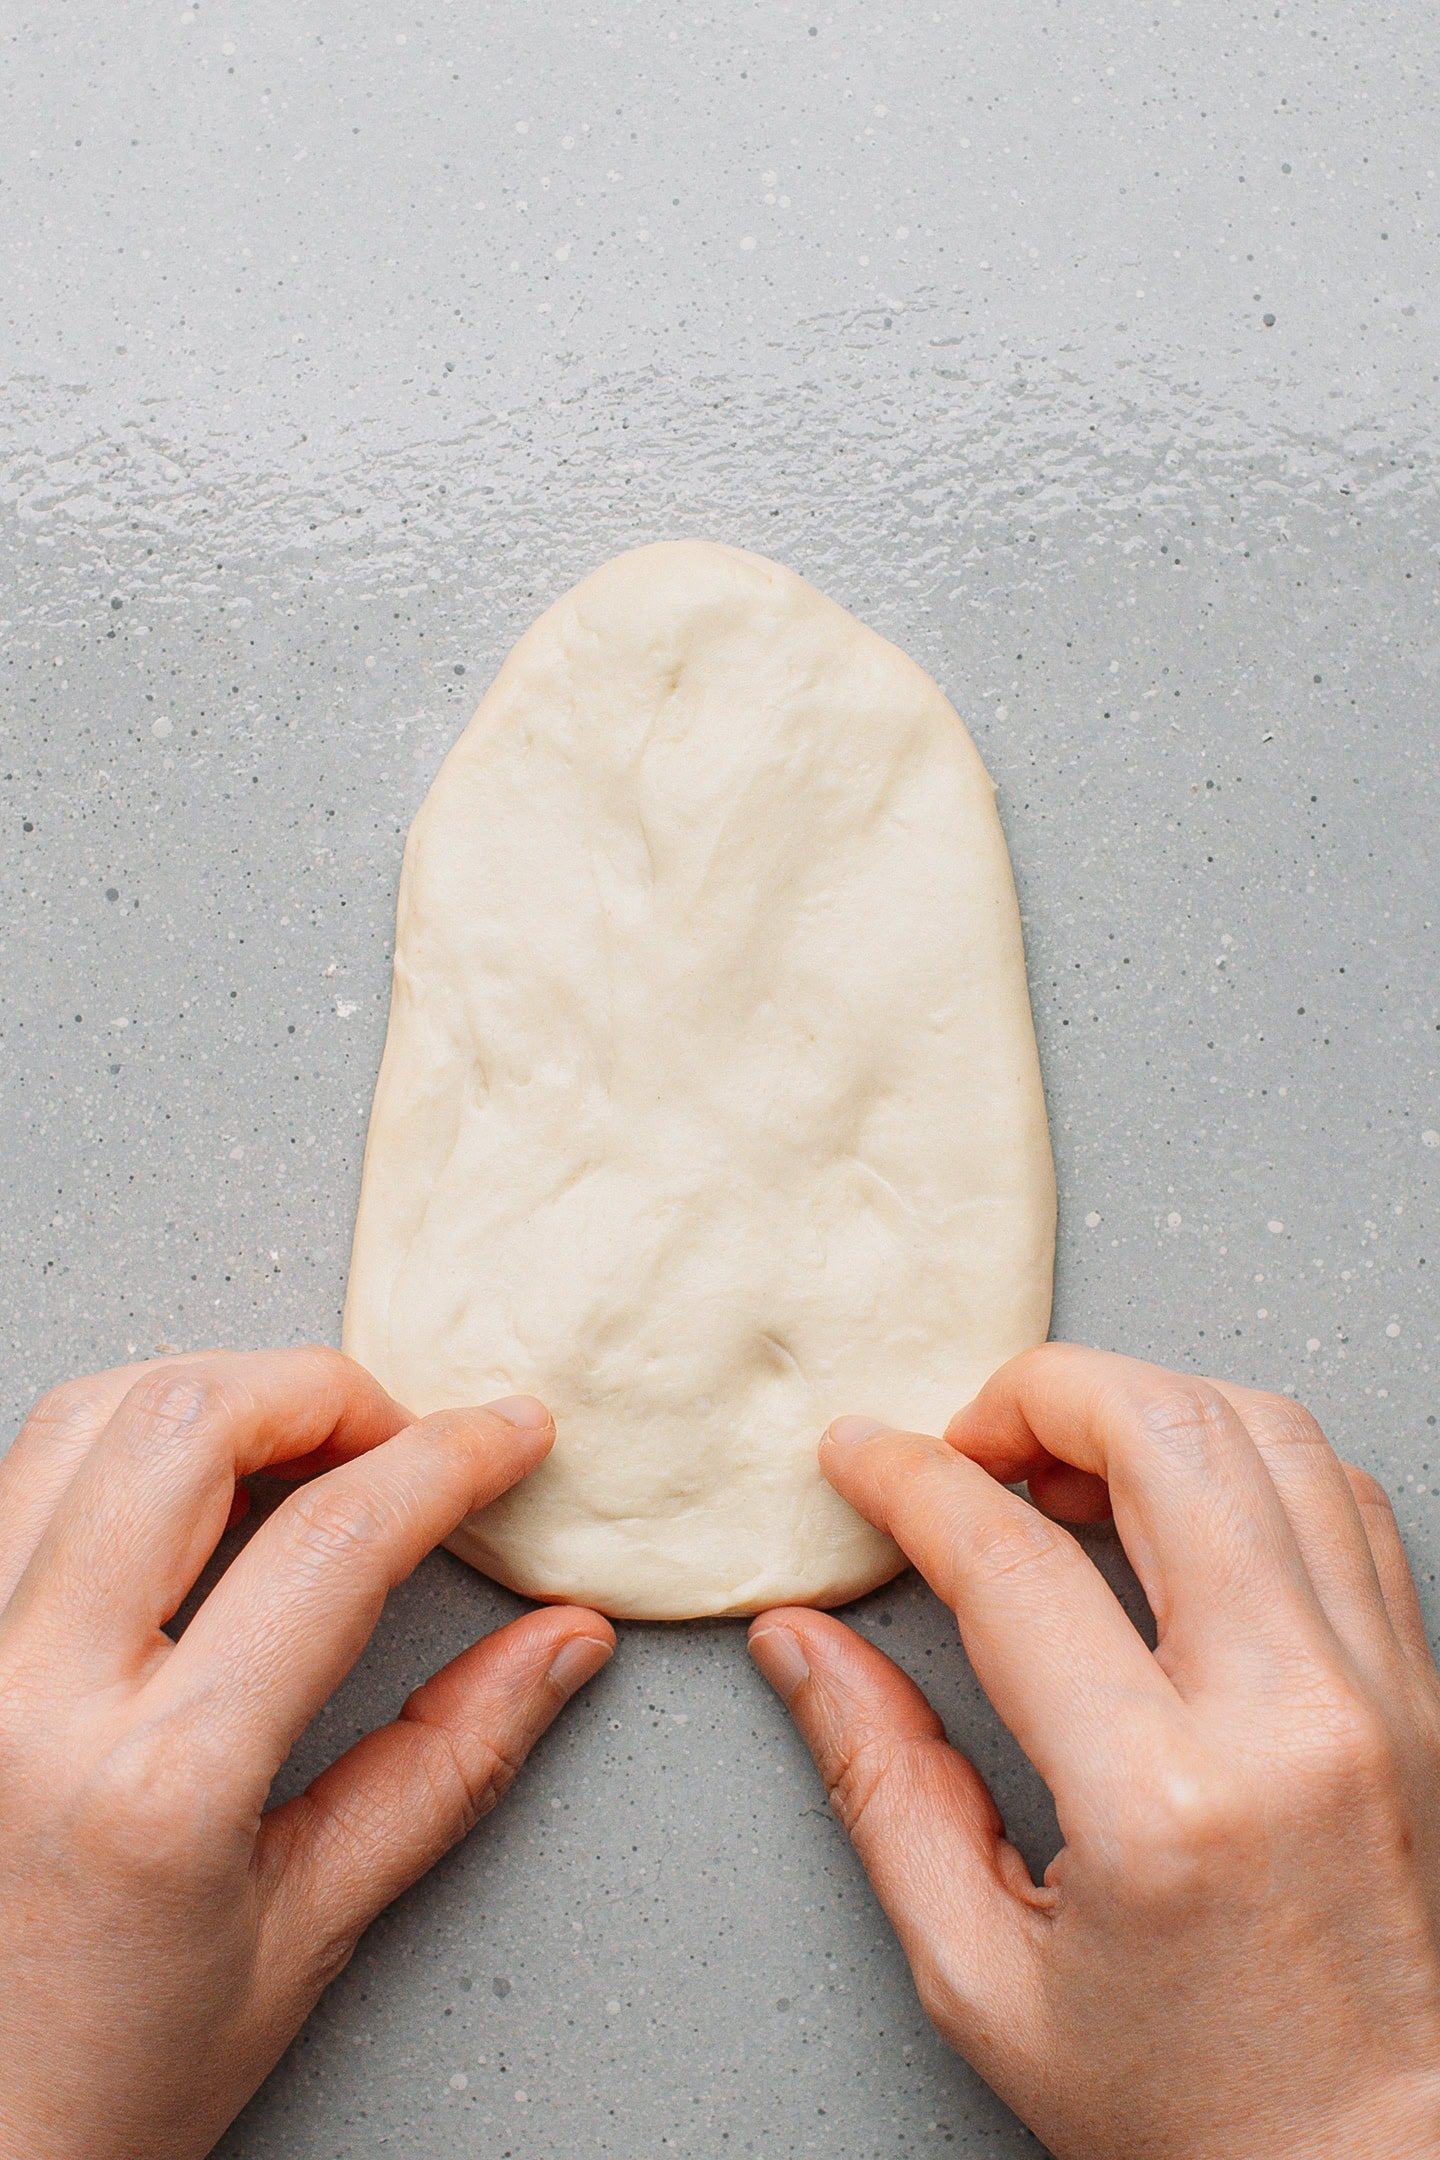
- Shape it. Use your hands to flatten the dough into a long, thin trapezoid of about 4 inches (10 cm) wide and 6 inches (15 cm) tall.
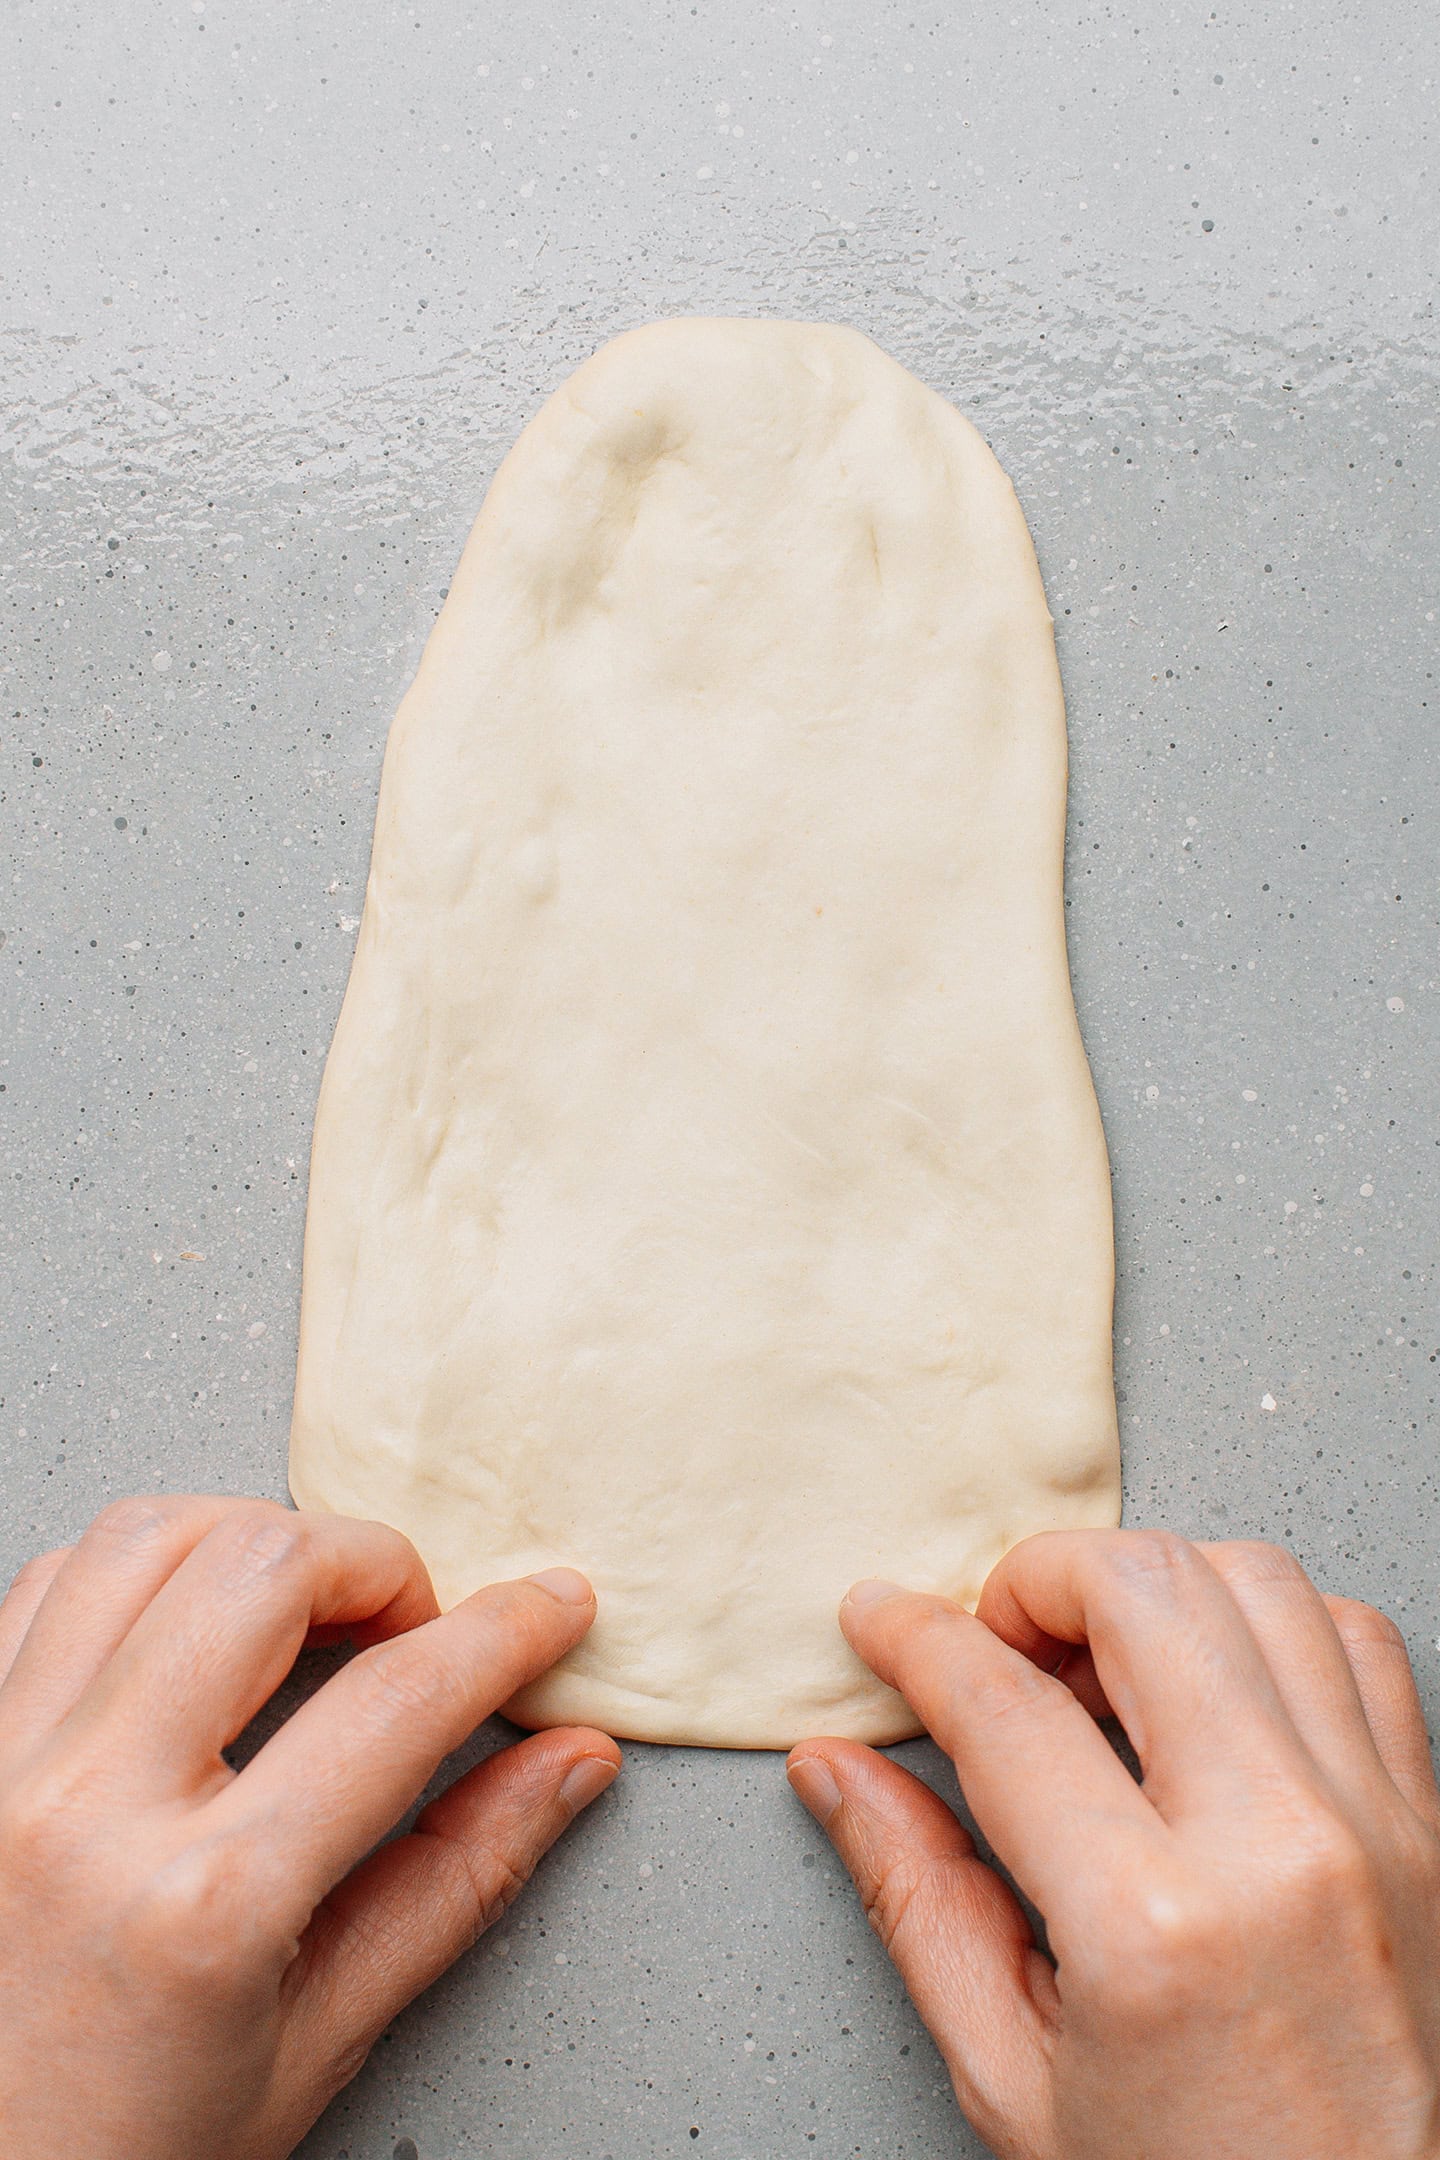
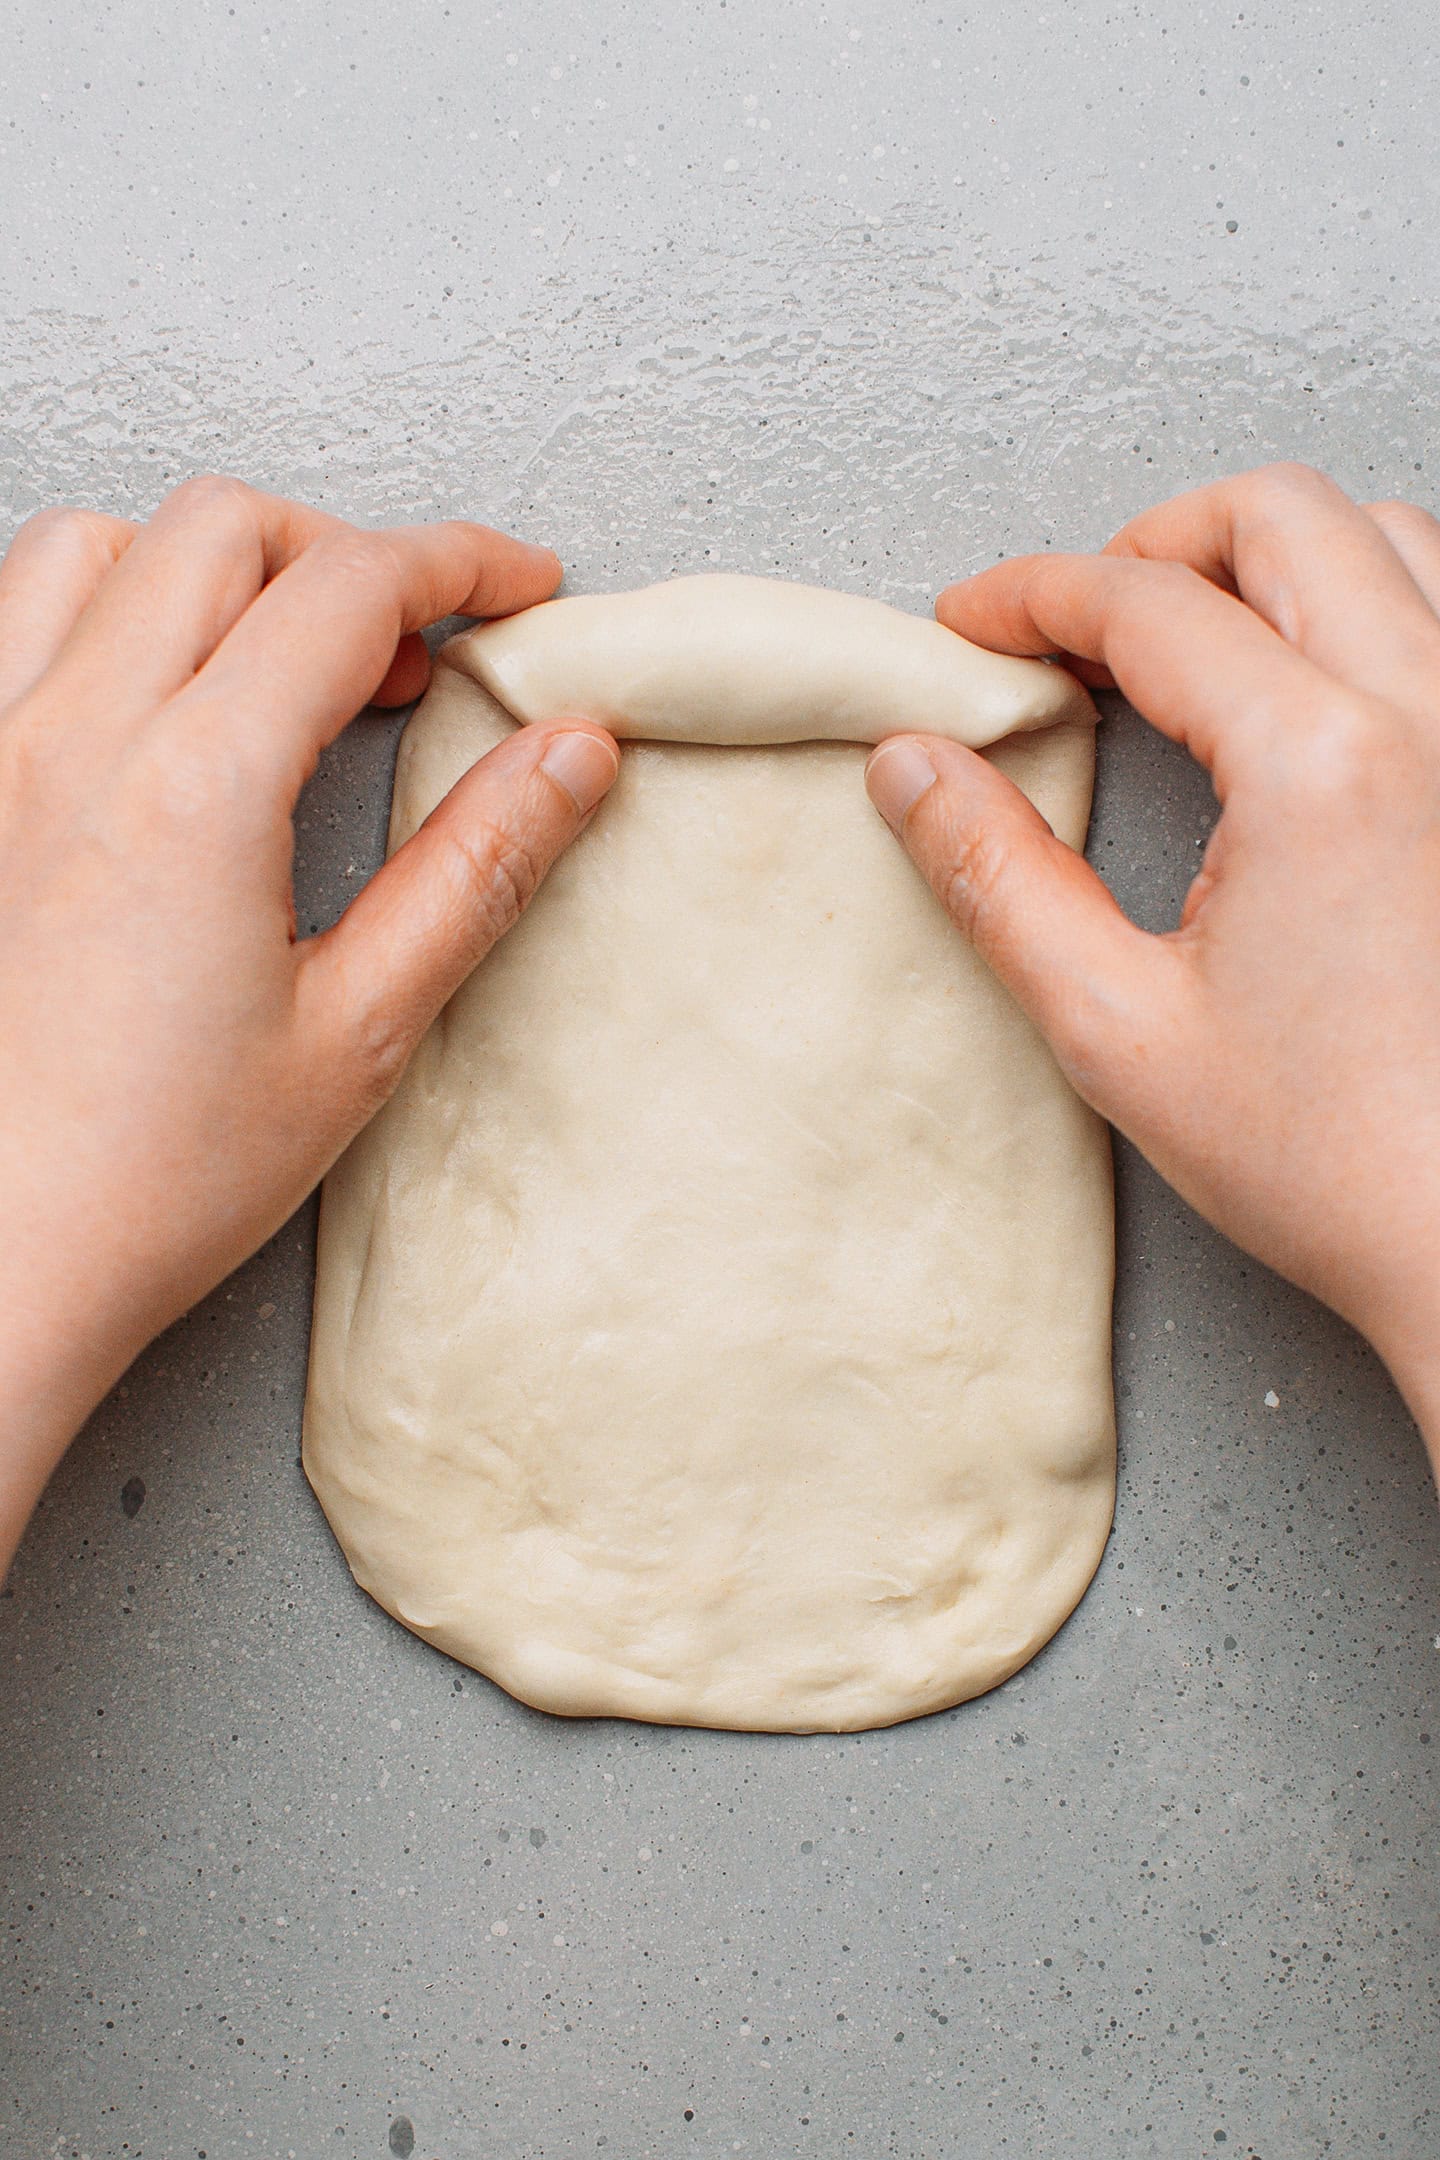
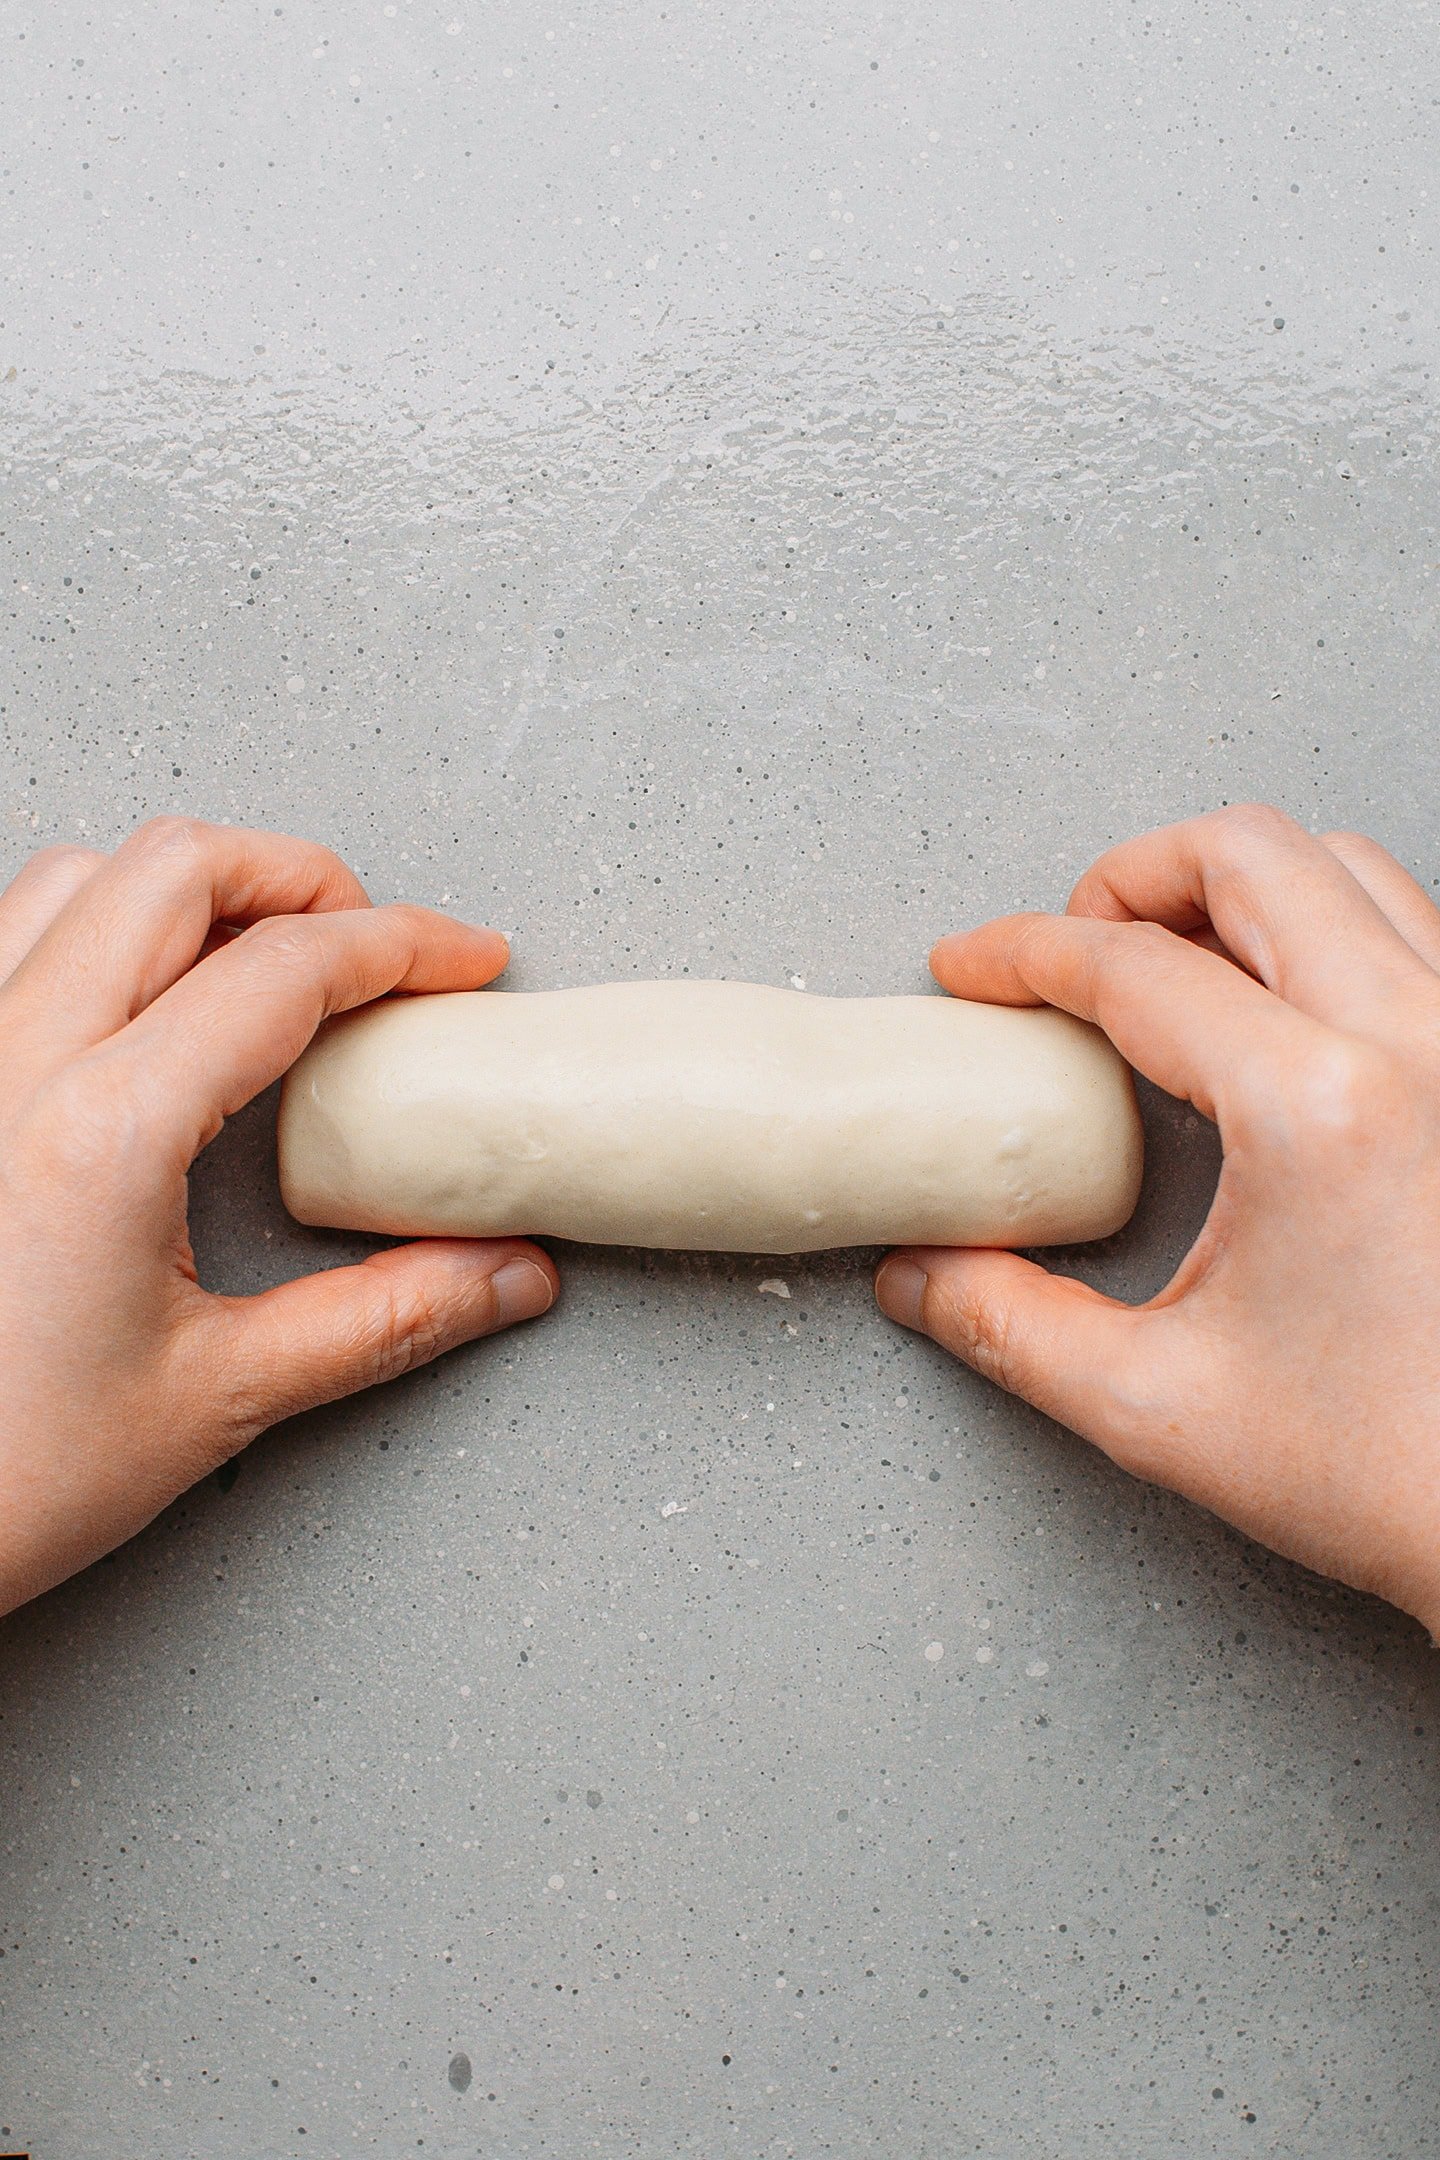
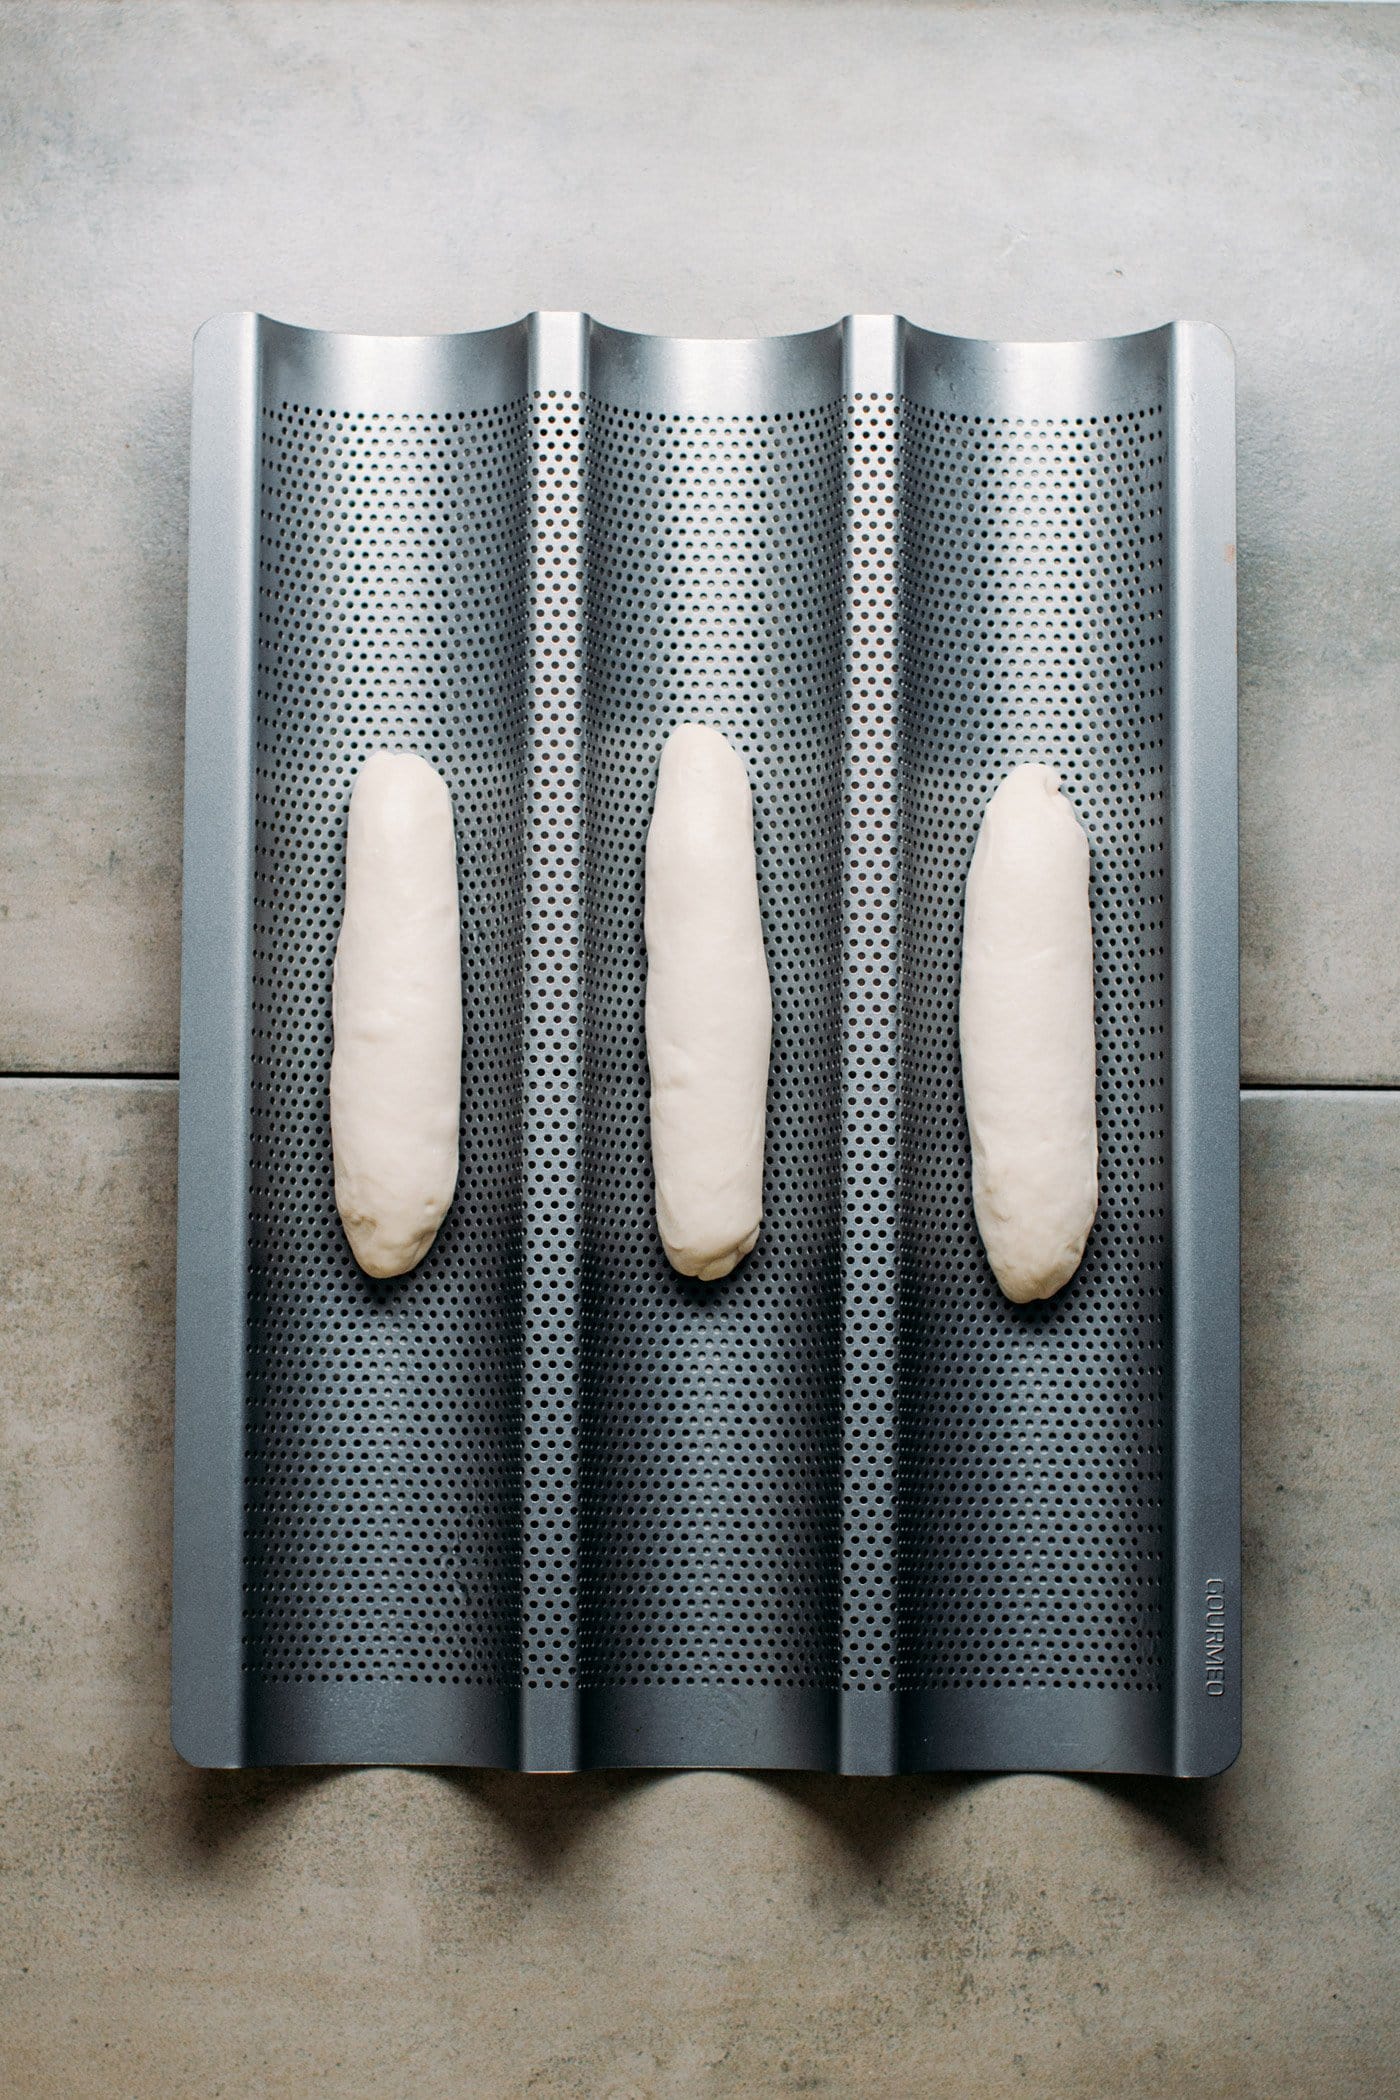
- Roll it into a log. Next, starting from the top of the trapezoid, roll into a log. Transfer to the greased baguette pan and repeat with the remaining balls of dough.
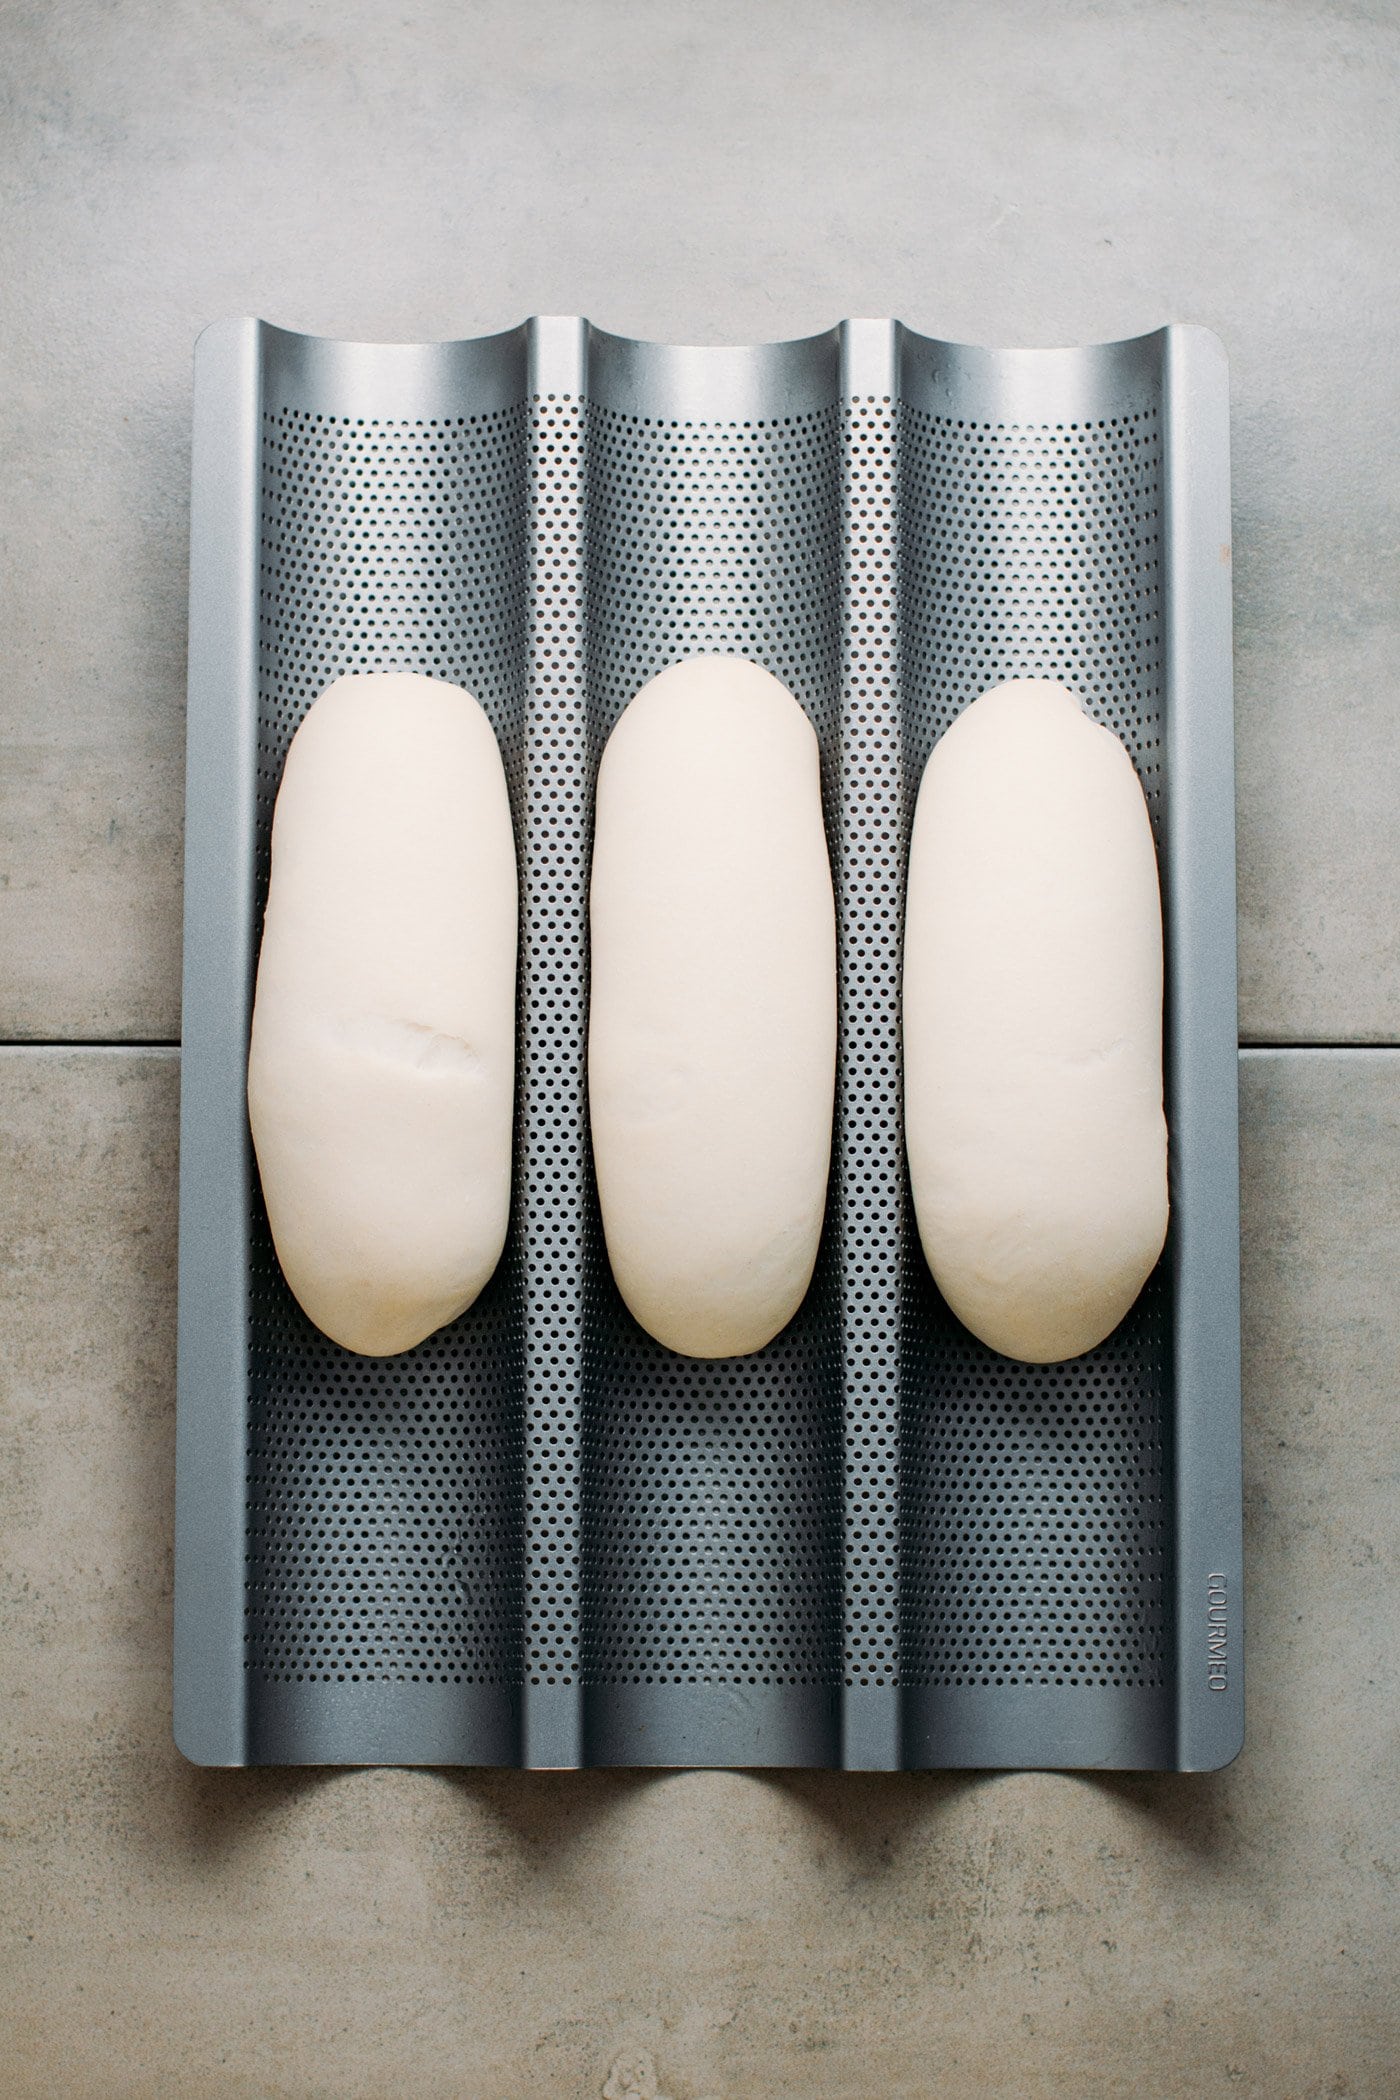
3. Proof
- Proof. To proof the baguettes, place the baguette pans in an oven set at approximately 86°F (30°C) or simply turn on the oven light. Fill a baking dish with about 3 cups of boiling water and place it at the bottom of your oven. This will create moisture, helping the dough rise properly and preventing the loaves from drying out.
Note: The proofing time will depend a lot on the temperature and will take between 1 h 30 and 2 hours. The baguettes are ready to be baked once they have almost quadrupled in size. The dough should bounce back slightly when you press it. If it bounces back quickly, it’s underproofed.
4. Bake
Once the loaves have quadrupled in size, it’s time to bake them! Here is how to bake the baguettes:
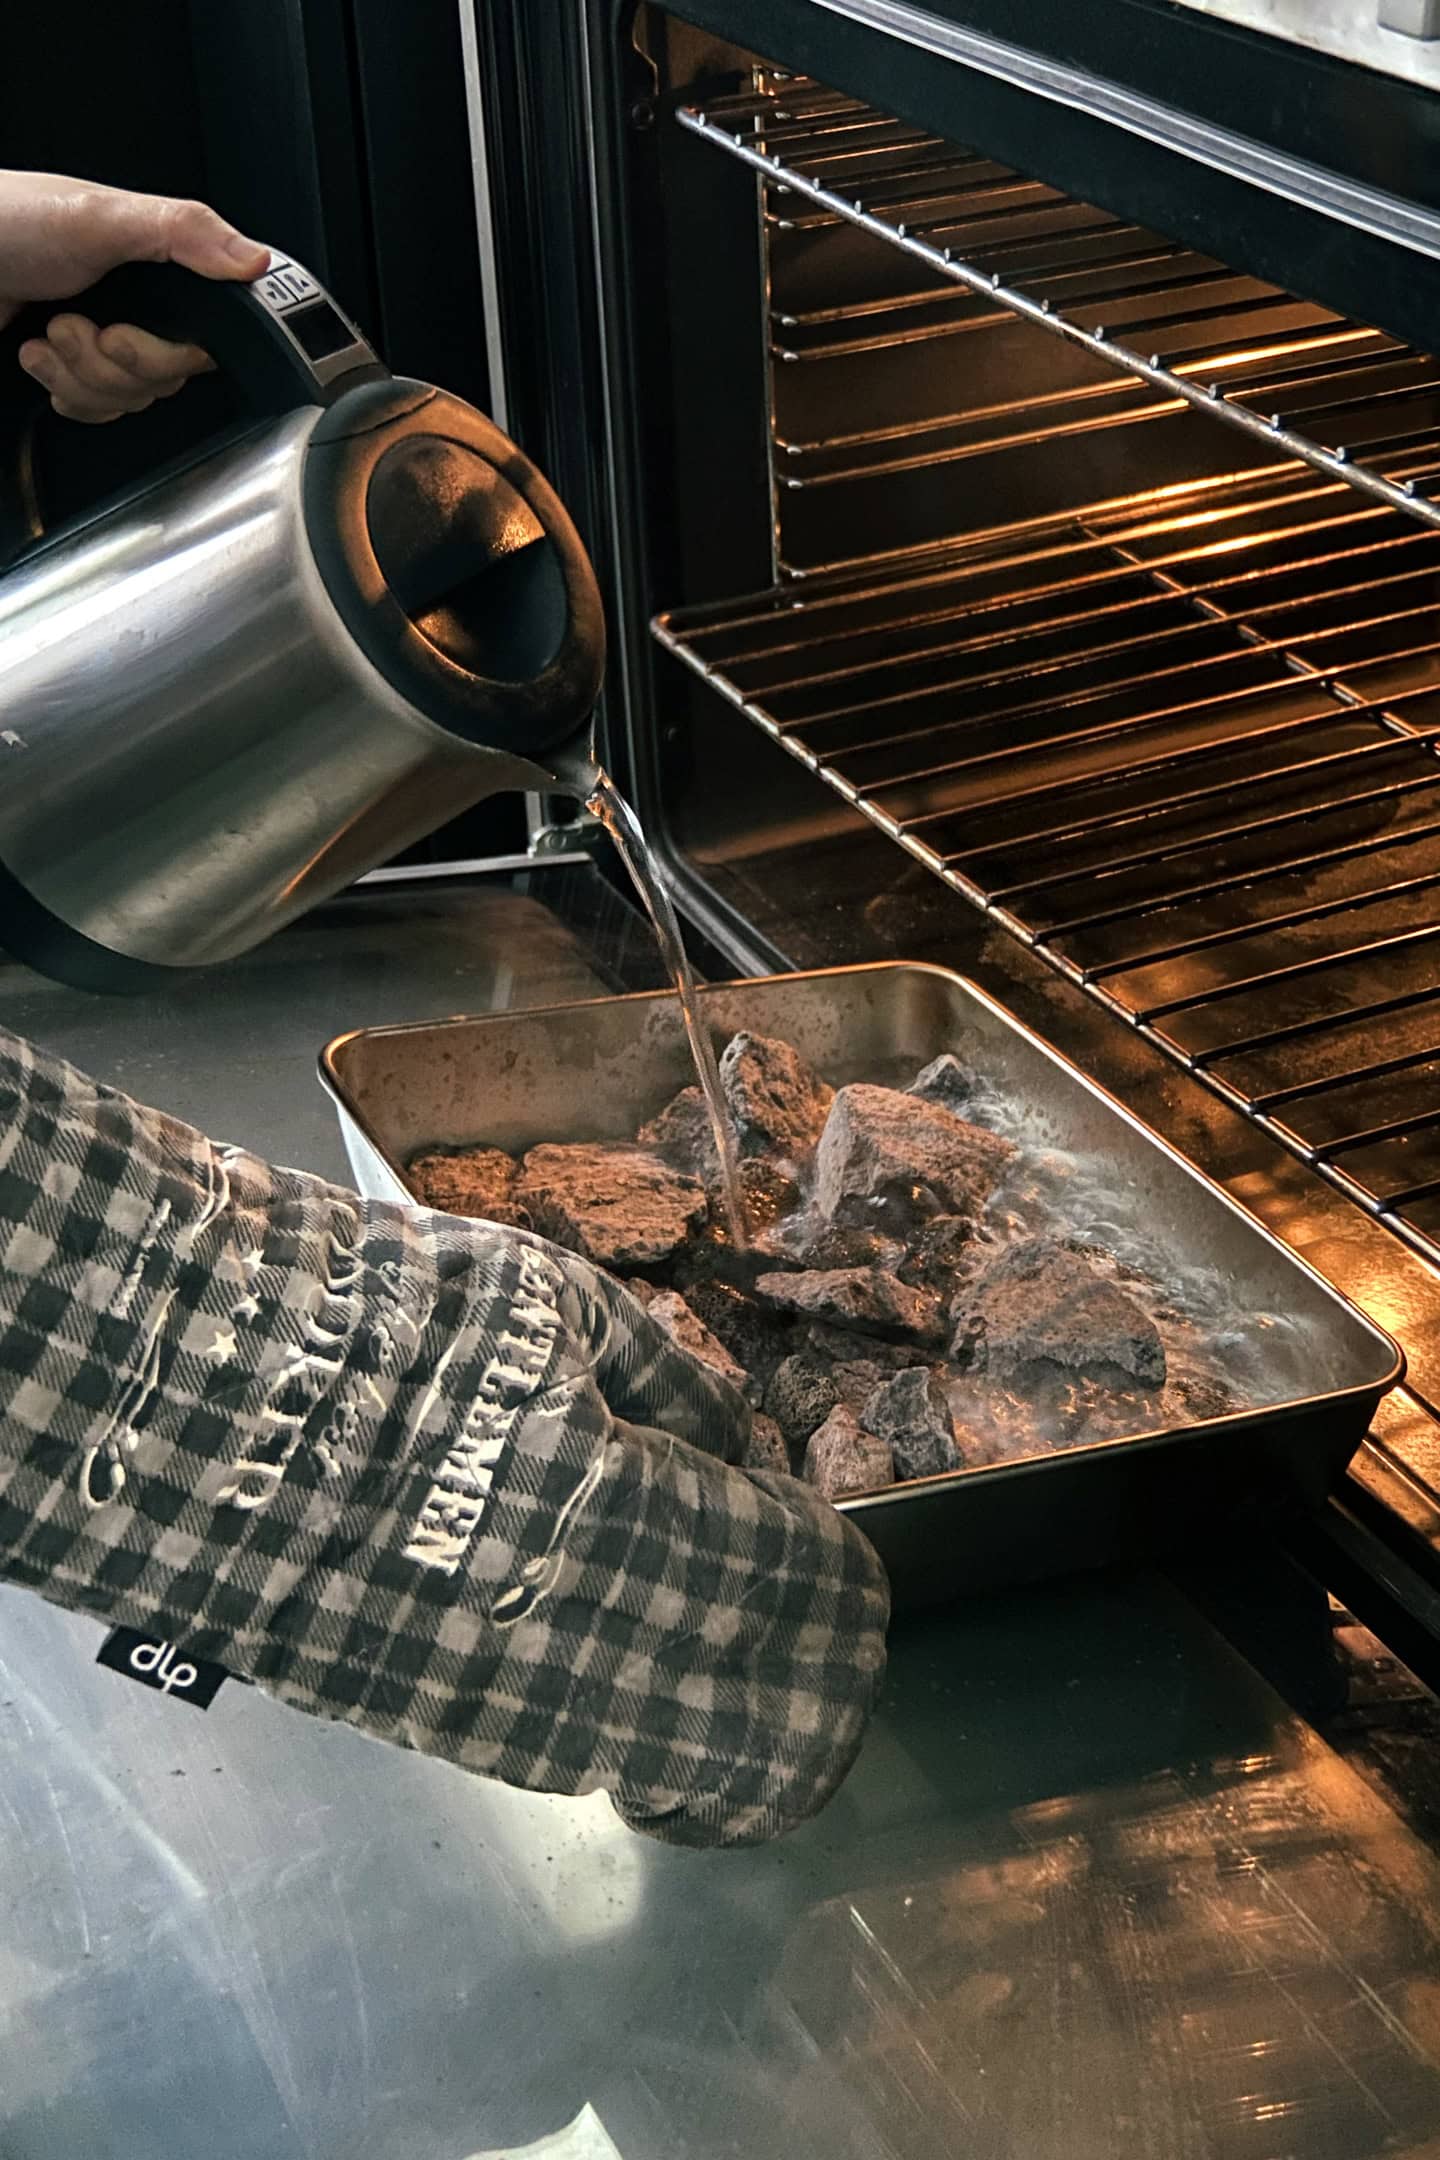
- Preheat your oven to 400°F (200°C) with either an iron skillet or a pan filled with lava rocks placed at the bottom. You will use it later to create steam. On top of that, the skillet will retain a lot of heat, so when you open the oven to bake your baguettes, it will come back to a high temperature more quickly. Allow the oven to preheat for at least 30 minutes.
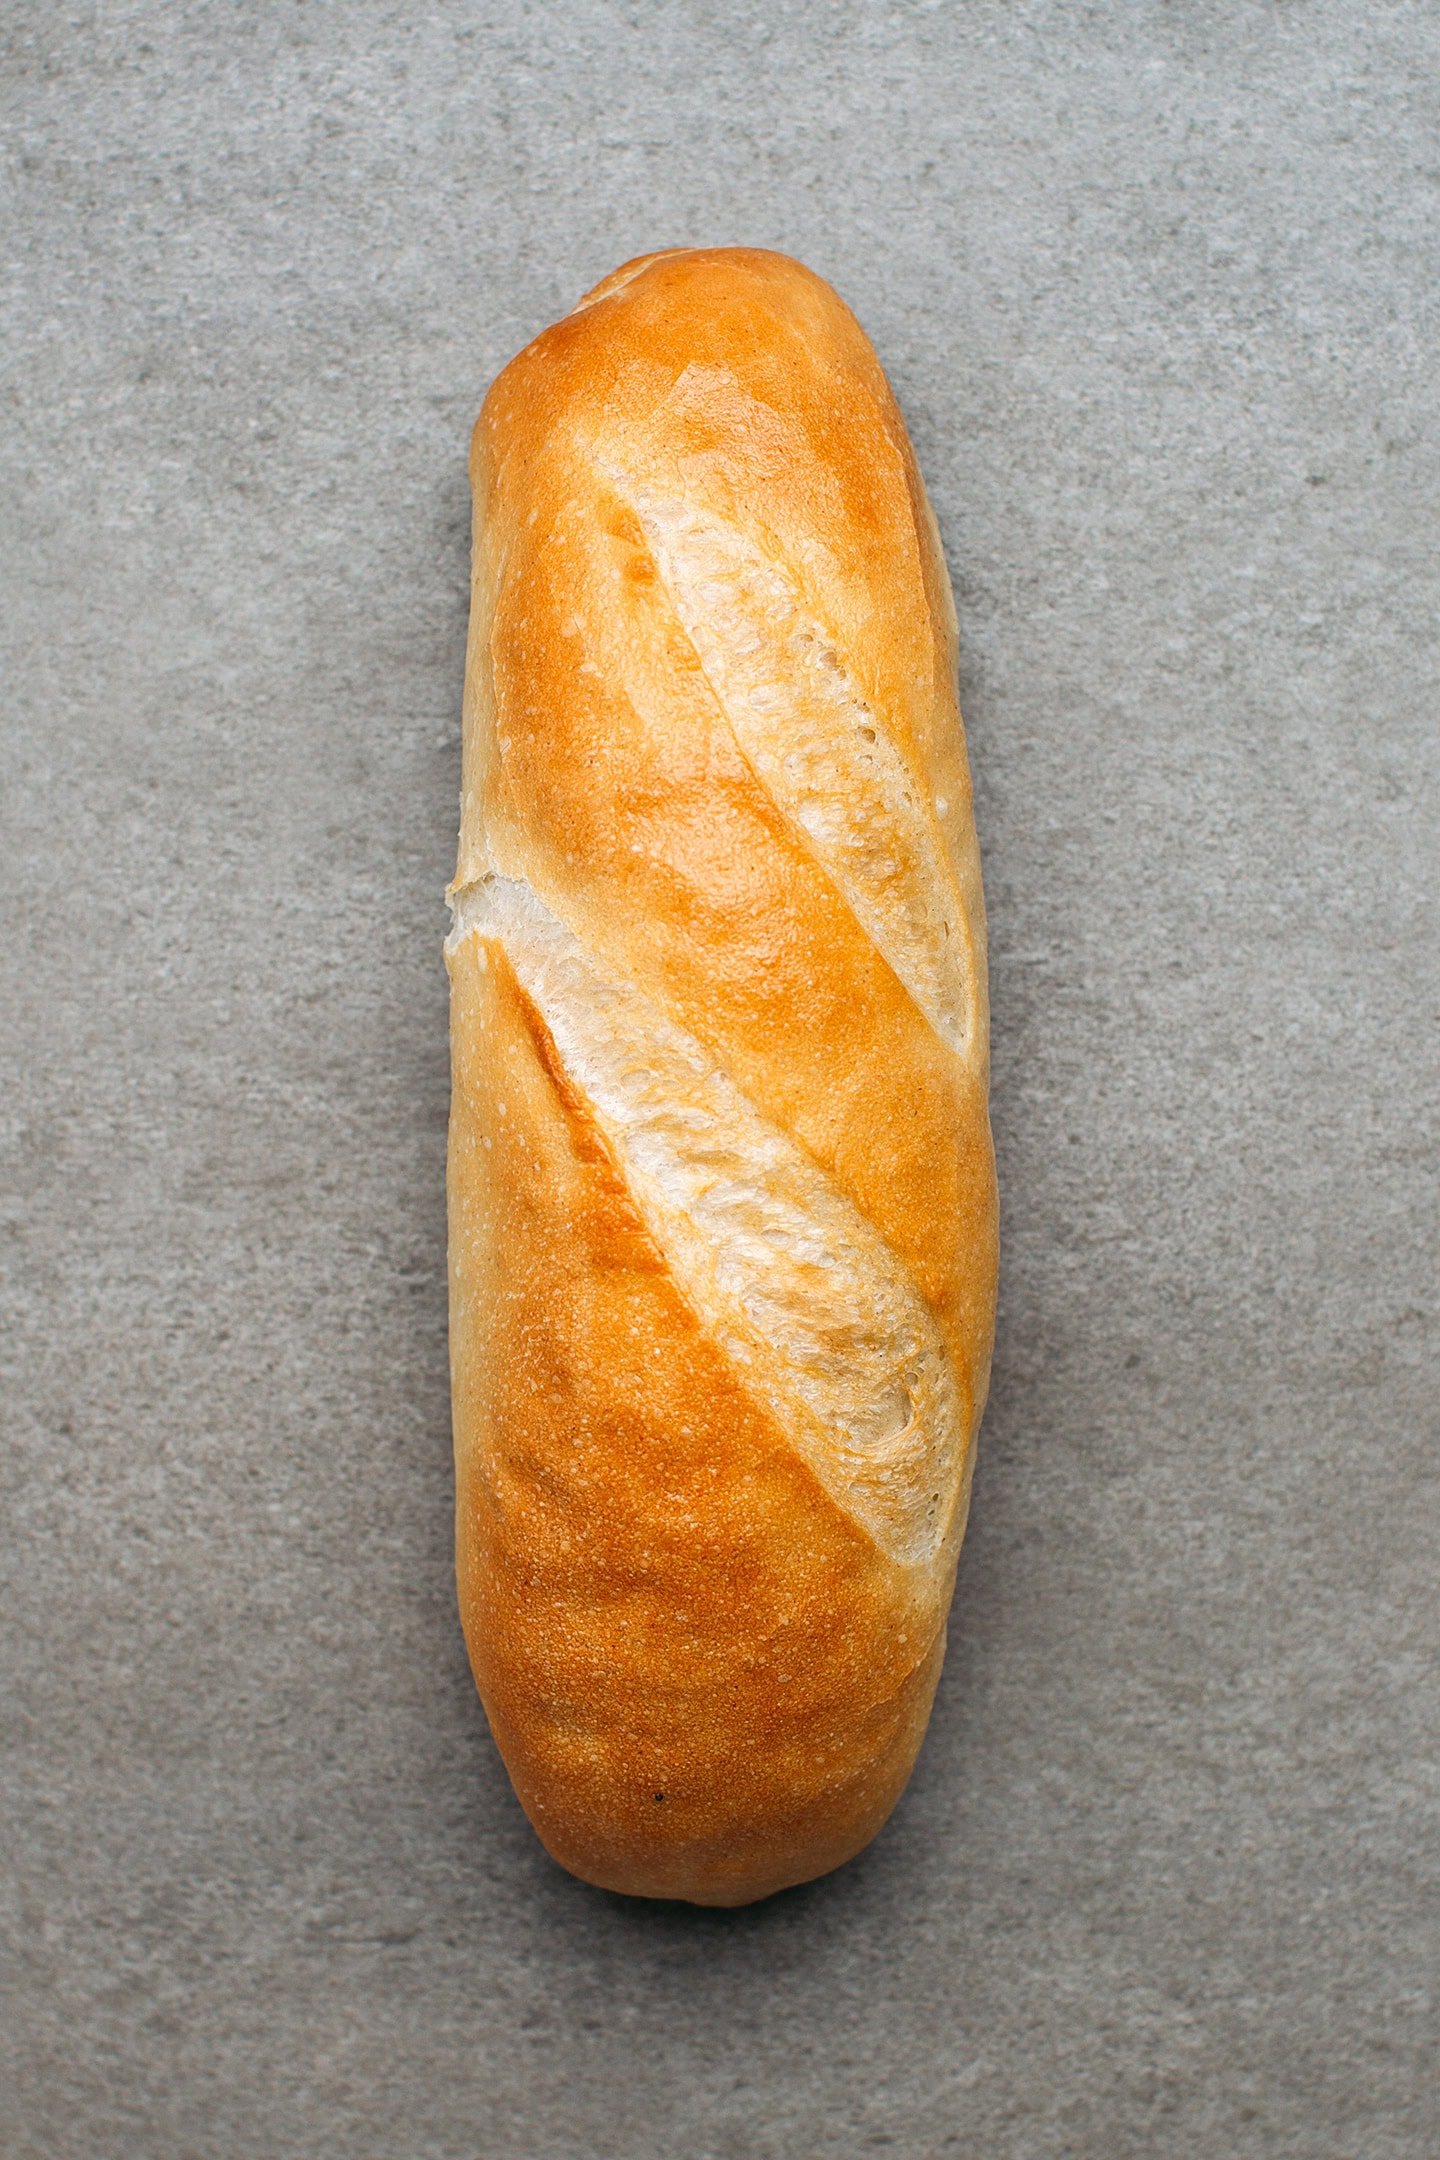
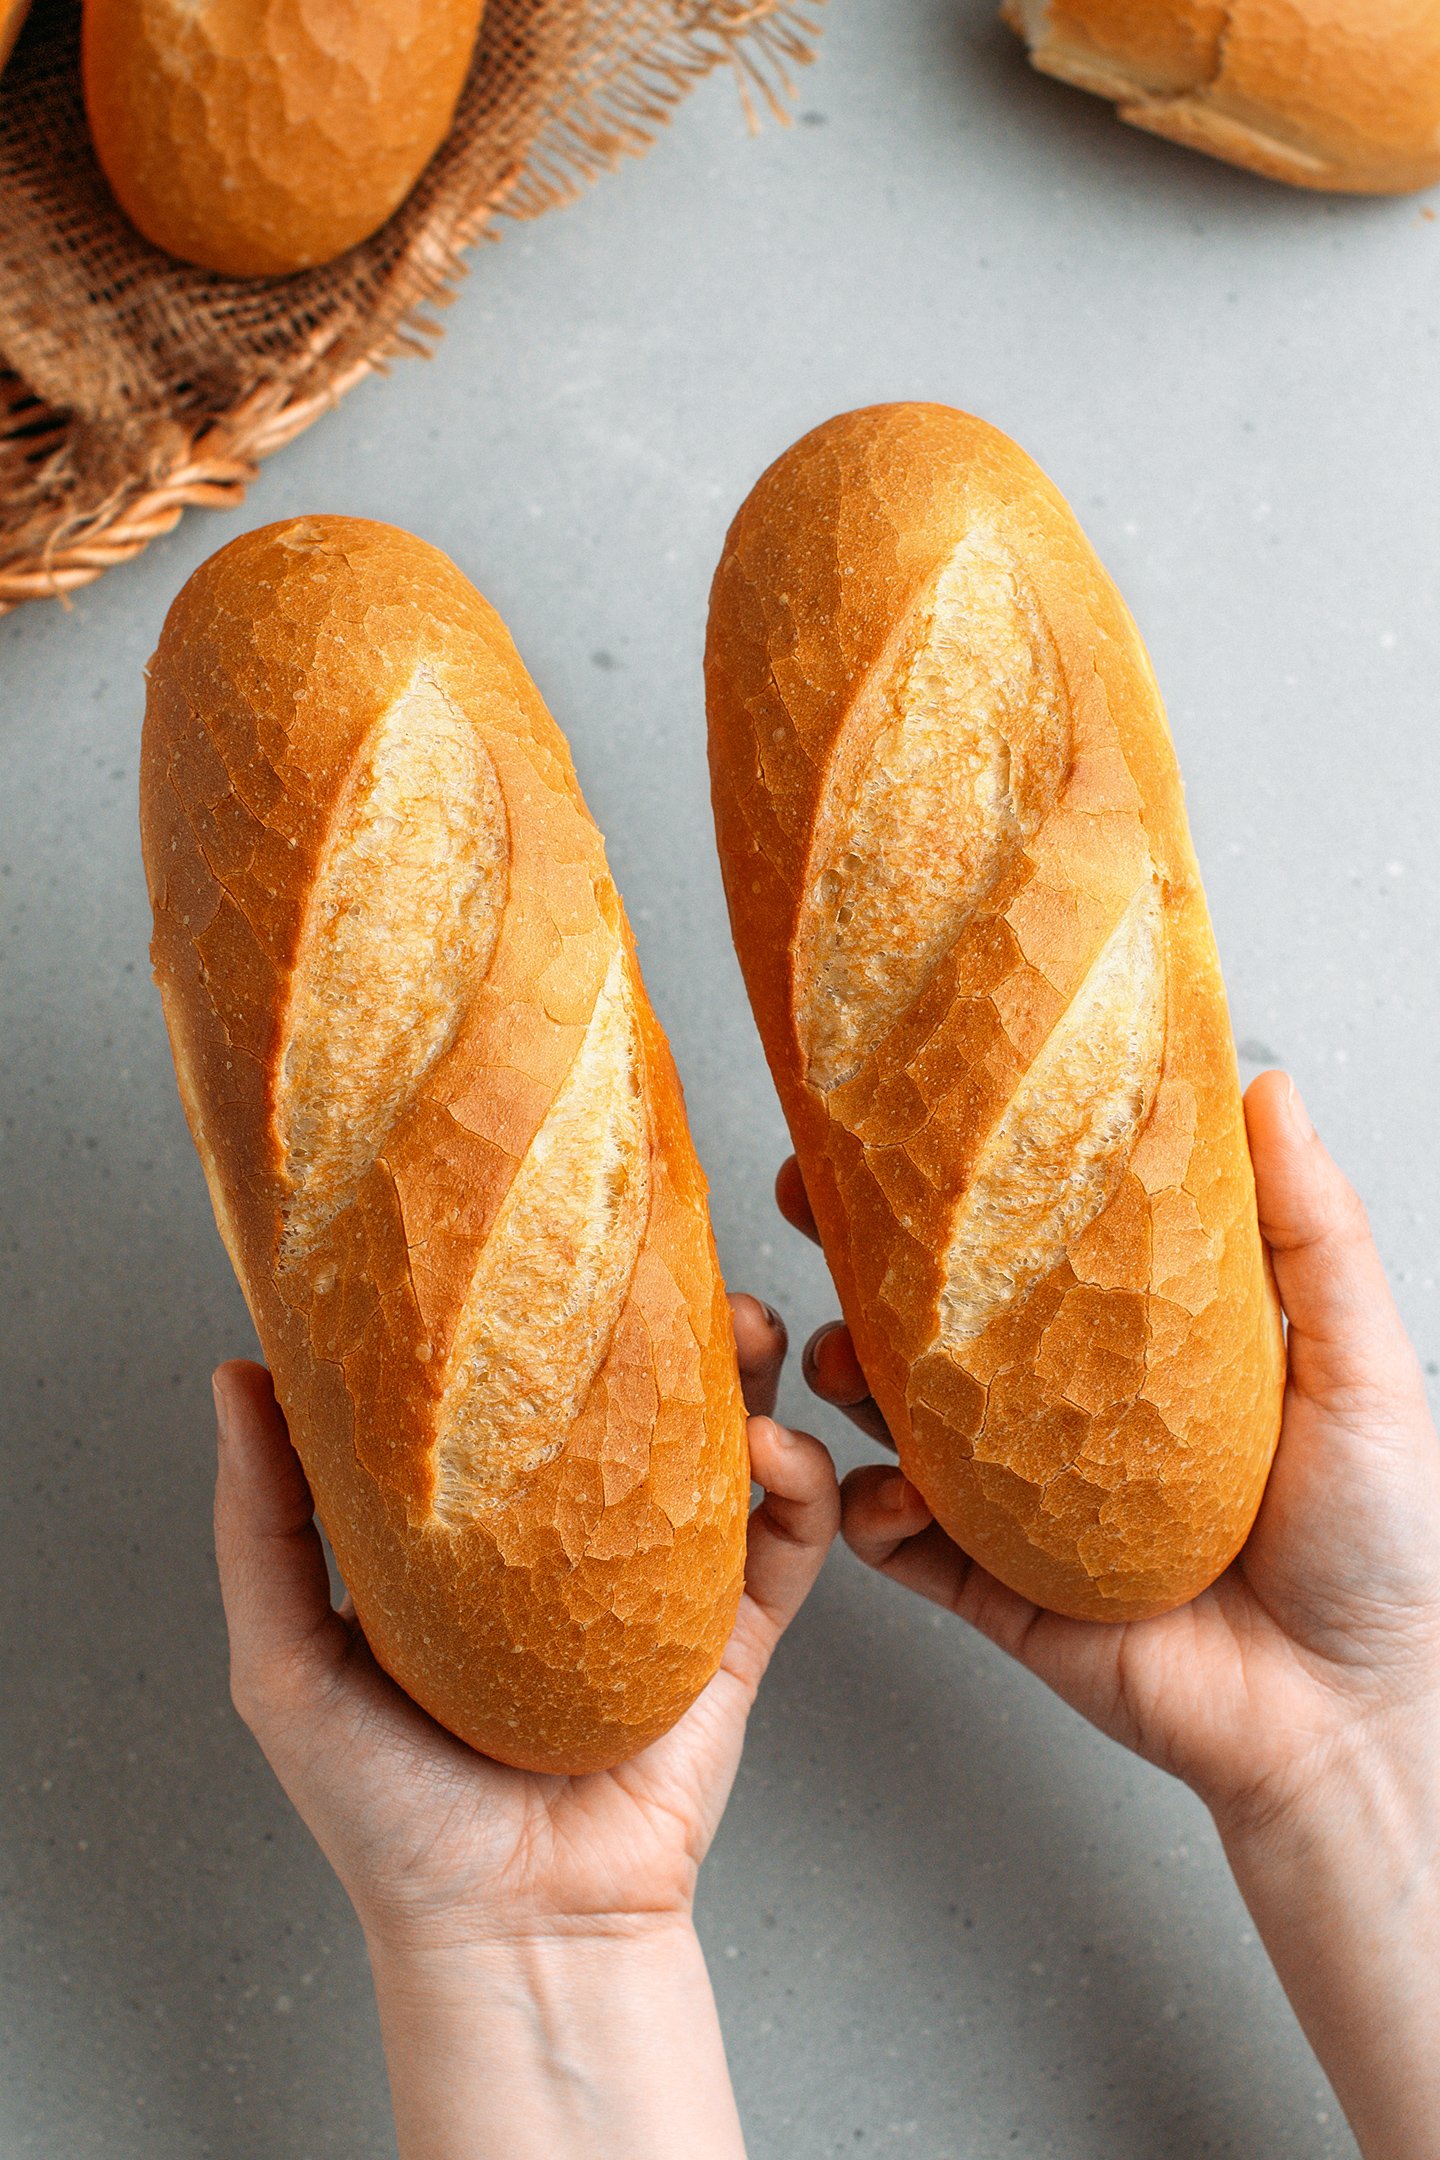
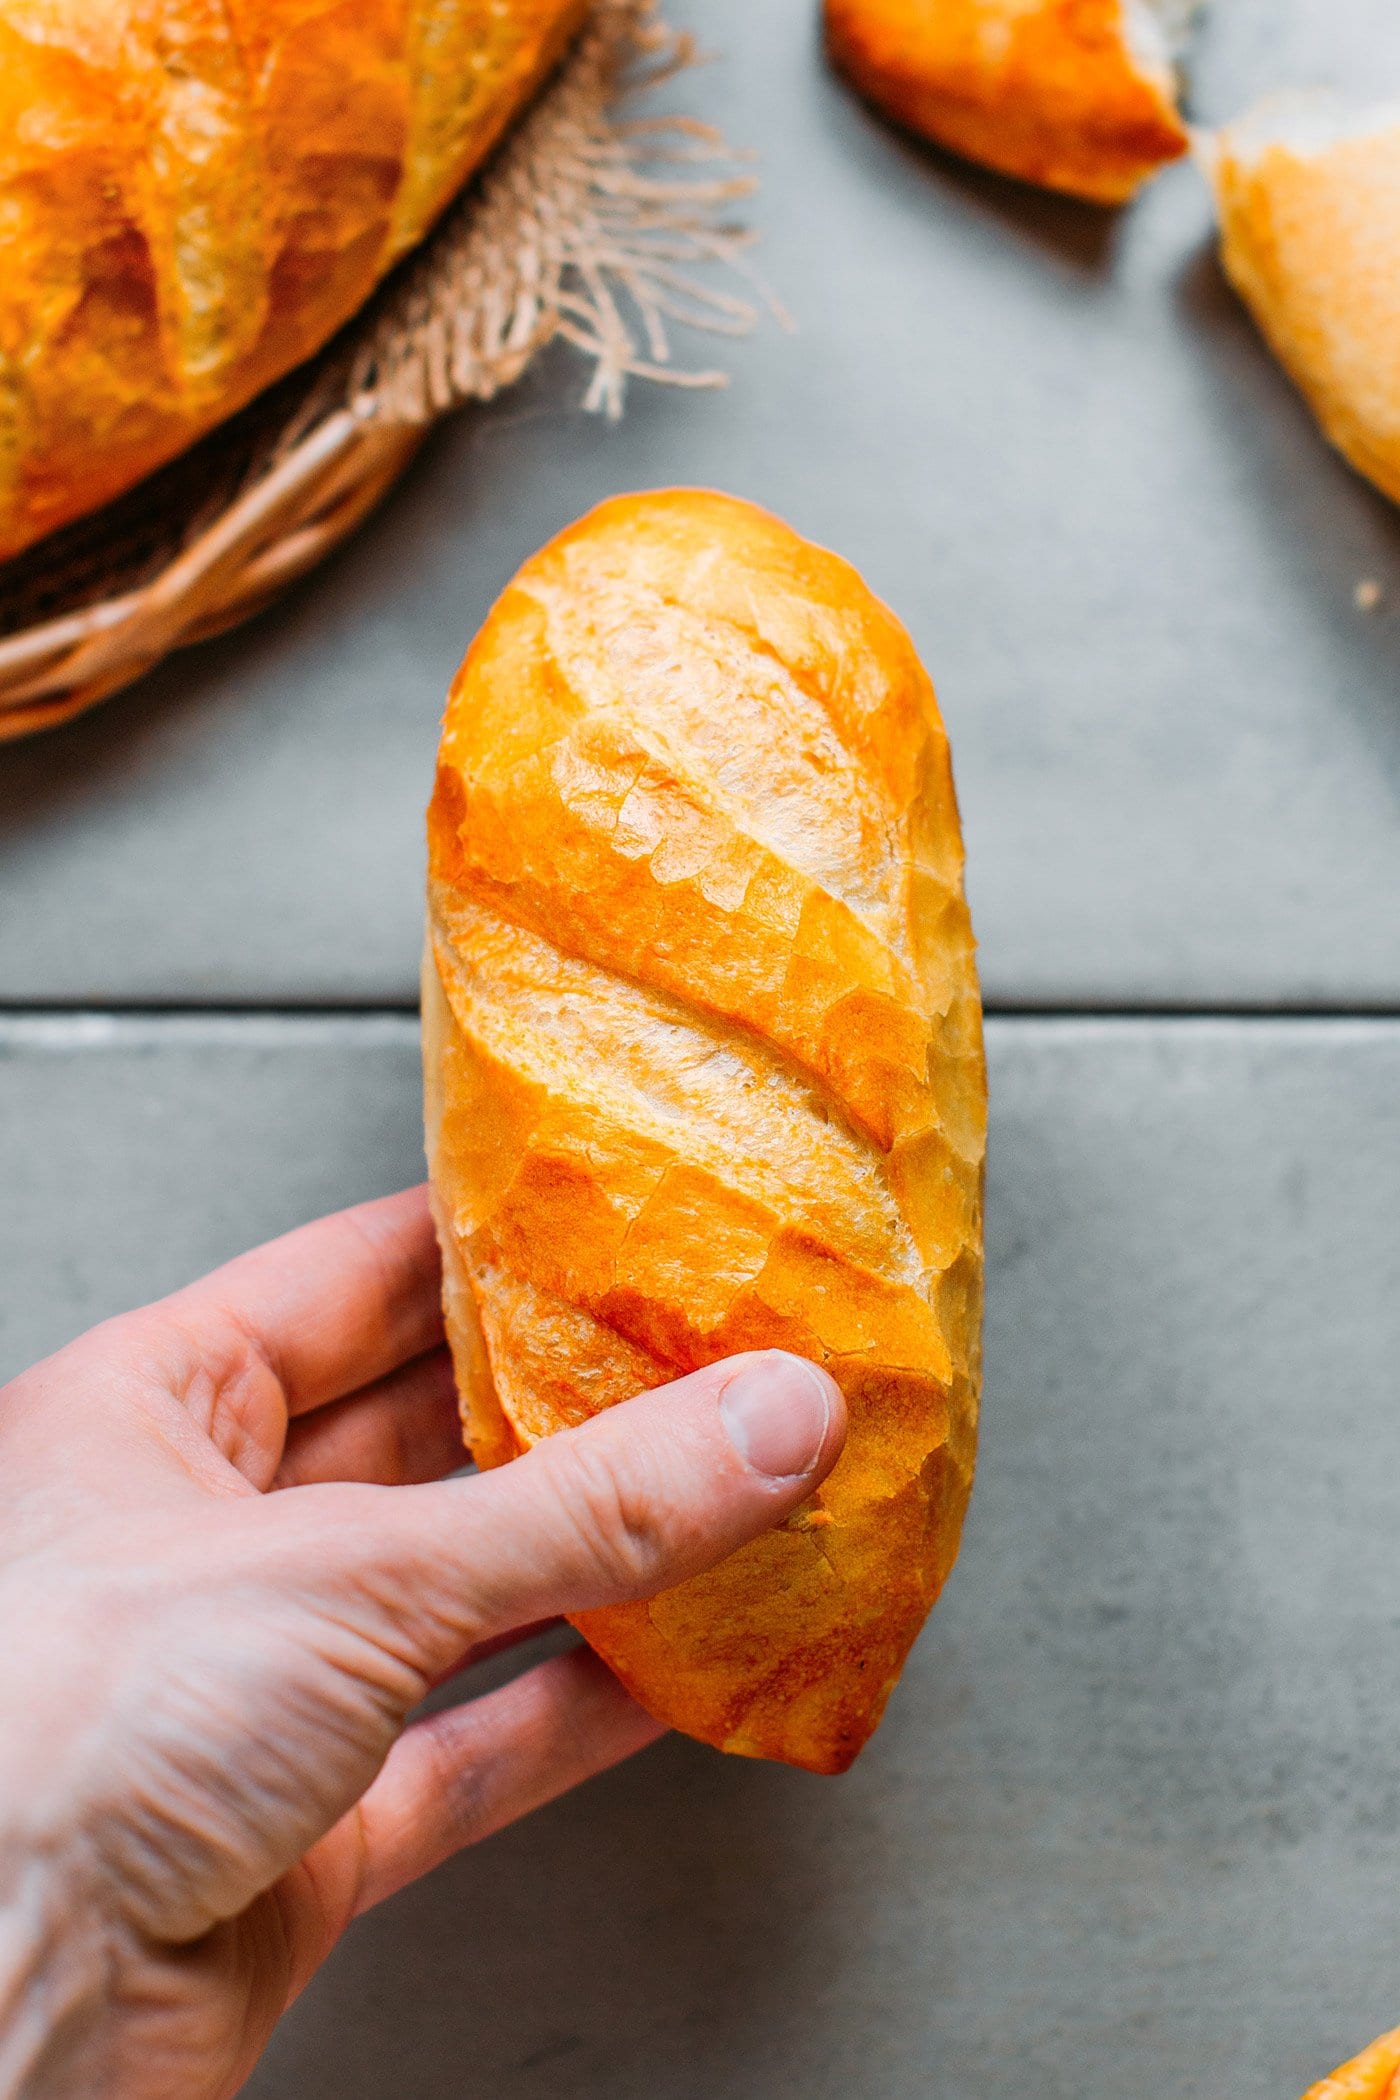
- Score at a 45-degree angle. Using a razor blade, score each baguette with either one cut vertically or 2-3 cuts diagonally. Ensure you are holding your blade at a 45-degree angle when scoring.
Scoring Guide
If you are unsure of how to score your baguettes, I have got you covered! You can refer to the image below, where I show you the angle and pattern you should use to score your bánh mì.
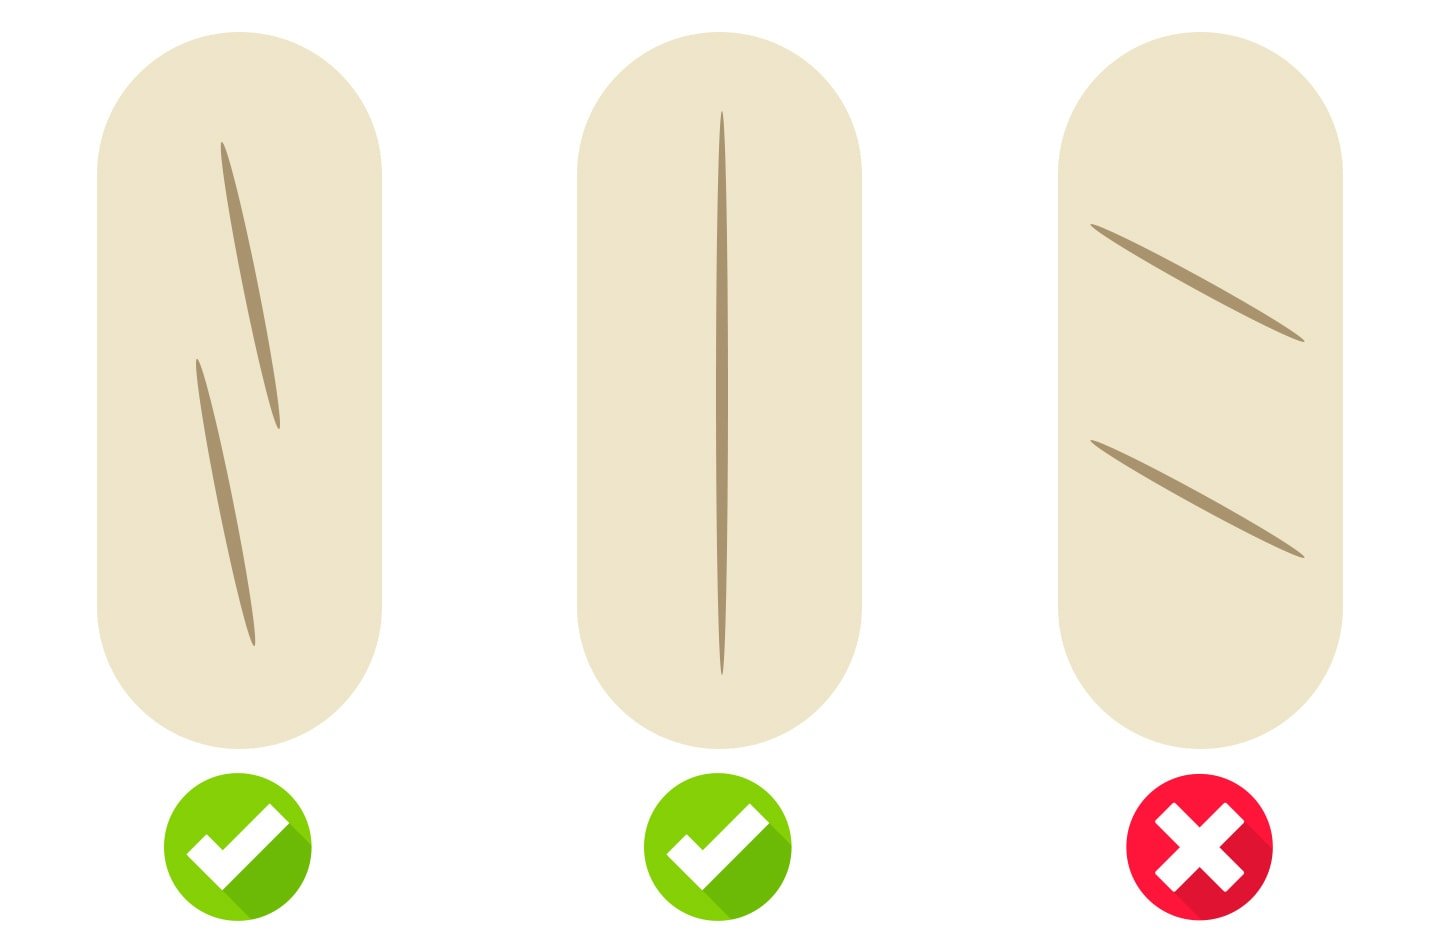
Scoring Tips
Through testing, I realized that there are a few tips to follow when scoring the dough, if you don’t want it to stick to your blade. Here is what I learned:
- Be non-hesitant: You must be fast and non-hesitant when scoring the dough. This is key. If you score the dough slowly, you are guaranteed to drag it using your blade. Be decisive!
- Score with one vertical cut: While you can score with two to three diagonal cuts, I find it much easier to score with one long vertical cut, especially if you are a beginner.
- Wet your blade: One more tip is to dip your blade in either water or oil before scoring. It helps the blade slide on the dough.

- Spray. Once your oven is at the right temperature, spray the baguettes with water. This will help them develop cracks.
- Create steam. Pour about 3 cups of boiling water into the iron skillet or pan filled with lava rocks to create a lot of steam.
Best Way to Create Steam
A lot of steam in the oven is the secret to getting a thin, cracked eggshell crust that characterizes authentic banh mi. There are two ways to create steam. You can use either:
- Lava rocks: Your best option is to use lava rocks, which are volcanic rocks that are typically used for indoor fireplaces or gas grills. They get really hot and release a ton of steam when water is poured onto them.
- Iron skillet: The easiest option involves placing a large, heavy iron skillet in the oven and pouring boiling water into it.
For both options, you must preheat the oven with them inside it. I recommend preheating the oven for at least 30 minutes to ensure they are very hot.
Conclusion: I have used an iron skillet for many years with great results. It’s only recently that I bought some lava rocks to compare, and I can report that these are the superior option. Not only do lava rocks create a lot more steam, but they also produce more consistent results with larger cracks on the crust.
- Bake. Right after pouring the hot water into the skillet or over the lava rocks, add your baguette pans to the oven and turn off the oven fan. By baking without the fan, you will keep a ton of moisture inside the oven.
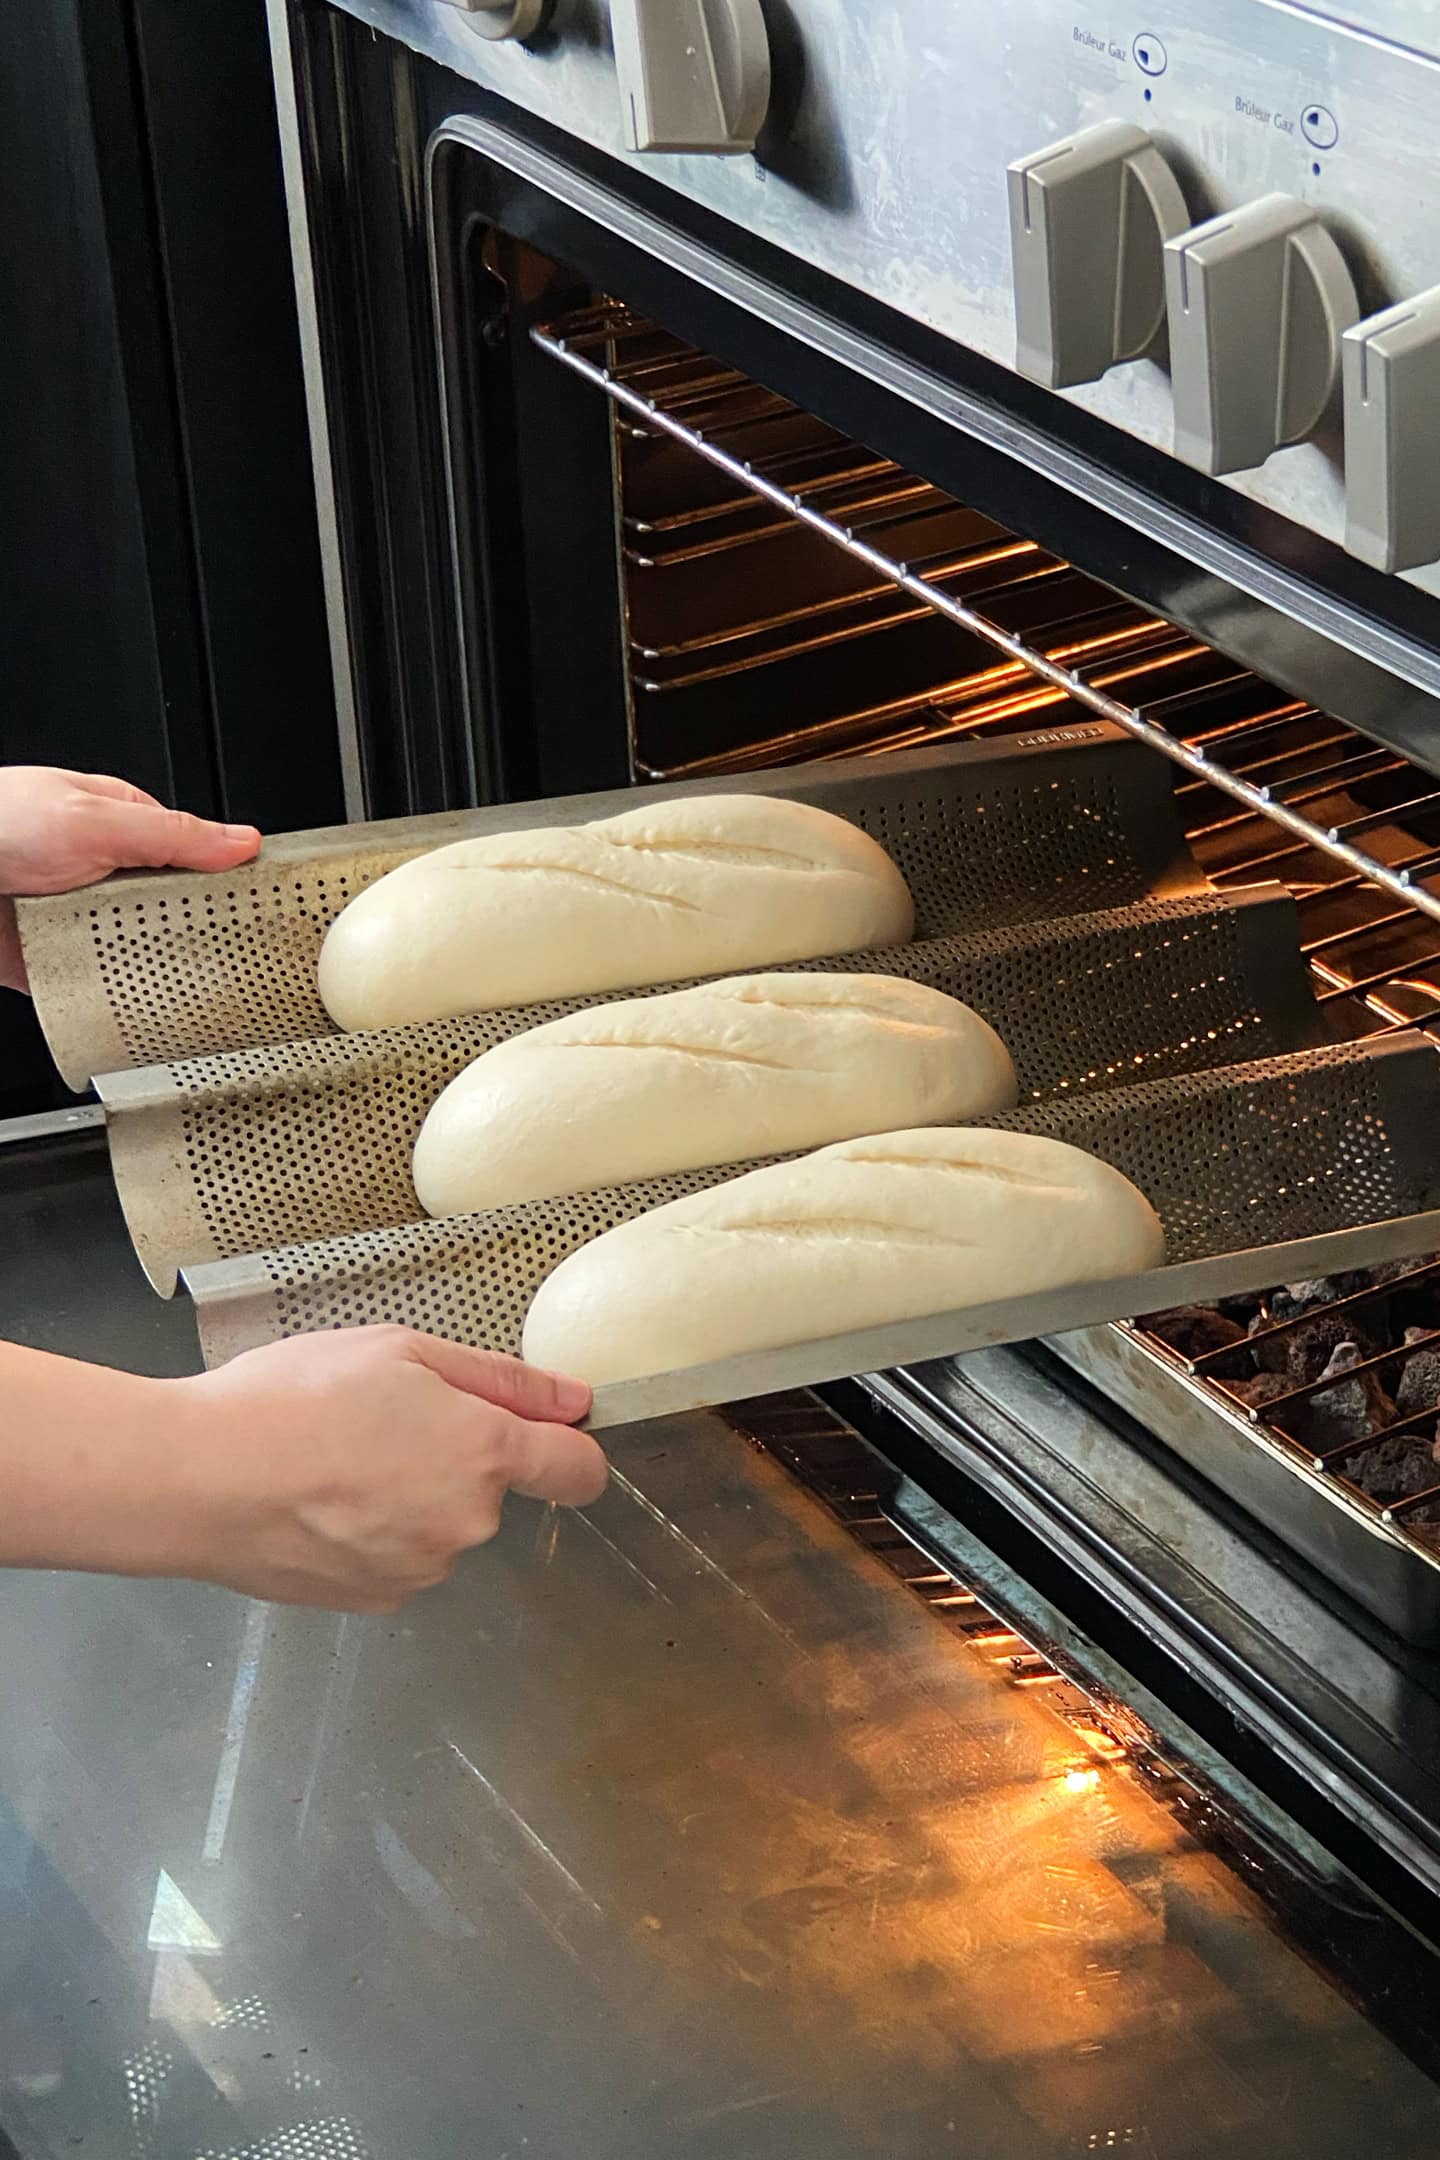
Be careful! DO NOT open the oven door during the first 7-8 minutes – otherwise, your baguettes will slightly collapse. The high heat and steam inside the oven make the bread rise, but if you open the door before the crust has set, it will simply collapse, and you will lose that super airy crumb.
- Remove the skillet/lava rocks. After 7-8 minutes, remove the iron skillet or pan filled with lava rocks. Bake the baguettes without steam for another 4-5 minutes or until evenly golden brown.
- Remove from the oven. Finally, remove your golden brown bánh mì from the oven and let them cool. Within 5 minutes, you should hear the sound of a crackling fire and see cracks appear on the crust! Magical!

I’m so happy with how these turned out! The crust is so thin and crispy, and the crumb is incredibly light! These little bánh mì look and taste just like the authentic ones! I had my share of bánh mì in Vietnam for years, so you can trust me on that!
📔 Tips
Do not make any substitutions.
I highly advise against using any substitution. This is not a recipe that you can tweak to your liking or use whatever you have on hand. Each ingredient and its ratio have been carefully calculated and tested.
Adjust the amount of water.
Not all brands of flour are equal, and while the exact measurements will work for the majority of people, some may have to slightly adjust the amount of water. The dough should be very soft, smooth, and just slightly sticky. If it appears too dry, add more water. On the other hand, if it’s too sticky, add a bit more flour.
Brush with melted butter.
After baking, you can brush the baguettes with a thin coating of melted butter. This will give your baguettes a shiny, more professional appearance.
For information: I used to recommend placing a wet cheesecloth on top of the baguettes during the rising process to prevent them from drying. The problem with this technique is that you must spray water on top in order to be able to peel the cheesecloth from the baguettes. This makes the dough more humid and very difficult to score later (the blade sticks to the dough).
After further testing, I realized this was not the best way. Now, I am simply placing the baguette pan in the oven with the light on and a baking dish filled with hot water at the bottom. This creates enough humidity to prevent the baguettes from drying. The dough is then much easier to score since it is not as wet. This also results in a better appearance and a more hollow inside as the dough can expand better when the scoring is done properly.

You can see above on the left photo, a bánh mì that was sprayed with water BEFORE scoring. Hence, it was very difficult to score it. During baking, the dough didn’t rise well. However, on the right, the dough was proofed without a cheesecloth, scored, and then sprayed with water. The shape is much nicer, and the bánh mì itself is lighter and more airy.
🥖 Where to Use It
Bánh Mì, while served as a sandwich, is usually eaten for breakfast in Vietnam, although you can have it any time of the day. The vegan versions usually include vegan paté, mayo, pickles, some sort of vegan “meat,” Maggi seasoning, fresh cilantro, Thai basil, and many other add-ins like peanuts, crispy shallots, etc. Here are a few recipes and ideas on where to use Bánh Mì:
- Vegan Bánh Mì: You can check out my full guide on how to make the best vegan bánh mì here or this Pulled Mushrooms Bánh Mì.
- Stews or curries: With Vegan Beef Stew or Vietnamese Curry. Dip a piece of bánh mì to soak up the sauce, yum!
- Grilled and drizzled with chili sauce, mayo, and green onions like in this Spicy Grilled Bread. This works best with 1-2 days old bánh mì.
- Anywhere else you would use bread!
❄️ Storing and Reheating
- To store: Like any bread, these baguettes are best enjoyed on day one. After a day, they tend to lose their crispiness.
- To freeze: Once your baguettes are cool, wrap them in plastic wrap and transfer them to a freezer bag. They will keep for up to 2 months in the freezer. Thaw on the counter for 20-30 minutes before reheating.
- To reheat: If your baguettes lose their crispiness, you can reheat them for 3-4 minutes in a 350°F (175°C) preheated oven. This will bring back their crispiness.
💬 FAQ
Unfortunately, you cannot omit the bread improver. It’s essential to achieve success with this recipe.
No, this recipe cannot be made gluten-free, sorry.
Traditional bánh mì does NOT contain egg. I have talked to many different bakeries in Vietnam, and none of them use eggs to make the baguettes.
No, this is another false information spread by some recipes online. The process to make traditional bánh mì only calls for a single rise.
It seems your baguettes didn’t rise correctly. Hence, they are smaller than they are supposed to be, and their crumb is also probably dense. I highly recommend making sure you are using the exact ingredients noted in the recipe and following the recipe and tips thoroughly.
I have extensively tested this recipe to make sure it is exactly like the bánh mì you can find in Vietnam, from the crust to the crumb and the saltiness. Hope you will love these little baguettes! SO light and crispy!
🇻🇳 More Vietnamese-Inspired Recipes


⭐️ Did you like this recipe? Let us know in the comments below, and tag us on Facebook, Instagram, or Pinterest!

Want to Save This Recipe?
Enter your email below & we’ll send it straight to your inbox! Plus, you will receive new recipes every week!
I’d like to receive more tips & recipes from Full of Plants.
This site is protected by reCAPTCHA and the Google Privacy Policy and Terms of Service apply.
How To Make Bánh Mì (Vietnamese Baguette)

Ingredients
- 3/4 cup + 3 tbsp water (225 ml) water at room temperature
- 3 cups (375 g) bread flour (at least 12% protein)
- 3/4 tsp (2.5 g) bread improver
- 3/4 tsp (2.5 g) instant dry yeast
- 3/4 tsp (3 g) sugar
- 1/16 tsp vitamin C powder or a 150mg tablet, crushed into powder
- 1/2 tsp (3 g) salt
- 2 tbsp vegan butter for brushing
Instructions
- Before starting: While I am also sharing measurements in cups, I strongly recommend using metric measurements for the water and flour to ensure more accurate results.
- Preheat the oven. Preheat your oven to its lowest temperature (about 86°F/30°C). If it cannot go that low, just turn on the oven light. Place a baking dish or bowl filled with about 3 cups of boiling water in the bottom of the oven (this will create humidity and prevent the dough from drying during the proofing step). Grease two baguette pans with an oiled kitchen paper towel and set aside.
- Combine all of the ingredients. To the bowl of a stand mixer fitted with the dough hook, add the water, bread flour, bread improver, instant dry yeast, sugar, and vitamin C.
- Knead. Then, knead on speed 2 for about one minute, or until everything is combined. Use a spatula to scrape down the sides if needed. Add the salt and increase the speed to 8. Knead for another 7-8 minutes. Keep an eye on it as it will move due to its speed. The dough should be silky smooth and slightly sticky.
- Divide into balls. Using slightly oiled hands, transfer the dough to a greased countertop or smooth surface. Divide the dough into six pieces, each weighing approximately 3.5 ounces (100g).
- Shape the baguettes. Place one ball of dough on your greased working surface and use your hands to flatten the dough into a long, thin trapezoid of about 4 inches (10 cm) wide and 6 inches (15 cm) tall. Next, starting from the top of the trapezoid, roll into a log. Transfer to the greased baguette pan and repeat with the remaining balls of dough.
- Proof. Place the baguette pans in the preheated oven and let them rise until they have almost quadrupled in size. This will take between 1 h 30 and 2 hours, depending on the temperature. Note: The dough should bounce back slightly when pressed. If it bounces back quickly, it’s underproofed.Once your dough has quadrupled in size, remove the pans from the oven.
- Preheat the oven. Preheat the oven to
 400 °F (200°C) and place either an iron skillet or a pan filled with lava rocks at the bottom. You will use it later to create steam.
 - Score. Once the oven is at the right temperature, use a razor blade to score each baguette with either one cut vertically or 2-3 cuts diagonally. Ensure you are holding your blade at a 45-degree angle when scoring.
- Spray. Next, generously spray your baguettes with water. This will help them develop cracks. Set aside.
- Create steam. Bring about 3 cups of water to a boil. Once boiling, pour it into the iron skillet or pan filled with lava rocks to create a lot of steam.
- Bake. Right after pouring the hot water into the skillet or over the lava rocks, add your baguette pans to the oven and turn off the oven fan. By baking without the fan, you will keep a ton of moisture inside the oven. Bake for 7-8 minutes.
- Remove the skillet/lava rocks. After 7-8 minutes, remove the iron skillet or pan filled with lava rocks. Bake the baguettes without steam for another 4-5 minutes or until evenly golden brown.
- Remove from the oven. Finally, remove your golden brown bánh mì from the oven and let them cool. Within 5 minutes, you should hear the sound of a crackling fire and see cracks appear on the crust – that's one of the characteristics of a good banh mi!
- Brush with butter. For a nice shine, lightly brush them with melted vegan butter and let them cool slightly before serving.
- Banh mi are best eaten the same day, the crust is super crispy, and the crumb is so fluffy! You can keep them for up to 3 days at room temperature in a bread bag. They will become softer the next day, but you can reheat them in a preheated oven to make them crispy again.
Video

Notes
Do not make any substitutions.
I highly advise against using any substitution. This is not a recipe that you can tweak to your liking or use whatever you have on hand. Each ingredient and its ratio have been carefully calculated and tested.Adjust the amount of water.
Not all brands of flour are equal, and while the exact measurements will work for the majority of people, some may have to slightly adjust the amount of water. The dough should be very soft, smooth, and just slightly sticky. If it appears too dry, add more water. On the other hand, if it’s too sticky, add a bit more flour.Brush with melted butter.
After baking, you can brush the baguettes with a thin coating of melted butter. This will give your baguettes a shiny, more professional appearance.Additional note.
The recipe was adapted from this video, with the help of friends to translate the ingredients and amounts. We also got tips from local bakeries in Saigon. Also note that some Vietnamese bakers add “fat powder” as well as coconut powder, which I didn’t add, and still got great results.Nutrition
Note: This recipe was first released in February 2021 and updated with new process shots and detailed instructions in May 2025. You can find the original photos below.


About the Author
Thomas Pagot is the founder, photographer, and recipe developer behind Full of Plants. He created the blog in 2016 as a personal cookbook for vegan recipes. Through years of recipe development, Thomas has successfully grown Full of Plants into a trusted resource for plant-based recipes.
Leave a Comment
These look AMAZING. I’m interested in making this for a large group. Can I make the dough in the advance and bake before the gathering? If so, how would I go about doing this? Thanks!
Hi Heather,
Since this recipe only requires one rise, making the dough ahead of time wouldn’t really save you any time. You could reduce the amount of yeast and make/shape the loaves the night before, but in that case, you’d want to be sure there’s enough moisture in the oven to keep them from drying out overnight.
Thank you so much for the recipe. It is the best recipe of Bánh mì I ever have. I made it twice and my family love them. The only I am missing is the crunchy outside of the bread. Please let me know what should I change or do next time so I can get the crunchy. FYI: I did follow every steps and all of ingredients and no substitute any ingredients 😊
You are welcome Nhi! Thanks for taking the time to leave a review, I appreciate it.
Regarding the crunchiness, are you baking the bread until golden brown on the outside? Also, you may try to remove the skillet/lava rock pan a few minutes earlier, maybe there is a bit too much steam in your oven.
Hey, can I just double check I’m reading the recipe right? Made it a couple of times, and have always given it two rises – one before, and one after shaping. Re reading, it looks like I’m only meant to give it one rise?
Hi Tejal,
There were never two rises, it was just a step where I used to let the dough rest for about 15 minutes before shaping. After re-testing multiple times, I noticed that this step is not needed. By shaping right after kneading, you will get an even smoother appearance.
I have also updated the post with an updated process and clearer instructions based on my latest experiments. You should get even better and more consistent results now.
This proved to be the best Vietnamese bread recipe we have found. Text and photos were excellent. Instructions clear and accurate and complete. Could not wait. Ate while still warm. Will make more and serve with Portuguese shellfish stew. Tastes, feels and presents better than artisan bread rolls, etc.
Thanks so much for your great feedback Don, I really appreciate it 🙂 I’m glad you had success with this recipe and enjoyed it!
Dear Thomas,
I know you mentioned no substitutions but I have a question, is Friax Soft similar to S 500? Thanks
I’m afraid I am not familiar with this brand at all and never tried it, sorry.
Made these today. Spent 3 weeks in Vietnam in October 2024, and this recipe seemed to be spot on. The only difference with mine and yours, the crackling didn’t occur. Exterior would crack when pushed, but didn’t do it out of the oven. Thanks so much for your time and research.
Thanks so much for your feedback and rating, I really appreciate it!
The cracking depends a lot on the steam inside your oven.
Hi, just a quick alert to those who don’t know: not all bread improvers/dough conditioners are vegan. You may want to make sure to purchase a fully synthetic one, or one that clearly specifies what it is sourced from.
The enzyme Amylases ( E1100 )may be derived from pig pancreas.
Whereas most of the widely used dough conditioner L-cysteine ( E920) “is obtained industrially by hydrolysis of animal materials, such as poultry feathers or hog hair.”
Those are just the ones I know about, there are likely others. So I think this is one to do your homework on and purchase carefully, if fully vegetarian or vegan ingredients are a concern for you!
Thanks for sharing Helen!
Hi, does anyone know if the puratos S500 ACTI PLUS is a vegan bread improver?
I made your bahn mi recipe yesterday and this is my result. My slashing needs a lot of practice.
The rolls are delicious with a nice outside crust and a lovely soft inside crumb. These are our favorite and are my now go-to roll recipe. Thank you so much for sharing and I have passed on your recipe. I am eating a sandwich on one right now. 😁
Thanks for your feedback Frances, I’m glad you had success with this recipe!
Your banh mi look great ^^ You could even bake them a few more minutes if you want them more golden brown 😉
I am sorry, but yiu changed the recipe, and not for the better. Now, it makes a great deli sandwich roll, but not a bahn mi baguette. The proofing method failed for me. I made a second batch and returned to the moist cheesecloth method, which worked much better. I wish i printed out the previous recipe that produced the eggshell cracked crust that i associate with real bahn mi rolls. Unfortunately, i will move on to another recipe to find the success as i did with the FOP recipe.
Hi Hutch,
I have to disagree. The updated recipe yields much better results compared to the previous one, on top of not requiring the use of a cheesecloth (some readers were having trouble with the cheesecloth sticking to the dough).
It took me a while to reply to you as I wanted to remake a batch of banh mi to show you the results. I baked one more batch yesterday following the updated recipe, and as you can see in the attached photos, the bread got the eggshell cracked crust.
For information, this batch was baked after a 2-hour proofing in a warm oven with a baking dish placed at the bottom and filled with boiling water (to create moisture and prevent the dough from drying). I then removed the loaves from the oven and let them sit at room temperature for 20-25 minutes while the oven was preheating. Scored and then generously sprayed with water (I actually sprinkled water using my hands as my spray was broken). Baked for 22 minutes, flipped the loaves, and baked for another 5 minutes.
After 15 minutes of cooling down, the cracked eggshell texture started to appear.
Regarding your issue, my guess is that either your dough was not proofed for long enough or there was not enough steam inside your oven (hence the importance of spraying the loaves with water + pouring boiling water into an iron skillet placed in the bottom of your oven right before baking). It’s not related to proofing using a cheesecloth or not.
Hi Thomas (I just posted a comment but I don’t see it here and am second guessing whether my upload went through). I’ve had success with this recipe! I’m just wondering how you’d recommend reheating day-old baguettes. I’ve tried a few methods-
Hey Thomas – I’ve had good success with your recipe! I’m making larger batches, and have found 150g to be my ideal size for each baguette. I had a question – I’ve experimented with a few ways of reheating day-old baguettes, and haven’t found a method I love. Do you have any tips? Oven temp, etc?
I’ve: 1. spritzed the baguettes and left them in an oven at 250 F for 15min, 2. spritzed and tried a hotter oven (350-375 F) for shorter time, and 3. a quick rinse under water and into the oven at 250 F.
Hey Lily,
I’m happy to hear you got success with this recipe! Wow, 150g is quite large 😉
Reheating banh mi is not the easiest and will always give you a very crumbly crust (I have recently tried to reheat banh mi I bought in Saigon and it was the exact same). I usually just reheat the baguettes in a 350°F preheated oven for 4-6 minutes without spritzing or rinsing them with water. It’s usually enough to bring back the crispiness.
Why are you hiding amazon links? That is not very nice. the recipe looks awesome and I will try it, but I won’t buy something from a hidden link. very dishonest
Hiding? There is a disclaimer at the very top of the post saying “This post may contain affiliate links. Please read our disclosure policy.”
I have never tried to hide anything…Even in my gift guides newsletter I will usually put both affiliate and non-affiliate links.
If you are talking about the redirect, it’s a plugin that allows me to update all links at once in case a product url changes. This way I don’t have to update all the posts/recipes containing a link to this product.
Took me two goes. I cant upload the pictures, such a shame! Initially, I used an Australian brand bread improver mixed with yeast! Total disaster which damped my spirit somewhat. Next day I bought a stand alone bread improver & vit C tablet. Worked a treat. Taste like the realy deal. Followed the recipe with one bit of altercation which makes me wonder if it is the reason why the bread did not cracked. Rather than 200, i cranked oven to 230 as i worry the heat escaped when i opened and shut the door a couple of time. My oven has fan which turns on and off on its own. Id appreciate your thought with this issue. Secondly, at 250gr is 5 rolls, do i simply double if i want more? Overall, thank you for your recipe. I read a few , some suggested egg whichbi dont think its authentic. I absolutely will brag to everyone now..minh
Hi Minh,
I would have loved to see your results! Regarding the cracks, it may be because there was not enough moisture inside your oven and/or on your loaves. Did you spray them with water before baking? Also, did you pour boiling water inside a dish placed in the bottom of your oven?
Yes, you can simply double the recipe 😉 Thank you so much for your feedback, I really appreciate it!
Hi,
I saw the Banh Mi Bread.
May I know what is Vitamin C for powder or a crushed tablet, the bread improver. Can I dont use the Vitamin C and the bread improver for this Banh Mi Bread. or other to product to replace.
What made the bread so crushed.
Hi Khim,
I explain the role of those ingredients in the post. They are mandatory if you want to get the same texture as banh mi from Vietnam, you cannot omit them.
What made the bread crack is the high temperature and high humidity 🙂
Can confirm this is the best white bread I have ever made! Only thing I couldn’t do was turn the fan off in my oven but they still turned out perfectly. Had so much fun making them. Thanks SO much for the best, softest, crispy Bahn mi baguette. We all loved them 😍
Thank you so much for your feedback, Sarah! I’m glad to hear you had success with this recipe 🙂
Hi, tried the recipe today. Very nice results. I have to ask are you using the baker’s percentage to find out the proportion of if you do, what is percentage of ascorbic acid compare to flour?
Hi Natalie,
Your banh mi look perfect! Great job! Thanks for sharing your photo, I really appreciate it.
I’m afraid I do not use baker’s percentage as I don’t own a scale that can measure very small amounts (<1g).
I have made this recipe many times already and wanted to say how great it is! I usually make a garlic, kalamansi, chilli mayo sauce for it. I fill it with various ingredients like a vegan egg, marinated air fried tempeh, veggies like shredded carrots and sliced cucumber and some onion slices. Then to finish it I top it with some coriander. One question I got actually is that when I try scoring the dough after proofing it, it often seems too wet & sticky to do so even with a oiled blade. Is there something I might be doing wrong? This might be my favourite dish of all time so thank you lots for sharing it!
WOW! Your banh mi look fantastic!! Thanks for your feedback and for posting this photo, I love it ^^
Regarding your question, do you spray the dough before scoring? If that’s the case you shouldn’t do that. After proofing in the oven, allow them to slightly “dry” at room temperature for 10-15 minutes. This should make the dough less sticky/wet and you will be able to score them more easily.
Hey, this recipe is fantastic, you know. Your Banh mi tastes exactly like the ones in Vietnam. Even better than some local sellers. For the most recent years, I’ve been moving between my hometown and Vietnam so often. I have a host family there and many Vietnamese friends and colleagues. So, believe me when I talk about the authenticity of Vietnamese food.
Your article is very informative, with detailed guidance and tips. Even I, who’s not good at baking, can still bake good Banh mi. For that, I appreciate your time and effort in experimenting and writing your articles. This is not only for this Banh mi baguette recipe but also for many other newly updated recipes too. Yes, I noticed you’ve been recently updating your recipes in a very helpful way of writing. Thank you very much!
And after spending time checking the other comments, I noticed something interesting.
1. The people who followed precisely the instructions had good results. They might have had experience in baking some baguettes and bread. For them, it’s not too tricky handling this recipe.
2. The people who are not familiar with making this unique baguette or don’t have much experience in baking bread and baguettes. They had some problems, and they asked for help, and then they continued their quest to make them. Some had excellent results right away. The other perfectionists had good results but still wanted to try again and again to make the best Banh mi they could.
3. The ones who failed and then tried to blame your recipe. They didn’t even bother asking what they did wrong and what they could do to improve it. They tend to brag about their expert baking skill and emphasize that they followed the recipe, which I have doubts about. If they really followed the recipe, even if they failed, it couldn’t be that terrible. The Banh mi would be heavier and denser but still taste pretty good. I failed many times; I know how it can be when you follow instructions and fail. All I saw here was their pure anger. Instead of questioning what was wrong with it, all they did is to blame the recipe. To all those people, I feel sorry for them. Their life must have always been filled with anger and negative things.
In my opinion, this is not a basic recipe, so it might be tricky. But no need to be a genius to be able to succeed either. All we have to do is read the instructions carefully and be patient.
This is the first time I wrote this much in a comment section. Lol. Thank you again for your hard work, and may your career be filled with success and fulfillment!
Hi Jess,
Thank you so much for your feedback and kind words! I agree with what you said, this is not the easiest recipe but it’s not that hard either. The main thing is that you need to follow it very carefully and not make any omissions or substitutions. I believe the few people that failed didn’t carefully read all the tips and instructions before starting, which is essential for this recipe.
I was so upset. The rolls looked incredible until I put the cut marks into them. They deflated and never rose again.
Hi Bev,
Assuming you didn’t make any substitutions or omissions (very important), you most probably let the dough rise too long. The rolls were overproofed, hence they deflatted and couldn’t rise again. I removed your 2 stars rating as this is not an issue with my recipe. I would recommend trying again and keeping an eye on the baguettes during rising next time. I cannot give you an exact rising time as it will depend a lot on the temperature of your home but it will take between 1 and 2 hours. They should have almost quadrupled in volume and springs back very slowly when you press it with your fingers.
I suck when it comes to baking bread. I saw this and gave it a crack. Firstly, 246C is way too hot. I had 2 rolls per tray and decided to split the bake. Im glad i did. As you can see from the pic, on the left we have rolls after 10 mins, the second bake on the right of the pic is 180C 20mins.
i have a precision oven with a steam function which I used both times.(and also as a proving oven) But regardless, while the first were little burnt and under done, they both had a super light & crispy crust, and incredibly light & fluffy inside. My wife (Vietnamese) was thrilled given all of my historical pathetic attempts at any kind of roll or bread. I had a brand new oiled blade and it still grabbed but that’s the least of my worries. Pretty happy with my first attempt at Bánh Mì so im super thankful I stumbled across this recipe. I can fine tune temps as I go. I’ll be cooking these regularly now.
Hi Paul,
I had the chance to test it with another oven that I borrowed and I agree that it may be a bit too hot (although with my personal oven it was okay). I adjusted the recipe to reflect that, thanks for the heads up! It’s always good to keep an eye on the bread during baking as all oven are different.
Your banh mi on the right look great and I’m glad you succeed in getting a light and fluffy inside, which is the key to a great banh mi 🙂
Thanks for your feedback!
after proofing, the dough was cracked on top, a horrible texture, and flat. something is wrong in this recipe, as I make bread often and this is the first time this has ever happened. extremely disappointing and bad
Hi Owen,
May I know if you have followed the recipe to a T and used the exact same ingredients noted in the recipe? Have you omitted anything?
I have made this recipe hundreds of times and never has the dough « cracked » on top. It just cannot since this dough has a high hydration. So, unless you added more flour or didn’t place a baking dish filled with boiling water in your oven during proofing I don’t see how the dough could crack. I would appreciate more details to try to troubleshoot your issue.
I plan to release a video soon showing that this recipe definitely works when using the exact ingredients and process explained in this post.
Other readers had success with this recipe, as you can see in this post on Reddit from 3 years ago: https://www.reddit.com/r/Breadit/comments/og4dzq/first_attempt_making_banh_mi_need_to_work_on/
I followed this to the letter (including buying the $17 bread improver), and I’m not impressed at all. 2.5 hours proofing is way too long. Guaranteed collapse. 60 minutes is plenty. Also, a 425F oven for 17 minutes would leave me with charred bricks. Way too hot, way too long. I’ll try again, but this recipe too far removed from French baguette to really be worth aspiring toward perfection. Also, this dough is too dry.
May I know which brand of bread improver you got?
Also, the proofing time depends a lot on the temperature, if the rising temperature is very warm, it might take only 1 hour for the baguettes to quadruple in size. (I will add this information to the post to make it clearer, thanks for the heads up). I have noticed that the brand of yeast can also affect the proofing time.
Well, it’s supposed to be far from French baguette. The process AND the final result are completely different, that’s what makes banh mi bread so unique. The crust is much thinner and crispier while the crumb is not as dense, so it’s two very different types of baguettes.
The dough is too dry? Which flour are you using? How many grams of protein/100g? I make this recipe about once a month (and freeze leftovers) and use the exact amount of water and flour specified in the recipe. The dough is quite sticky and far from being dry. Also, as noted in the Tips, you might have to adjust slightly the ratio of water to flour depending on the brand of flour.
I used:
Puratos S500 improver from the link in your recipe
King Arthur Bread flour 12.7% protein
Saf instant yeast
Plain vitamin C powder
Proofed at 80F in a perforated pan
I will try your recipe again. Probably many times. I will cut yeast in half to avoid over-proof, and shoot for higher hydration (70%). I feel it needs a touch more salt.
This is a complex item to make, and it requires a lot of practice, and it requires familiarity with specific flour and oven and ambient conditions.
I would consider your recipe to be a decent basic framework. It takes LOTS and lots of practice. Or luck. I don’t want anyone to get discouraged, but we don’t want to create false hope, either.
Cheers.
Those ingredients sound good. Yes, this is a recipe that does require some practice to get it right. Just like any bread recipe, the conditions and oven can affect the final render, hence it may require some adjustments.
What is the purpose of the vitamin c tablet please?
It give the dough a better rise and increases the volume of the baguettes.
I haven’t had a banh mi sandwich in years because there is nowhere around here to get them. I’m excited to try these, but I don’t have a stand mixer. Can I mix the dough in my food processor? What speed and how long? I also have a bread machine. Maybe that would work but I don’t think it does that much kneading. Your thoughts?
I do not recommend using a food processor as it could cause it to break…The dough is very elastic and you need to knead at a high-speed, that would not be safe for your food processor.
Regarding kneading by hand, I tried a couple of times before and was not so happy with the results. The dough doesn’t get as smooth and stretchy even after kneading for a long time by hand. I’m afraid a stand-mixer is really essential for this recipe.
I made the recipe first time. It ended up more like a hot dog bun at 5 inches long. My wife said Banh Mi should be about 8 inches long or half a French baguette. I had issues adding the boiling water to produce steam in the oven. Is there an easy way to do without burning yourself?
Hi Raymond,
The type of banh mi used to make sandwiches is definitely not half of a French baguette as the standard size for a French baguette is 23-inch (60cm). According to my wife, banh mi were longer in the past, decades ago, but nowadays they are around 7-8 inches, like you mentionned. I slightly updated the recipe to yield 4 loaves instead of 5. Just be aware that I have seen banh mi of all sizes in Vietnam, from 5 inches to 25 inches so there is no standard.
Thank you so much for sharing this absolutely wonderful recipe, Thomas! I made it twice in the past two days, and both times the loaves were light as a cloud on the inside and beautifully cracked and crispy outside. I am so thrilled.
I ended up lowering the oven temperature to 425 on the second make — 475 got the loaves very dark brown after 9 minutes (they were fully cooked inside, though, so it was no problem). I saw in a comment below, you mentioned that your oven temperature may have been lower than thought, and 425 browned closer to 17 minutes for me at least.
Finally, I wanted to add that I used Zetov baking improver and it worked perfectly for this recipe. (It appears to be more widely available in the US.)
Thanks again for sharing your excellent recipes. For a person who doesn’t mind procuring new ingredients and putting in the time and effort to make a top-notch dish, your site is a godsend.
Hi Ash,
Thanks so much for your great feedback! I’m so happy to hear you had success making banh mi 😀
Yes, I need to re-test the recipe with another oven as I think mine might be a bit off regarding the temperature.
It’s also great to hear that the Zetov brand works well, I’m sure it’s going to make it easier for a lot of readers!
Hello, Thomas! I love your incredible passion for baking.
Unfortunately, my oven is quite old and only runs in convection mode with no option to disable the fan. Is it still worth it trying to make this bread?
Hi Eve,
I think it’s still worth trying, as long as you can get your hands on the bread improver I’m talking about in the article (probably one of the most important ingredients of this recipe).
Oops! Didn’t telos my comment was posted and commented on. My apologies.
Hi, did you use dry active yeast or instant? Thank you!
Hi Kim,
I usually use instant yeast.
I got to the cheese cloth step and the moist cheese cloth stuck to the dough, and it ruined my attempt. What do you mean by covering the bread in cheesecloth? Does it not stick to the dough for you?
You should place a moist and very light cheesecloth (gaze) on the baguettes while they are rising. Then, use a spray bottle filled with water and spray the cheesecloth before removing it. It will peel very easily.