This post may contain affiliate links. Please read our disclosure policy.
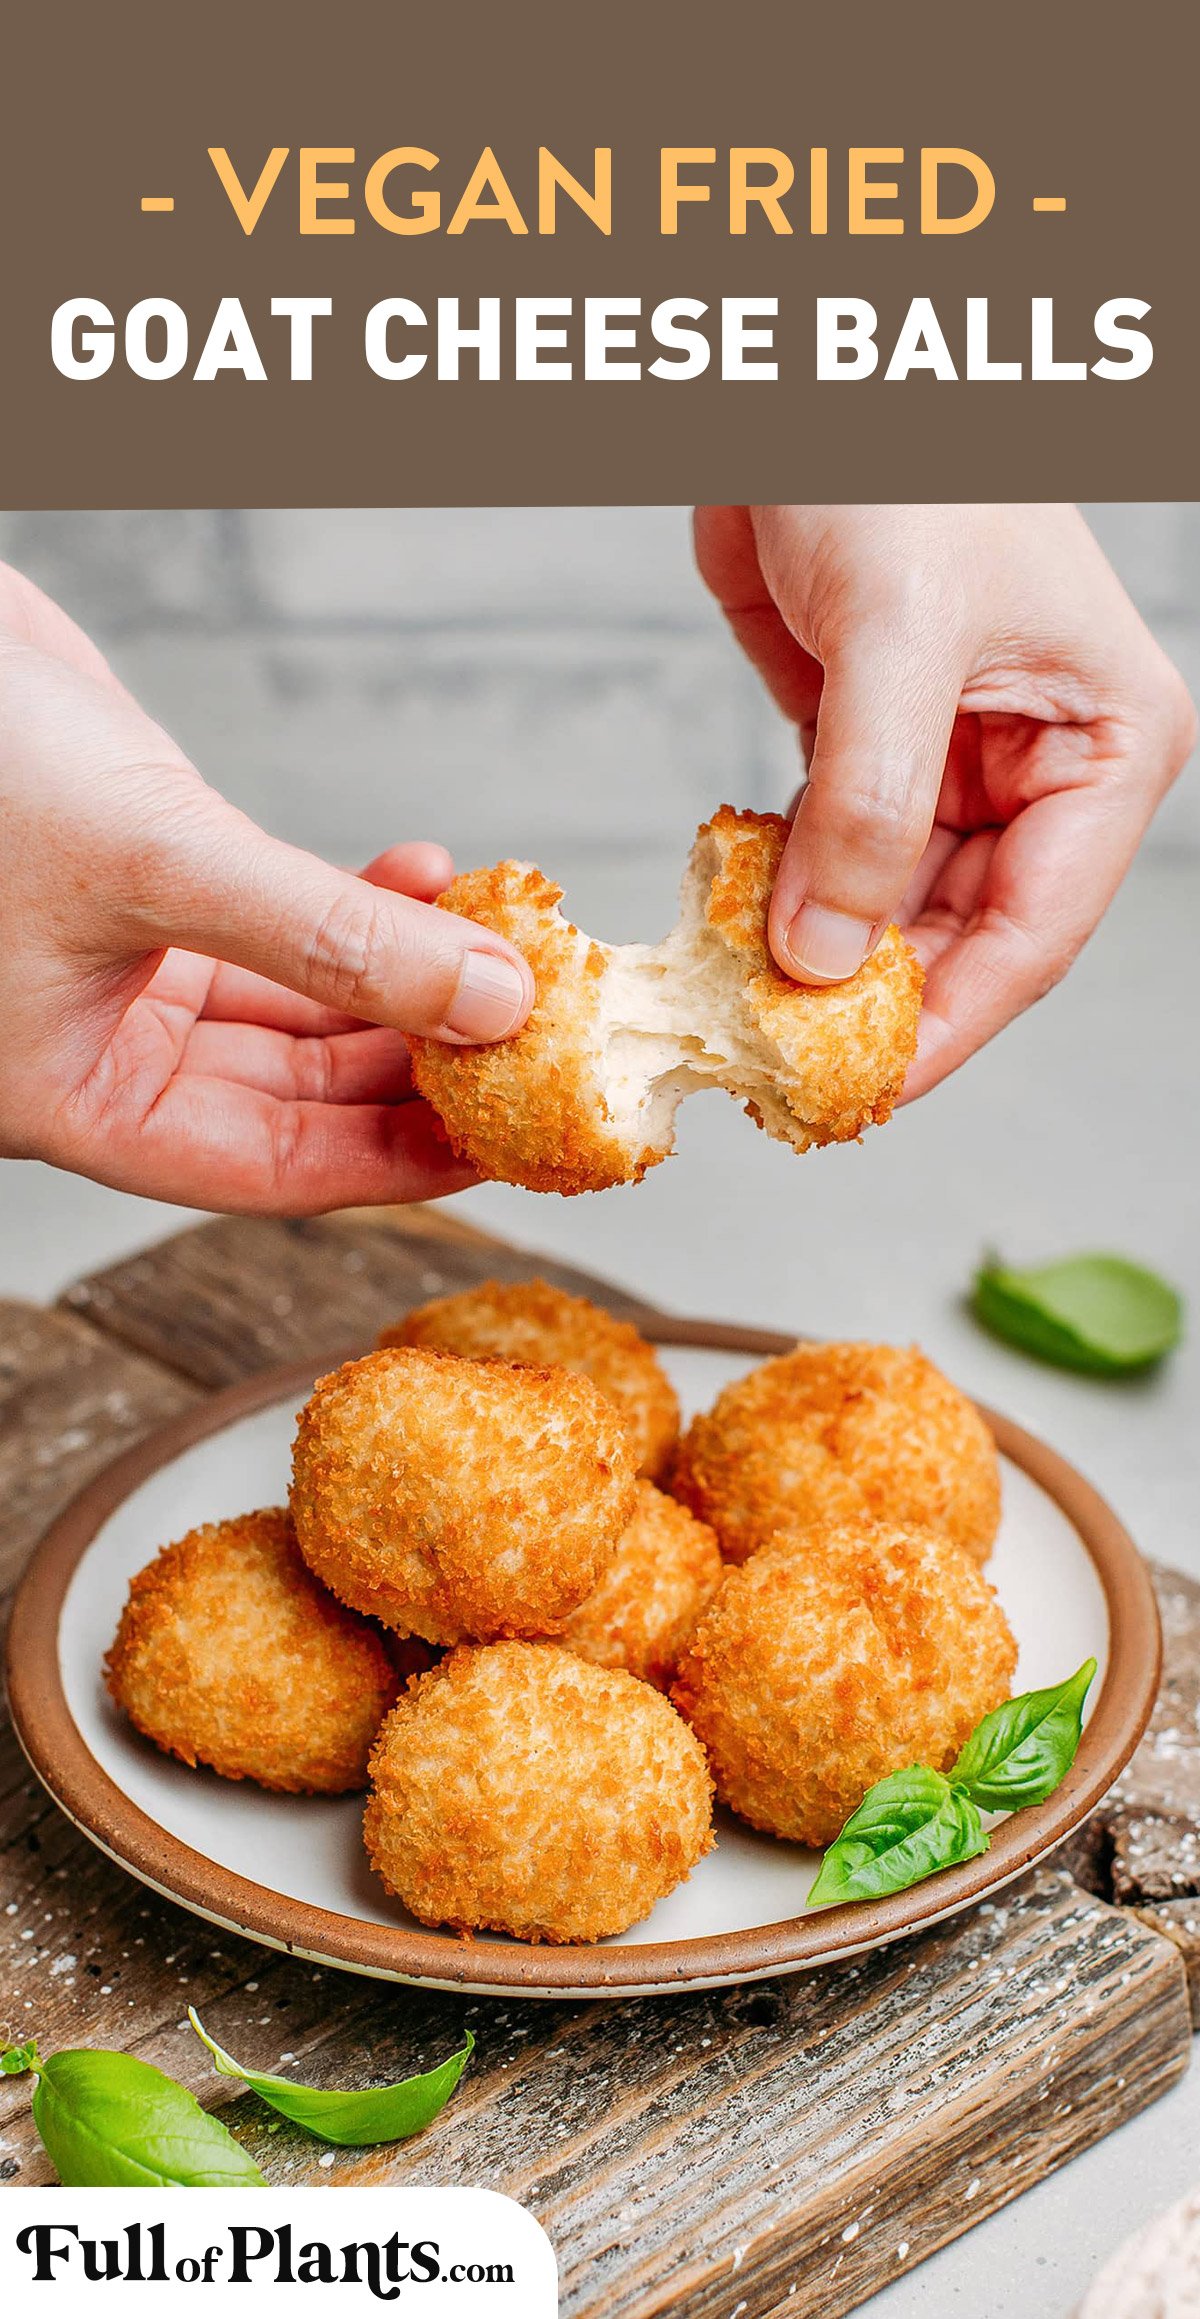
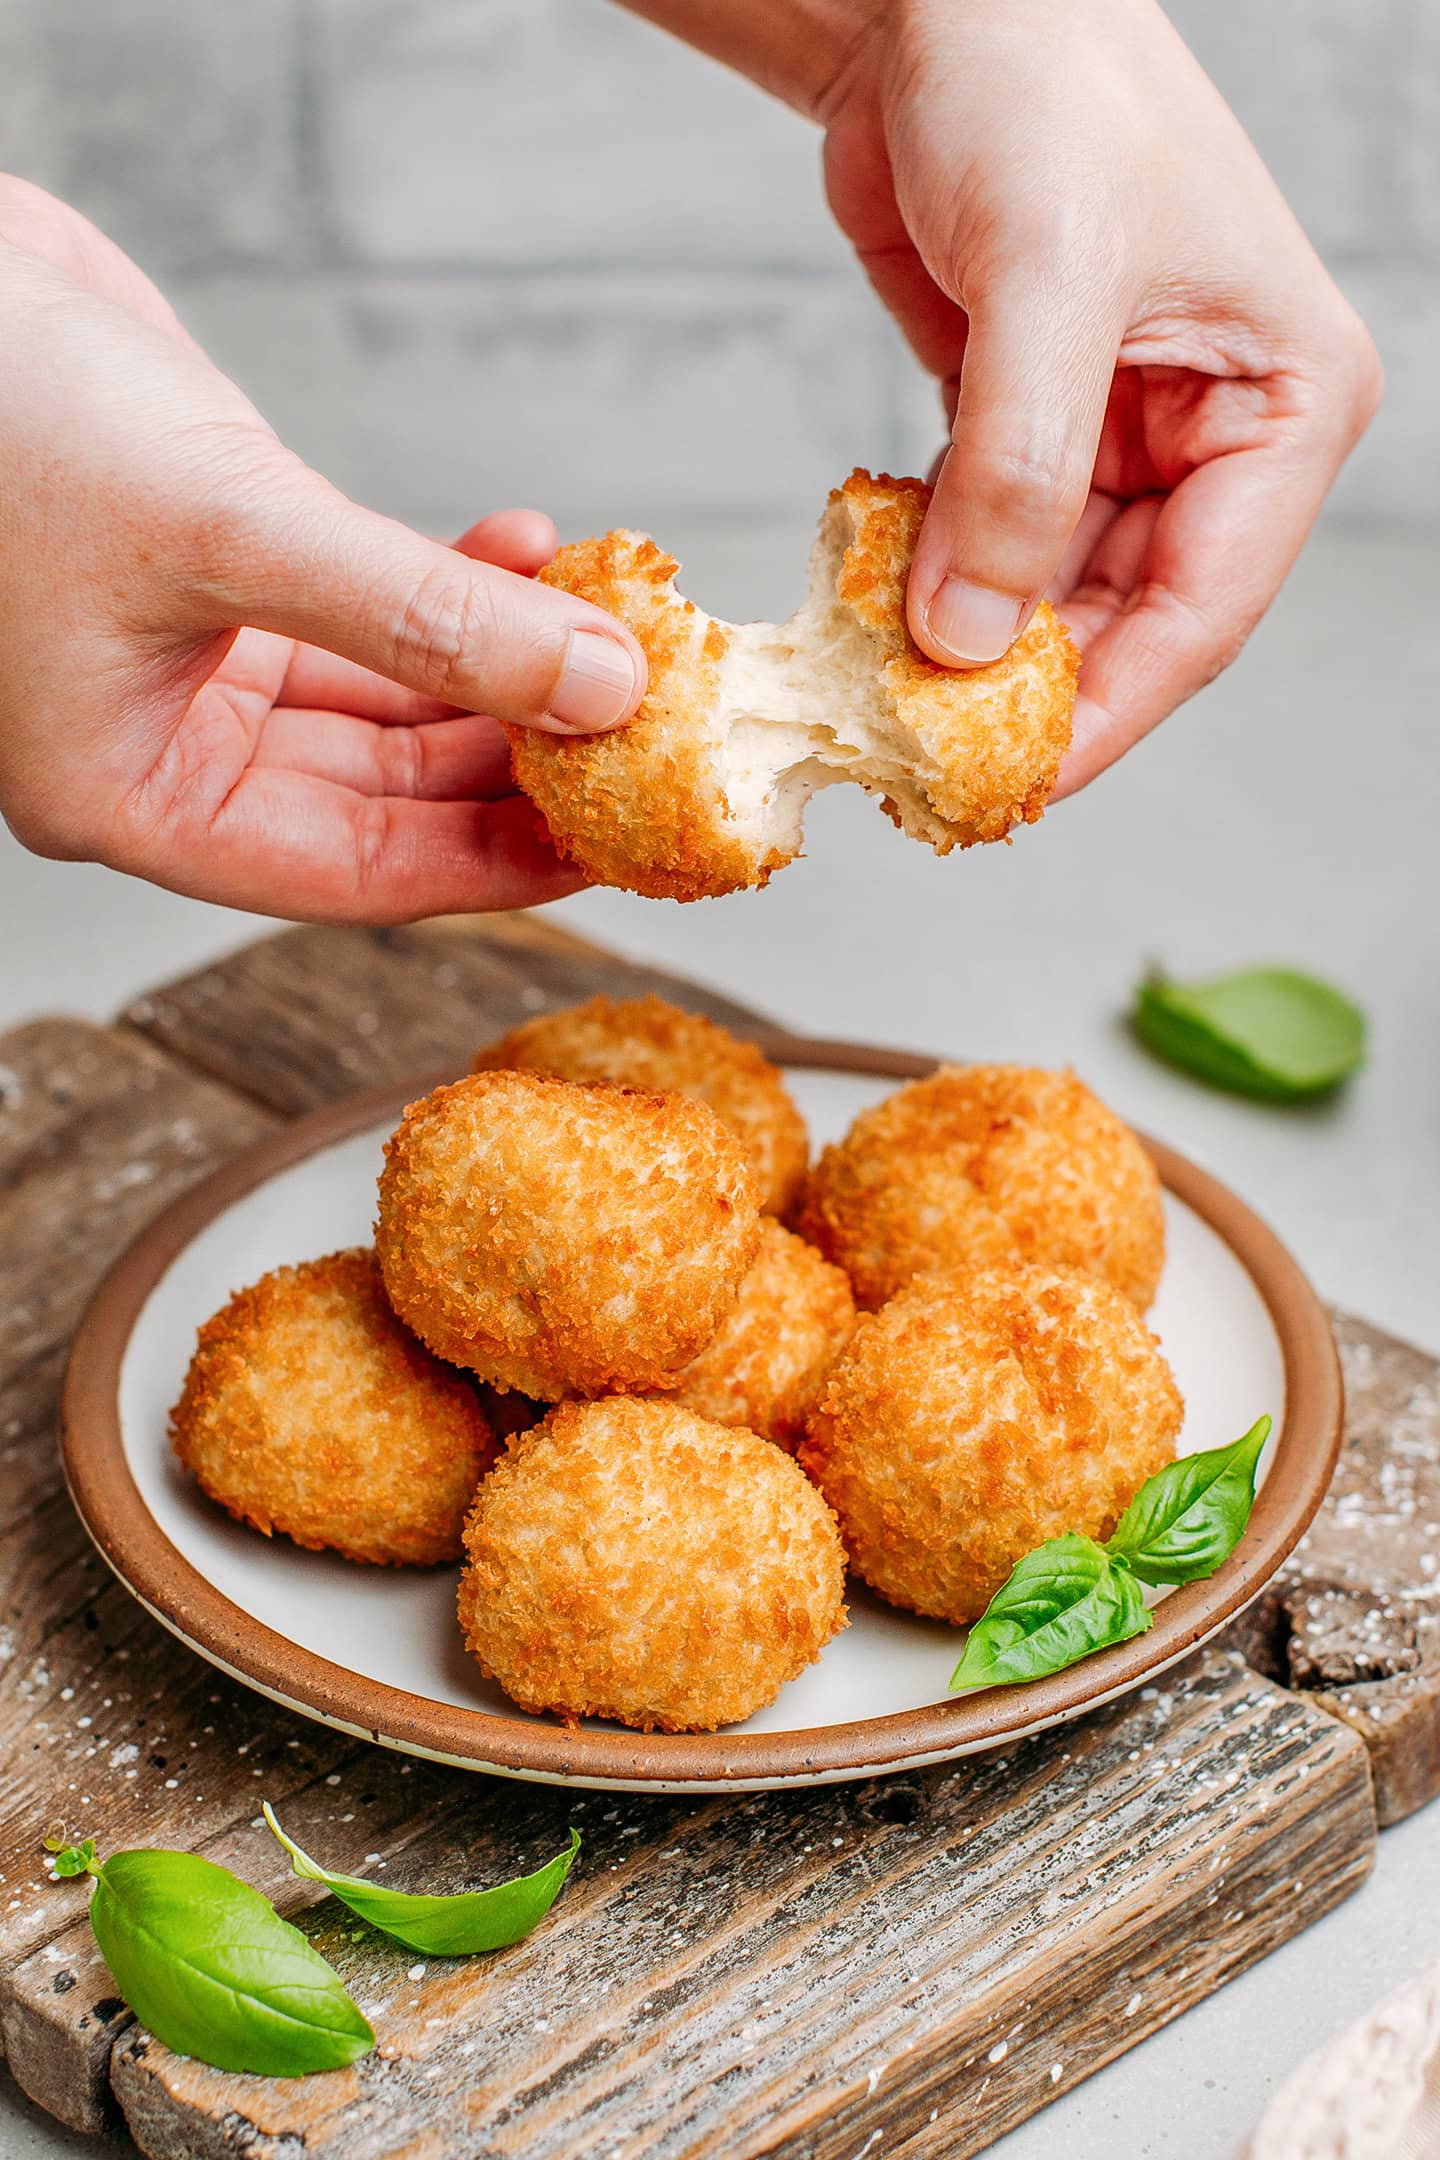
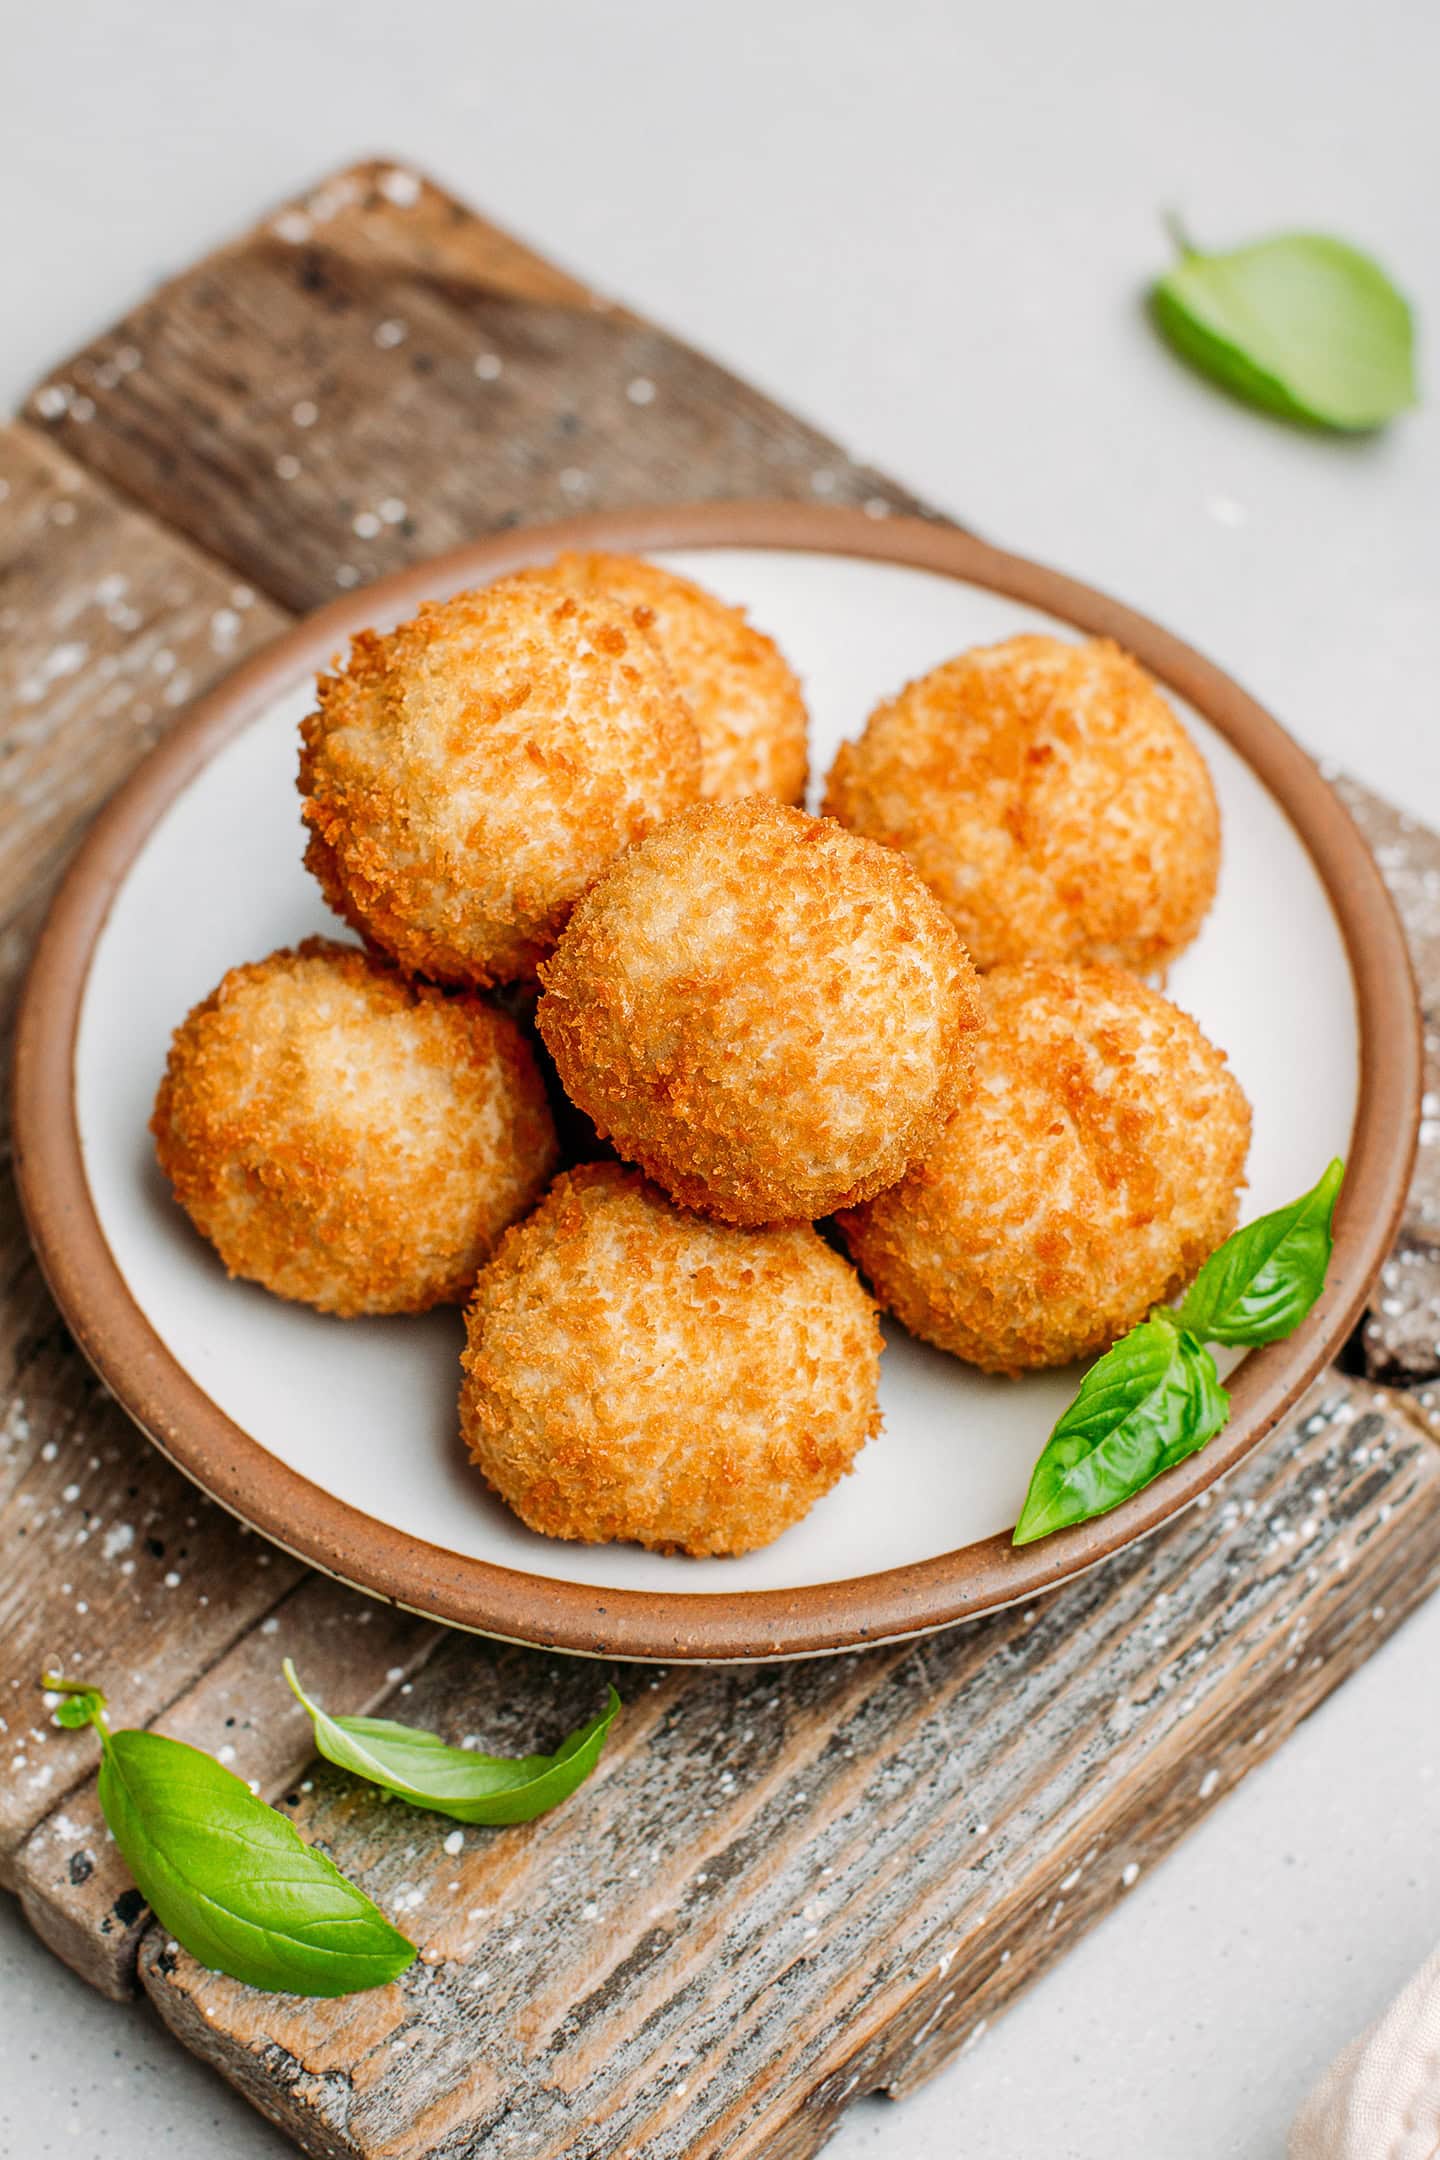
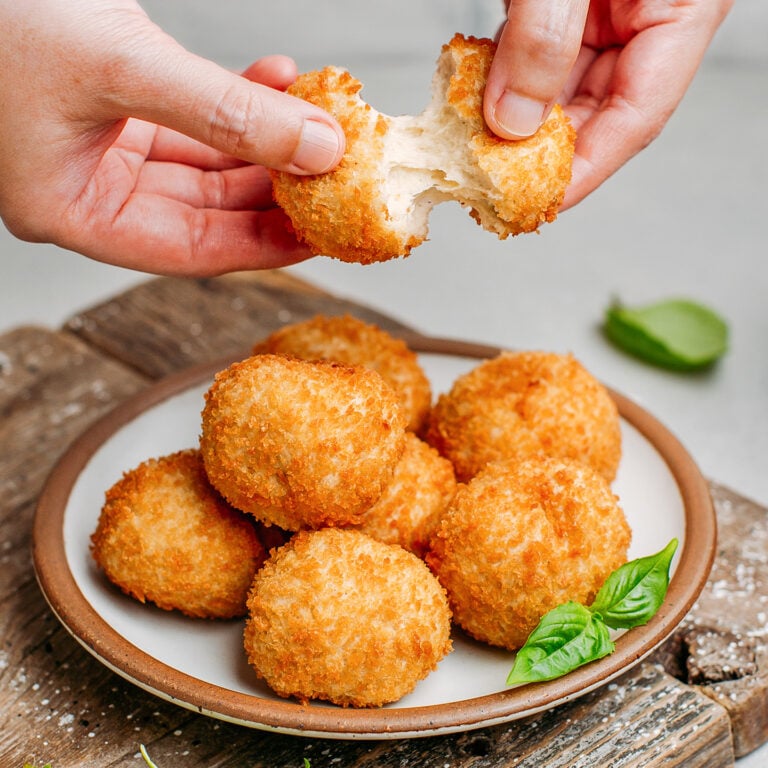
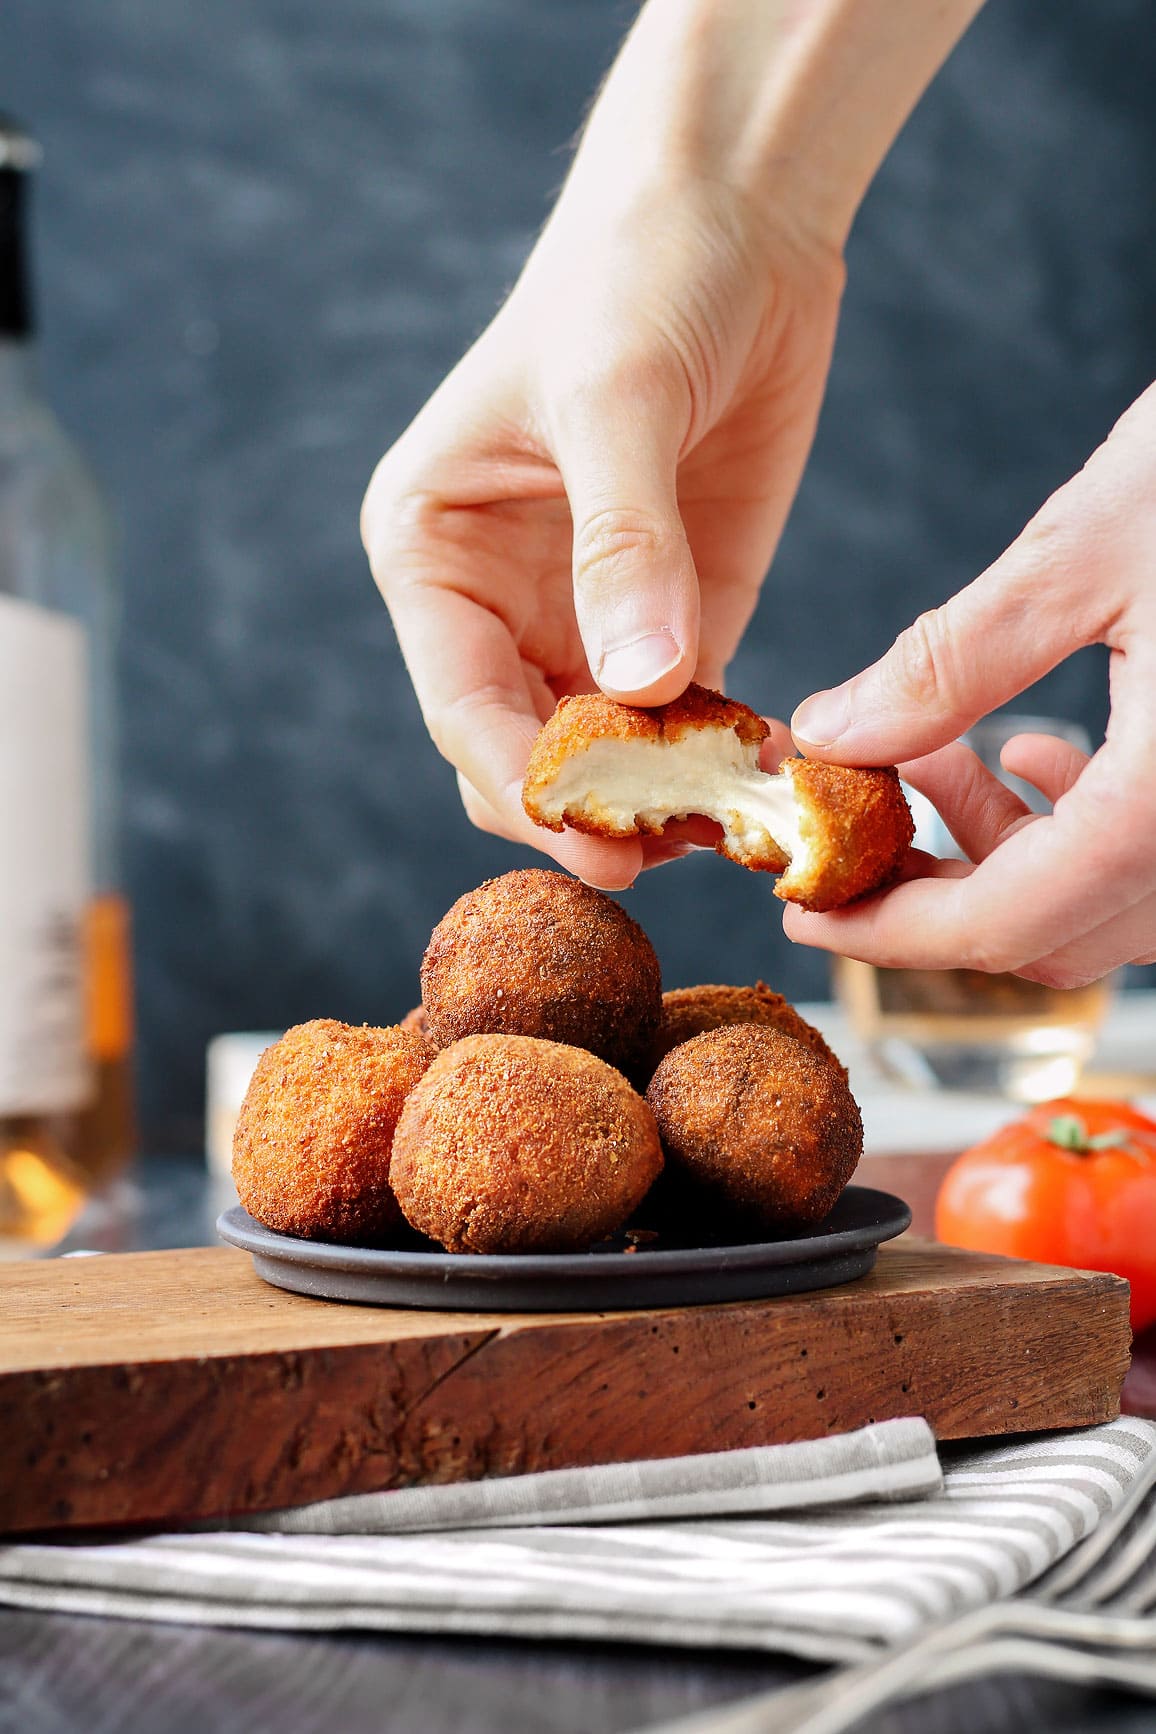
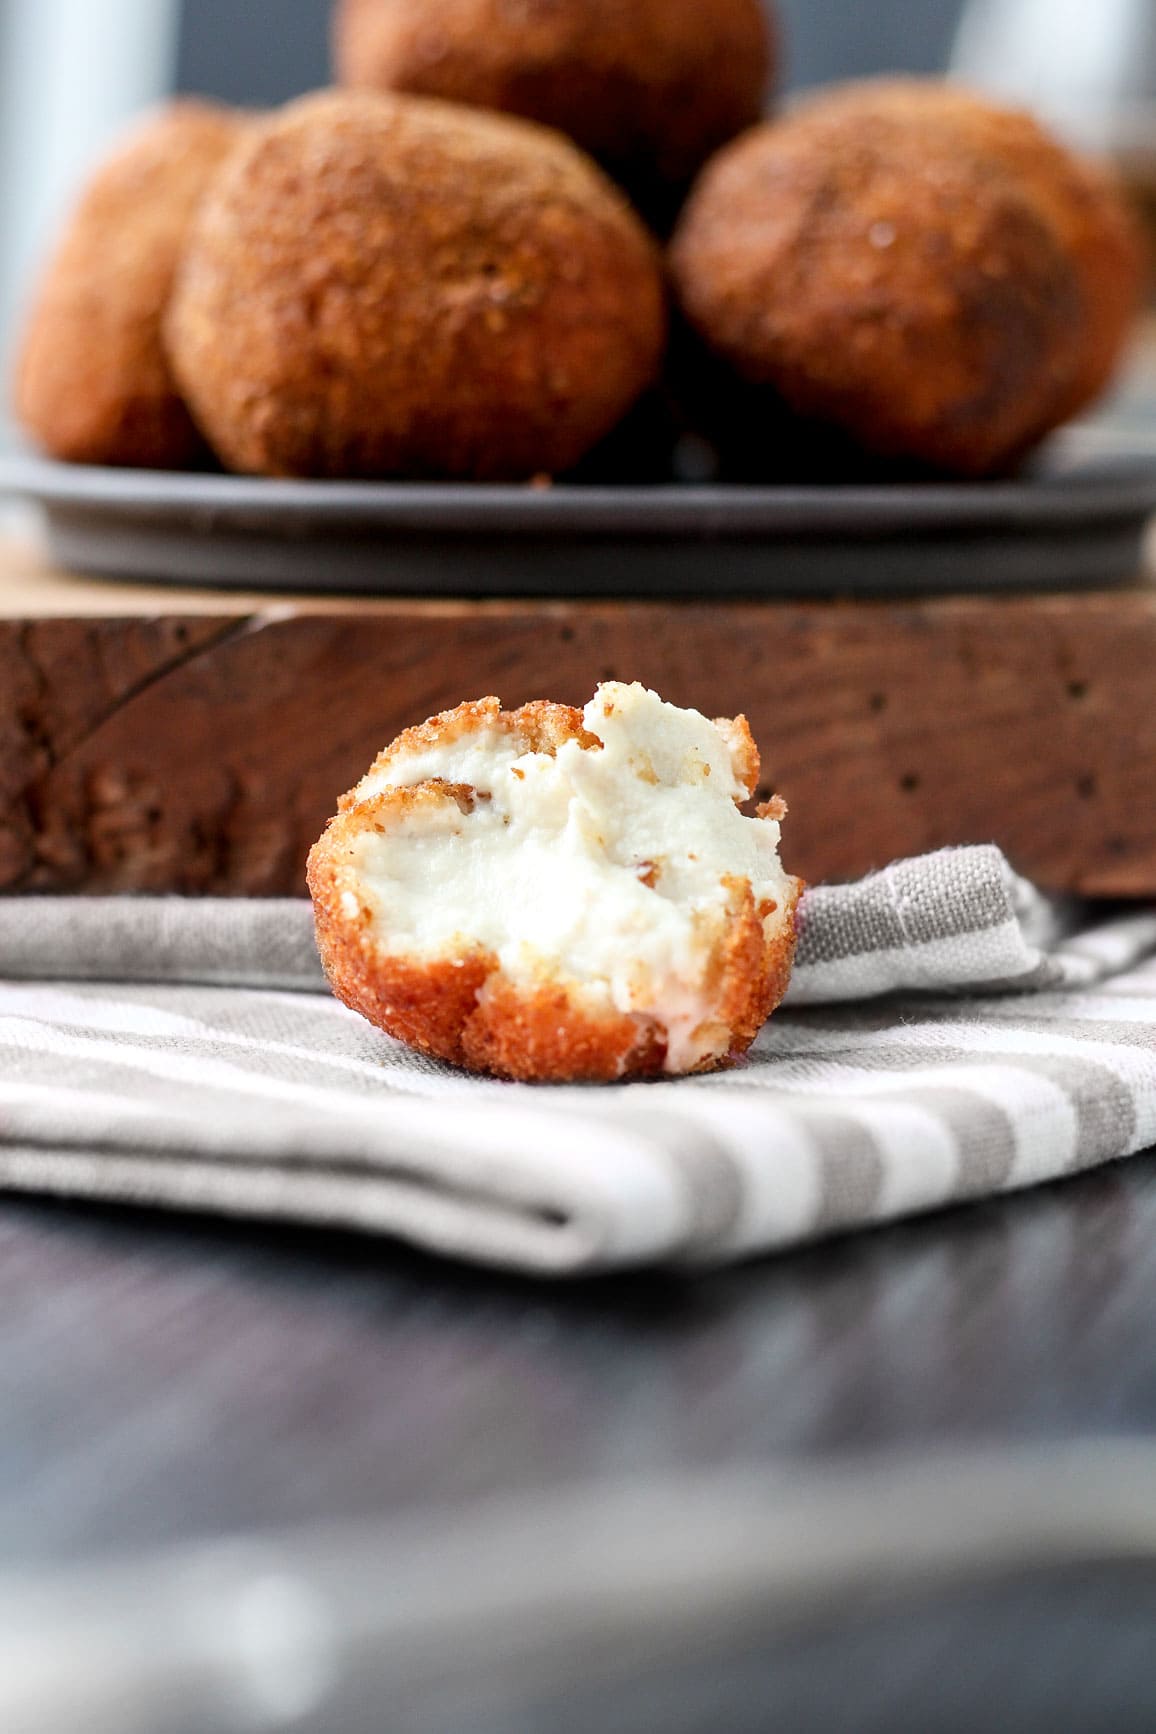
These 4-ingredient vegan fried goat cheese balls are melty on the inside and crispy on the outside. Made from cultured cashew cream, they are tangy and so cheesy! Serve them as an appetizer or incorporate them in salads!
“This tastes just like real goat cheese!” That’s what my guests said when I served these fried “goat” cheese balls. All of them thought it was real cheese. So YES, it is possible to veganize (does this word even exist?) everything, even cheese!
I’m not new to vegan cheese making, having made vegan camembert and vegan blue cheese in the past. But I have never tried making a deep-fried version of vegan cheese.
These vegan cheese balls are perfectly tangy, cheesy, and so rich! Plus, they are packed with texture – crispy on the outside and soft and melty on the inside. It’s PURE deliciousness.
Although the whole process is very simple, I won’t tell you you can make these in no time because it’s not the case. Making the cream cheese mixture takes about 3 days because it needs to culture, giving it that wonderful flavor that is so similar to goat cheese.
⭐️ Why You Should Try It
Super crispy on the outside. Tender on the inside.
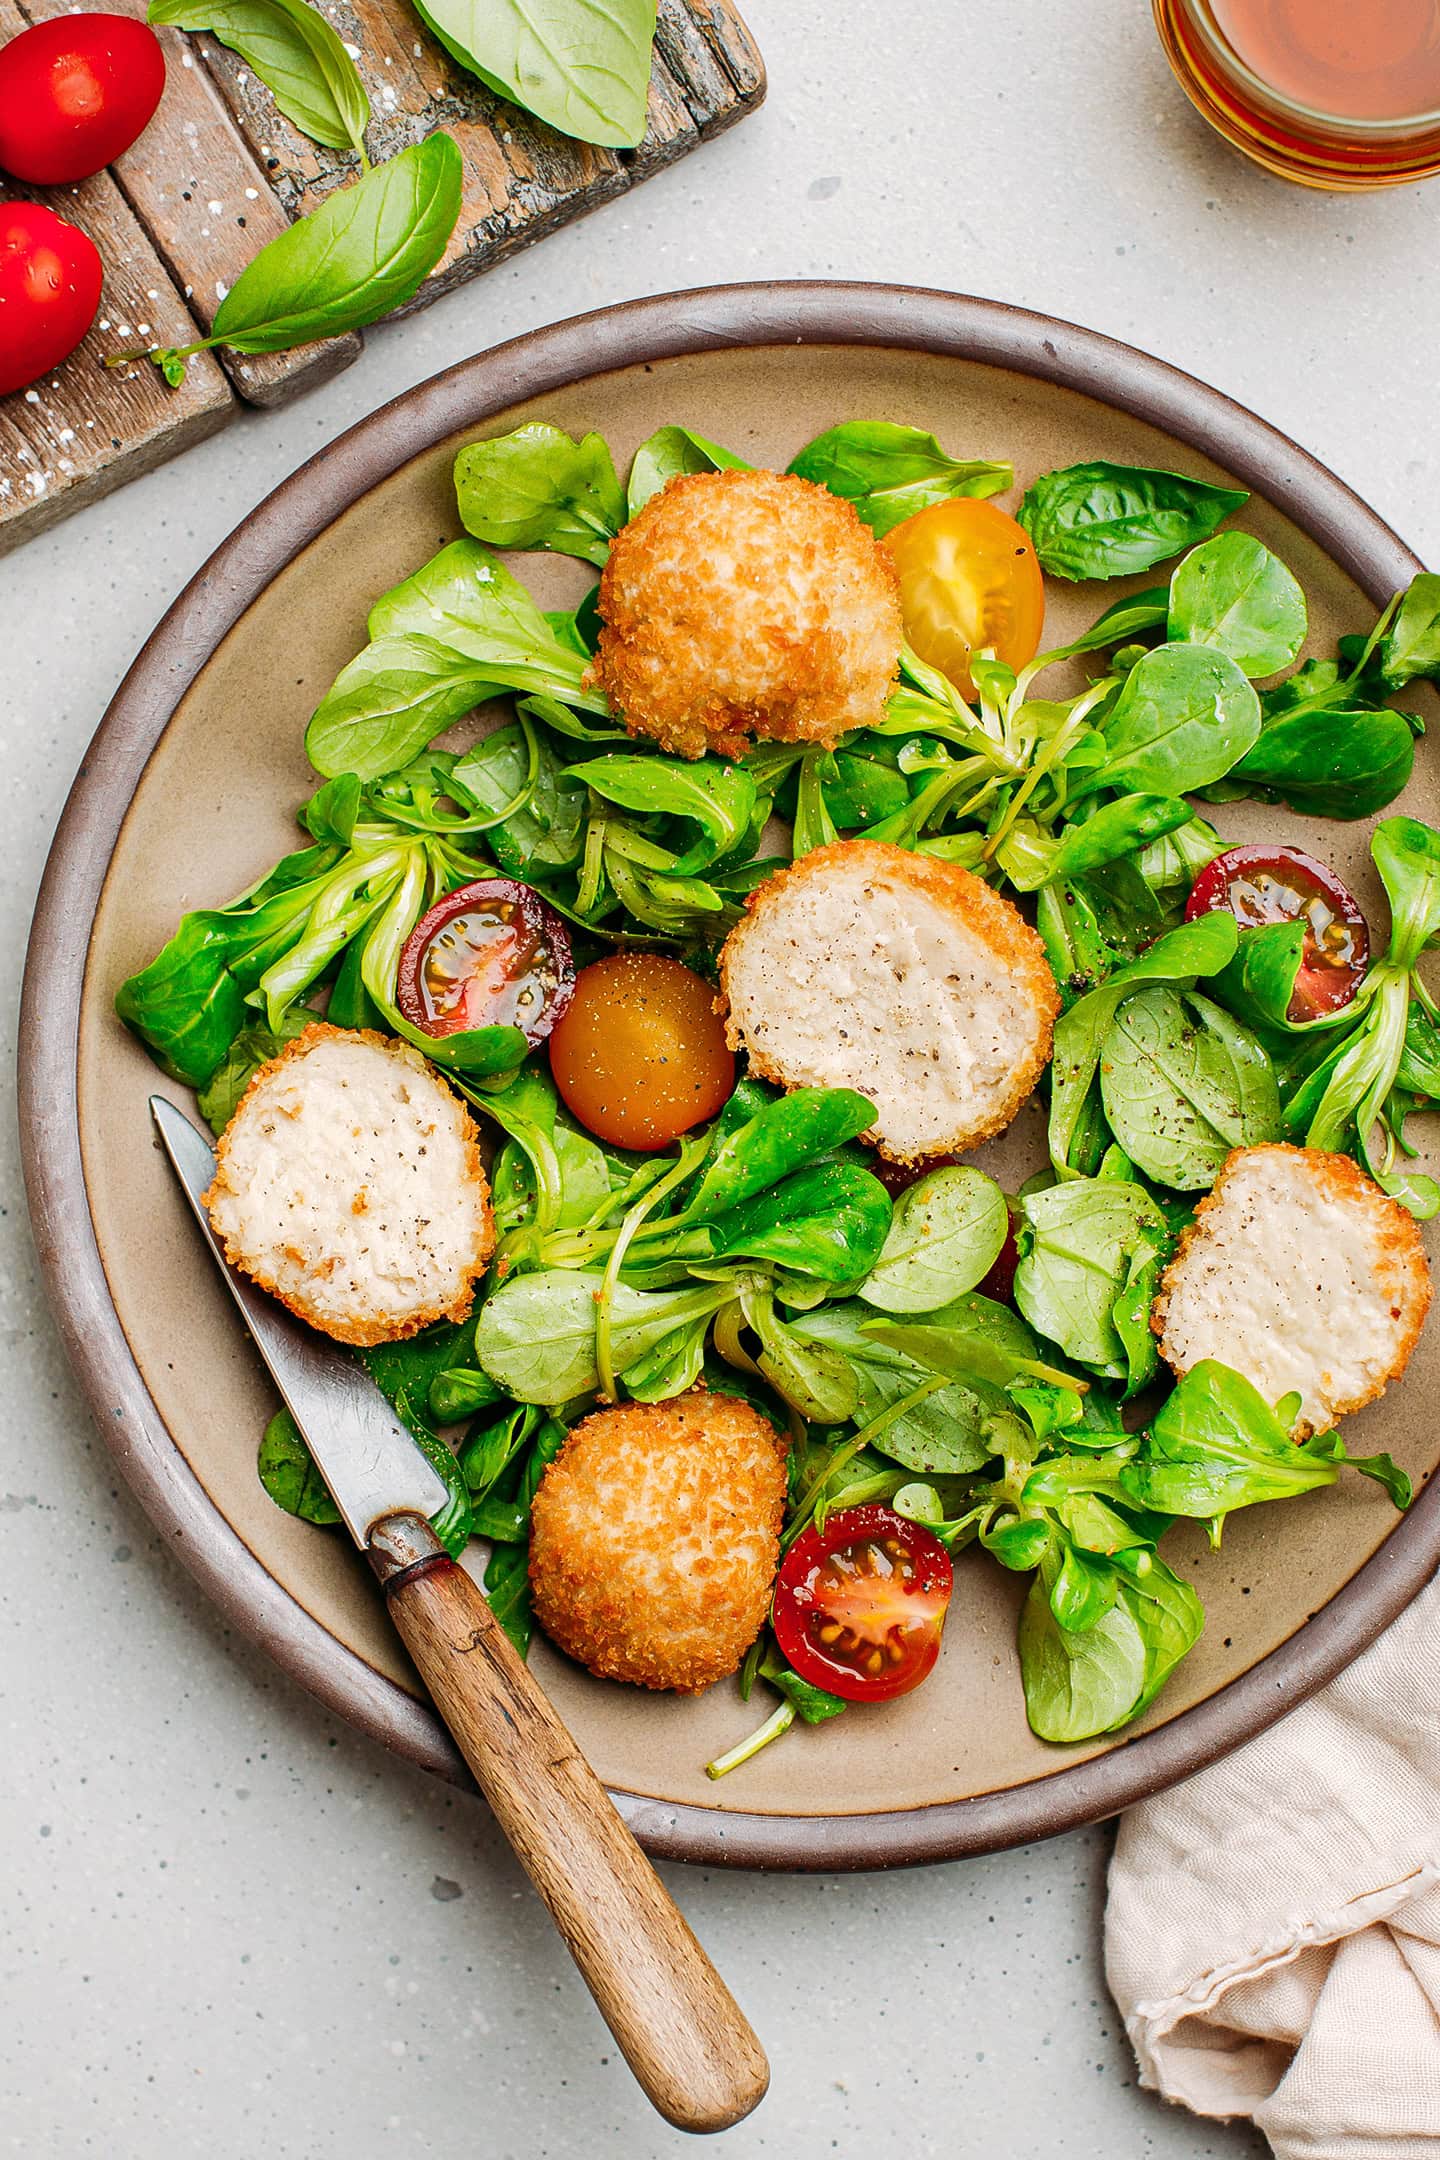
These cheese balls are just irresistible. Maybe it’s the rich and creamy cream cheese, the extra crispy breadcrumbs coating, or the combination of both. Either way, I have no doubt you will adore these. My favorite way to serve them is with a green salad on the side and a French vinaigrette dressing. It’s simple but oh-so delicious!
Wholesome and naturally tangy.
I have a confession to make: I’m not a fan of store-bought vegan cheese. Except for a few brands, most of them are made with a million ingredients and almost always have “cheese flavor” in the list. That sounds fake and heavily processed to me.
The cheese balls I make here, however, require only THREE main ingredients: raw cashews, probiotics, and a pinch of salt. THAT’S IT. They don’t rely on any flavoring. The main flavor comes entirely from the fermentation process!
Readers love them!
With an average of 5 stars with 18 reviews and over 100 comments, readers who have tried this recipe love it! Here is what they have to say:
Jackie Rivera, a reader, said: “These are so good! I just fried up 3 and put them in a salad. I’m completely amazed. I was skeptical since vegan cheese is… well you know. Usually terrible. Thank you so much for sharing this amazing recipe!”
Jessica said: “Holy moly, this was good! I used about half of the batch to make the fried balls, and I used panko because I didn’t have any breadcrumbs on hand, and they turned out great. I used the other half of the batch and put it in the smoker for about a half hour and it turned out amazing. It got devoured in seconds by a group of non-vegans. Thanks for the recipe!”
📘 About This Recipe
You may be wondering why I named this recipe “goat cheese” balls. Well, that’s mainly because these are inspired by a French dish called “Chèvre chaud.” Chèvre means goat, and chaud means hot. It’s a salad that consists of fresh goat cheese coated with breadcrumbs, deep-fried, and served with a green salad.
There are many variants of this salad, and sometimes, the goat cheese is not fried but simply placed on a toast and baked until it is melty. In this recipe, I will make the fried version as it’s the one I grew up with.
🌰 Ingredient Notes
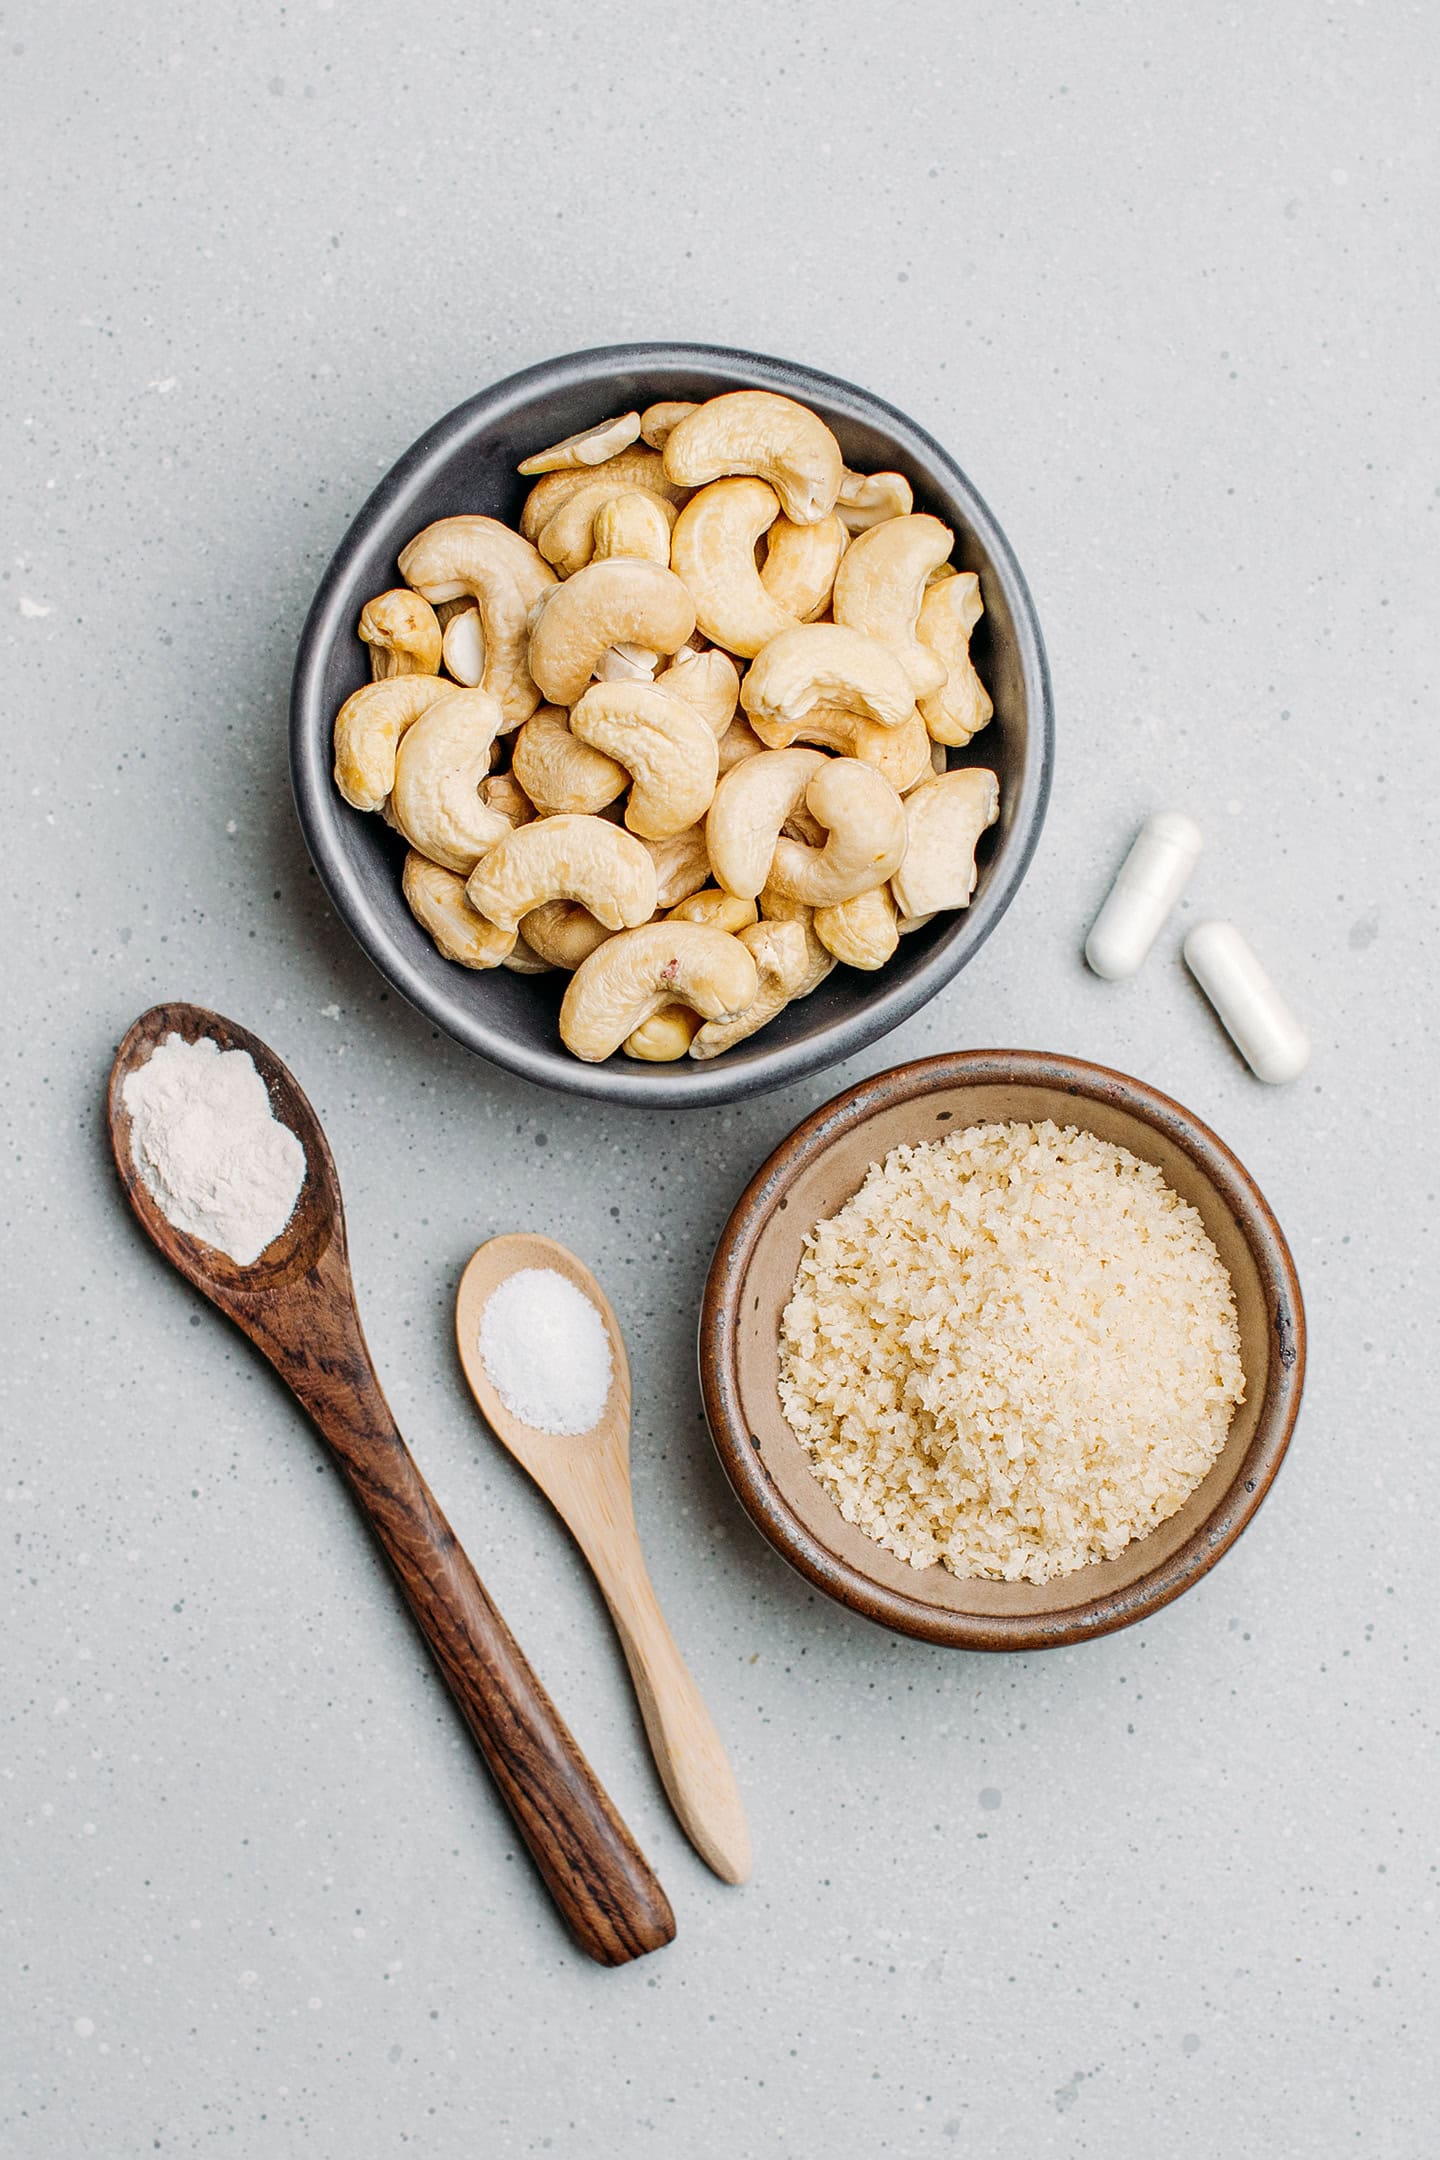
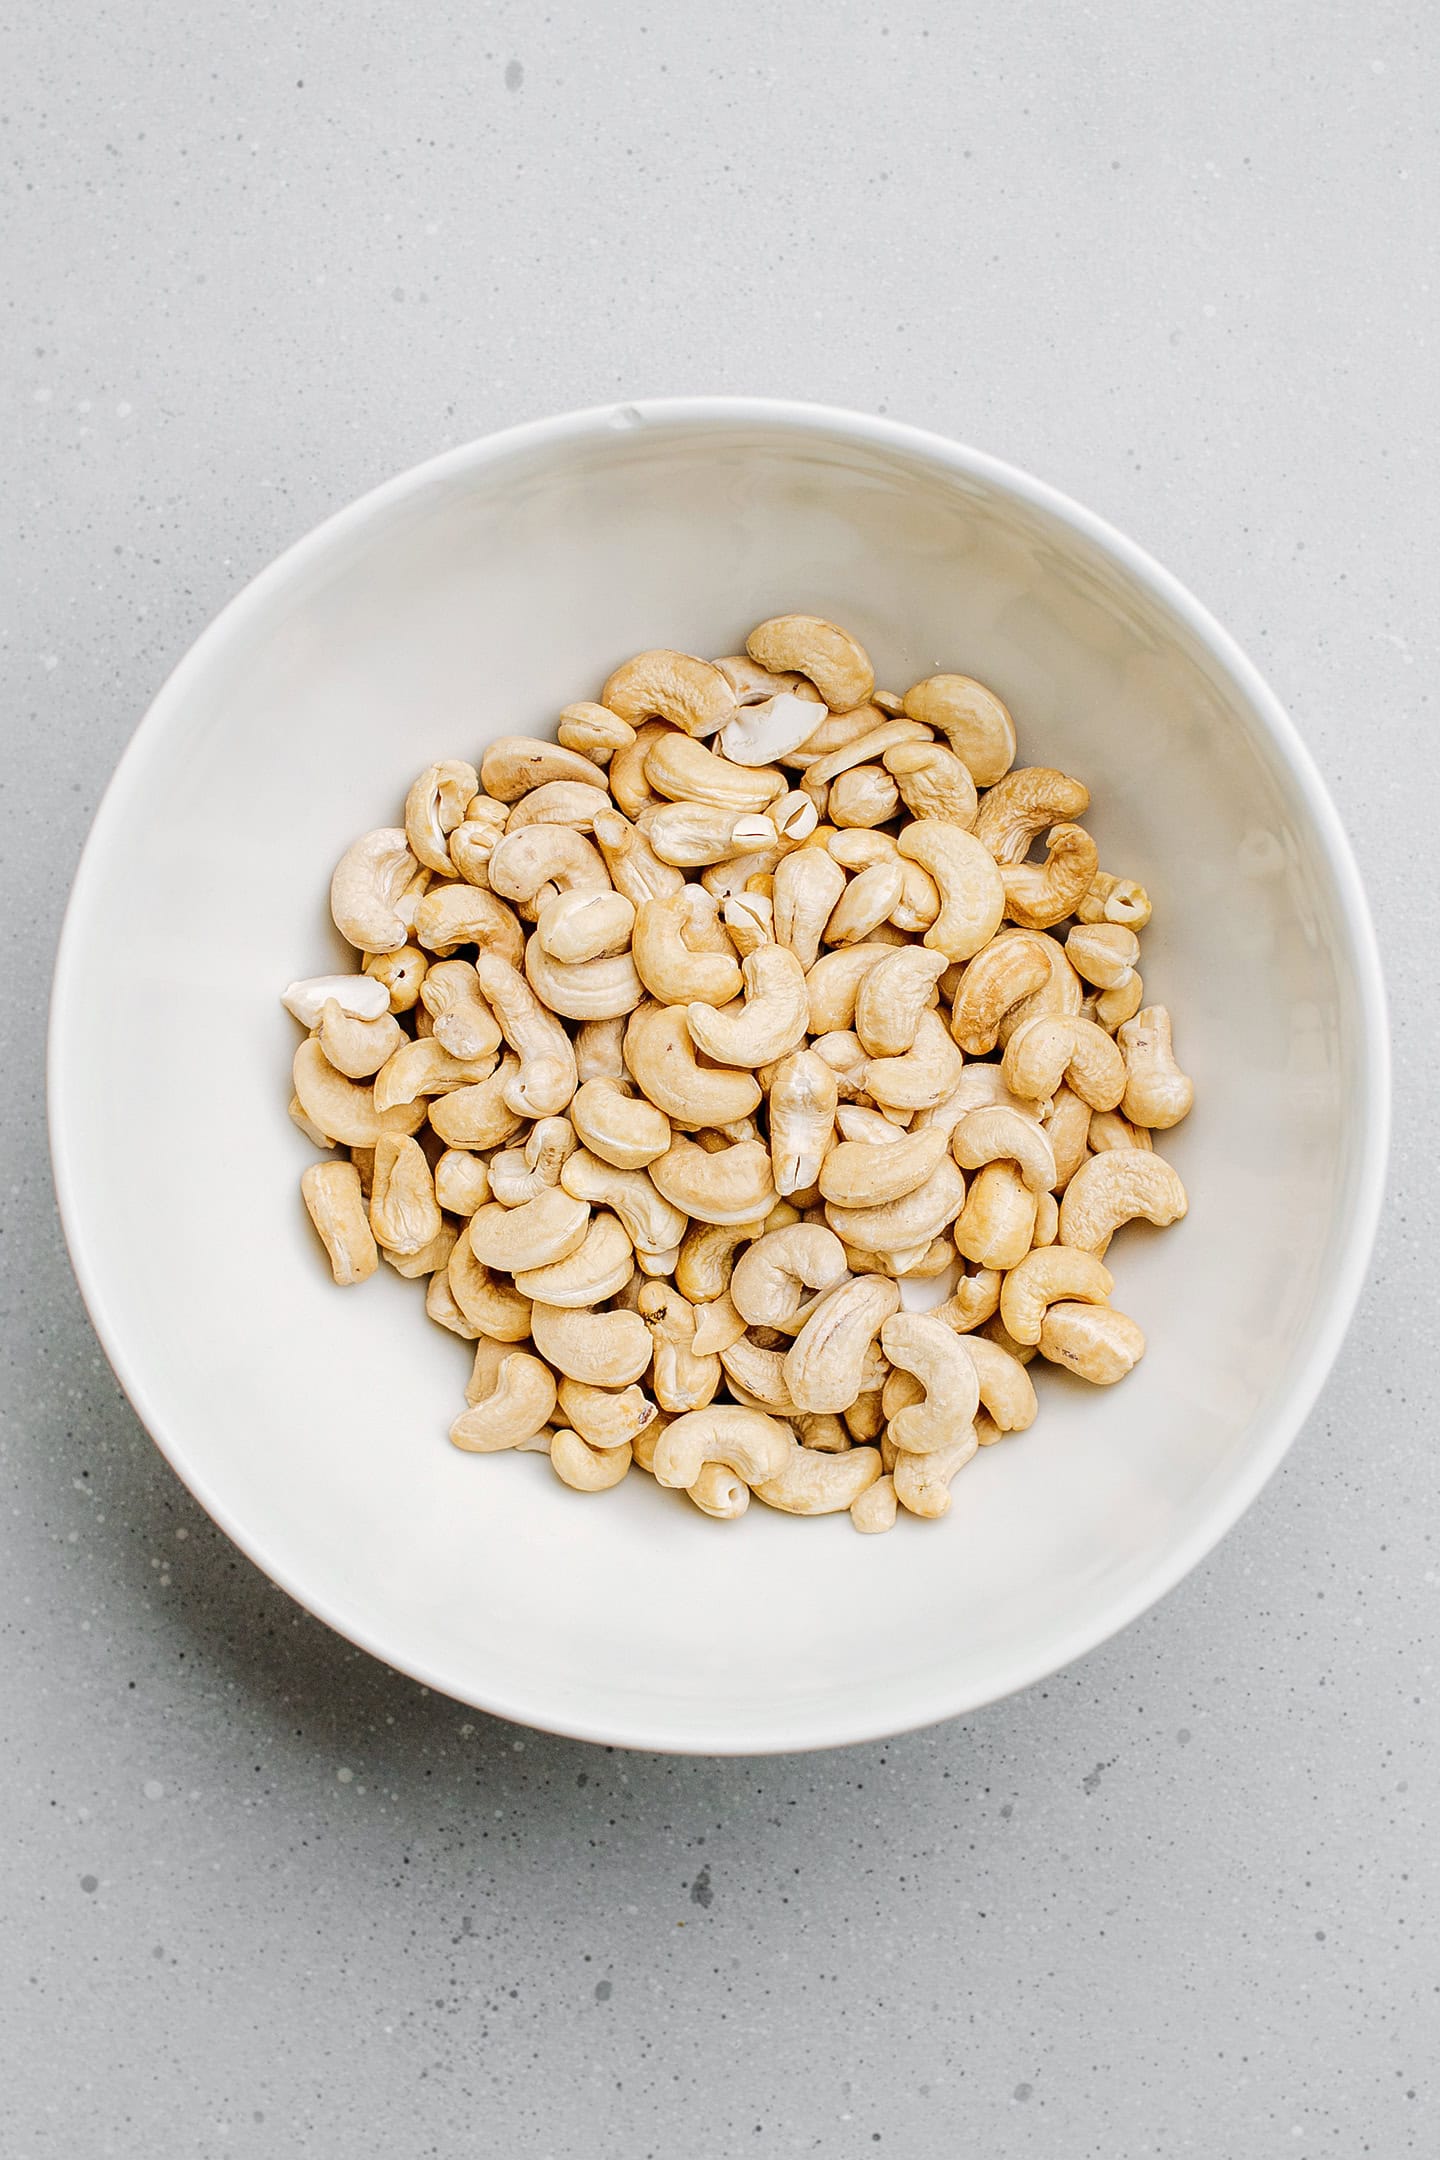
Cashews
Raw cashews make the base of these cheese balls. They create a rich and creamy texture reminiscent of fresh dairy cheese. Make sure you are using raw cashews, not the roasted kind.
Probiotics
Instead of relying on vinegar or lactic acid to add tanginess to the cashew cheese, I naturally cultured it with probiotics. Although this step takes a bit more time, I truly believe it yields a superior, more natural flavor.
Note: I generally use Solgar Advanced Acidophilus Plus probiotics. Each capsule contains 500 million microorganisms, and I use 4 capsules for one batch. If you are using probiotics with a higher amount of microorganisms, you might have to use fewer capsules.
Substitute: If you have been making other vegan cheeses, you might already have mesophilic cultures. In that case, you can replace the probiotics with 1/16 teaspoon of mesophilic.
If you don’t have any probiotics or cultures, you can replace the water used to blend the cashews with rejuvelac. The result will be approximately the same.
Breadcrumbs
You can use regular breadcrumbs or panko if you prefer a crunchier texture. Italian-style breadcrumbs work great too!
Psyllium husk (optional)
If you have never heard of it, psyllium (Plantago) is a plant that contains a soluble fiber in its husk). In addition to its potential benefit of relieving constipation, it does wonders to create a stretchy consistency as it forms a gel when in contact with liquids.
In this recipe, I use it mostly to thicken the cashew cheese cream, making it easier to shape it into balls. On top of that, it adds a bit of stretchiness, but that’s minimal. If you have tried “chèvre chaud” before, you know that this type of cheese is not stretchy, so do not expect a ton of stretchiness here.
Note: Psyllium is completely optional, though, and won’t alter the flavor if you omit it.
Best type of psyllium: Ensure you are using super fine psyllium husk powder for optimal texture. Psyllium husk can be found in flakes – do not use those.
Oil
To deep-fry the cheese balls. Use a neutral oil with a high smoking point, such as canola, peanut, sunflower, or grapeseed oil.
🥣 How to Make It
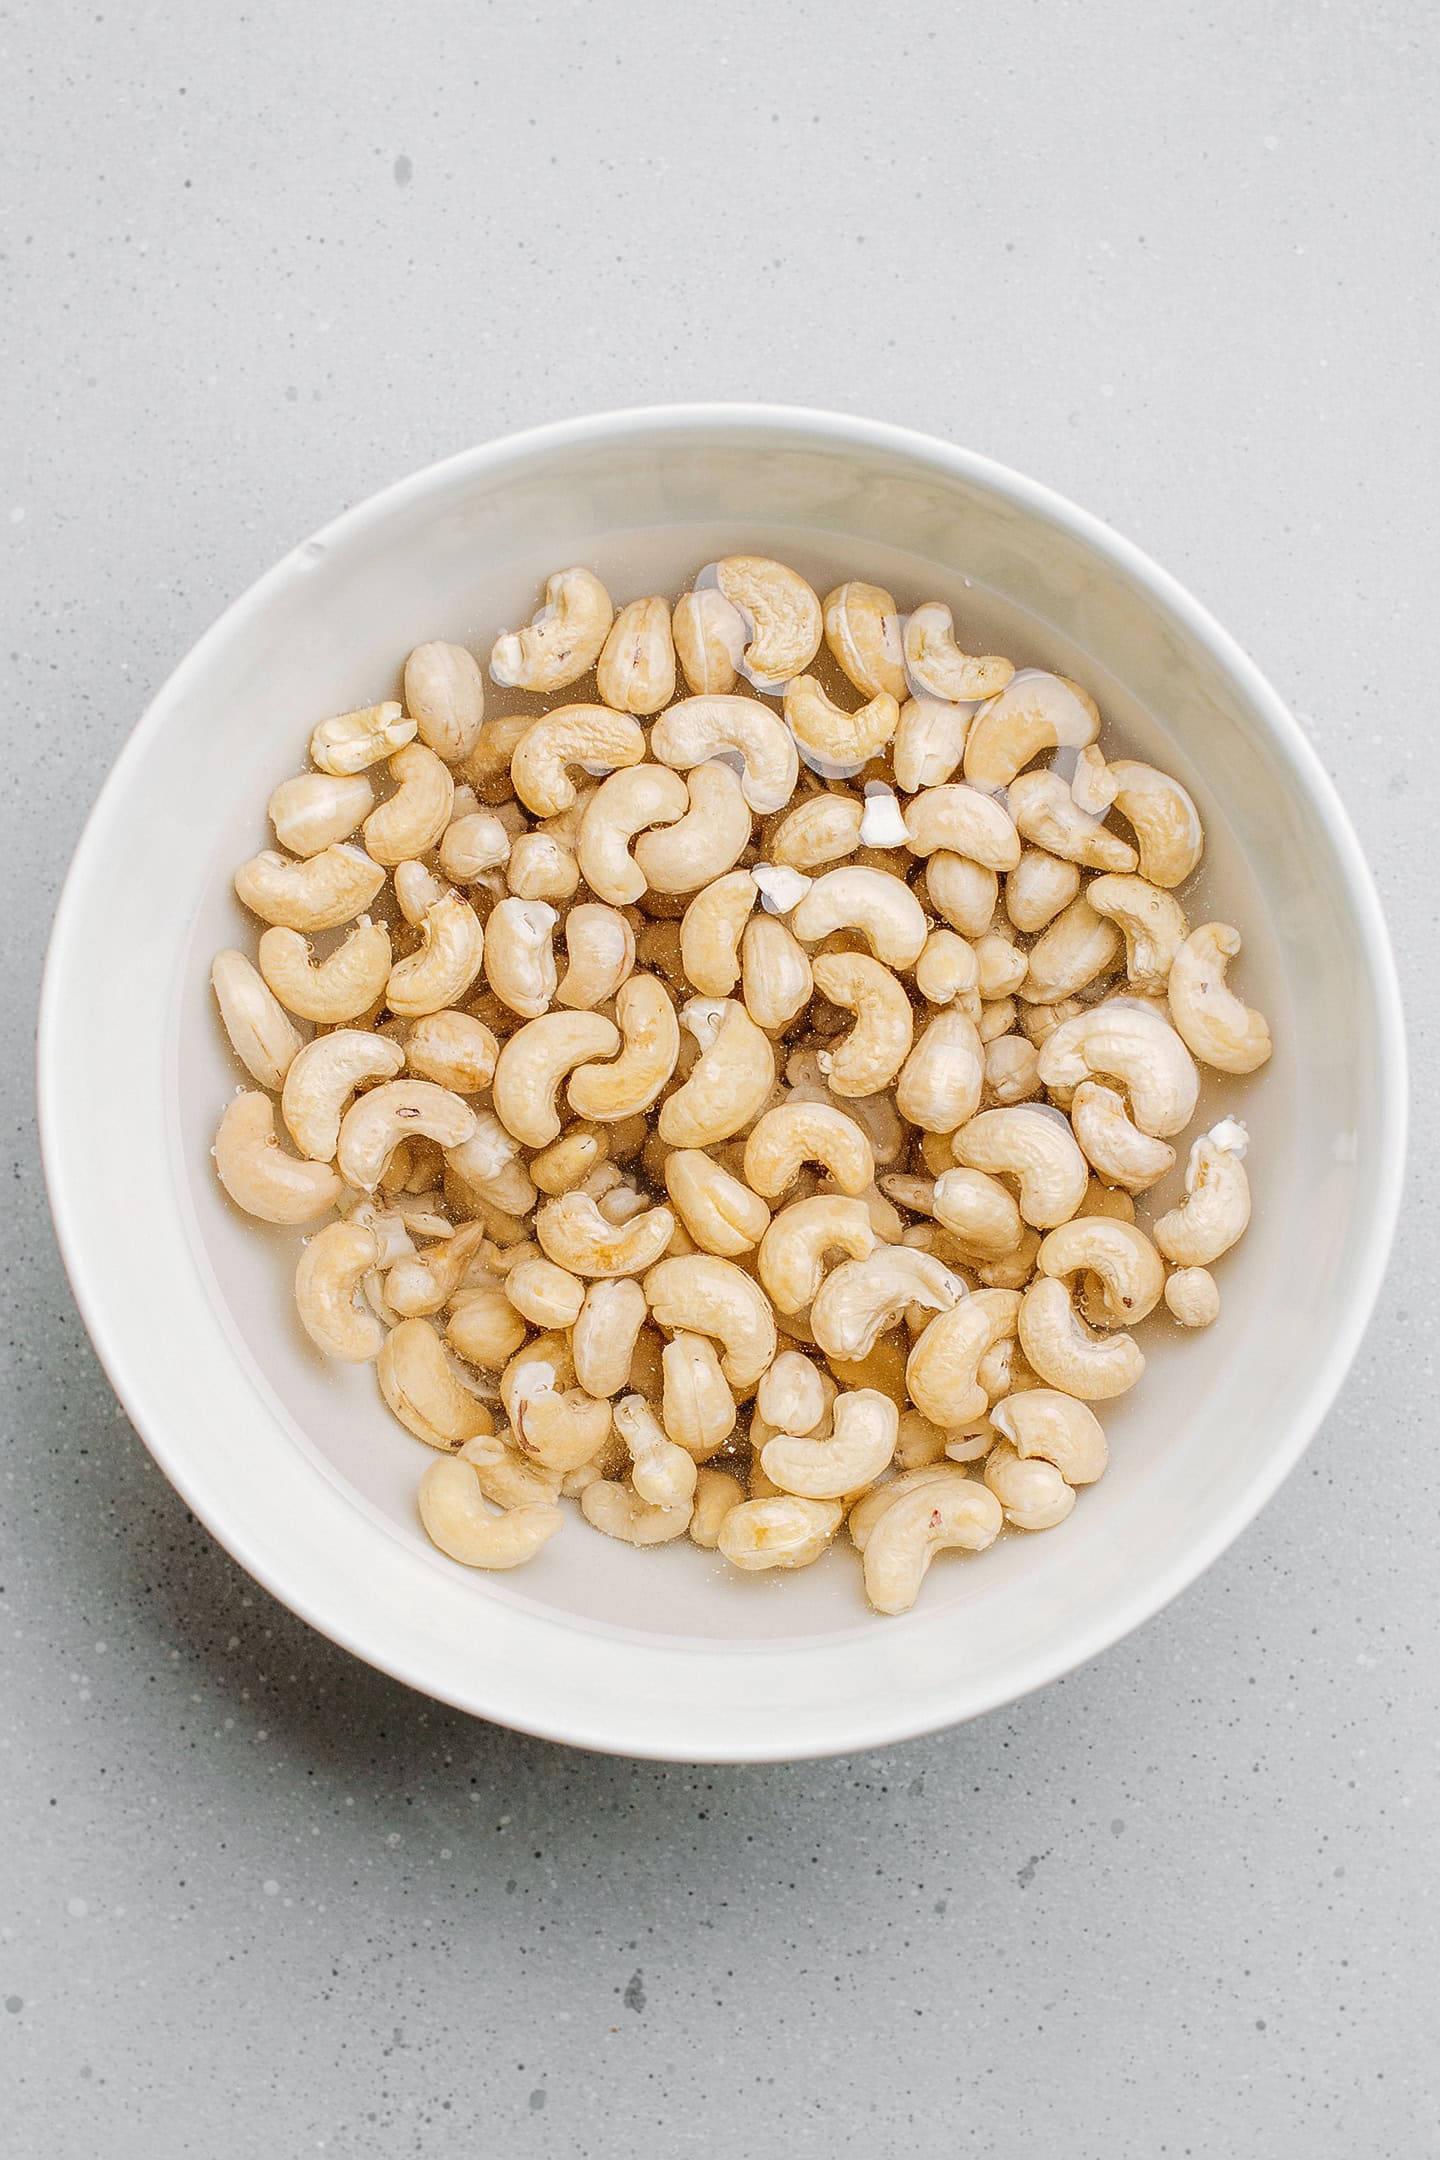
1. Soak the cashews
- Soak overnight. Add the cashews to a large bowl and cover with cold water. Let the cashews soak overnight or for at least 8 hours.
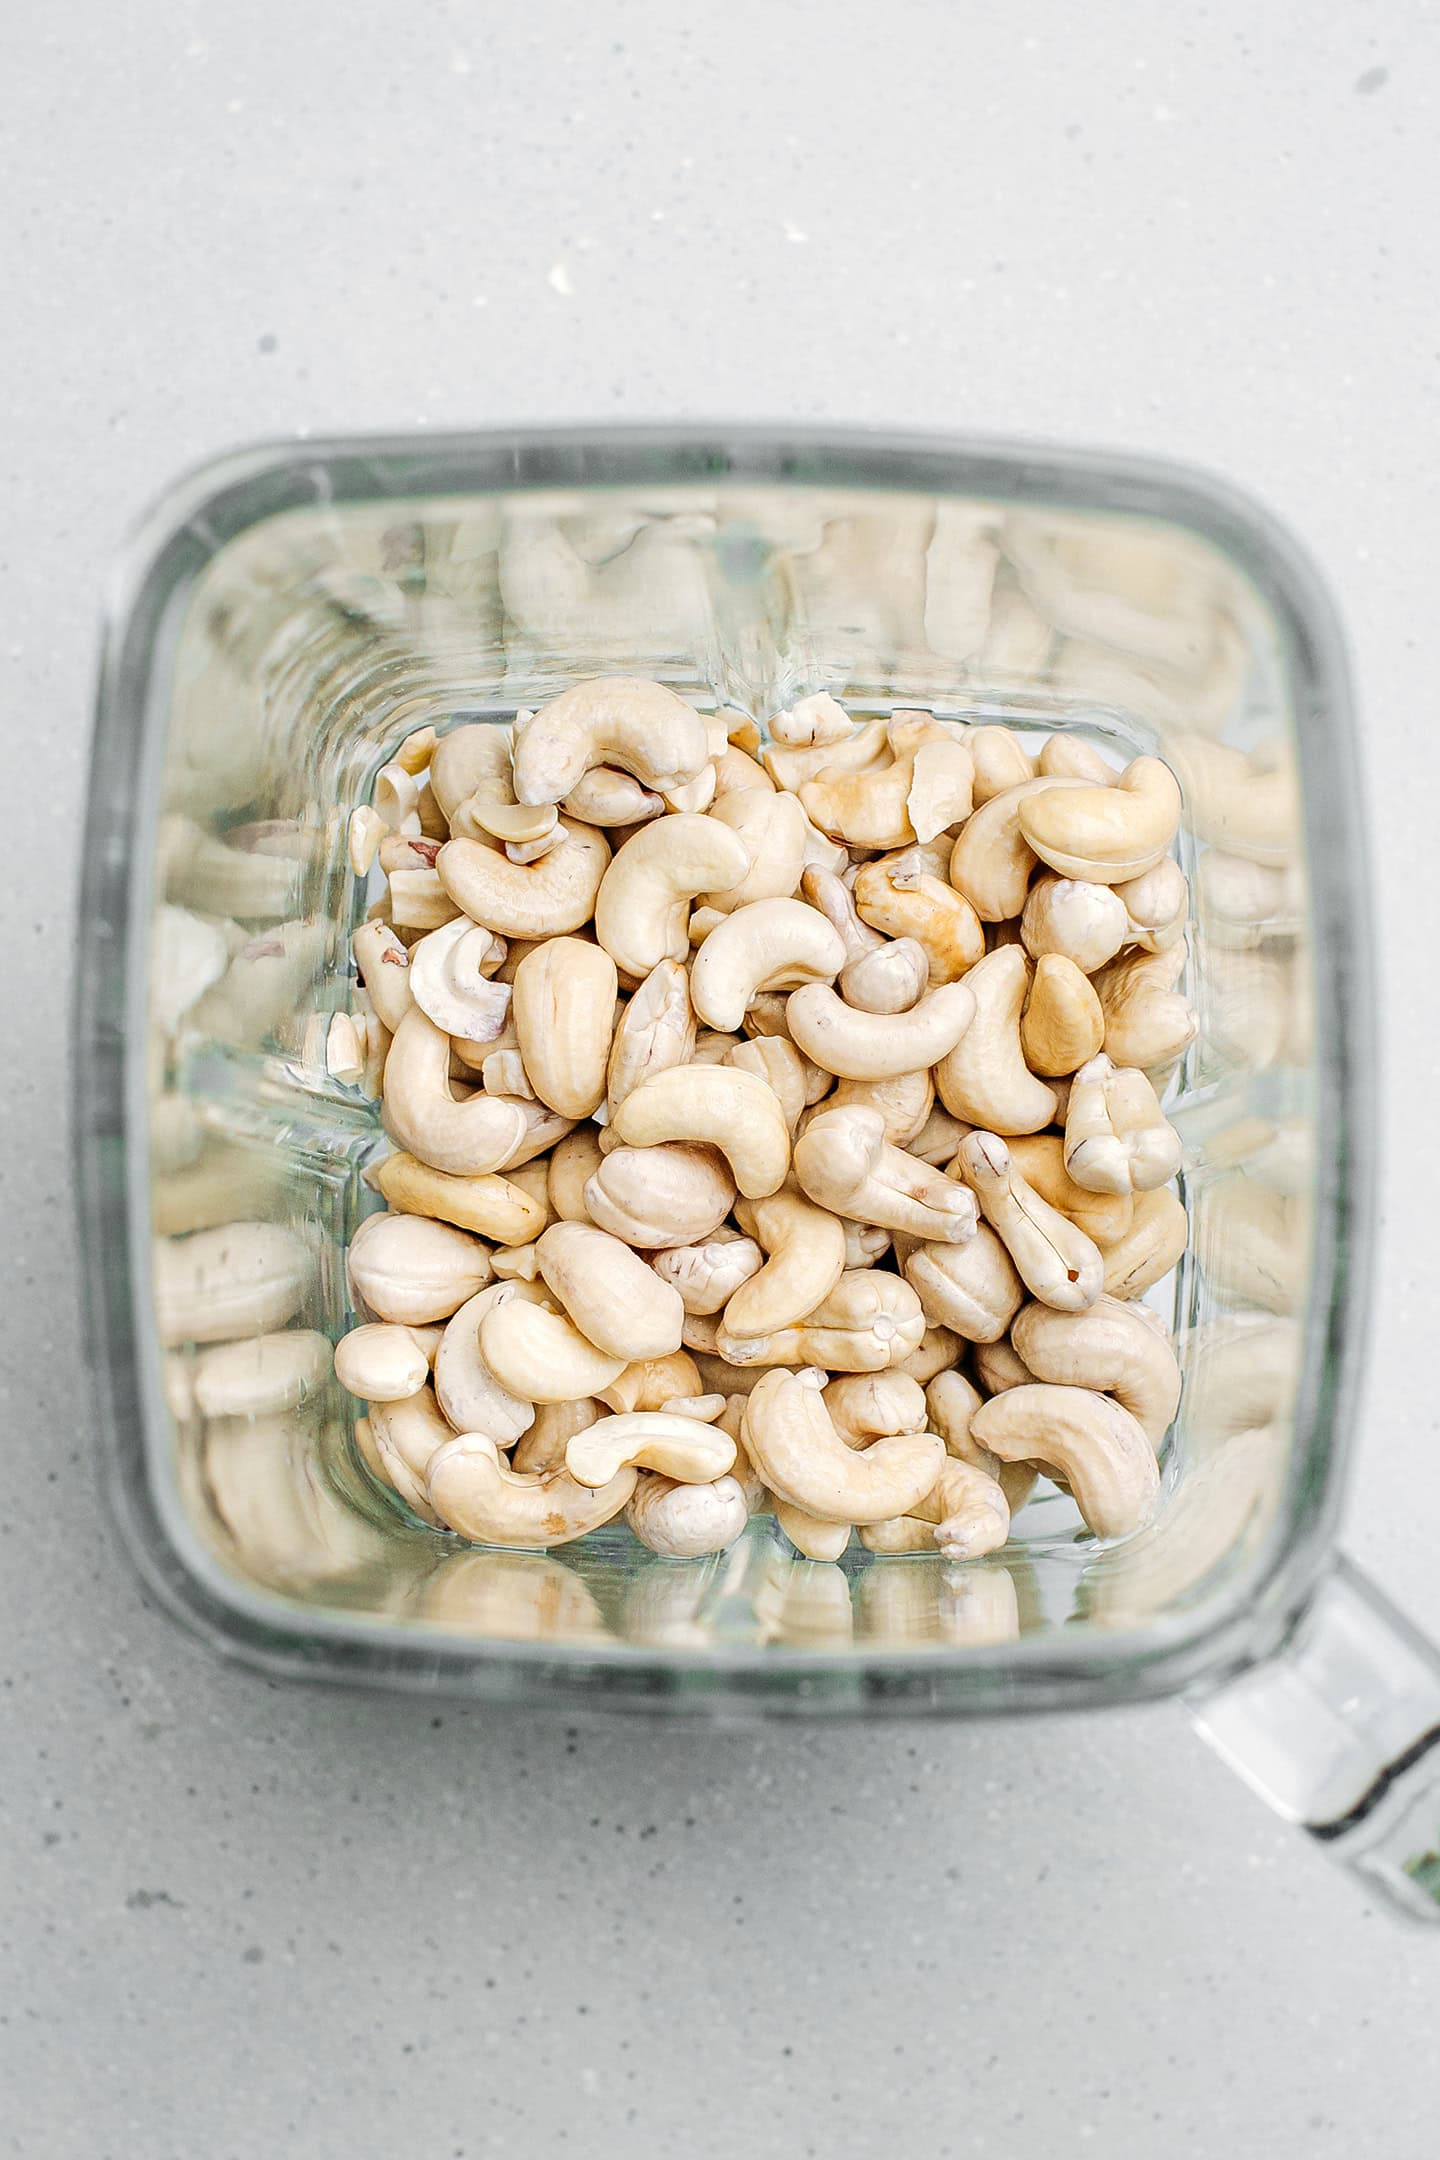
2. Blend into a cream
- Drain. Rinse the soaked cashews and drain them well using a colander.
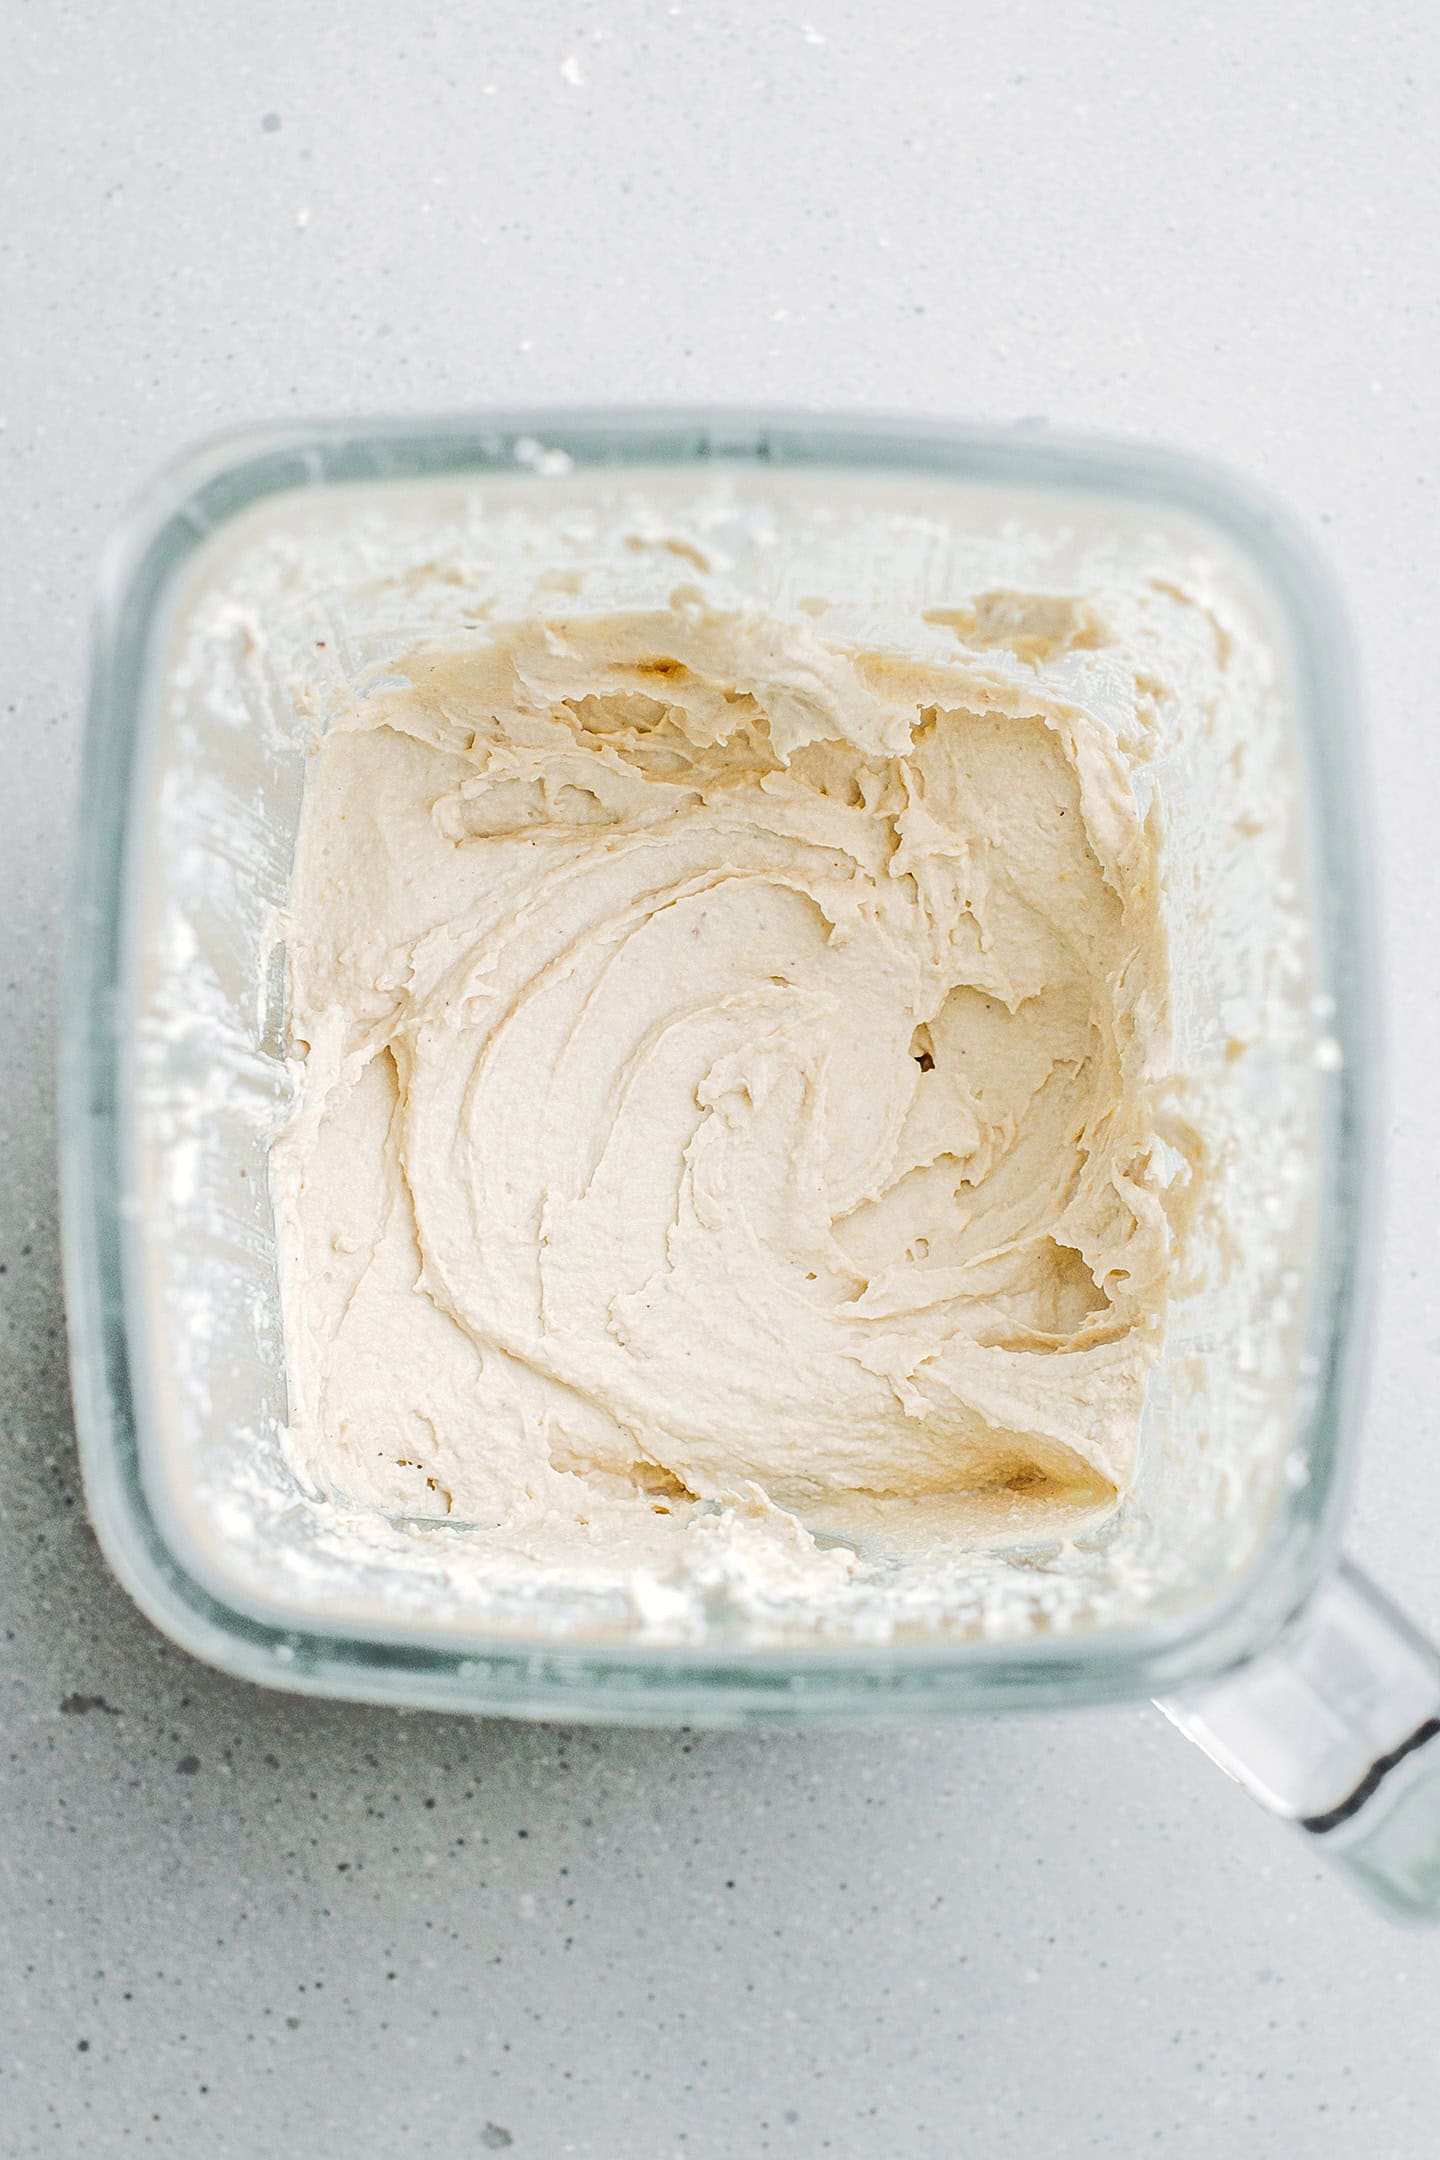
- Blend. Transfer the soaked cashews to a blender or food processor and add 1/4 cup of water. Blend on high speed, scraping down the sides from time to time until it forms a very thick and smooth cream. This step might take up to 3 minutes.
- Add the salt and cultures. Open the probiotic capsules and add the powder to the blender. Add the salt and process for another 15-20 seconds.
3. Let it ferment
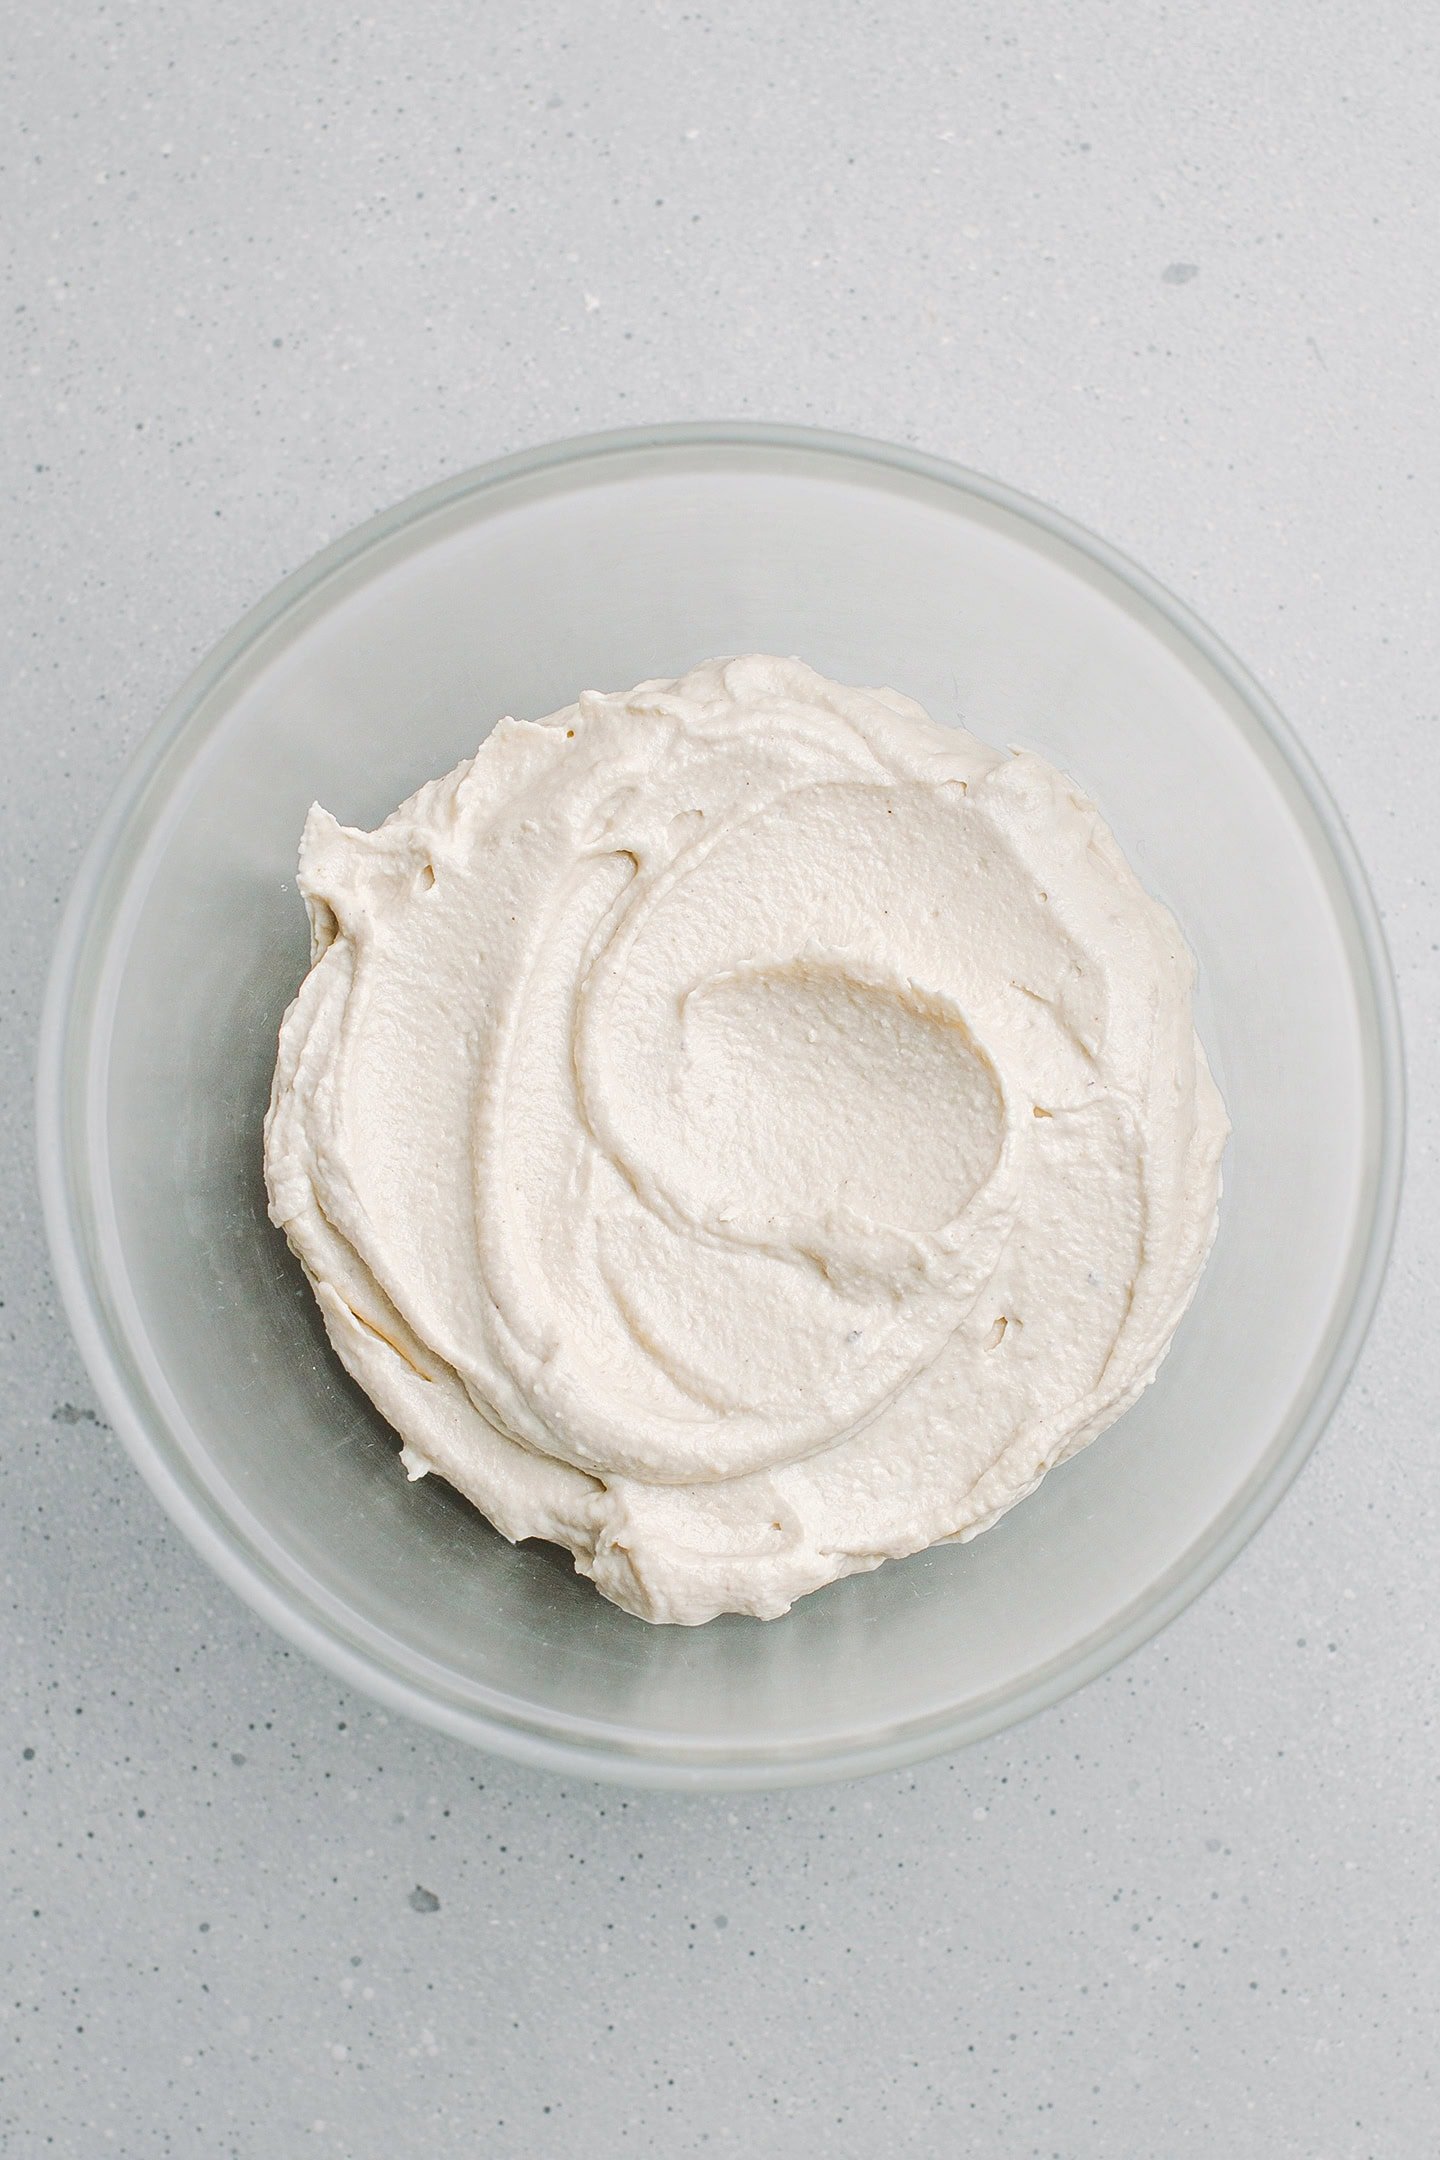
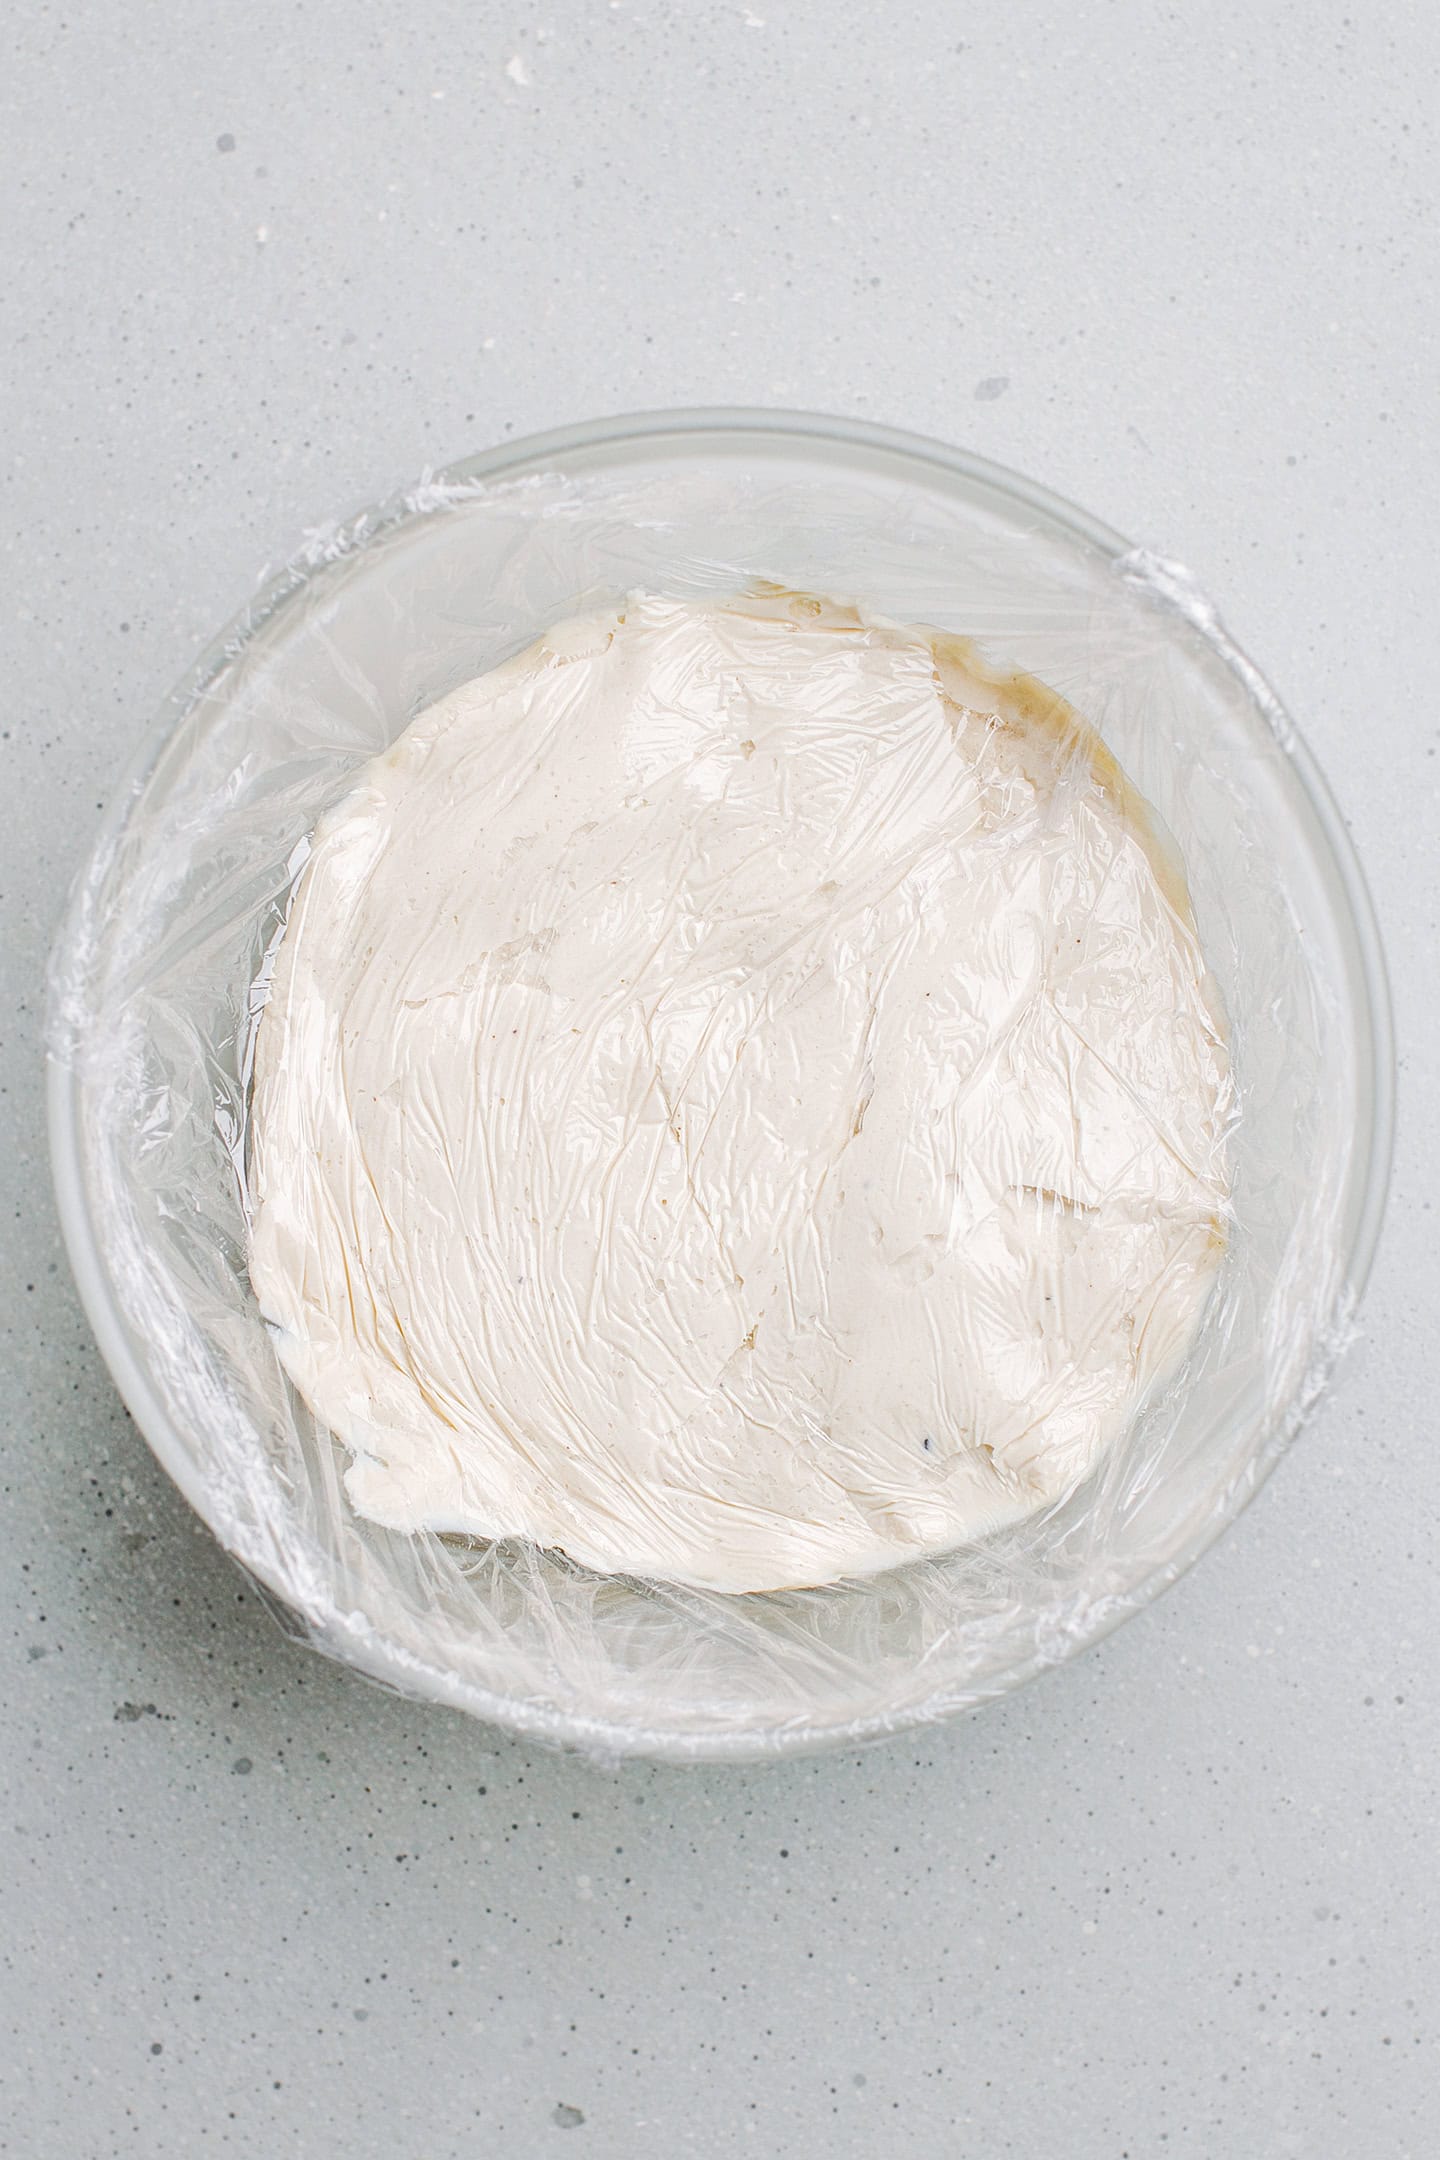
- Transfer to a bowl. Once your cashew cream is smooth, transfer it to a clean glass bowl and cover it with plastic wrap touching the top of the cream (this will prevent it from forming a skin on top.)
- Let it ferment. Allow the cashew cream to ferment for about 24 hours at room temperature in a dark place. After one day, taste the cream to see if it’s sharp enough for your taste. If it’s tangy enough, transfer it to the refrigerator for another day. This step will help firm up the cream, making it easier to handle later. Note: it may take up to 48 hours for the cashew cream to culture, depending on the temperature of your home.
Add the psyllium husk (optional)
If you plan to add psyllium husk: Dilute 1 and 1/2 teaspoon of psyllium husk powder in 2 tablespoons of water. Next, transfer the psyllium gel to a food processor and add the fermented cashew cream. Process for 10-15 seconds or until fully combined.
4. Coat with breadcrumbs
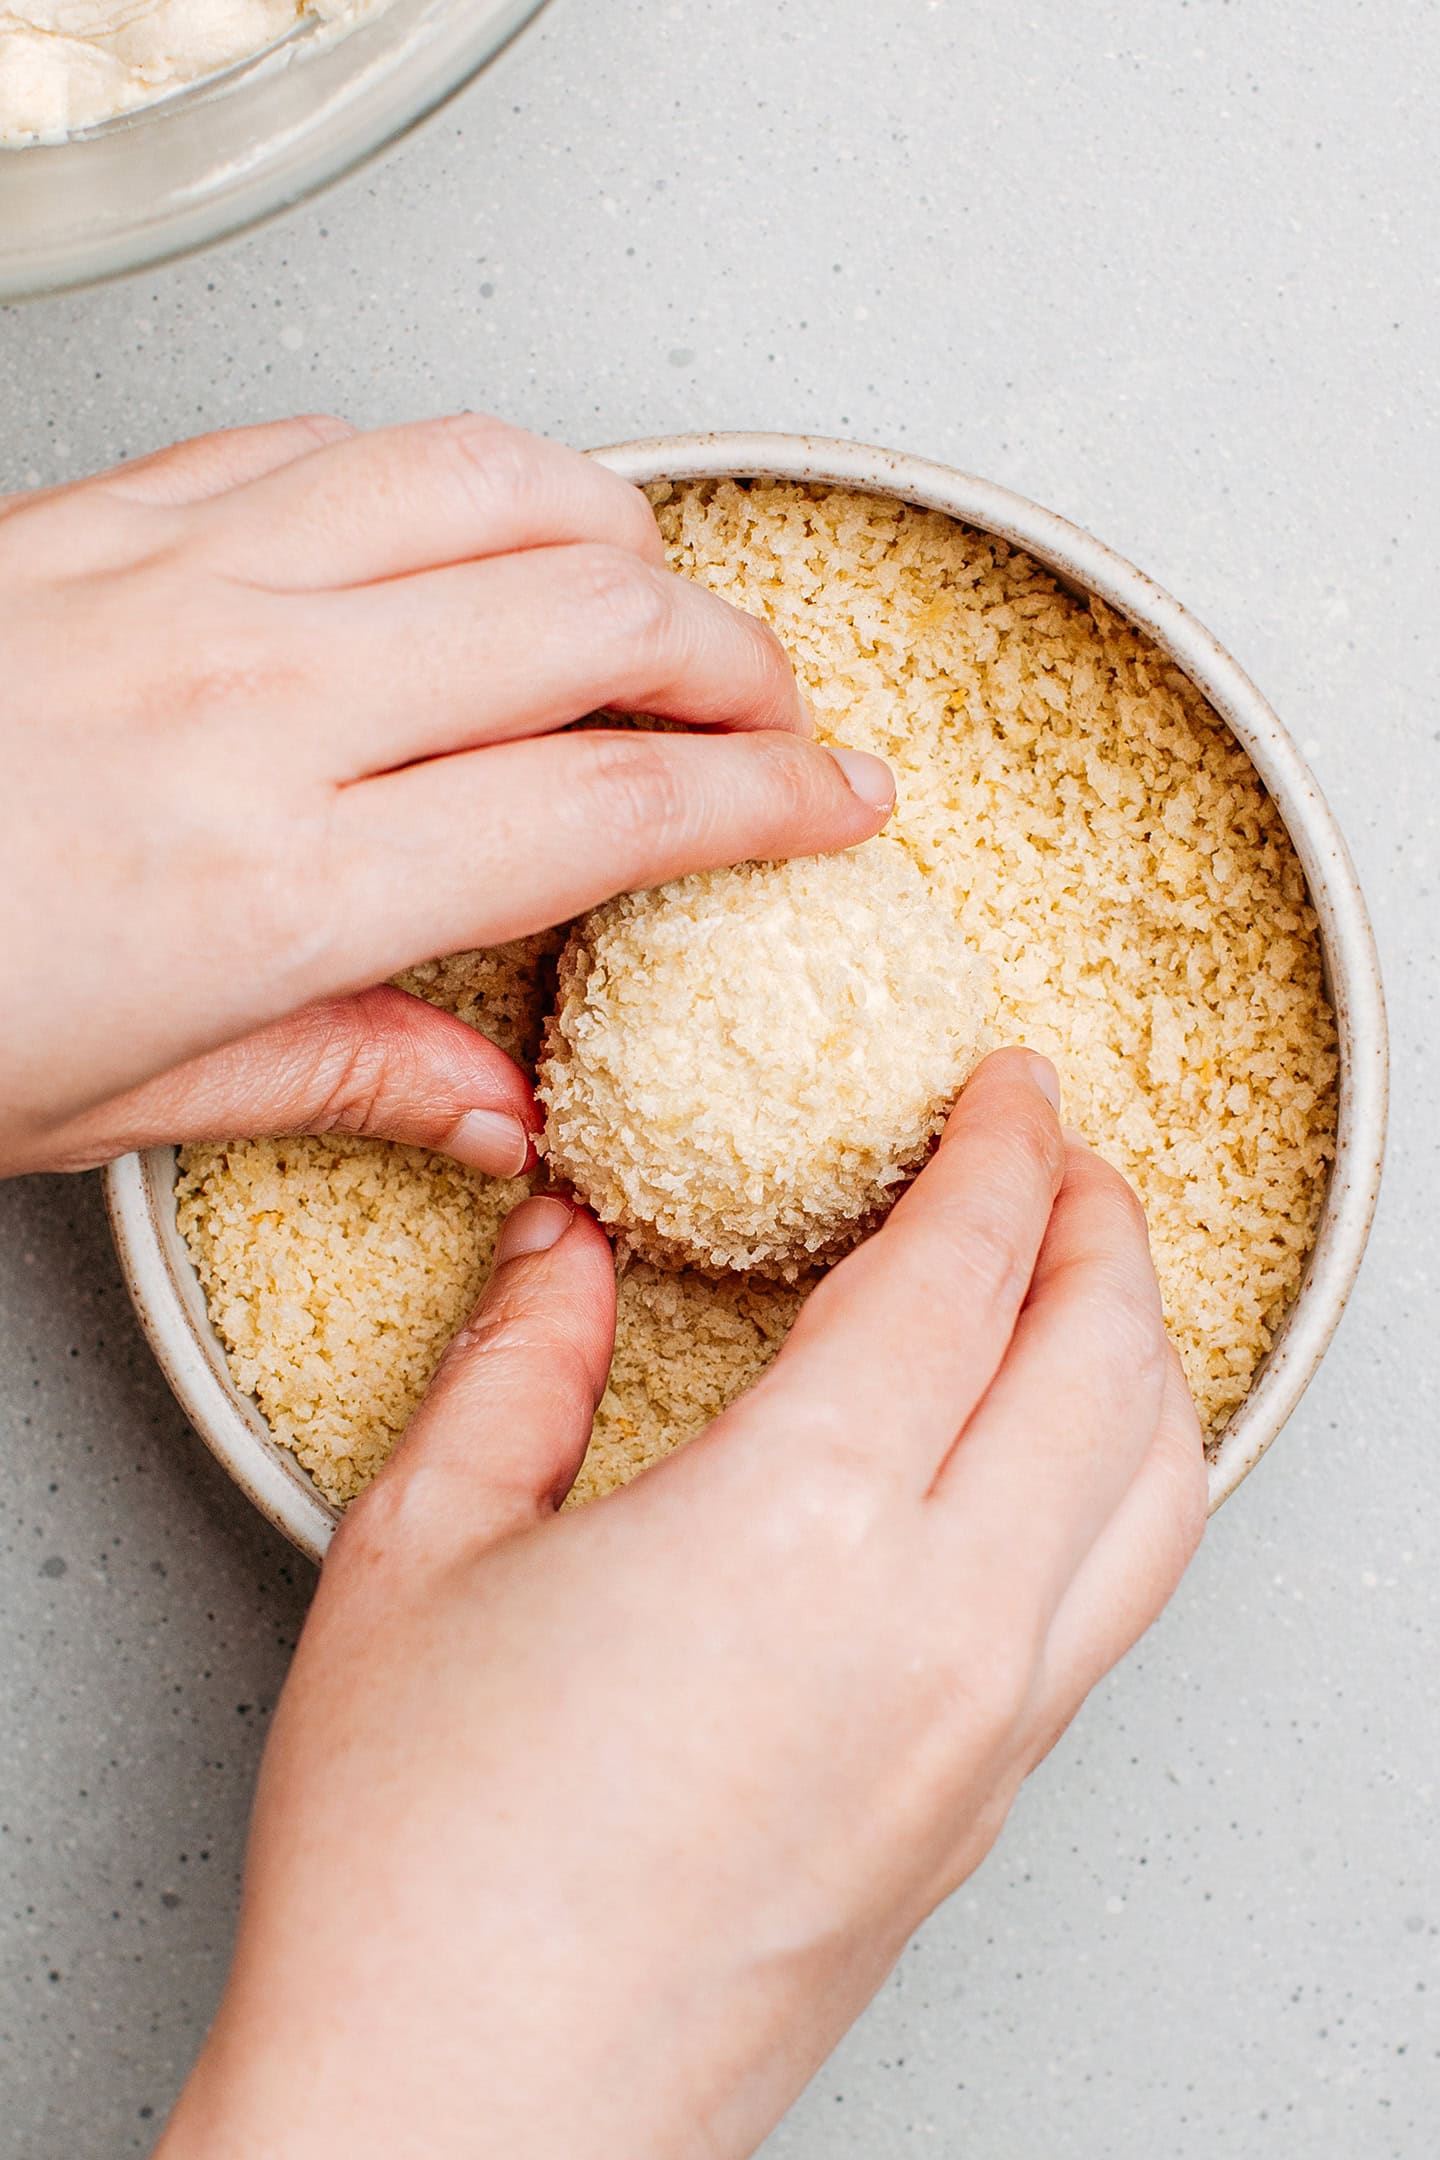
- Set up your workstation. Place the breadcrumbs inside a deep plate and line a baking sheet with parchment paper. Remove the cashew cream cheese from the refrigerator.
- Coat with breadcrumbs. Scoop out about 1/4 cup of the cashew cream cheese and form a ball using slightly wet hands (to prevent the cream from sticking to your hands). Transfer the ball to the plate containing the breadcrumbs and roll it to coat it completely. Transfer the cheese ball to the prepared baking sheet.
- Repeat. Repeat with the remaining cashew cream cheese.
Tip: If the cashew cream cheese becomes too soft to handle, put it back in the fridge or freezer for a few minutes.

5. Deep-fry
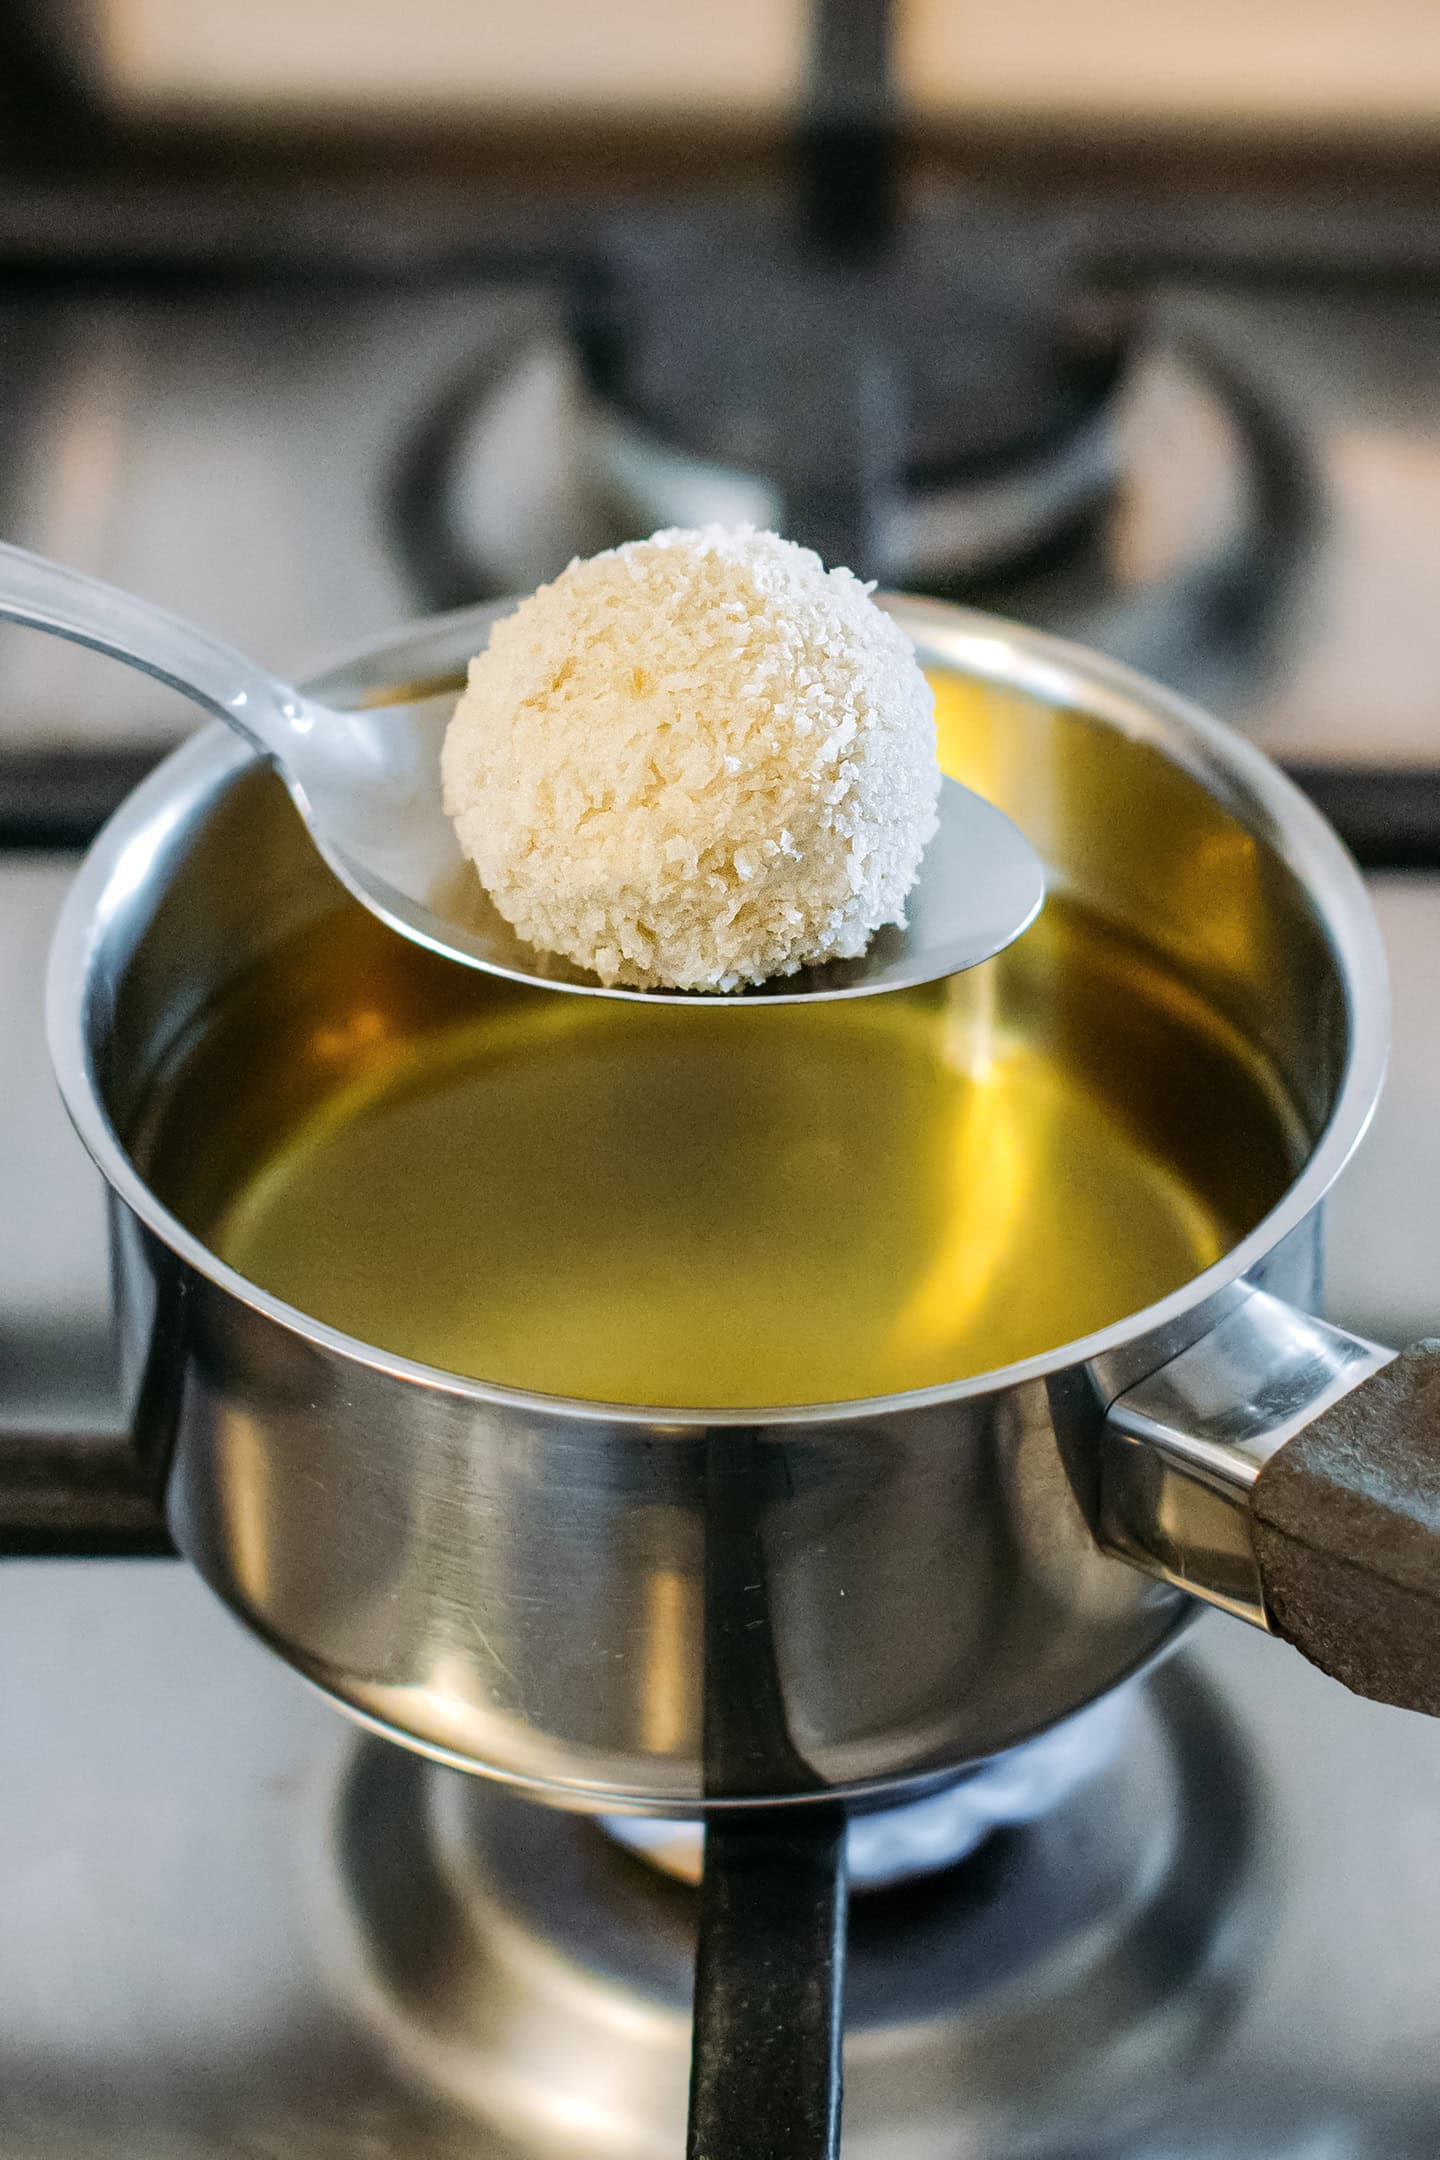
- Heat the oil. Heat about 3 inches of oil to 350°F (175°C) in a deep pot. Set a large plate topped with some kitchen paper towels on the side.
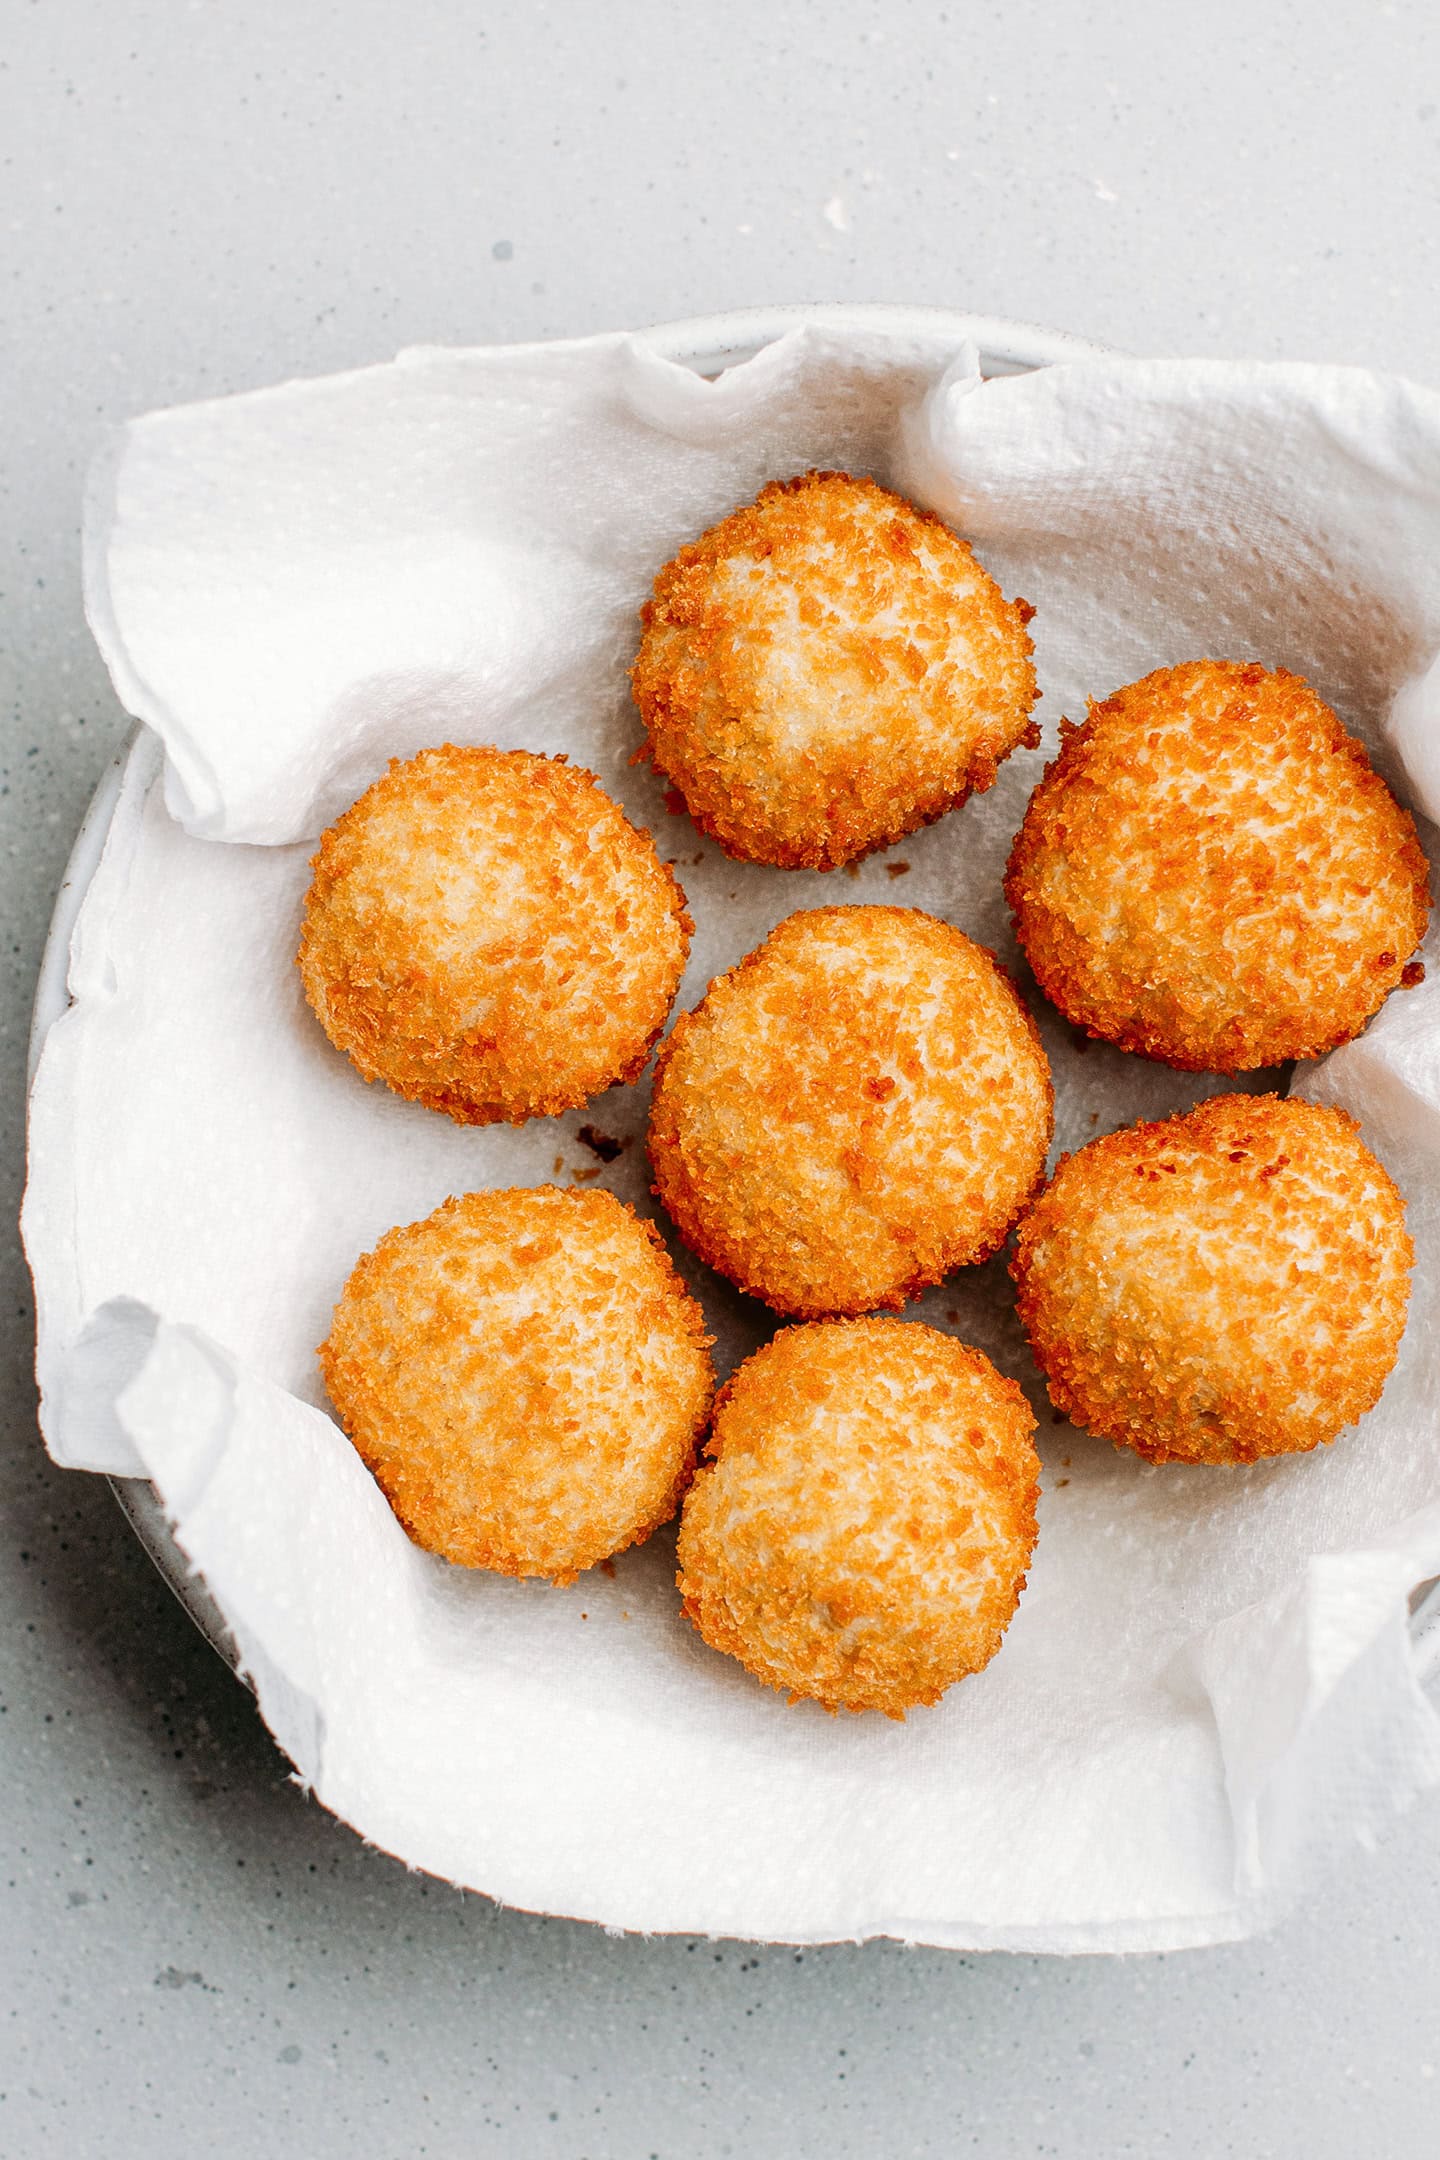
- Deep-fry. Using a spoon, place a few cheese balls into the oil. Work in small batches (3-4 at a time). Fry the cheese balls for about 1 minute or until golden brown. Use a slotted spoon to remove the balls from the oil and transfer them to a plate lined with kitchen paper towels to remove the excess oil. Repeat with the remaining cheese balls.
- Let cool. Allow the cheese balls to cool for a few minutes before serving.

📔 Tips
Do not add too much water.
When blending the cashews, refrain from adding extra water. Remember that the thicker the mixture, the easier it will be to form balls later.
Fry them just before serving.
I advise you to fry the cheese balls just before serving – they will be crispier, and the cheese inside will be very soft. Actually, they taste better warm!
Make cleaning easier.
If you are having trouble cleaning your blender after making cashew cream, I have a super simple tip for you: Add 2-3 cups of water and a squeeze of dishwashing liquid into your blender and blend for 15-20 seconds. It will do 90% of the cleaning job!
🌿 Variations
You can easily customize these cheese balls to your liking by incorporating extra flavorings (you should add them after culturing the cream cheese). Here are some ideas:
- Nutritional yeast: Make them more cheesy by adding 1-2 tablespoons of nutritional yeast.
- Herbs: Give them herbaceous notes by incorporating fresh or dried herbs such as rosemary, thyme, oregano, or fresh basil.
- Dried fruits: You can even stir in a handful of raisins or cranberries for sweet and salty cheese balls!
A stronger vegan “goat” cheese?
If you are up for a little experiment, adding extra cultures can make these balls taste even closer to real goat cheese! How to do it? It’s quite simple. In addition to the probiotics, you will need to add a pinch (about 1/16 teaspoon) of a mold called Geotrichum candidum. You can buy this mold online or in cheese-making specialty stores.
Next, allow the cashew cream to ferment for one day at room temperature before shaping it into small wheels or balls. Place them in an airtight container and age those for 2-3 days in a refrigerator set at its highest temperature or in a wine cave. The ideal temperature is between 47-54°F (8-12°C). After 2-3 days, your cheeses should have a thin coating of white mold and a different flavor. You can then coat them with breadcrumbs and fry them!
🥗 What to Serve It With
Serve these cheese balls as an appetizer or with a salad, some fresh cherry tomatoes, and a balsamic vinegar vinaigrette for a super decadent and hearty entrée!
❄️ Storing and Reheating
- To store: These fried cheese balls can be stored in the refrigerator for up to 4 days. Remember that since they contain cultures, their flavor will get sharper over time.
- To reheat: You can reheat them in a 350°F (175°C) preheated oven or air fryer for about 10 minutes.
💬 FAQ
I have tried culturing the cashew cream with yogurt but didn’t get good results. Yogurt cultures generally require a higher temperature to activate.
You can omit the probiotics, but your cream cheese will lack tanginess.
The cashew cream can be stored in the refrigerator for up to 1 week.
If you are talking about aged goat cheese, then no. However, if you are talking about the fresh goat cheeses that are used to make “chèvre chaud,” then they taste very similar!


Want to Save This Recipe?
Enter your email below & we’ll send it straight to your inbox! Plus, you will receive new recipes every week!
I’d like to receive more tips & recipes from Full of Plants.
This site is protected by reCAPTCHA and the Google Privacy Policy and Terms of Service apply.
Vegan Fried Goat Cheese Balls
Ingredients
Goat Cheese
- 2 cups raw cashews
- 4 capsules vegan probiotics Acidophilus
- 1/2 tsp salt
- 1/4 cup water
- 1 and 1/2 tsp psyllium husk powder optional
Fried Balls
- 1 cup breadcrumbs
- neutral oil for frying
Instructions
- Soak overnight. Add the cashews to a large bowl and cover with cold water. Let the cashews soak overnight or for at least 8 hours.
Make the cream cheese
- Drain. Rinse the soaked cashews and drain them well using a colander.
- Blend. Transfer the soaked cashews to a blender or food processor and add 1/4 cup of water. Blend on high speed, scraping down the sides from time to time until it forms a very thick and smooth cream. This step might take up to 3 minutes.
- Add the salt and cultures. Open the probiotic capsules and add the powder to the blender. Add the salt and process for another 15-20 seconds.
Let it ferment
- Transfer to a bowl. Once your cashew cream is smooth, transfer it to a clean glass bowl and cover it with plastic wrap touching the top of the cream (this will prevent it from forming a skin on top.)
- Let it ferment. Allow the cashew cream to ferment for about 24 hours at room temperature in a dark place. After one day, taste the cream to see if it’s sharp enough for your taste. If it’s tangy enough, transfer it to the refrigerator for another day. This step will help firm up the cream, making it easier to handle later. Note: it may take up to 48 hours for the cashew cream to culture, depending on the temperature of your home.
- Add the psyllium husk (Optional). Dilute 1 and 1/2 teaspoon of psyllium husk powder in 2 tablespoons of water. Next, transfer the psyllium gel to a food processor and add the fermented cashew cream. Process for 10-15 seconds or until fully combined.
Coat with breadcrumbs
- Set up your workstation. Place the breadcrumbs inside a deep plate and line a baking sheet with parchment paper. Remove the cashew cream cheese from the refrigerator.
- Coat with breadcrumbs. Scoop out about 1/4 cup of the cashew cream cheese and form a ball using slightly wet hands (to prevent the cream from sticking to your hands). Transfer the ball to the plate containing the breadcrumbs and roll it to coat it completely. Transfer the cheese ball to the prepared baking sheet.
- Repeat. Repeat with the remaining cashew cream cheese.
Deep-fry
- Heat the oil. Heat about 3 inches of oil to 350°F (175°C) in a deep pot. Set a large plate topped with some kitchen paper towels on the side.
- Deep-fry. Using a spoon, place a few cheese balls into the oil. Work in small batches (3-4 at a time). Fry the cheese balls for about 1 minute or until golden brown. Use a slotted spoon to remove the balls from the oil and transfer them to a plate lined with kitchen paper towels to remove the excess oil. Repeat with the remaining cheese balls.
- Let cool. Allow the cheese balls to cool for a few minutes before serving.
- These fried cheese balls can be stored in the refrigerator for up to 4 days. Remember that since they contain cultures, their flavor will get sharper over time.
Notes
Do not add too much water.
When blending the cashews, refrain from adding extra water. Remember that the thicker the mixture, the easier it will be to form balls later.Fry them just before serving.
I advise you to fry the cheese balls just before serving – they will be crispier, and the cheese inside will be very soft. Actually, they taste better warm!Make cleaning easier.
If you are having trouble cleaning your blender after making cashew cream, I have a super simple tip for you: Add 2-3 cups of water and a squeeze of dishwashing liquid into your blender and blend for 15-20 seconds. It will do 90% of the cleaning job!Nutrition
Note
This recipe was first released in July 2016 and updated with new process shots and detailed instructions in October 2024. You can find the original photos below.

About the Author
Thomas Pagot is the founder, photographer, and recipe developer behind Full of Plants. He created the blog in 2016 as a personal cookbook for vegan recipes. Through years of recipe development, Thomas has successfully grown Full of Plants into a trusted resource for plant-based recipes.
Leave a Comment
Thank you for this. Perfect on my salad. I’ll be saving this one and making these delicious fried cheese balls again. Yum, yum, yum!
You’re welcome Martha!
Hello Thomas,
Can these be done in the oven?
Thank you
Hi Silvia,
I’m afraid I haven’t tried baking these yet (I will try next time!). I think it should work but they might not be as tasty 😉
I’m going to plant a seed in your head: have you tried using psyllium husk powder to make vegan cheeses? If not, YOU HAVE TO! It makes the cheese suuuuper stretchy, it’s amazing.
I always make a recipe from Chef Jana on YouTube (video named: “I CAN’T BELIEVE IT’S VEGAN! THE GAME CHANGER SUPER STRETCHABLE SUPER MELTABLE MOZZARELLA CHEESE”).
That cheese would be amazing here! And I would love to see what you can come up with using this ingredient 🙂
It’s been on my list to try for a long time but I have yet to experiment with psyllium husk!
Hi! While I’m waiting fir my Camembert to age (omg omg today the fluffy mold started showing up properly, I’m so psyched!), I decided to try this recipe!
Quick question, since I wanted to start fermenting tonight, is there a substitute for soaking the cashews overnight? Boiling them? Or would that interfere with the consistency / fermentation process?
This blog is a gift to the world, seriously!
Hi Amanda,
Awesome! 🙂 Thanks for your kind words!
You could pour boiling water over the cashews and let it sit for an hour or two, it should work just as well.
These cheese balls look totally appetizing!
Thanks Hani!
I don’t have a food processor. Is it the same directions for using a blender instead or do adjustments need to be made?
Thanks!
Merci pour cette recette – apparemment, le tempeh ajoute un goût de “chèvre” aux fromages végétaux..ce que j’ai testé et pas spécialement approuvé. Qu’en penses-tu? Que conseillerais-tu pour ajouter un arôme plus proche du chèvre et plus typique?
Car j’ai déjà fait cette recette et ça me fait plut^t penser à de la mozzarella panée !
Un gout de chèvre ? J’ai un peu de mal à y croire 🙂
As-tu bien laissé le crème de noix de cajou fermenter pendant au moins 24 heures ?
En ce qui concerne le gout de chèvre, la seule solution serait d’y ajouter du Geotrichum Candidum et de laisser les fromages s’affiner pendant 7-10 jours avant de les paner et les frire.
Great recipe 🙂 I will try later on.
Do you know if we can we freeze it before frying?
I think that would work 😉
Is it possible to make with plants milk?
I’m not sure what you mean.
This recipe looks really wonderful, and I truly can’t wait to try it out! Rather than deep fry, do you think these balls could be air fried? If so, what do you suppose the air fryer settings might be for that? …..Thanks so much for these great recipes, Thomas 🙂 !!
That is a good question! I have never used an air fryer so I have absolutely no idea, sorry…
I’m glad you like the recipes though!
I don’t actually have an air fryer (lol), but have been (literally) chomping at the bit to get one! I do have a suspicion these balls would be great in the air fryer…. Thanks again for all your innovative recipes – and for responding so quickly! 🙂
If you get one I would love to know how it turns out in an air fryer!
Hi Thomas,
first of all, thank you so much for this recipe, I made it a few days ago and it was sooo good!
I liked the fermented cashew base so much that I was thinking about maybe trying to add some other ingredients to see how the flavor would change (like adding garlic, herbs or liquid smoke) and I was wondering if maybe you had already tried something like this and you had any suggestions? Not necessarily to fry it later, just to get different kinds of cheeses.
Thanks in advance!
Hi Yumi,
Happy to hear it turned out great for you!
Sure, you can definitely add your favorite seasonings. Sometimes I add fresh basil, shallots, and a pinch of onion powder. Another tasty option is to roll the cheese balls in a mix of dried tomato powder, garlic powder, onion powder, parsley, and chives. Liquid smoke is another good idea! I plan to release a recipe based on these cheese balls so stay tuned!
Thank you for your reply, looking forward to your new recipe! 🙂
Can these be frozen pre or post frying.
Hey Dot, I just replied to your previous comment 😉
Hi Thomas, can’t wait to try. Would it be possible to freeze the mix when it has the desire red taste or can you freeze the fried balls thanks
Hi Dot, it’s better to freeze the cashew cheese. Then let thaw in the refrigerator and when it’s soft you can make balls, coat in breadcrumbs and fry just before serving. I would not recommend freezing fried balls.
Your blog is so perfect!
I found it by searching a recipe of blue cheese.
I’ll try all of them!!!
I loved your way to teach and the format of the recipes.
Thank you so much for all the work and pacience.
Lots of vegan love!
Thank you so much for the kind words Beatrice! I’m happy to hear you like it, hope you will like the recipes 🙂
I am very excited to have found your site and look forward to trying this recipe and many more. While my cashews are soaking, I was wondering can you substitute rejuvilac in this and other of your cheese recipes? Are the probiotics capsules in the health food stores the same as what you mention in these recipes? How long is the maximum time for nuts to soak? By that I mean I started soaking the nuts Monday morning but, got called into work fornthe next 3 days, should I scrap it and start over? Should I mix the nuts and probiotic blend. Can that sit and wait to be finished any ampuntnof tome? You probably have answered these questions before, however, there is a lot of information to read through in the comments. I look forward to hearing from you or the community soon. Thank you so much for all your hard work on your site.
Renee
Hi Renee,
Yes, you can use rejuvelac instead of probiotics. Just replace the water with rejuvelac.
There are many types of probiotics, the one I recommend are the ones I had the most success with. Some contain too many different types of microorganisms and that can make the cheeses turn bad.
Do not soak the nuts for more than 72 hours, so you should be good. Regarding the mixing, yes you blend everything together: the soaked cashews + rejuvelac (or the powder from the probiotic capsules).
Once blended, the cashew cream should not stay at room temperature for more than 4 days. I recommend 48H max.
Hope this helps!
Update. I made the cheese for this recipe and it came out perfect. Tonight I am going to fry some up and will.let you know how it goes. Renée
Update. I made the cheese for this recipe and it came out perfect. Tonight I am going to fry some up and will.let you know how it goes.
Awesome! Hope you liked them Renée!
These are so good! I just fried up 3 and put them in a salad. I’m completely amazed. I was skeptical since vegan cheese is… well you know. Usually terrible. I wonder if freezing them before deep frying would work. Thank you so much for sharing this amazing recipe!
Happy to hear you liked the cheese Jackie 🙂 Regarding the freezing option, I never tried but I think it should work.
Thanks for the rating!
I love this recipe! Worked great. The result I got were yummy, but I think my kitchen was too cool as I didn’t get the tanginess I had hoped for and think the cashews just didn’t ferment enough. I’m going to try again today and see if I can keep it a little warmer so that it ferments more.
Great! Glad to hear you liked it! 🙂
If your kitchen is not hot enough, you can just let it ferment longer (48-72H). The longer it ferments, the tangier it gets.
Thank you! I think you are absolutely right. It needed to ferment longer. I knew that when I stuck it in the fridge, but I was too excited to stop myself…lol. I have the ingredients coming for the butter and the Bleu cheese this week. I can’t wait to try that too!
I’m curious, have you ever fermented chickpeas and used them as the base for cheese?
I never tried with chickpeas but I doubt the result would be satisfying as they don’t contain as much fat as nuts. That would probably make it a bit dry, but I could be wrong, it’s always worth testing!
Hello Thomas! I made this cheese, but used it to make my own ravioli and wow was it amazing! My boyfriend said it was restaurant quality. I made my dough, stuffed with the goat cheese as well as sauteed mushrooms and onions with some fresh herbs and then I froze the ravioli for a few days. When I cooked it tonight (straight from freezer), the cheese was so creamy inside and had a wonderful, sharp flavor. Your cheese freezes very well! Thanks for an awesome recipe.
Hey Sarah, thank you for sharing your recipe! Homemade ravioli with cashew cheese and mushrooms sound delicious! 🙂 Glad to hear you liked the cultured cashew cream!
Hi Thomas and thank you for your delightful recipes! I am wondering in part 6 of making the goat cheese, do you cover it with something like cheese cloth or with a solid cover? Thanks!
Hi Hope,
You can cover it with plastic film to touch, or a damp clean cheese cloth.
I’d love to make these. I’m wondering if either the finished product would freeze week and then be warmed up in the oven. Christmas is coming and it would be great to cook them ahead?
I have never tried freezing it but if you do I would recommend freezing the balls without the breadcrumbs, then thaw in the refrigerator overnight and coat with breadcrumbs just before frying. I doubt freezing the balls after frying would give good results.
This is an awesome recipe! The second time I wanted to avoid oil and wheat, so I coated the balls with crumbed macadamia nuts and herbs and cooked them in the oven. They came out delicious. Thank you, Thomas, for all your creative and inspiring experiments!
Macadamia breadcrumbs sound great! Thanks for your feedback Lina!
Hi Thomas, I like your recipes ! But I’m the type that likes to use rejuvelac versus probiotic capsules. Could you give directions how to do that. In some recipes you hardly use any fluids, so I guess that woud be difficult as a substitute.
Thanx, Monique
If I only have children’s probiotic capsules is the amount of 4 still the same? Also, if using sauerkraut juice or other fermented vegetable juice, what is the correct amount to add? Thanks a lot.
The capsules I’m using contain 500M microorganisms (acidophilus), so if yours contain less than that you should use a bit more. I always used 4 capsules but I’m almost sure it would work with less.
Regarding the fermented juices, just replace the 4 tbsp water with the sauerkraut juice or rejuvelac. I had the chance to try with quinoa rejuvelac and it worked, so I guess it will work with sauerkraut juice too. Good luck!
Hello Thomas,
Are you referring to 500million?
I’m considering buying the acidophilus and I can buy them in capsules, but they have 4 billion organisms per capsule. Can you advise how much I should use? Do you think I can use 1 capsule of 4 billion? And will this result in different taste profile?
PS. After waiting for 2 weeks, today I’m finally going to smoke the Hickory cheese. I’m smoking it in our BBQ Super excited! On the other side, I’m soaking the cashews to start making Camembert for the first time.
As soon as they’re picture worthy I will place them on your Instagram!
Hello Nina,
Yes, I’m referring to the 500M microorganisms. Depending on the brand of probiotics, it’s very hard to tell what will work and what won’t.
For your case, 1 capsule will be more than enough.
Hope you will like the Hickory Smoked Cheese!
Hi! Thanks for your recipes! I tried this recipe this weekend and ended up with light red spots on top of the cashew mixture after fermenting at room temperature. I’m wondering if you’d know what it might be and it’s salvageable. Thanks so much!
This looks great! I have some Mesophilic culture that I used for your vegan camembert 9http://www.thecheesemaker.com/mesophilic-starter-series-md-88-89/). Can this be subbed in for the acidophilus?
Thanks!
Definitely! Use about 1/16 tsp of mesophilic and it should work 😉
Hi! I’m so excited to find your page, all your recipes look wonderful. Two questions: One, since I have probiotic powder – how much should I use in this recipe? Two, if I purchase the Roquefort bacteria for the Camembert cheese – are there any other recipes I can use that in? Thank you for the recipes and for being a super awesome vegan!!
Hi,
I would recommend using a heaping 1/8 tsp, if after 48h your cashew cream is still not lemony, add some more.
Hope this helps!
Hello, excited to try These, thank you. Do you think I Could I use the liquid from fermented vegetables as long as the flavours were fairly plain (no garlic ect) ?
I mean as a replacement to the probiotics?
Hi Keren,
Yes you can, like sauerkraut juice for example. Be aware it might change the flavor a bit.
Thank you, can’t wait to try.
I really wanted to love this but it just tasted like cashews. I left it out for 2 days with probiotic but the flavour didn’t seem to change. What did I do wrong? Maybe the probiotic were too old?
Hi Steph,
Something definitely went wrong, it should not taste like cashews. The flavour should change and taste like fresh cheese with a tangy taste. I would recommend trying again with other probiotics, I hope it will work for you next time!
Thomas–I think you have nailed the problem–not quite a creamy enough to start with. Will get started on my next batch!
Thanks again, AY
Thomas, I too love your excellent recipes. I am brand new to veganism but a lifelong serious home cook and I so appreciate the complexity of your thinking about food. There are many very good vegan recipes out there but so far the ones I am finding tend to involve a fairly straightforward combining of flavors. This can make for delicious dishes, no doubt, but I have missed a sense of richness, flavors developing over time. That is what I have found with your recipes. Thank you for that!
And now for my question! I have just made my first batch of goat cheese balls, following the recipe at exactly. The mixture matured at room temperature for 24 hours and then in the fridge for 4 days–it seemed to take that long for the flavor to develop. I made the balls last night and while tasty they were in texture and color more like falafel. In your photos, the interior looks creamy and pale. Any advice on how to get closer to the texture you seem to have achieved?
Hi Adeline,
Thanks for your kind words!
It all depends on the room temperature, in the spring/summer the cashew cream can ferment in 12-16 hours while it can take up to 48h in winter. Taste it from time to time until it tastes like fresh cheese and has a nice acidity. Flavors will develop a bit in the fridge, but not that much, the main flavor really develops at room temperature (I would say 65-70°F).
Yes the interior should be very pale, did you use raw cashews? I would also recommend covering the cashew cream with a clean towel so it doesn’t dry out too much in contact with the air. Was the cashew cream at least pale in color before frying?
Regarding the texture, I think it’s because you didn’t blend it enough. If you don’t have a very powerful food processor I would recommend using a blender and scraping the sides regularly until you get a thick and very smooth consistency. I hope this helps, and good luck for your next batch!