This post may contain affiliate links. Please read our disclosure policy.

Learn how to make egg roll wrappers at home with just 3 ingredients! It’s so easy to prepare that you won’t buy them at the supermarket anymore. Use them to make egg rolls or samosas!

I’ve bought a lot of frozen egg roll wrappers at the store in the past, and in full honesty, I always threw away half of the packet because I would have to thaw the whole thing to use just a dozen of them. What a waste! Especially at the cost of a package. Little did I know that I could make them at home at a fraction of the cost!
Recently, Vân, my Vietnamese wife, taught me how she makes egg roll wrappers from scratch. I was MIND-BLOWN. « It’s that easy?! » I told her.
Yes, IT IS. Making egg rolls at home only requires flour, salt, baking powder, and water. Today, I’m pleased to share this technique with you all!
Let’s be real. The recipe is super simple, but it took me quite a few tries to get it right. Don’t worry, I’m sharing all of my tips in the article below. If you are more into videos, I have made one as well that you can find in the recipe card.
A quick note before starting: Vietnamese egg rolls were once wrapped in rice paper. Nowadays, most of the egg rolls in Vietnam are wrapped in wheat flour wrappers, which makes them less greasy and crispier. I am going to show you how to make the latter.
⭐️ Why You Should Try It
- You will never buy egg roll wrappers again. Once you realize how easy it is to make and how great it tastes, I’m confident you will never buy those expensive wrappers at the store. If you have ever made crêpes, you will feel very familiar with this recipe!
- It’s ready in no time. Simply whisk together all ingredients and cook the wrappers in a non-stick pan. There is no resting time, no rolling, and it will take only 15 minutes to make them all!
- It’s crispy, flaky, and fries to perfection. You will end up with crispy and golden brown egg rolls each and every time.

🌾 Ingredient Notes
To make these wrappers, you will need only 3 basic ingredients you probably already have in your pantry. Here is what you will need:
- Flour – The good old-fashioned all-purpose flour works great here. There is no need to use bread flour or a specific kind of flour.
- Water
- Baking powder – Adding baking powder to the batter helps the wrappers crisp up and turn golden brown during frying.
- Salt – Optional. It just adds a hint of saltiness to the wrappers.
🥣 How to Make It
There are different ways to make egg roll wrappers. Some techniques call for rolling the dough into a very thin layer, while others require making a wet dough and then swirling it quickly into the pan.
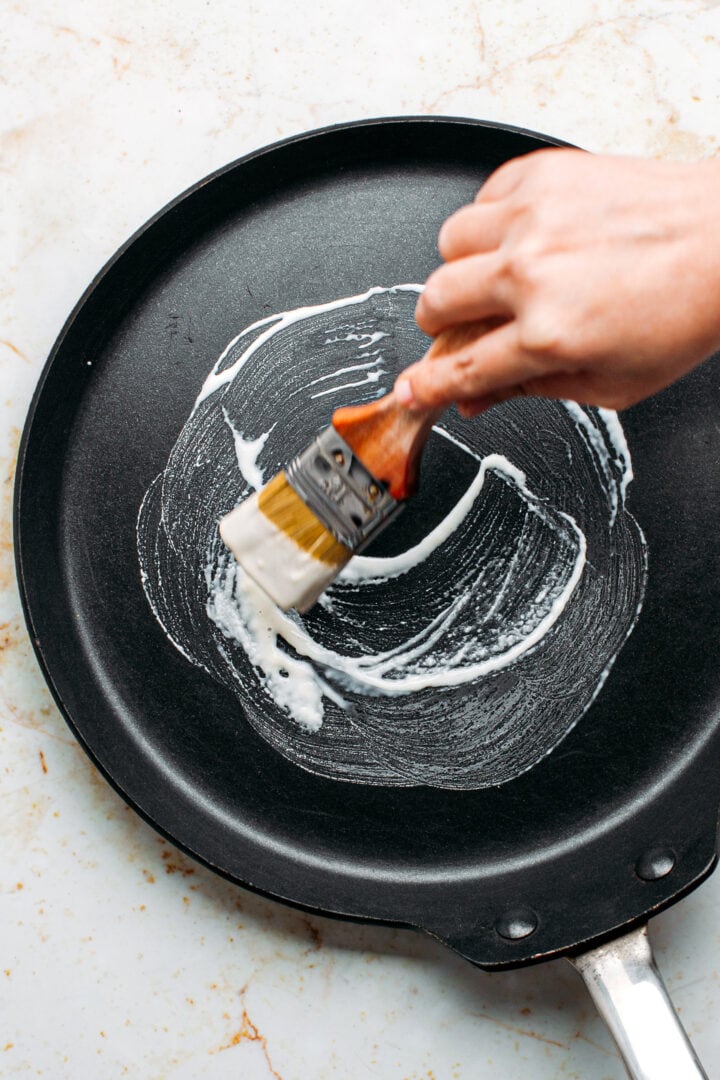
I tried both of these techniques, and none were easy. However, I discovered another way! Introducing the brushing technique! I find this way of making wrappers much easier, and it always yields great results. It does require some practice as you have to brush the batter on a hot pan just like you would paint a circle on an empty canvas, but after a couple of tries you should be able to make perfect wrappers!
Note: Before starting, ensure you have a non-stick crêpe pan and a pastry brush. Both of these are essential to making these wrappers.
With that being said, here is my process for making the wrappers:
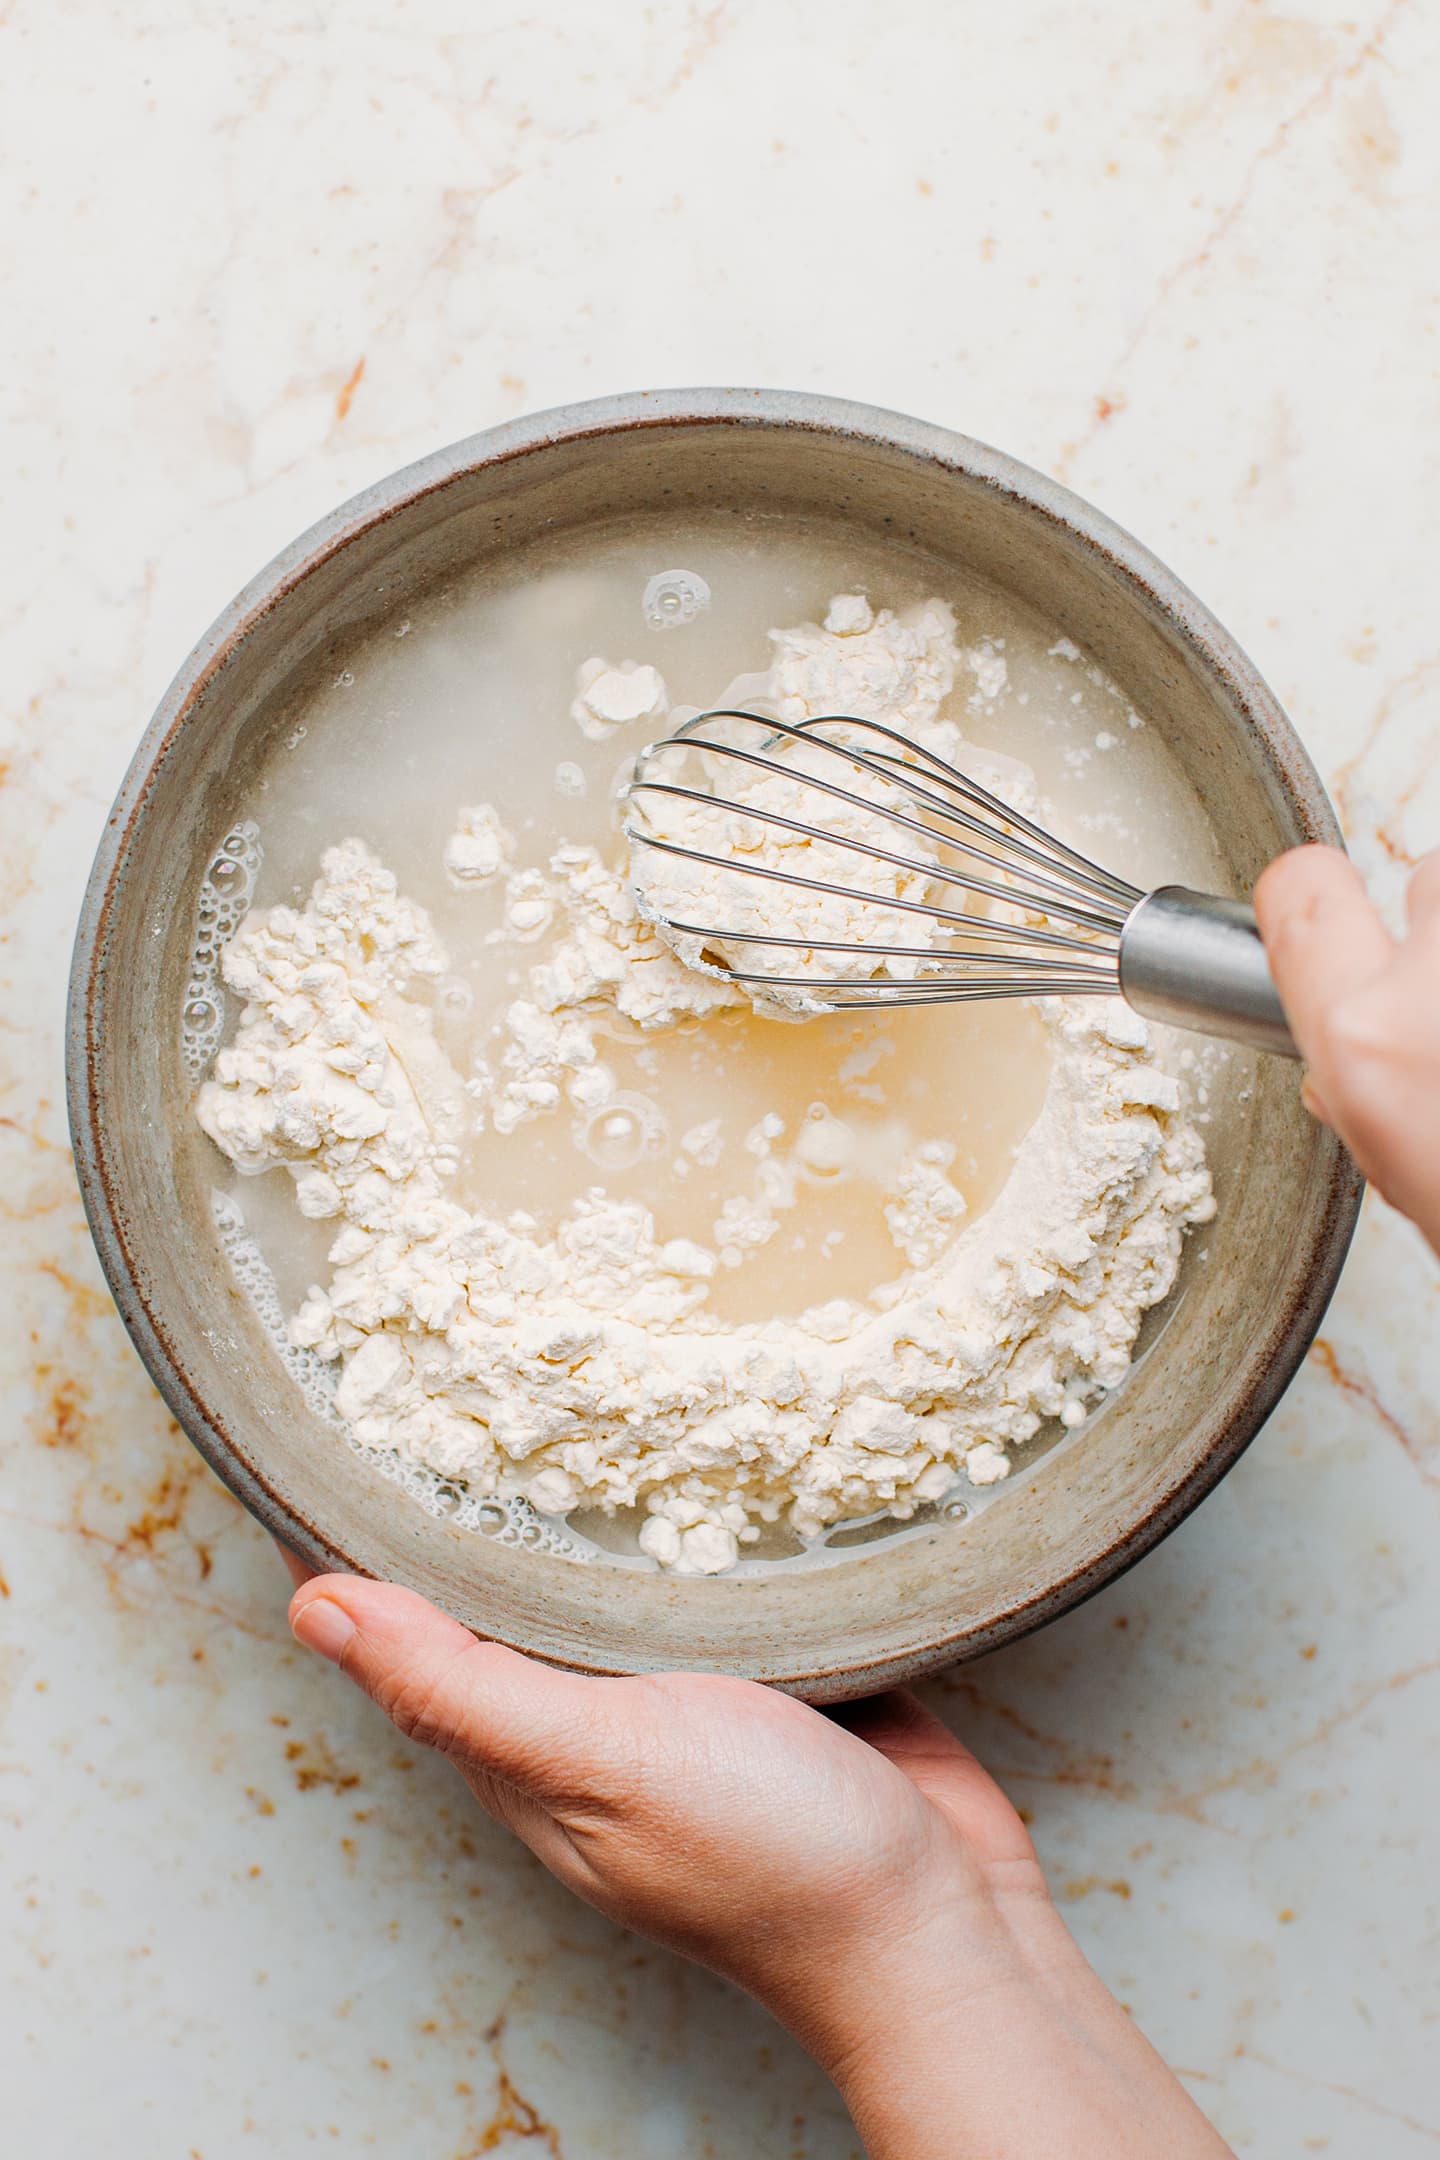
- Whisk together the dry ingredients. Add the flour, baking powder, and salt to a mixing bowl and whisk until combined.
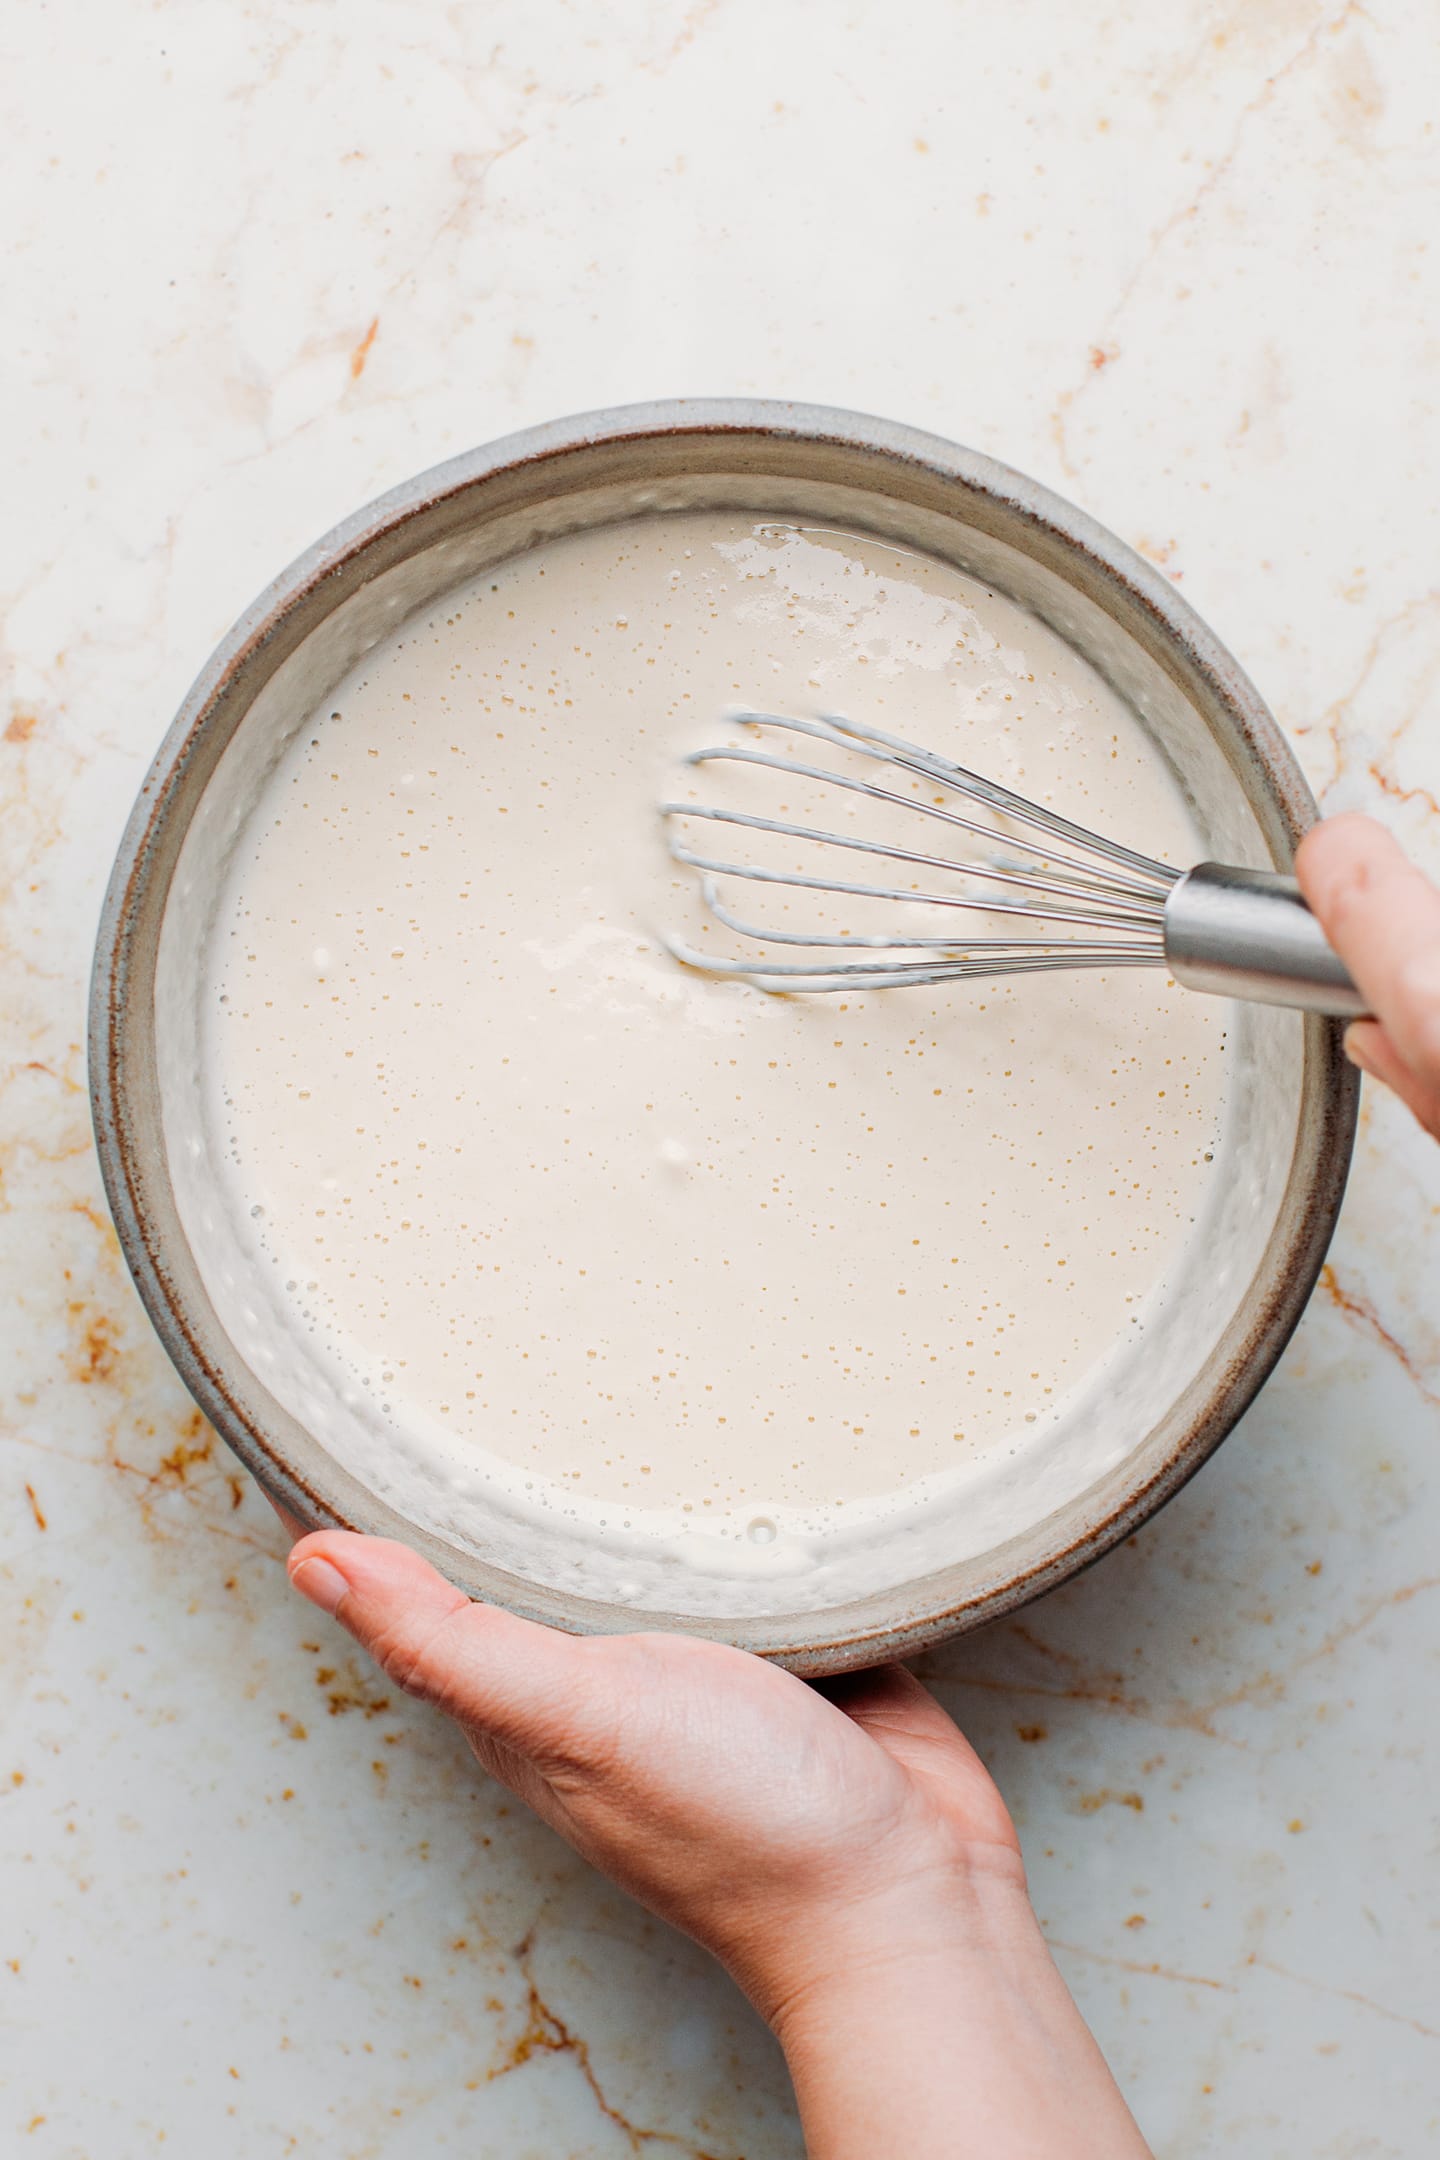
- Add the water. Next, pour in the water and whisk until smooth (the batter will appear very liquid. This is normal). If the batter has lumps, at this point, you can pass it through a fine sieve mesh. I personally always do that as it results in smoother, more good-looking wrappers.
- Heat a pan. Heat a non-stick crêpe pan over low-medium heat. This is important. Your pan must not be too hot.
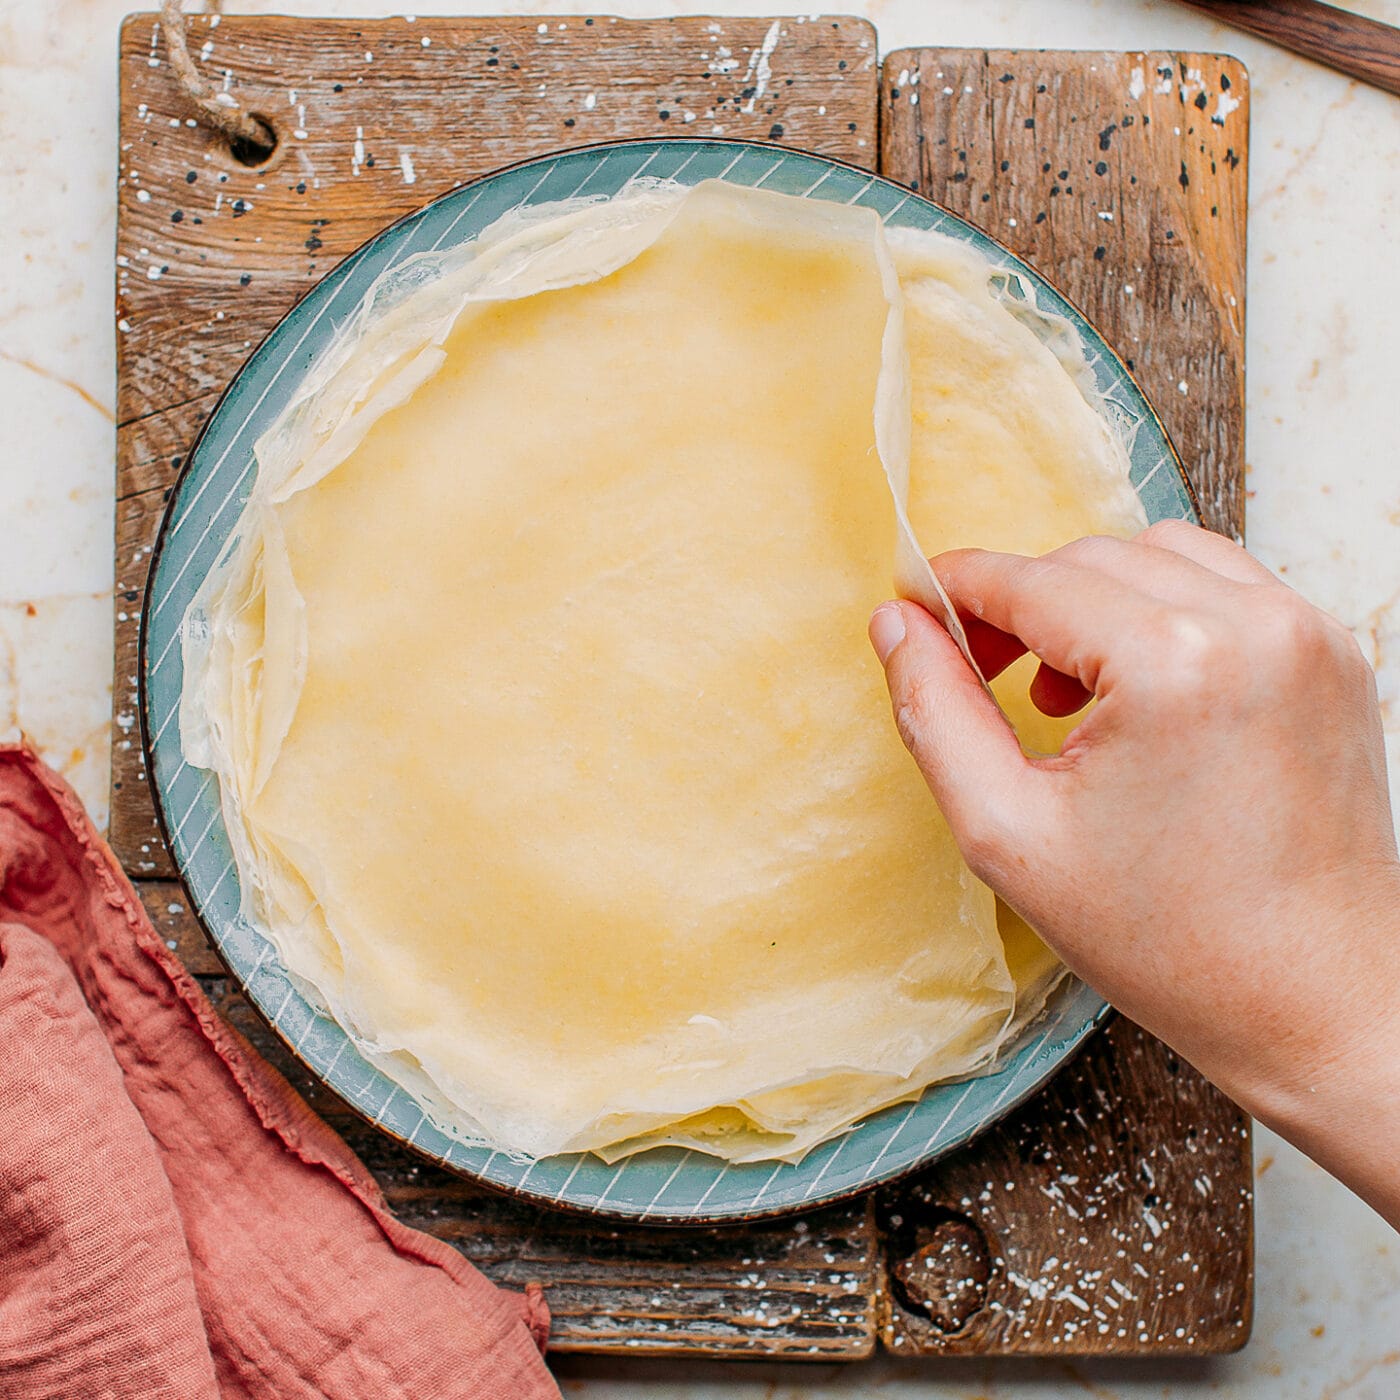
- Brush the wrapper. Dip your pastry brush into the batter and quickly brush it on the pan in a circular motion to create a circle about 8 inches (20cm) in diameter. Dip your brush again and keep brushing until you have an even layer. 12-15 dips are usually enough. Basically, it’s like painting a circle on a canvas.
- Cook. As you brush, the batter will cook in just a few seconds. Once you have finished brushing the wrapper, cook it for 15-20 seconds but not more. Otherwise, it will dry and crack when you try to roll it later.
- Lift the wrapper from the pan. Using a spatula, carefully lift one side of the wrapper and use your hands to remove the wrapper from the pan. Transfer to a plate.
- Clean the pan. Using a clean kitchen paper towel, clean the pan to remove any leftover batter. Repeat the brushing process to make more wrappers with the remaining batter. Remember to clean the pan between each wrapper.

🫔 How to Use It
Obviously, these wrappers are perfect for making vegan egg rolls, but you can also use them to make samosas or apple pie egg rolls!
❄️ Storing
- To store: These wrappers are best used the same day as they quickly dry out and stick together. You can keep them for up to 12 hours at room temperature on a plate covered with plastic wrap. I do not recommend storing them for longer than a day.
- Freezing: I do not recommend freezing the wrappers. However, you can easily freeze the wrapped egg rolls before frying.


📔 Tips
- Use a non-stick crêpe pan. This is mandatory. Since you won’t use oil, your pan must be non-stick. Please don’t use a cast-iron pan.
- Heat over low-medium heat. You want to keep the pan at a low fire. This will give you enough time to spread the batter using the brush.
- Do not make the wrappers too thin or too thick. If your wrappers are too thin, they will be difficult to work with and fragile. On the opposite, if your wrappers are too thick, they will break when trying to roll them and will yield a too-crunchy texture.
- Use the wrappers the same day. Since these wrappers are thin and partially cooked, they tend to stick to each other if you stack them for too long. I recommend preparing them a maximum of 3 hours before using them.
💬 FAQ
I haven’t tried it yet, but I believe this recipe should work with a 1:1 gluten-free four mix.
Brushing the batter into the pan vs. pouring it helps achieve a very thin thickness.
I do not recommend using a silicon brush as you won’t be able to get a very thin wrapper. I tested both, a regular pastry brush and a silicon one. The silicon one yielded thicker wrappers that broke during frying.
Your wrappers are ready when the batter is no longer white, has a light yellow color, and has a mate appearance.
Yes! You can use these wrappers in an air-fryer.

If you have ever wondered if making egg roll wrappers at home is possible, you will be amazed at how easy it is! My wrappers are much cheaper than buying them at the supermarket, and they brown and crisp up beautifully!


Save this recipe!
Enter your email below and I’ll send it to your inbox!
Plus, you will receive new recipes every week!
Homemade Egg Roll Wrappers
Ingredients
- 1 cup (125 g) all-purpose flour
- 1/8 tsp baking powder
- 1/8 tsp salt
- 3/4 cup and 1 tbsp (200 ml) water
Instructions
- Whisk together the dry ingredients. Add the flour, baking powder, and salt to a mixing bowl and whisk until combined.
- Add the water. Next, pour in the water and whisk until smooth (the batter will appear very liquid. This is normal). If the batter has lumps, at this point, you can pass it through a fine sieve mesh. I personally always do that as it results in smoother, more good-looking wrappers.
- Heat a pan. Heat a non-stick crêpe pan over low-medium heat. This is important. Your pan must not be too hot.
- Brush the wrapper. Dip your pastry brush into the batter and quickly brush it on the pan in a circular motion to create a circle about 8 inches (20cm) in diameter. Dip your brush again and keep brushing until you have an even layer. 12-15 dips are usually enough. Basically, it's like painting a circle on a canvas.
- Cook. As you brush, the batter will cook in just a few seconds. Once you have finished brushing the wrapper, cook it for 15-20 seconds but not more. Otherwise, it will dry and crack when you try to roll it later.
- Lift the wrapper from the pan. Using a spatula, carefully lift one side of the wrapper and use your hands to remove the wrapper from the pan. Transfer to a plate.
- Clean the pan. Using a clean kitchen paper towel, clean the pan to remove any leftover batter. Repeat the brushing process to make more wrappers with the remaining batter. Remember to clean the pan between each wrapper.
- These wrappers are best used the same day as they quickly dry out and stick together. You can keep them for up to 12 hours at room temperature on a plate covered with plastic wrap.
Video

Notes
- Use a non-stick crêpe pan. This is mandatory. Since you won’t use oil, your pan must be non-stick. Please don’t use a cast-iron pan.
- Heat over low-medium heat. You want to keep the pan at a low fire. This will give you enough time to spread the batter using the brush.
- Do not make the wrappers too thin or too thick. If your wrappers are too thin, they will be difficult to work with and fragile. On the opposite, if your wrappers are too thick, they will break when trying to roll them and will yield a too-crunchy texture.
- Use the wrappers the same day. Since these wrappers are thin and partially cooked, they tend to stick to each other if you stack them for too long. I recommend preparing them a maximum of 3 hours before using them.
Nutrition

About the Author
Thomas Pagot is the founder, photographer, and recipe developer behind Full of Plants. He created the blog in 2016 as a personal cookbook for vegan recipes. Through years of recipe development, Thomas has successfully grown Full of Plants into a trusted resource for plant-based recipes.
Leave a Comment
hi! do you know if i can wrap the egg rolls and then freeze them to fry or bake later on?
Hi Julianna,
Yes! You can wrap your egg rolls and freeze them. When you’re ready to cook, you can deep-fry them straight from the freezer. No need to thaw first. Just keep in mind that frying will take a little bit longer.
Can this be made using white spelt flour ?
I’m coming to how much ingredients you need in any recipe how about putting it in the English measurement rather the European measuring system. Thank you.
Hi Ray,
I try to add both in most recipes but some may be missing one or the other, thanks for the heads up!
Metric measurements are used in many other countries, not just in Europe. I’ll update this one with volume measurements soon though.
The very best recipe ever! I didn’t break any and my egg roll turned awesome. Thank you for the recipe. ❤️
You’re welcome Hilkka! Thanks for your feedback!
Egg rolls wrappers have egg in them. This is a spring roll wrap recipe
The difference between spring roll wrappers and egg roll wrappers is very unclear. You can find a lot of debate about that. For some, the difference is not about the wrappers themselves but about the filling and/or process of making them (for example, dipping the rolls in eggs before deep-frying).
If you check popular supermarket brands such as Twin dragon, Melissas, Frieda’s, or Dynasty, they all use the label ‘Egg Roll Wrappers’ and do not contain any eggs.
I picked this name for the recipe as it’s the one that speaks the most to me, but you can definitely call them spring roll wrappers 😉 Anyway, the main point is that I hope you will enjoy the recipe!
It’s not unclear. Egg roll wrappers form a lot of surface bubbles on them as they fry. This is the one feature that differentiates egg roll wrappers from spring roll, lumpia, wonton, and other Asian wrappers. And to reference supermarket, mass-produced wrappers as authentic is almost shameful.
Thanks for your input and kind words Dan. Glad to hear it’s not unclear for you. If you’re after that bubbly texture, you can try dipping the rolls in beaten eggs (if you are not vegan) before frying. Anyway, I hope that, whatever you want to call it, you enjoyed the recipe!
I tried the recipe as shown and the batter was about as thick as pancake mix. I do not have a non-stick pan but I do have perfectly seasoned cast iron skillets which are virtually non-stick. I have been cooking since I was a child and I am 76. At even a low heat trying to brush the dough batter on the skillet instantly cooked with the next brushing just pulling the first layer off of the skillet. It was a mess. I fell back on my experience and added three more ounces of water to the mix to thin it out. Using an 8” iron skillet I poured three tablespoons of mix in the skillet tilting to evenly coat the bottom and placed the skillet on a low to medium heat for just over two minutes. The wrap easily came off the skillet. I then turned the skillet over and cooled it under running water and added another three tablespoons of batter to repeat the process. Every third use received a light spray of canola. No sticking. See photos. The finished wrap from my skillet was a shade over six inches. A ten inch skillet might produce an 8” wrap. This system was easier and much faster with uniform wraps.
Hi Andy,
I’m sorry to hear the recipe didn’t work for you. However, if you mix 125g of all purpose flour with 200ml water I can assure you that the batter won’t be as thick as a pancake batter (more like a crêpe batter, so it’s a bit more runny).
Regarding your system, you just cannot cook the batter like a crêpe because it won’t be thin enough. If it’s not paper thin, you may be able to roll your egg rolls but they will break during frying and you won’t get a very thin and flaky texture. That’s why in Vietnam they either use the “wet dough” technique or this simpler brushing one.
Also, you want to make sure the pan is not too hot and as stated in the post, you should use a non-stick pan, not a thick iron skillet, even if it’s correctly seasonned. Avoid using oil as well, that’s probably why one brush pulled off the first one in your case.
One more thing, on the video we made, we used exactly the amount of ingredients and process shared in the recipe, so you can see how it works.
I saw in the video that the baking powder is more than the salt, but not in the recipe. Which one is it?
It looks like that but it is actually the same volume 🙂 You should always refer to the written recipe.
Hope you will have success with your egg roll wrappers, Maria!
Can you bake these instead of frying them?
You can bake them but the texture and taste won’t be as good.
This was awesome! My hubby and I were intimidated by making our own wrappers, but it turned out great! Thank you!
Glad you had success in making your own wrappers 😉 Thanks for your rating, Dyana.
Do you think this will work with a silicone pastry brush? Or should it be a bristle one?
I have yet to try with a silicon pastry brush, but to be honest, I doubt it will work.
I’m going to give these a go with moonglette, parsley and capers to make Brik sans oeuf. Can’t find a reliable vegan recipe for brik- this one may be okay, but they really need to be deep-, not pan-fried. Note also the two types of flour, which I hadn’t heard of before.
I am not sure these would make a good substitute for briks, it’s a bit different.
Amazing wrappers. This will add a new taste for rolls. Good job!
Thanks Tommy!
Love that you created these! Thanks so much.
You’re welcome Tetyana 😉