This post may contain affiliate links. Please read our disclosure policy.

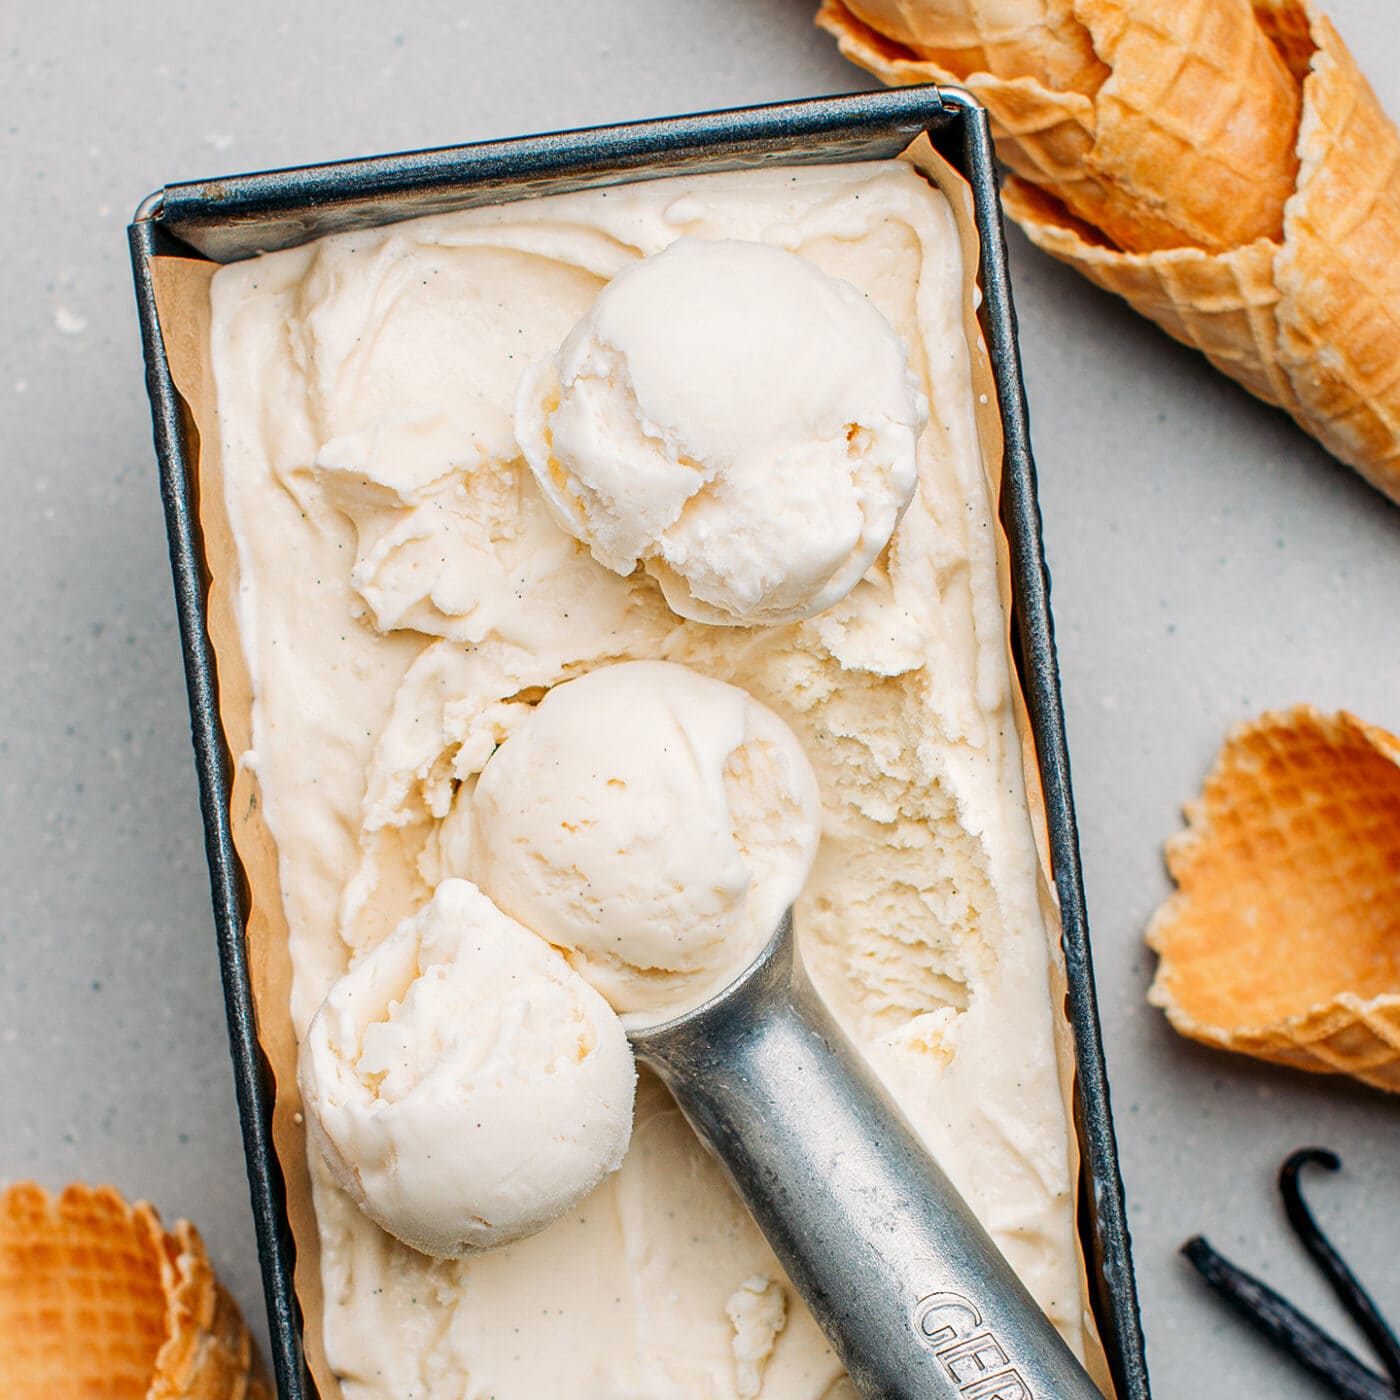
Introducing the best vegan vanilla ice cream! This plant-based ice cream is irresistibly creamy, infused with plenty of fresh vanilla flavor, and has nothing to envy its dairy counterpart. Nut-free and coconut-free!

I’m so excited to release this vegan vanilla ice cream recipe finally! It’s been in the works for a while, and after dozens of tests, it’s finally here!
⭐️ Why You Should Try It
- Insanely creamy. This vanilla ice cream has everything you are expecting from top-quality ice cream. It has a rich and creamy mouthfeel, is perfectly sweetened, and is not icy or chewy.
- Nut-free and coconut-free. Let’s be honest, cashew-based ice creams taste good, but they are quite heavy to digest. And when it comes to coconut milk-based ice creams, they obviously have an overpowering coconut flavor. This recipe kicks those out of the equation to bring you the true ice cream experience.
- It’s scoopable straight from the freezer. Say goodbye to rock-hard ice creams. This vegan ice cream is scoopable right out of the freezer, just like commercial ice creams. You don’t even need to wait a second to scoop it!
- Infused with plenty of vanilla. We are using fresh vanilla and vanilla extract to create a bold vanilla flavor.
- It tastes better than store-bought. For real, if you are familiar with Ben & Jerry’s or Oatly ice creams, I can assure you this one tastes even better!
- It’s cheaper! After calculation, 2 pints (1L) of ice cream costs about $3 to make, which is much lower than most premium brands of vegan ice cream! Plus, you know exactly what is inside.
Why This Recipe Works
Making great ice cream is all about the ratio of ingredients. After looking at the ingredients of many different brands of vegan ice cream, I tried to reverse the recipes. Here are a few explanations about the role of each ingredient.
Fat: A key element in ice cream. Fat not only gives the ice cream body and a creamy mouthfeel, but it also helps enhance the flavors. According to most vegan commercial ice cream nutritional values, the amount of fat is, on average, around 14%. To add fat, I went with cacao butter as it has a melting point higher compared to coconut oil, allowing the ice cream to melt more slowly in the mouth. According to this article, to get optimal consistency and texture, it’s best to replace 20% to 40% of the cacao butter with liquid oil. I personally went with sunflower oil, but any neutral oil will work.
Sugar: We will be using a combination of granulated sugar and dextrose. The latter helps improve the scoopable factor, making the ice cream softer. Dextrose is only 70% as sweet as white sugar (sucrose) and lowers the freezing point twice as much as white sugar. I replaced 30% of the sugar with dextrose and found this amount perfect for getting a scoopable ice cream straight from the freezer.
Gums: The addition of gums reduces the formation of crystals that can make the ice cream icy. I went with a combination of locust bean gum and guar gum, but there are other possible combinations that yield the same result.
Please note that I am giving measurements in grams, so you will need a kitchen scale to prepare this recipe.

🥛 Ingredient Notes
This vegan ice cream recipe requires a few special ingredients you might not have on hand, but it is quite easy to find online. Here is what you will need:
- Plant-based milk – Any unsweetened plant-based milk will work. I used soy milk which contains 1.8g of fat per 100g. If using almond or oat milk, you might have to adjust the amount of fat slightly. Check out the Tips section to learn how to do that.
- Cacao butter – Preferably deodorized cacao butter. The cacao butter I’m using comes in small chips, but if yours comes in blocks or chunks, it’s also okay. Check out the Tips to learn how to substitute it.
- Sunflower oil – Sunflower, rapeseed, or any other neutral oil.
- Sugar – Preferably granulated white sugar. Using coconut or brown sugar would alter the overall flavor and cover the fresh vanilla flavor.
- Dextrose – I do not recommend omitting or substituting dextrose, as it would result in a harder texture.
- Lecithin – A key ingredient in blending oils and liquids. I used powdered soy lecithin, but sunflower lecithin will also work if you want to make this ice cream soy-free.
- Gums – The addition of gums helps enhance the overall texture. Locust bean gum reduces crystal size, while guar gum gives more body to the ice cream.
- Vanilla extract – For the best flavor, use high-quality vanilla extract or homemade vanilla extract.
Note: My recipe has been designed to reproduce commercial vegan ice creams, not to be the healthiest. If you have a problem with any of the ingredients used here, I recommend checking another recipe that makes use of cashews and coconut cream.
🍦 How to Make It
It consists of 3 steps: prepare the ice cream base, chill overnight, and churn.


Prepare the ice cream base
- Melt the cacao butter. Add the milk, cacao butter, oil, vanilla extract, and vanilla bean seeds, if using, to a saucepan. Heat over low-medium heat until the cacao butter has melted.
- Whisk together the dry ingredients. In a small bowl, whisk together the sugar, dextrose, lecithin, gums, and salt.
- Combine everything. Add the dry ingredient to the pan and heat the mixture to 170°F (75°C), constantly whisking. You must bring the ice cream base to this temperature to activate the locust bean gum.
- Blend. Finally, transfer to a high-speed blender and blend for 5-10 seconds. This will help emulsify everything.
- Chill. Transfer the ice cream base to a large bowl and chill in the refrigerator overnight.


Churn
Once the ice cream base is completely cold, it’s time to churn it! To do so:
- Turn on your ice cream maker and slowly pour in the chilled mixture.
- Churn on low speed (I used the Kitchenaid attachment on speed 1) for 20-25 minutes or until it looks like fluffy soft-serve ice cream.
- Transfer to a freezer-safe container and freeze for at least 6 hours before enjoying!
Which ice cream maker to use?
I highly recommend this Ice Cream Maker Attachment if you own a KitchenAid Stand Mixer. It’s the one I use, and it yields smooth ice cream every time. Otherwise, this Cuisinart Ice Cream Maker is a top-rated product, so you cannot go wrong with it.

📔 Tips
- Substituting cacao butter. You can substitute deodorized coconut oil for the cacao butter, but be aware the mouthfeel will be slightly different. Since coconut oil has a lower melting point, the ice cream will melt a bit more quickly in the mouth. It will, however, have a more neutral flavor, as deodorized cacao butter still has a subtle cacao flavor. You can also use a combination of both.
- Do not make any other substitutions. I do not recommend replacing any other ingredients as it will alter the texture of the ice cream.
- Do not omit the salt. It rounds up and enhances the overall flavor.
- Feel free to play with the ratios and ingredients. If you are feeling adventurous and want to adjust the sweetness or tweak the ratios, I am sharing with you my Vegan Ice Cream Ratio Sheet. I used it to develop this recipe. It can be helpful to use vegan milk that is higher/lower in fat or already sweetened. Simply copy and paste the table into a new sheet and play with the amount of fat/sugar.
- Make sure your ice cream bowl is cold enough. I recommend freezing your ice cream bowl for at least 15 hours to ensure it is completely ice cold.
- Let the mixture chill overnight. Your ice cream base must be completely cold as well, do not try to run it into your ice cream maker if it’s warm or at room temperature. It simply won’t freeze.
🍫 Add-ins
If you find plain vanilla ice cream too boring, you can have fun making your own Ben & Jerry-style ice cream. Stir in the add-ins after you have churned the ice cream. Here are a few ideas to get you started:
- Chocolate: Stir in chocolate chunks or chocolate chips for a crunchy texture.
- Nuts like walnuts, hazelnuts, almonds, or macadamia. Preferably roasted for a nuttier flavor.
- Crumbled cookies like these vegan chocolate chip cookies.
- Salty crackers like pretzels or graham crackers.
- Swirls of vegan caramel sauce, vegan Nutella, or praline paste.
- Nut butter like peanut butter, almond butter, or cashew butter!
🍪 How to Serve It
You can serve this vegan vanilla ice cream the simple way, in a bowl, or:
- In a waffle cone: The classic way to serve ice cream, scoop 2-3 balls into a vanilla waffle cone.
- To make a sundae: Scoop the ice cream into a cup and top with chocolate sauce, caramel sauce, and coconut whipped cream!
- In a banana split: Peel and slice a banana in half. Place scoops of ice cream between the banana halves, top with chocolate sauce, and top with whipped cream, chopped nuts, and maraschino cherries.
- To make an ice cream sandwich: Sandwiched between two cookies or graham crackers.
- Wrapped in mochi: This vanilla ice cream is also perfect for making mochi ice cream!
- On top of waffles, pancakes, vegan brownies, or vegan crêpes.

💬 FAQ
It’s definitely not the healthiest, but it tastes terrific and is dairy-free!
No, you might be looking for another recipe if you don’t want to use any of those ingredients. This recipe is not versatile, and I don’t recommend making any substitutions.
Yes, it’s essential. This is not a no-churn recipe.
First, check the temperature of your freezer. It should be at around 0°F (-18°C). Second, make sure you are using the exact amount of ingredients given in the recipe. If you omitted the dextrose or replaced it with another type of sugar, your ice cream will be harder.
It will keep for up to 3 months in the freezer.

If you are looking for an amazing alternative to those expensive vegan supermarket brands, you are going to love this vegan vanilla ice cream! It has a velvety mouthfeel, packs a ton of fresh vanilla flavor, and is scoopable straight from the freezer!
🍨 More Vegan Ice Cream Recipes


⭐️ Did you like this recipe? Let us know in the comments below, and tag us on Facebook, Instagram, or Pinterest!

Save this recipe!
Enter your email below and I’ll send it to your inbox!
Plus, you will receive new recipes every week!
The Best Vegan Vanilla Ice Cream


Ingredients
- 670 ml unsweetneed soy milk or any other plant-based milk
- 88 g deodorized cacao butter or deodorized coconut oil
- 45 g sunflower oil or other neutral oil
- 10 ml vanilla extract 2 tsp
- seeds from 1 vanilla bean optional
- 122 g granulated sugar
- 55 g dextrose
- 2 g lecithin powder about 1 tsp
- 1 g locust bean gum about 1/2 tsp
- 0.5 g guar gum about 1/4 tsp
- a pinch of salt
Instructions
Prepare the ice cream base
- Melt the cacao butter. Add the milk, cacao butter, oil, vanilla extract, and vanilla bean seeds, if using, to a saucepan. Heat over low-medium heat until the cacao butter has melted.
- Whisk together the dry ingredients. In a small bowl, whisk together the sugar, dextrose, lecithin, gums, and salt.
- Combine everything. Add the dry ingredient to the pan and heat the mixture to 170°F (75°C), constantly whisking. You must bring the ice cream base to this temperature to activate the locust bean gum.
- Blend. Transfer to a high-speed blender and blend for 5-10 seconds. This will help emulsify everything.
- Chill. Finally, transfer the ice cream base to a large bowl and chill in the refrigerator overnight.
Churn
- Turn on your ice cream maker and slowly pour in the chilled ice cream mixture. Churn on low speed (I used the Kitchenaid attachment on speed 1) for 20-25 minutes or until it looks like fluffy soft-serve ice cream.
- Transfer to a freezer-safe container and freeze for at least 6 hours before enjoying! The ice cream will keep for up to 3 months in the refrigerator.
Notes
-
- Substituting cacao butter. You can substitute deodorized coconut oil for the cacao butter, but be aware the mouthfeel will be slightly different. Since coconut oil has a lower melting point, the ice cream will melt a bit more quickly in the mouth. It will, however, have a more neutral flavor, as deodorized cacao butter still has a subtle cacao flavor. You can also use a combination of both.
-
- Do not make any other substitutions. I do not recommend replacing any other ingredients as it will alter the texture of the ice cream.
-
- Do not omit the salt. It rounds up and enhances the overall flavor.
-
- Feel free to play with the ratios and ingredients. If you are feeling adventurous and want to adjust the sweetness or tweak the ratios, I am sharing with you my Vegan Ice Cream Ratio Sheet. I used it to develop this recipe. It can be helpful to use vegan milk that is higher/lower in fat or already sweetened. Simply copy and paste the table into a new sheet and play with the amount of fat/sugar.
-
- Make sure your ice cream bowl is cold enough. I recommend freezing your ice cream bowl for at least 15 hours to ensure it is completely ice cold.
-
- Let the mixture chill overnight. Your ice cream base must be completely cold as well, do not try to run it into your ice cream maker if it’s warm or at room temperature. It simply won’t freeze.
Nutrition

About the Author
Thomas Pagot is the founder, photographer, and recipe developer behind Full of Plants. He created the blog in 2016 as a personal cookbook for vegan recipes. Through years of recipe development, Thomas has successfully grown Full of Plants into a trusted resource for plant-based recipes.
Leave a Comment