This post may contain affiliate links. Please read our disclosure policy.

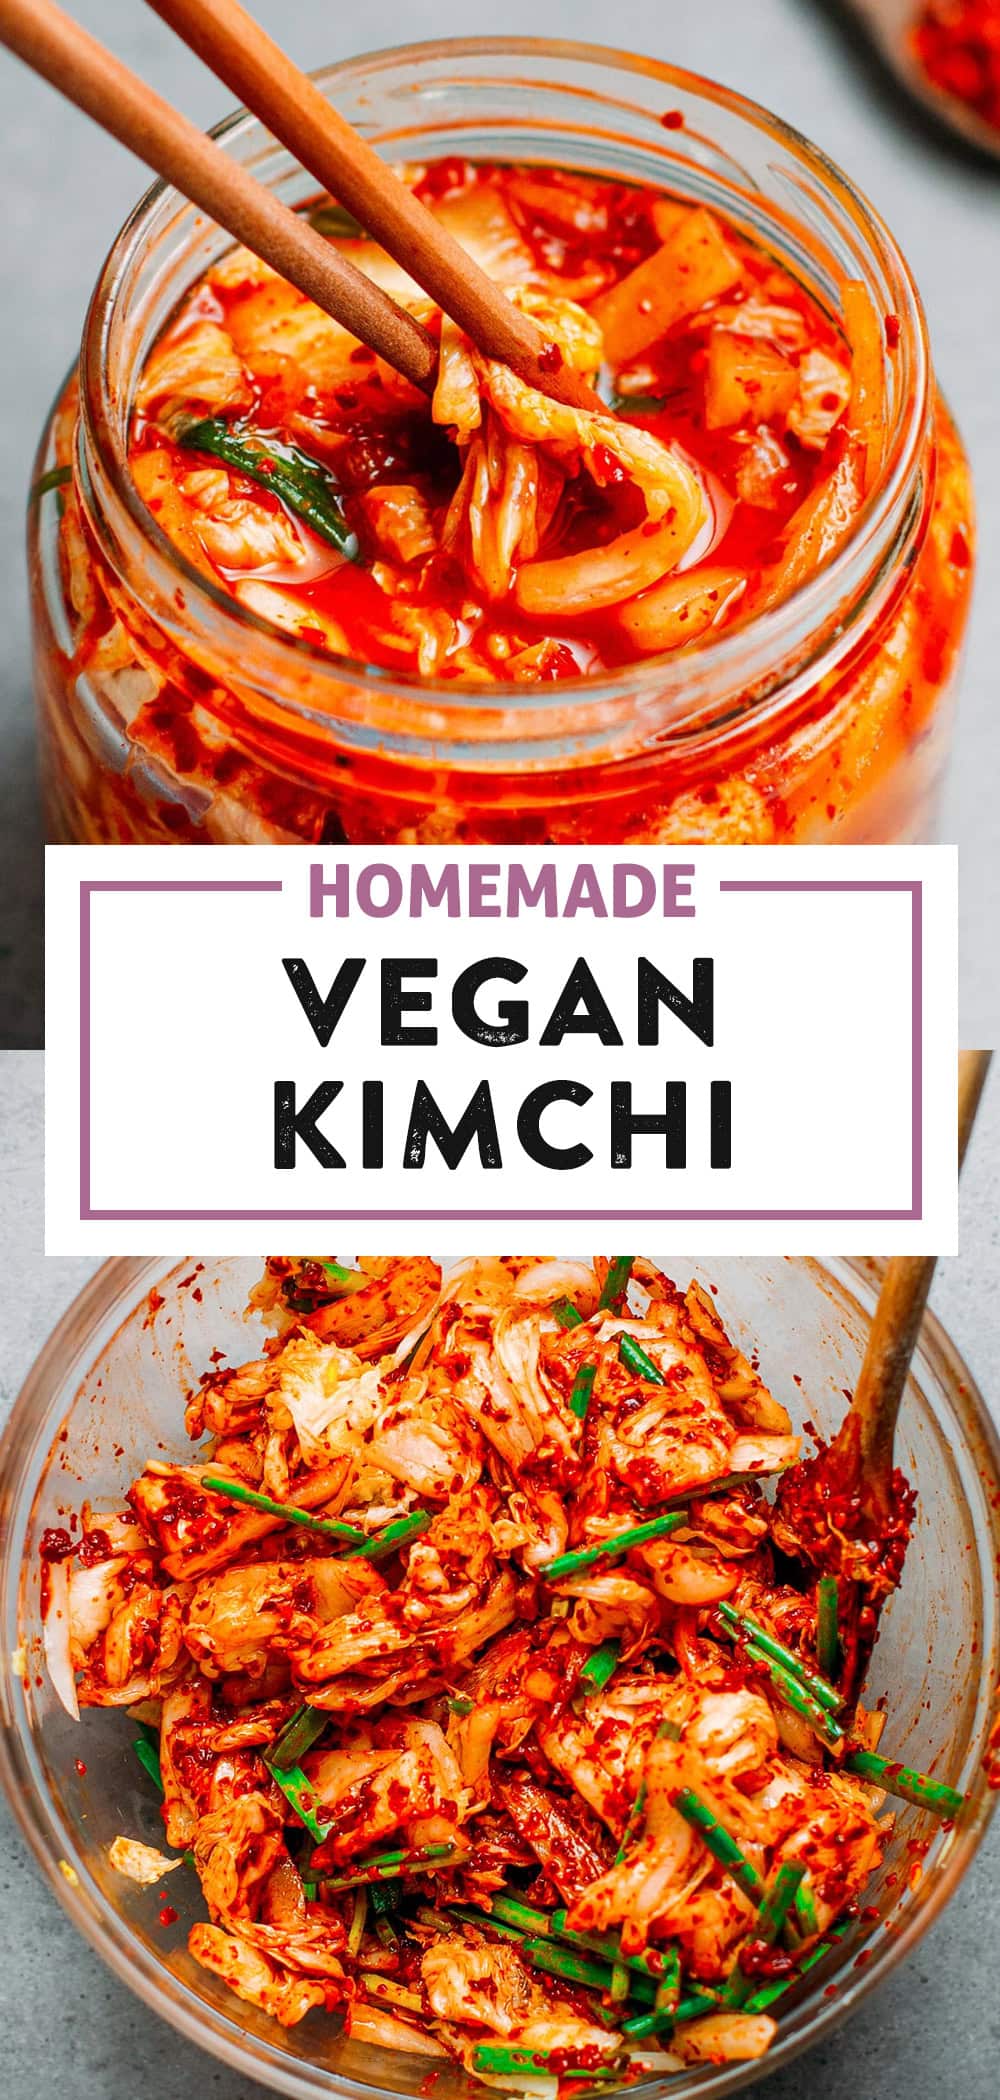
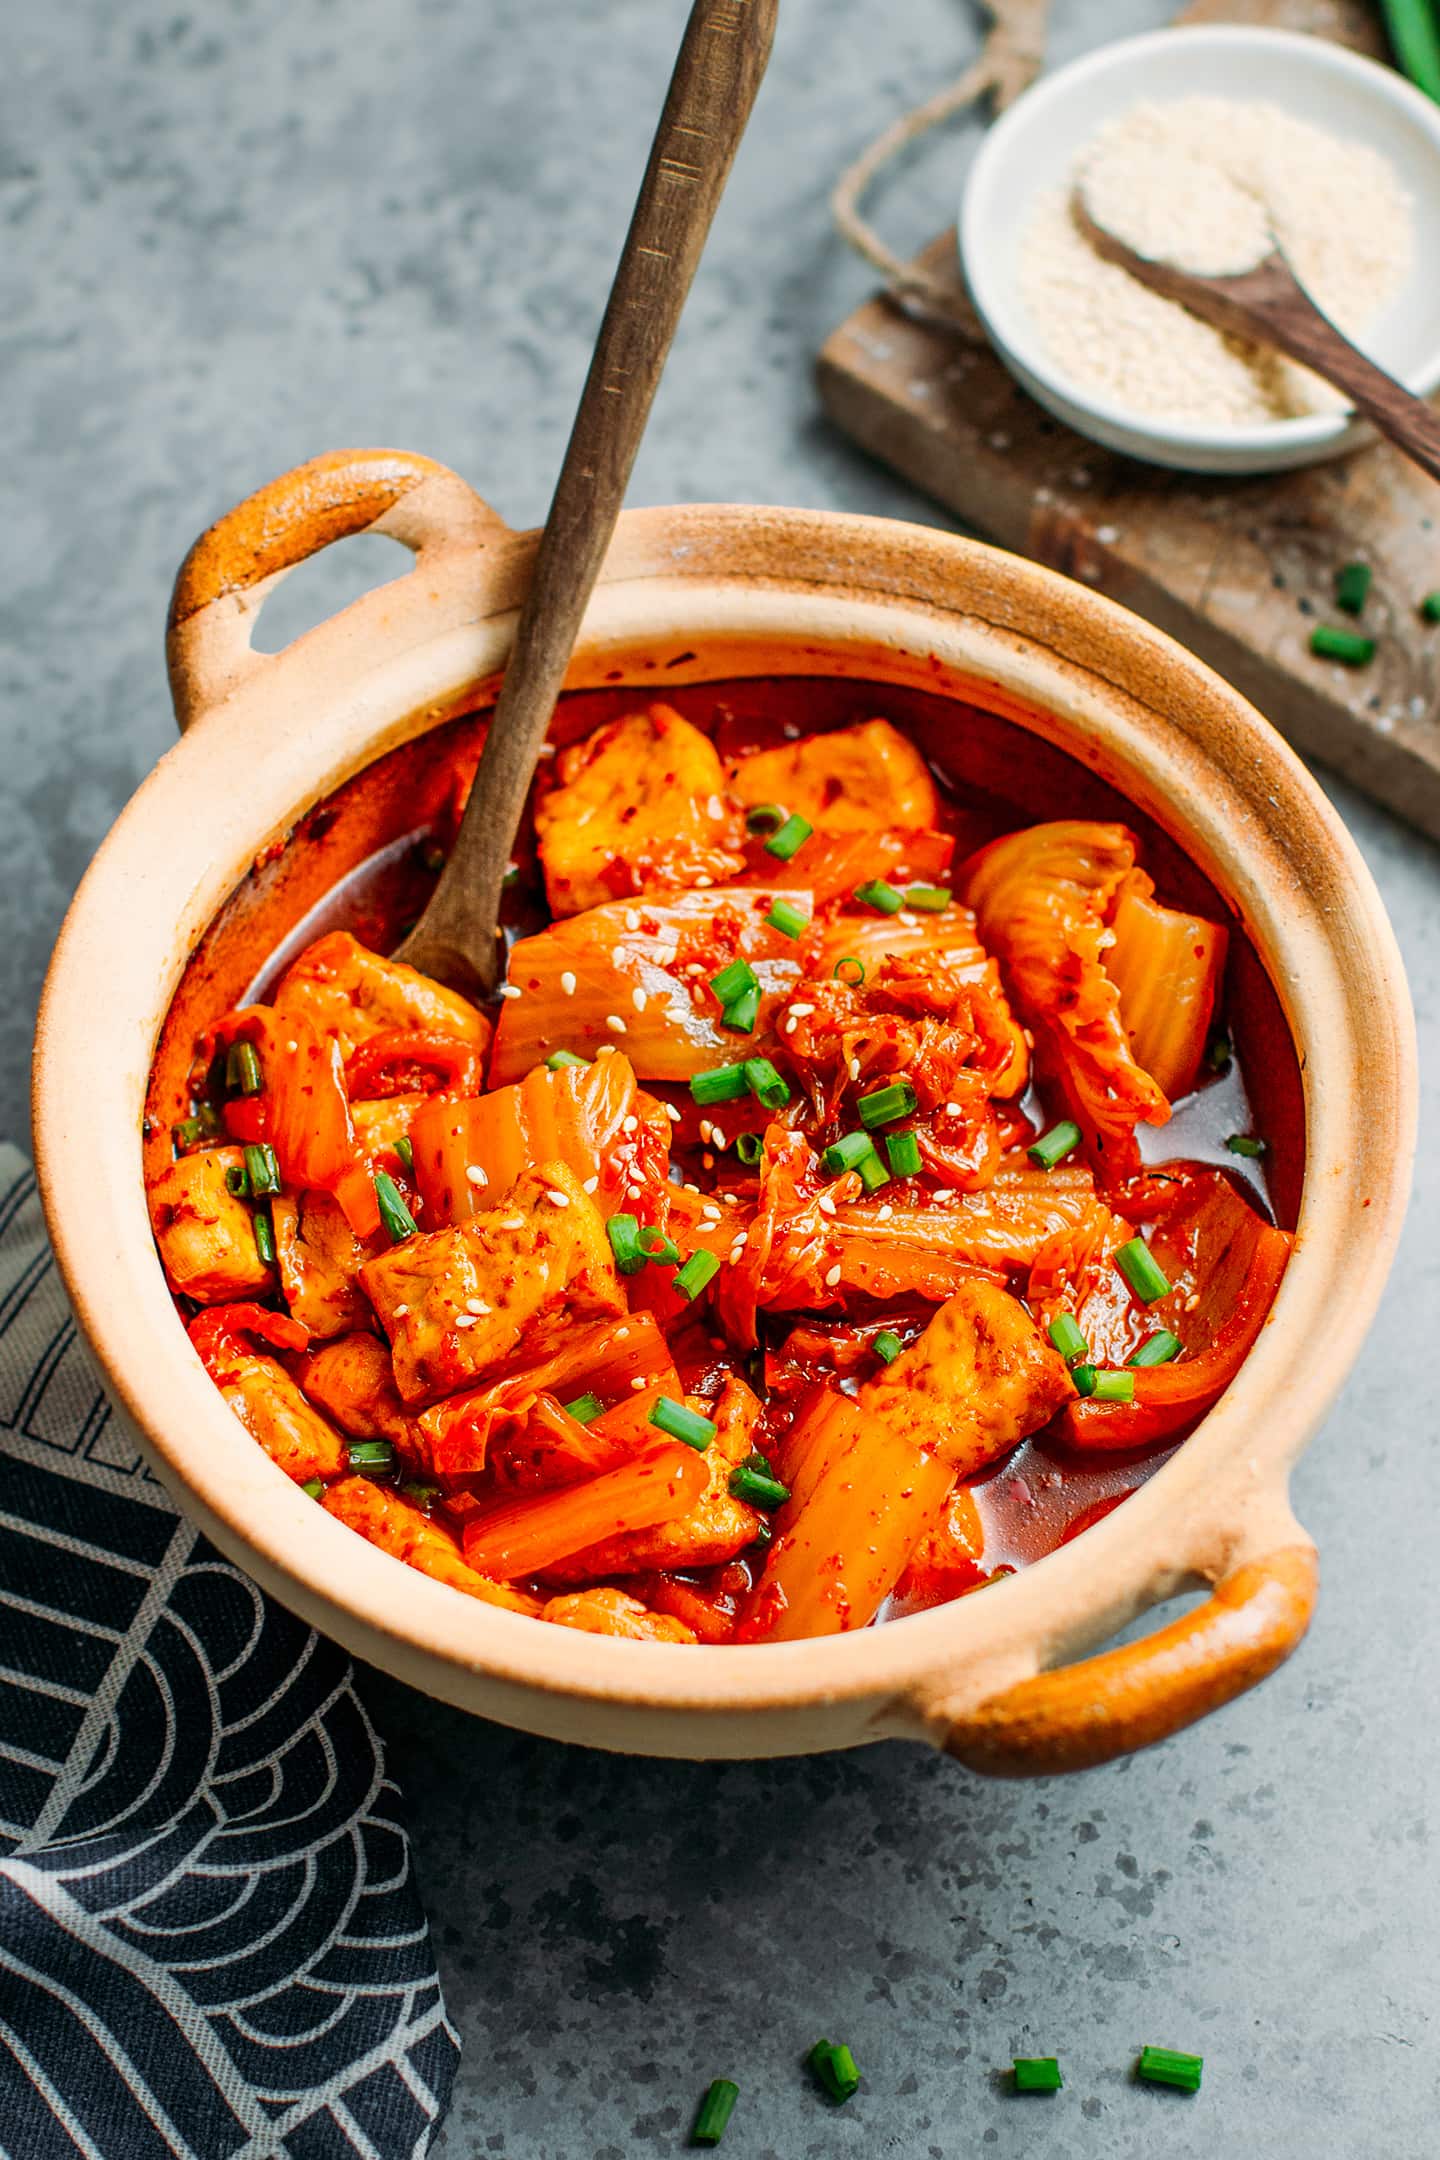
Learn how to make your own vegan kimchi at home! This Korean-inspired condiment is sour, spicy, and delicious on top of rice, in soups, savory pancakes, and more! Plant-based, easy to make, and just 10 ingredients!

Today, I’m excited to share my tried-and-tested vegan kimchi recipe with you! Before diving deeper into the details, I have to admit that it took me an insane number of trials before getting the results I wanted.
First, I wanted kimchi that was spicy but not too spicy. It should also be quite tangy with a hint of sweetness to balance it out. Then, I was determined to get kimchi with a lot of juice because kimchi juice (or brine) is a MAGICAL ingredient when it comes to making sauces. Whether it is dipping sauces for dumplings, creamy pasta sauces, or even mayo, that brine adds plenty of flavor.
My recipe checks all of the boxes mentioned above. Trust me, once you have tried my vegan kimchi, you will never go back to the store-bought kind. Yes, it’s THAT GOOD. I have made this kimchi recipe repeatedly, sometimes every week for a couple of months, so I can safely say that it works every single time!
⭐️ Why This Recipe Works
It yields a lot of juice.
Aren’t you tired of kimchi recipes that leave you with no juice? I am, too! This kimchi recipe gives you a lot of juice, which can be used to make pasta sauce, dipping sauce, and more! I personally love to combine a few tablespoons of kimchi juice with a splash of soy sauce and a pinch of sugar to make a fantastic dumpling dipping sauce. This kimchi is also perfect for making Kimchi Bibim-Guksu, which is a dish consisting of noodles tossed with kimchi and Gochujang!
Tested over 30 times.
This kimchi recipe is among the ones from the blog that I have made the most. Since releasing it back in 2022, I have made it over 30 times and it worked every single time. That shows how FOOLPROOF is my kimchi recipe! I will show you exactly how you can make it too, and share my best tips in the recipe below.
Perfectly balanced.
Kimchi is supposed to be spicy, tangy, salty, and slightly sweet. I tested multiple batches, playing with the amount of Gochugaru, salt, and sugar, until I found what I consider the best balance.
I recently gave a jar to my dad, who is not a huge fan of Korean food, or spicy foods in general, and he said he loved it. Although it was still a bit spicy for him, he used it as a topping for rice and incorporated it in vegetable stir-fries and grilled cheeses.
You can obviously adjust your kimchi’s spiciness, sweetness, and saltiness by playing with the ratio of ingredients but more on that later.
It’s cheaper and healthier than store-bought.
My homemade kimchi is better than the one you can find at the store in every way. It’s not only more affordable but also tastes much better than store-bought versions. For reference, a 14-ounce (400g) jar of kimchi at my local Asian store costs over $6! After calculation, this homemade version costs around $5.5 for 50 ounces (1400g). That’s four times cheaper! With the rise of food prices lately, that is not negligible. Plus, you know exactly what is inside.
📘 What Is Kimchi
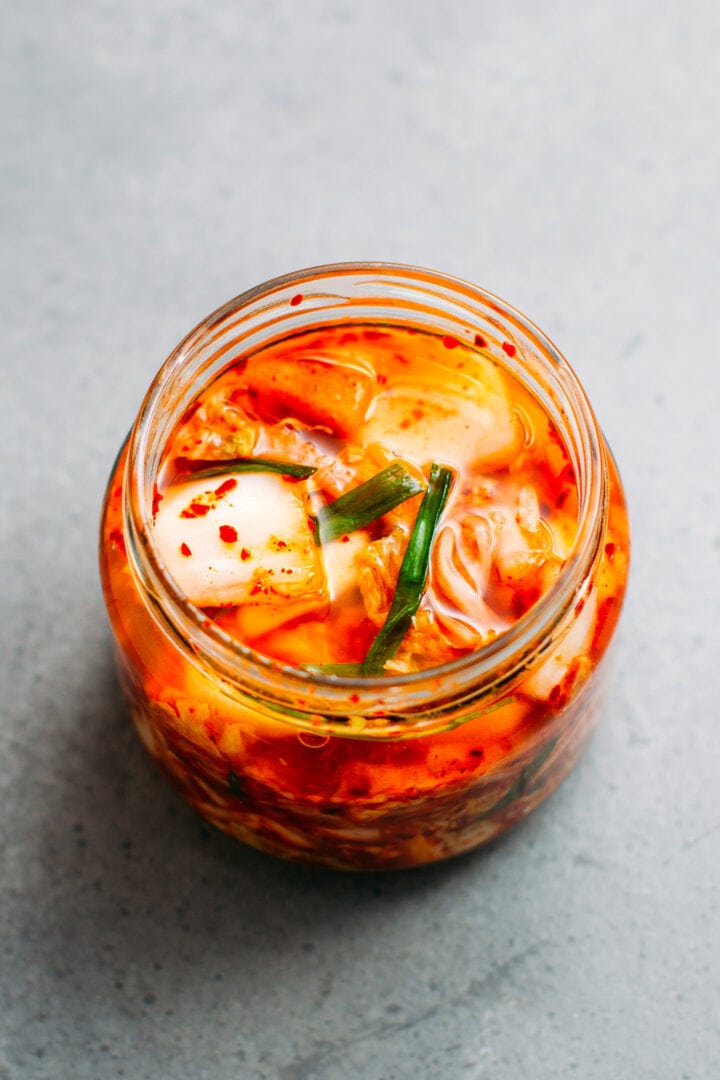
Kimchi (김치) is a traditional Korean condiment made of fermented Napa cabbage. It is usually seasoned with garlic, ginger, and chili flakes. It is a staple in Korean cuisine and used in many dishes, from soups to stir-fries, savory pancakes, dumplings, and more.
Kimchi is low-calorie, packed with probiotics and nutrients, and contains many antioxidants. It is said that Kimchi may help boost your immune system and improve digestion.

🥬 Ingredient Notes
Making kimchi at home is very easy and requires basic ingredients. Here is what you will need:
Napa cabbage
Sometimes called Chinese cabbage, it makes the base of kimchi. For optimal flavor and texture, make sure you pick fresh Napa cabbage. You can usually tell it is fresh by checking its appearance and weight. It should be firm and crisp. In my experience, the color of the cabbage can be misleading as some types of cabbage have very bright green leaves while others tend to be more yellow. I find that a cabbage with lots of yellow leaves on the inside yields a sweeter kimchi.
Note: To make one batch of kimchi, I always use one large head of Napa cabbage, which weighs approximately 2.2 pounds (1kg). I understand that not all heads of cabbage are the same weight. Hence I also tested this recipe with a medium head of 27 ounces (765g). I only reduced the amount of salt by 1 tablespoon and followed my regular recipe. It worked just as well, and I didn’t notice any change in flavor. Conclusion: You can use the same recipe but slightly adjust the amount of salt used for salting the cabbage as long as it is between 27 ounces and 2.2 pounds (750-1000g).
Salt
Just like in any fermented food, salt plays an important role here. It encourages the growth of good bacteria and prevents bad bacteria. Typically, lacto-fermented foods require about 2-5% salt, which is what I went for in this recipe. The cabbage is tossed with 5% of its weight in salt and then rinsed twice, which lowers the total salt content to approximately 2-3%.
Daikon radish
I like to add daikon radish sliced into matchsticks for extra texture. It adds natural sweetness and a peppery taste. If you can’t find daikon radish, don’t worry your kimchi will still taste great without it. I have made this kimchi multiple times without any radish or carrots, and the result was just as tasty.
Gochugaru
Also known as Korean chili flakes, this chili powder has an intense red color, a mild spiciness, and a subtle smoky flavor. It’s responsible for the spiciness and the vibrant red color of kimchi.
Do not substitute Gochujang for the Gochugaru. While both of these are Korean condiments, one is a very salty and spicy paste made from fermented soy beans, while the other is simply ground chili peppers. You must absolutely use the latter.
I use 1/3 cup of Gochugaru in this recipe as it’s the amount of spiciness I prefer. You can reduce or increase the amount based on your preference.
Garlic and ginger
I like to use a combination of garlic and ginger to add a pungent and zesty flavor to the kimchi. For the best flavor, use very fresh ginger that has smooth skin. The fresher the ginger the less fibrous and the more zesty it tastes.
Scallions
They are also known as green onions. Do not chop them. Instead, slice them into 2-inch pieces. You can use both the green and white parts of the onions.
Carrots
Carrots are optional and not essential to this recipe, but you can cut one carrot into matchsticks and add them at the same time you add the green onions.
Vegan fish sauce
Traditional kimchi is not vegan due to the use of fish sauce and/or shrimp. To make this recipe plant-based, I went for vegan fish sauce. It adds saltiness and extra umami. You can get vegan fish sauce online or use my recipe to make your own vegan fish sauce.
While regular soy sauce is a good alternative to vegan fish sauce, I largely prefer kimchi made with the latter as I find that the ginger and garlic flavors shine best.
Sugar
Kimchi is supposed to be a bit sweet! You can use granulated white sugar or light brown sugar. While I haven’t tried it yet, I do believe this recipe will also work with liquid sweeteners such as maple syrup or agave.
Note: I use a slightly higher amount of sugar than most of the other kimchi recipes. In my opinion, this yields a better flavor and perfectly balances the saltiness and spiciness of the kimchi.
Sweet rice flour
Also known as glutinous rice flour, it thickens the chili paste that coats the cabbage. My chili paste consists of Gochugaru combined with fish sauce, sugar, and aromatics such as garlic and ginger. All of the flavors of kimchi are packed in this paste!
🥣 How to Make It
Tools Needed
To make this recipe, you will need large glass jars. If you make one batch, I recommend using two one-quart mason jars or three 16-oz glass jars.
1. Prepare the Cabbage
- Slice the cabbage. Start by cutting the cabbage in quarters lengthwise. Remove the hard core part and discard it. Using a large knife, cut each quarter into 1-inch wide strips.
- Rinse it. Once done, rinse the cabbage a few times under cold water to remove possible dirt. Transfer the rinsed and drained cabbage to a large bowl.
- Coat with salt. Add the salt and massage the cabbage with the salt using your hands or two spatulas.

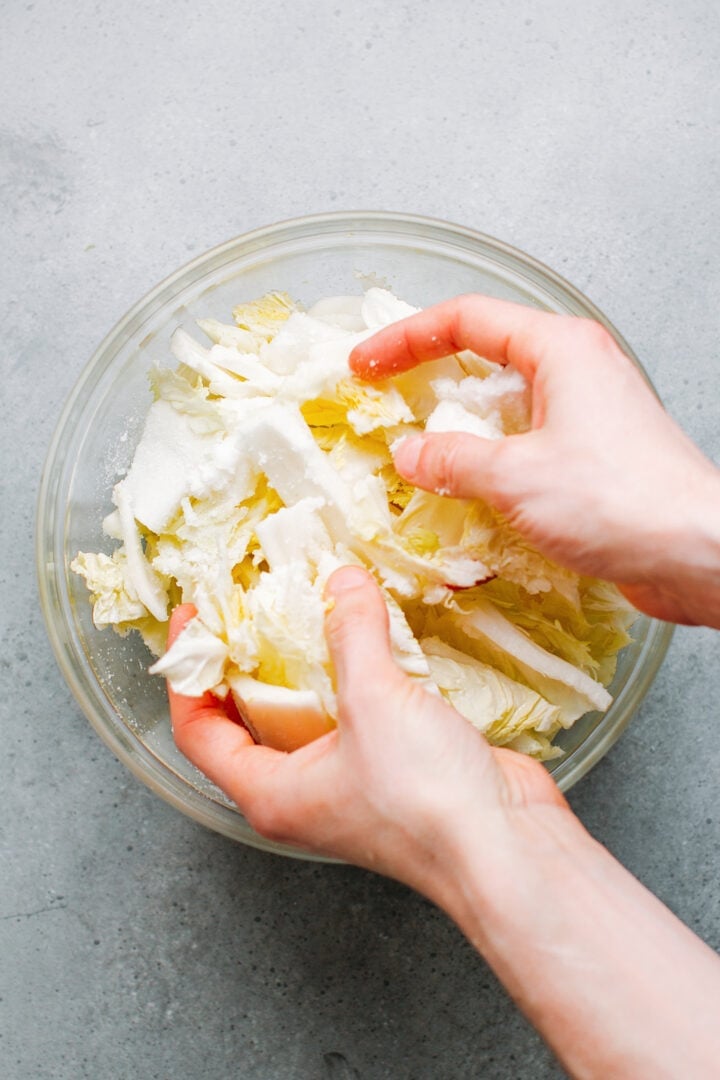
- Let it rest. Cover the bowl with plastic wrap and let the cabbage rest for 2-3 hours. Based on my experience, 2 hours is usually enough. You should be able to see a lot of water in the bottom of the bowl. This means the salt drew water from the cabbage.
A chemical reaction called osmosis is what causes the salt to draw moisture from the cabbage. It also helps the salt penetrate the cabbage to season it.
- Drain and rinse. After 3 hours, drain the cabbage, but keep the brine (we will use it later). Rinse the cabbage twice under cold water, but do not squeeze it. Just give it a rinse.
- Add the other vegetables. Transfer the drained cabbage to a large mixing bowl, add the sliced daikon radish and green onions, and toss well to combine.
2. Make the Chili Paste
While the cabbage is resting, prepare the chili paste:
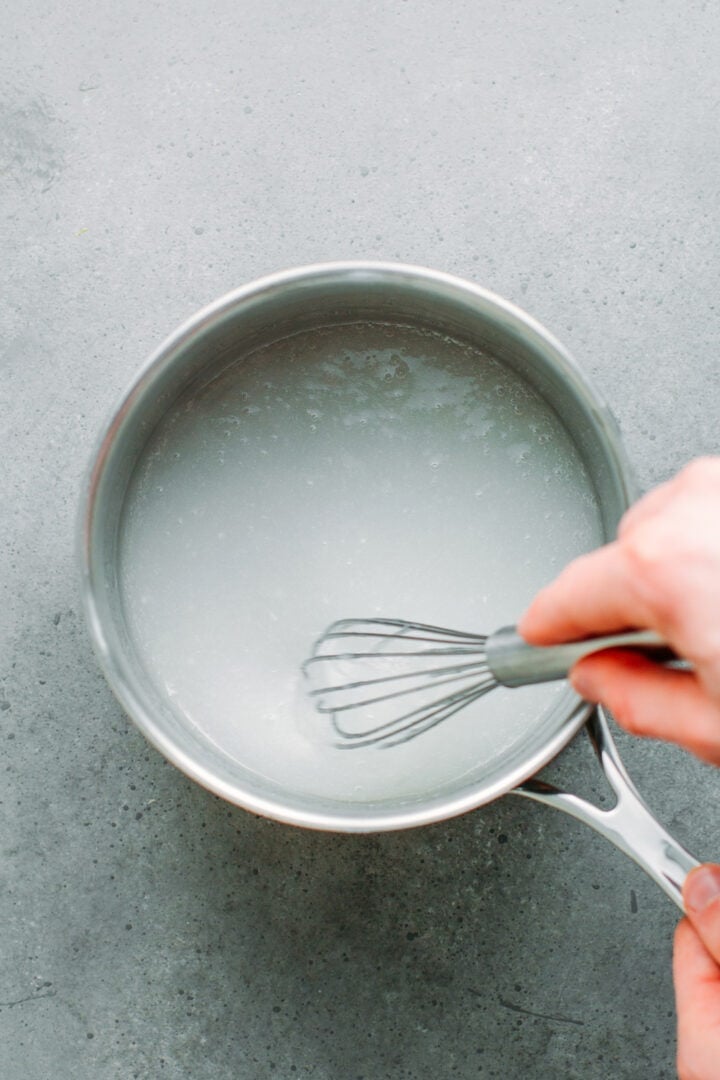
- Make a paste. Add water, sugar, and sweet rice flour to a saucepan. Heat over medium heat, whisking constantly until it thickens. This thick liquid will make the base of the chili paste and will allow it to coat the cabbage better.

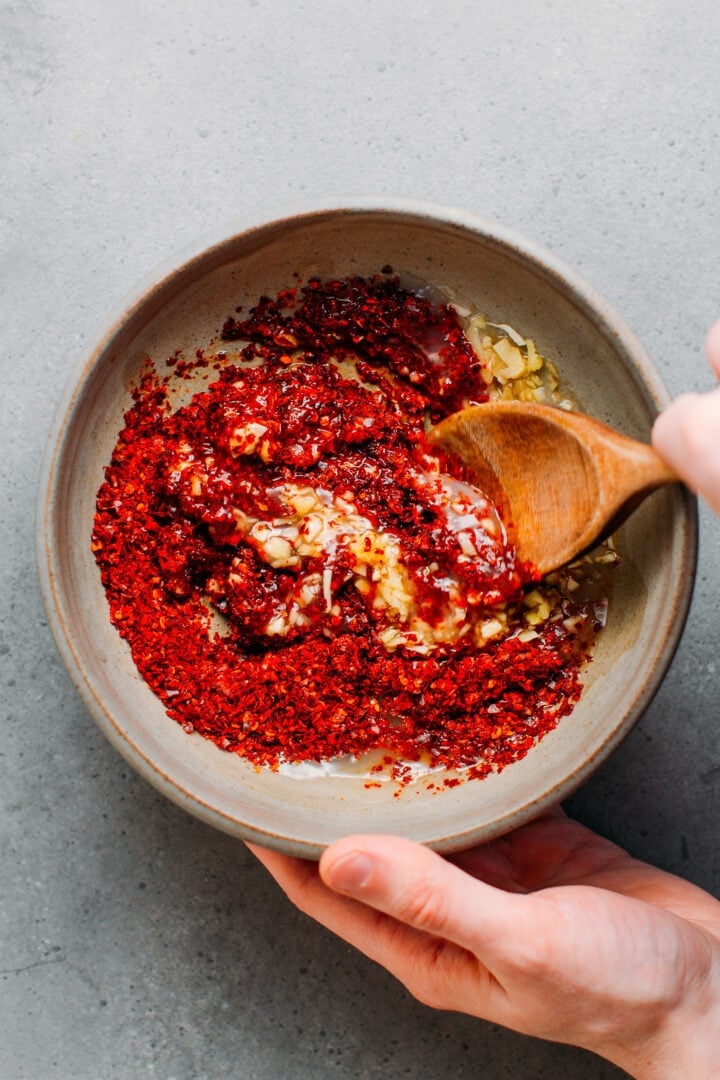
- Season it. Remove the rice paste from heat and transfer it to a mixing bowl. Combine the paste with the Korean chili flakes, vegan fish sauce, minced garlic, and minced ginger. The chili paste is now ready to use.
Note: While some recipes call for apples and onions to be blended with the sauce, I found out not all authentic recipes have these. I went with a simple version here and omitted those.
3. Coat the Cabbage
The next step consists of coating the cabbage with the chili paste.
- Add the chili paste to the cabbage. Pour the chili paste over the drained cabbage and toss to coat the vegetables very well with the paste. You can use your hands (with gloves) to massage the cabbage or use wooden spoons.

4. Fermentation
Finally comes the fun part: the fermentation!
- Transfer to jars. Transfer the cabbage to clean glass jars and pack it very well. You only want to fill the jars to 2/3 or 3/4, as the cabbage will expand slightly as it ferments. I used 2 one-quart jars, but any glass jar will work.
- Cover with juice. Next, pour in about 1/4 cup of the reserved brine on top of the packed cabbage into each jar. Cover with a lid, but do not screw it completely. You want to allow some air to escape. Alternatively, you can cover your jars with plastic wrap during the fermentation process.
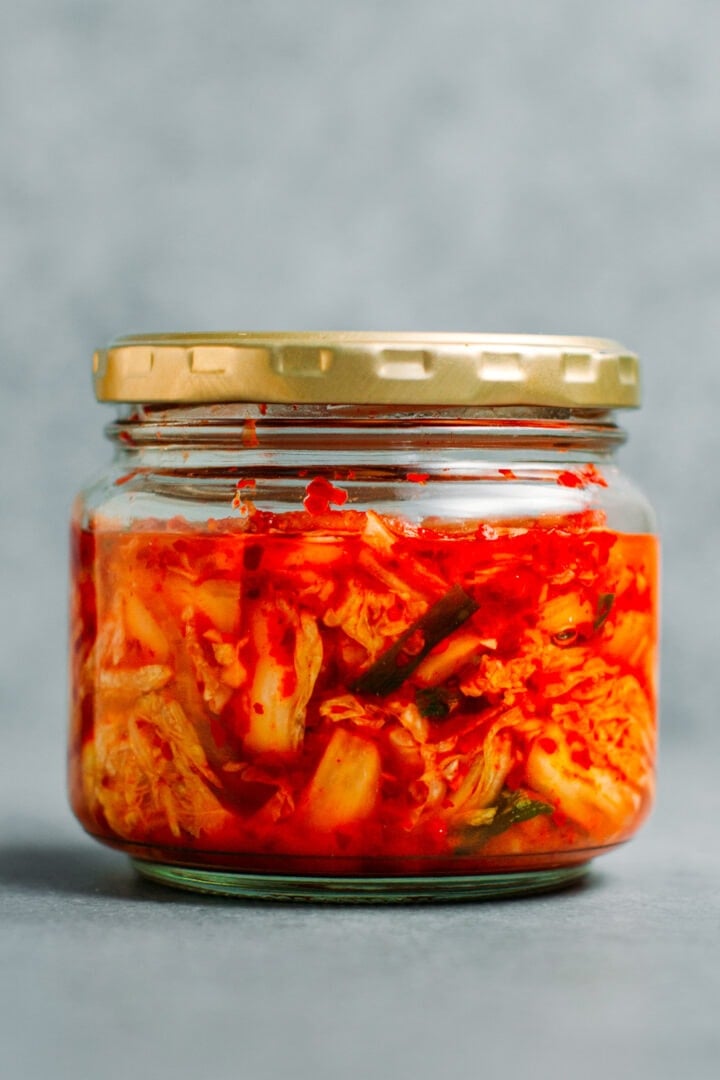
- Let it ferment. Place the jars in a dark place at room temperature (about 65-70°F). Let the kimchi ferment for 24-48 hours or until it has a tangy flavor and you can see some bubbles in the jar.
- Refrigerate. At this point, transfer the jars to the refrigerator and let them rest for another 3-5 days before eating. It will allow the flavors to merge and develop.
How to Know When Kimchi Is Ready
It can be hard to know when your kimchi is ready, especially if it’s your first time making it. I am sharing below a few tips to check if the fermentation of your kimchi has started:
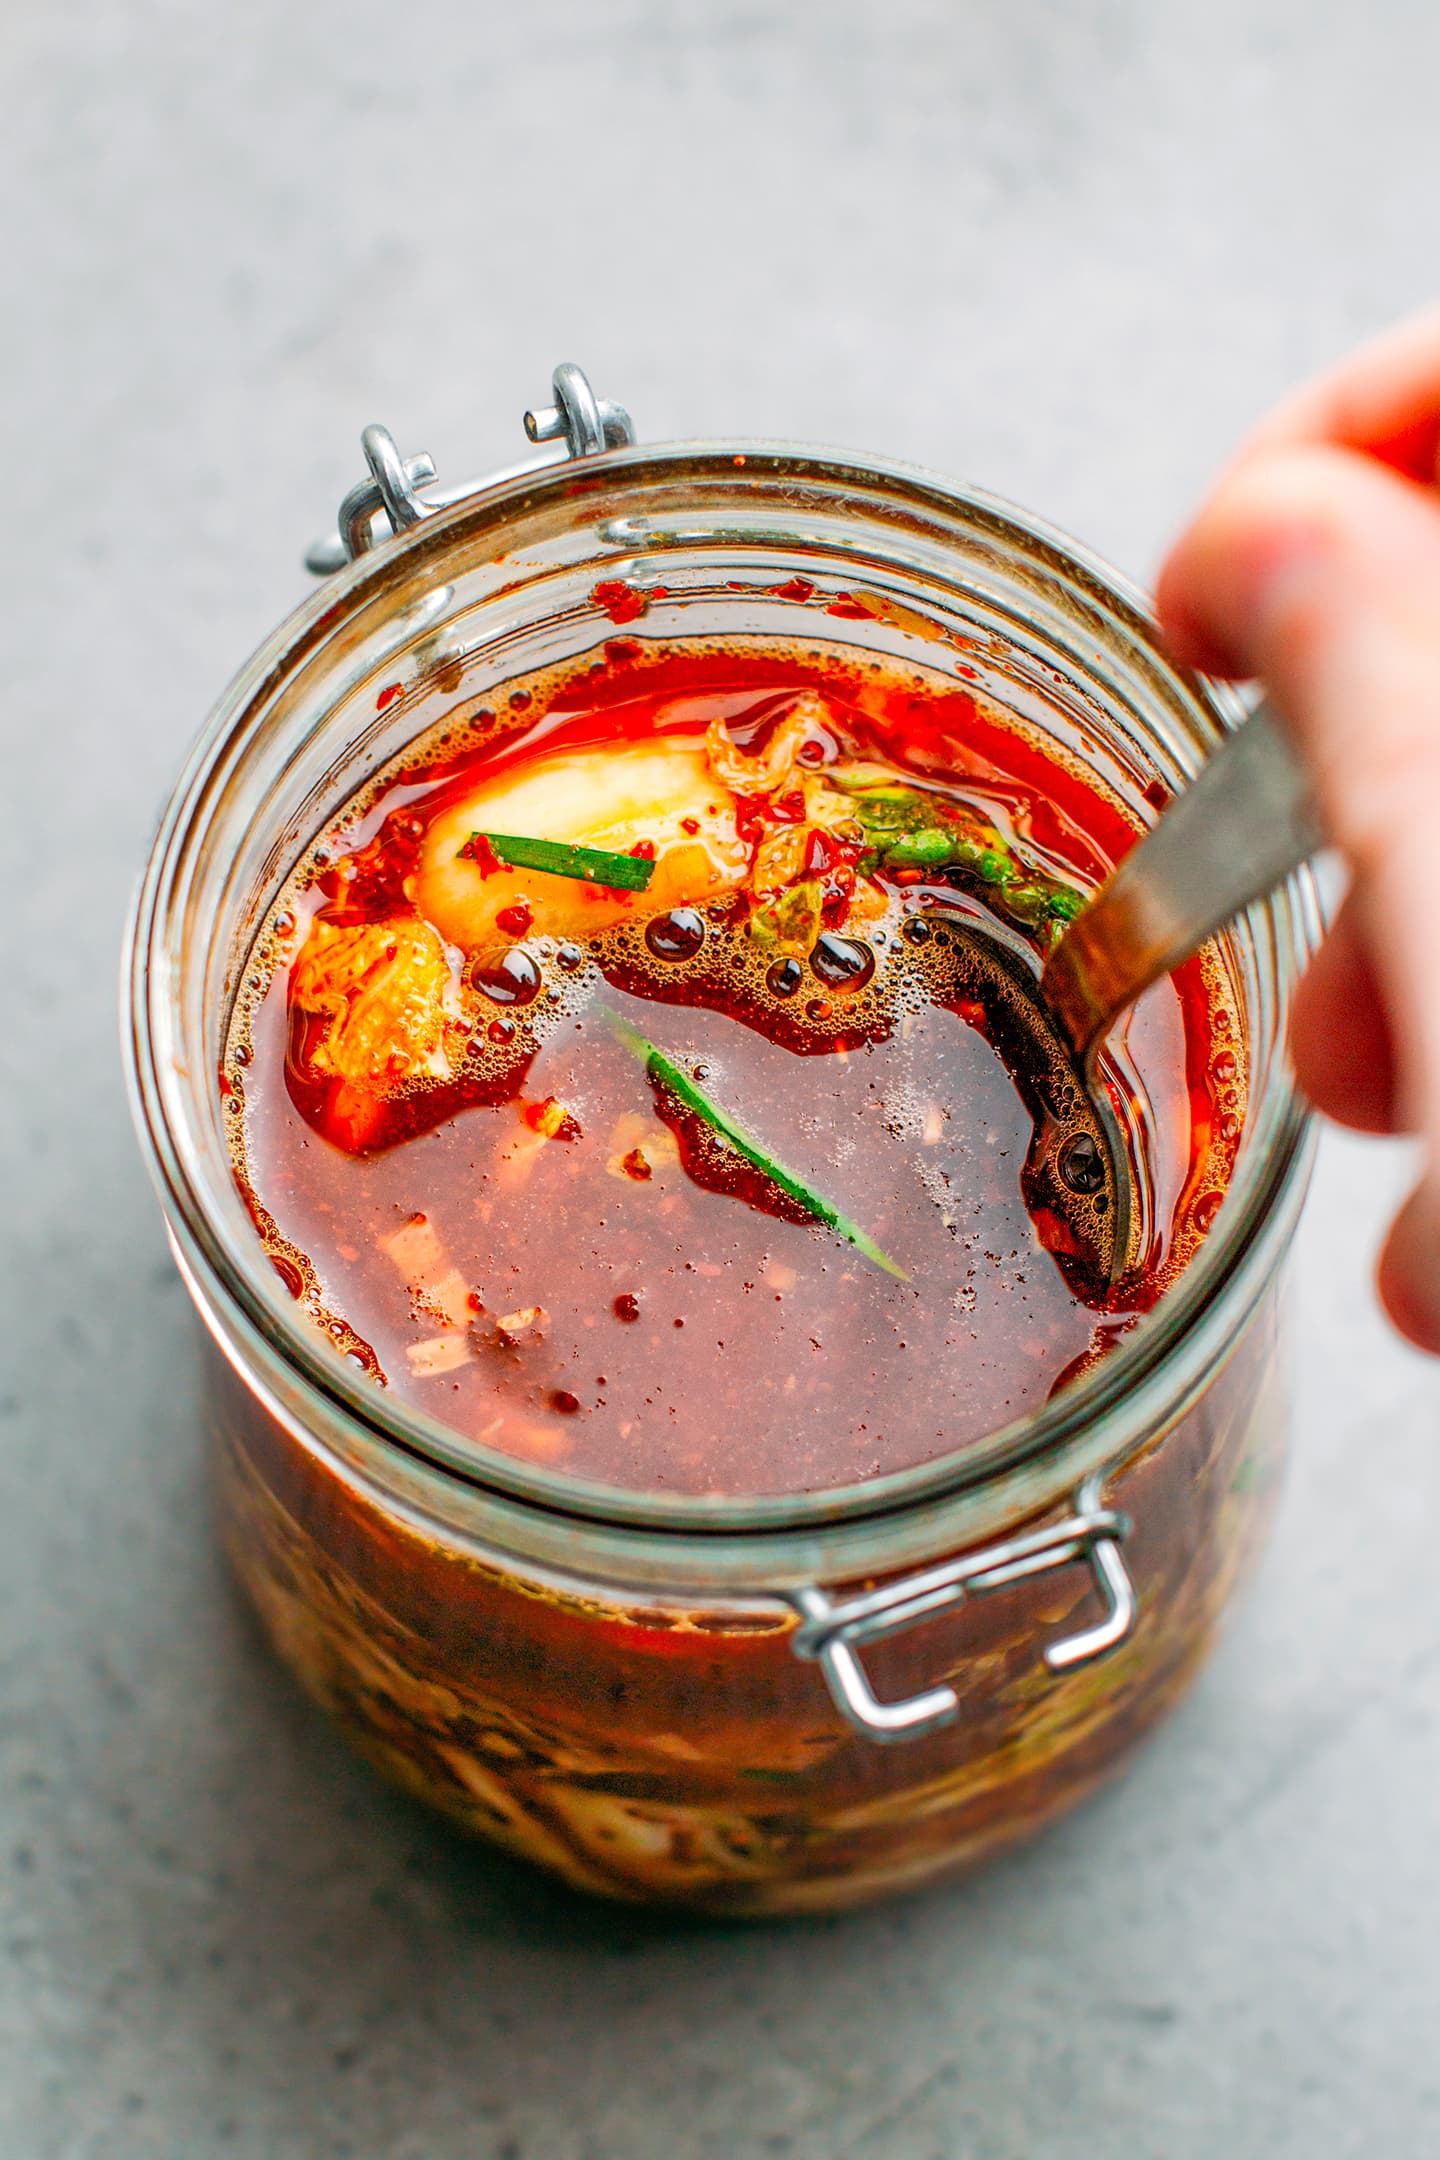
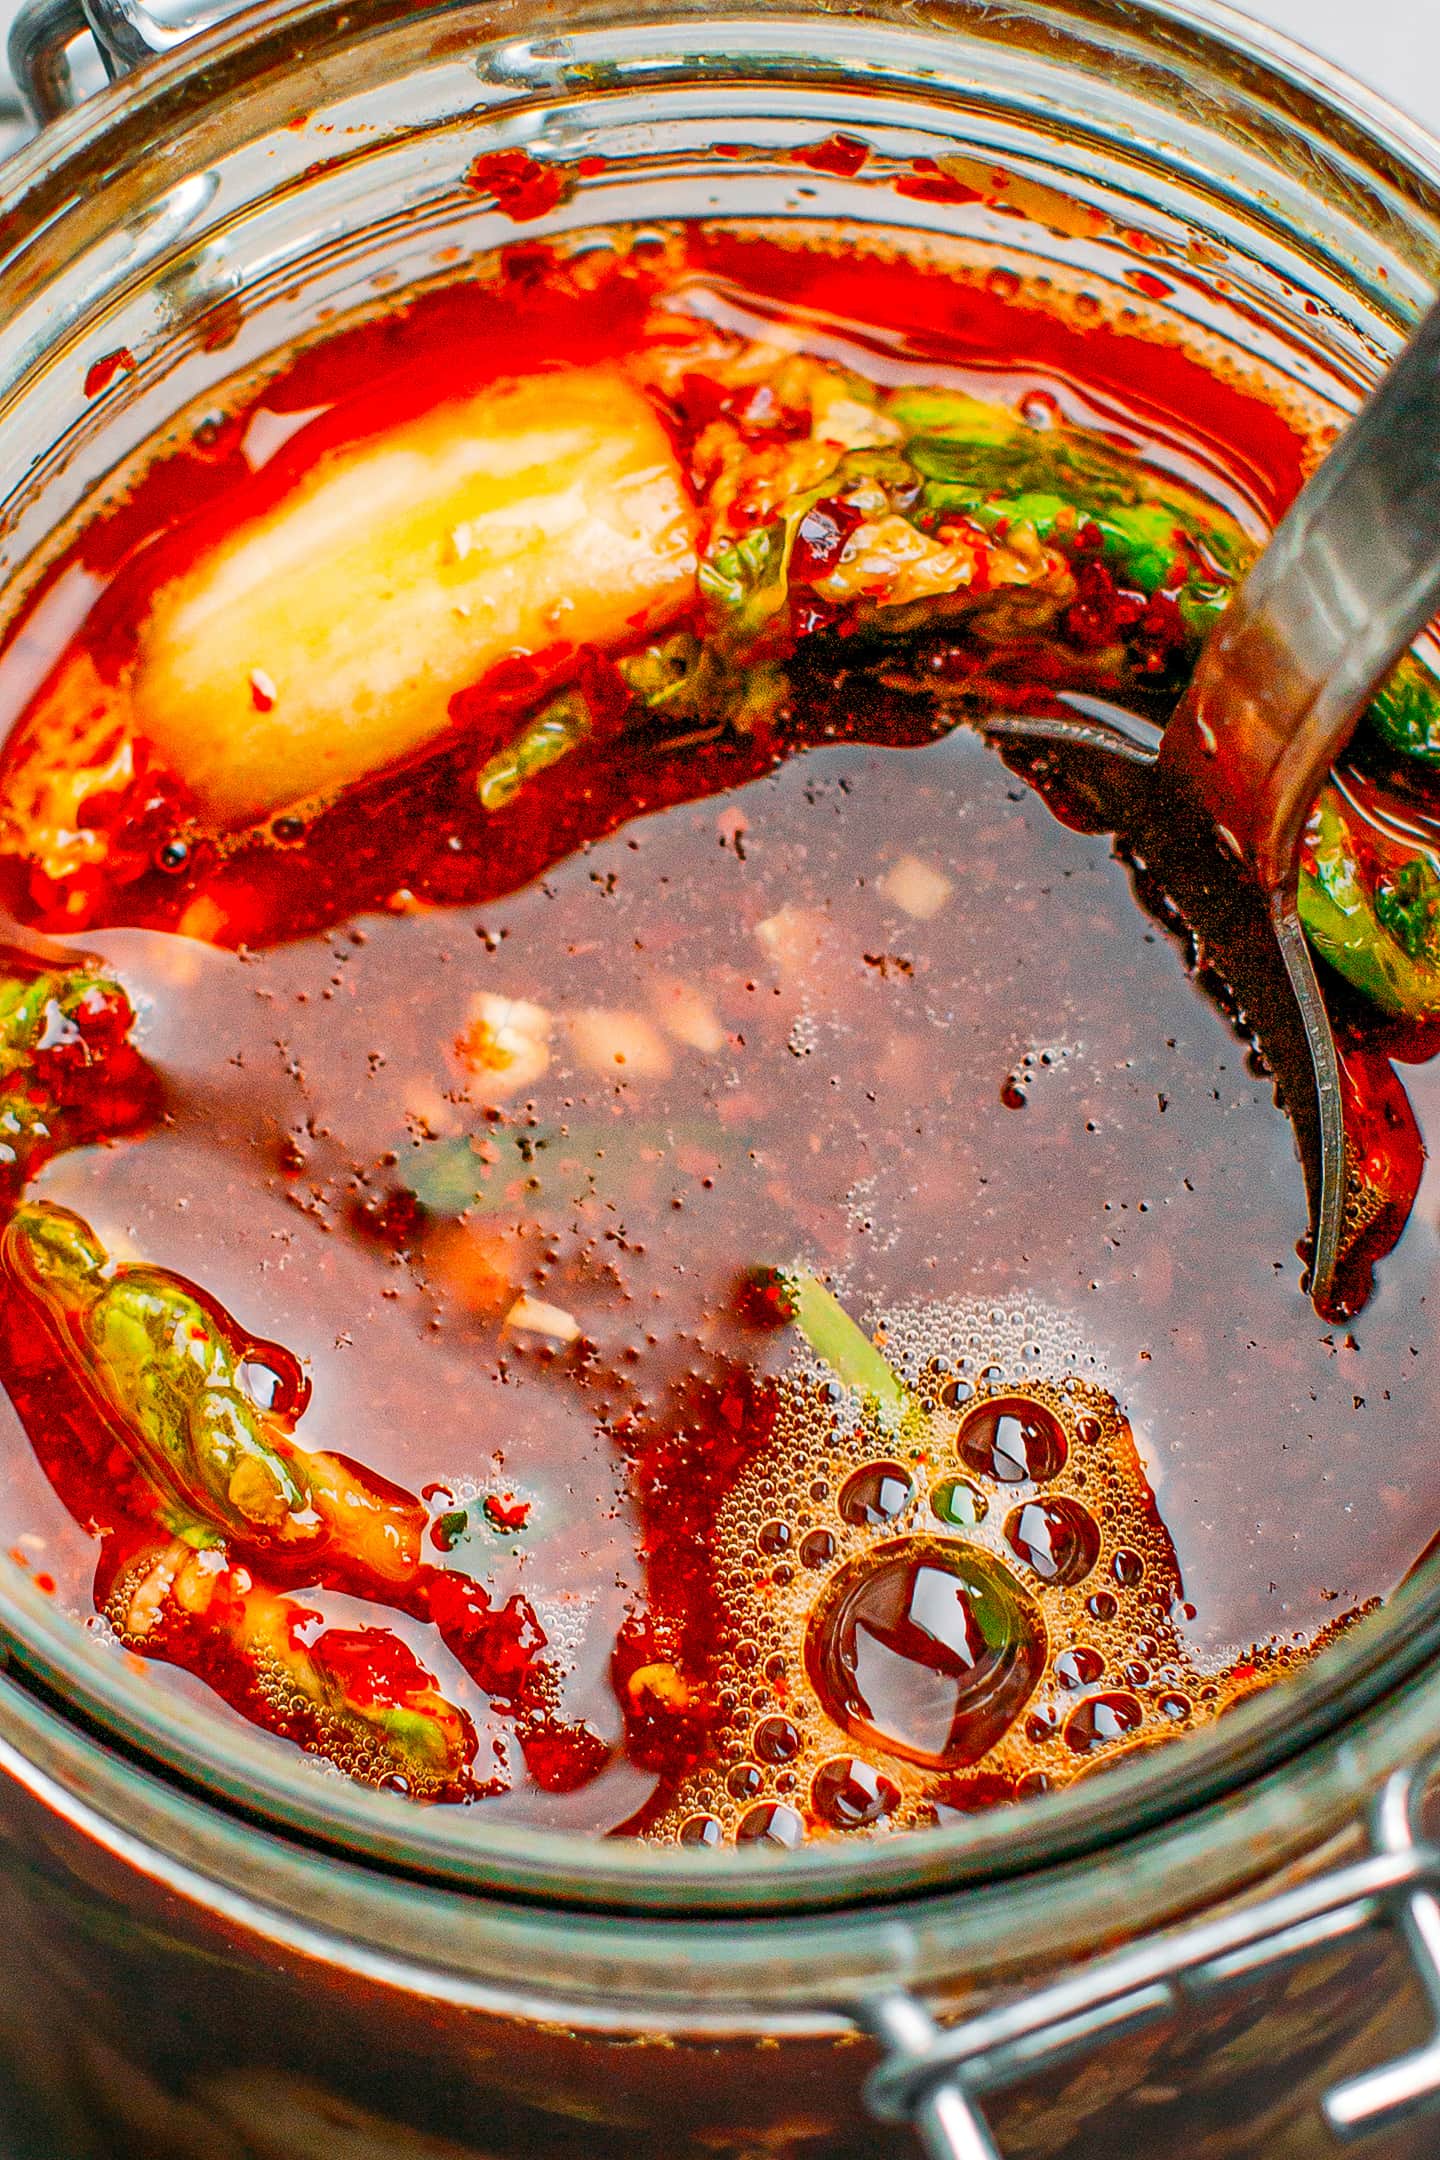
- Look for bubbles. First, start by checking your jar of kimchi from the side. You should be able to see tiny bubbles that formed. Next, open the jar and use a spoon to press the cabbage down the jar. At this point, a lot of bubbles should come to the surface, and the liquid should appear fizzy. For reference, the kimchi shown in the photos below is one I made during Fall. It took a total of 48 hours before I saw any sign of fermentation. When I prepare kimchi during Summer, however, it generally takes only 24 hours before the fermentation starts, so you will have to adjust the time depending on the temperature and humidity.
- Smell it. Start by smelling it before the fermentation. Your kimchi should have a strong chili smell. After fermentation, the kimchi will smell tangy and slightly pungent.
- Taste it. Kimchi should have a sour flavor, just like pickles. It’s obviously not as vinegary, but you should still be able to taste the tanginess.
Once the fermentation has started, you can either transfer it to your refrigerator or let it ferment for another 24-48 hours at room temperature if you prefer a tangier kimchi. Be aware that the kimchi will continue to ferment slowly in the refrigerator, taking a tangier flavor as it ages.
🍜 Where to Use It
Kimchi is incredibly versatile! You can use it on top of rice, stir it into noodles, soups, stir-fries, make kimchi fried rice, and so much more! I love to use it as a topping for Tteokbokki as it brings extra texture and a hint of sourness.
Looking to incorporate your kimchi into recipes? You can find below a few of my recipes that use kimchi:


Vegan Kimchi Noodle Soup: Vân, my wife and I are huge fans of this soup! It packs a wonderful blend of spiciness, sweetness, and richness. The broth is flavored with kimchi, ginger, and garlic, and paired with tender tofu, mushrooms, and greens.
Vegan Kimchi Dumplings: If you are more into dim sum, you will love these Korean-inspired dumplings. I filled them with kimchi, tofu, vegan ground meat, bean sprouts, and green onions! Plus, the recipe uses kimchi juice as the dipping sauce!
Tofu Kimchi Stew: This stew features fried tofu combined with kimchi and cooked in a clay pot. It’s spicy, sweet, and super warming! I make it regularly during the colder season.
Vegan Kimchi Quiche: Have you ever considered incorporating kimchi in a quiche? I did, and the result was amazing! My kimchi quiche features a creamy cashew-based filling with kimchi and scallions baked in a buttery and flaky homemade crust! It is subtly spicy and tangy!
📔 Tips
- Do not fill the jars to the top. I highly recommend leaving at least 1/3 of your jars empty to allow the kimchi to expand a little bit during the fermentation.
- If you are not used to spicy food, reduce the amount of Gochugaru. If you prefer your kimchi with a mild spicinesss, use only half of the recommended amount of chili powder.
- After 1 day, push the cabbage back into the brine. Cabbage tends to rise above the surface at the beginning of fermentation. Use a spoon to submerge it in the brine after a day or two.
- At first, the brine will be very liquid. This is totally normal. The brine (kimchi juice) will thicken as it sits.
- Do not leave it at room temperature for too long. The longer you leave your kimchi at room temperature, the tangier it will get. I found that 48 hours at room temperature (at about 68°F/20°C) was the perfect fermentation time to get a nice sourness.
- Allow the kimchi to rest. I always find that my kimchi tastes best after 5-6 days in the refrigerator. Hence, I suggest allowing the kimchi to rest for a few days before eating to allow the flavors to merge.

❄️ Storing & Freezing
- To store: You can keep kimchi in the refrigerator for up to 4 weeks. It can probably be kept longer than that, but I haven’t tried it. The longer you let it sit, the more sour it becomes. I recommend pushing down the remaining cabbage into the brine every time you take some kimchi out of the jar. As long as the cabbage is submerged in the brine, no mold will grow.
- To freeze: Transfer the kimchi to freezer-safe containers or bags and freeze for up to 3 months. Thaw overnight in the refrigerator before using.
💬 FAQ
The short answer is yes. My recipe is based on Korean recipes. Be aware that there is not just one authentic recipe, though, and each person has their own way of making it. This recipe has been tweaked to my taste.
Kimchi has a spicy and garlicky flavor with some sourness and just a hint of sweetness.
Your kimchi is ready when you can see some air bubbles forming in the brine. You can also tell by tasting it. It should be slightly sour, a little bit like pickles.
Yes, it does! Kimchi juice is perfect for making dipping sauces and adds extra flavor to soups, stews, marinades, and more!
I do not recommend lowering the salt content as it is essential to prevent bad bacteria. It also plays a crucial role in the fermentation of the cabbage.
If you ever wondered how to make kimchi at home, you should definitely try this recipe! It’s easy to make and tastes so much better than store-bought!


Save this recipe!
Enter your email below and I’ll send it to your inbox!
Plus, you will receive new recipes every week!
Homemade Vegan Kimchi
Equipment
Ingredients
- 1 (1 kg) medium head napa cabbage about 2.2 pounds
- 1/4 cup (50 g) salt
- 5 stalks (50 g) scallions cut into 2-inch pieces
- 1/2 medium (80 g) white daikon radish peeled and cut into thin matchsticks
Kimchi Chili Paste
- 1/2 cup (120 ml) water
- 1/4 cup (48 g) sugar
- 1 tbsp (10 g) sweet rice flour
- 1 tbsp (15 ml) vegan fish sauce or soy sauce
- 1/3 cup (36 g) gochugaru (Korean chili powder)
- 2 cloves (8 g) of garlic minced
- 1 inch (5 g) ginger finely chopped
Instructions
- Cut the cabbage in quarters lengthwise. Remove the hard core part and discard. Using a large knife, cut each quarter into 1-inch wide strips.
- Rinse the cabbage under cold water to remove possible dirt. Transfer the rinsed and drained cabbage to a large bowl. Add the salt and massage the cabbage with the salt using your hands or two spatulas.
- Let the cabbage rest for about 3 hours at room temperature, stirring once halfway. In the meantime, prepare the chili paste. Check the recipe below.
- After 3 hours, drain the cabbage but keep the brine. Rinse the cabbage twice under cold water, but do not squeeze it. Just give it a rinse.
- Transfer the drained cabbage to a large mixing bowl and add the sliced daikon radish and green onions Toss well to combine.
- Pour in the chili paste and stir to coat the cabbage with the paste. You can use your hands with gloves to massage the cabbage or simply use two spatulas.
- Pack the coated cabbage very well into 2 one-quart jars (do not fill it to the top, leaving about 1/3 to allow the cabbage to expand). Make sure there are no air bubbles. Next, pour in about 1/4 cup of the reserved brine on top of the packed cabbage into each jar. Cover with a lid, but do not screw it completely. You want to allow some air to escape.
- Place the jars in a dark place at room temperature (about 65-70°F) for 48 hours to ferment.
- After one day, use a spoon to submerge the cabbage again in the brine if it has risen above the surface.
- After 48 hours, the cabbage should have expanded a little bit and you should see some bubbles in the brine. Your kimchi is now ready!
- You can use it immediately or place it in the refrigerator for another 3-5 days to allow the flavors to develop and merge. I personally think kimchi tastes even better after 1 week in the refrigerator.
- Kimchi will keep in the refrigerator for up to 4 weeks. It can probably be kept for longer than that, but I haven't personally tried as I always finish it quickly.
Kimchi Chili Paste
- Add the water, sugar, and sweet rice flour to a medium saucepan. Heat over medium heat, whisking constantly until the sugar dissolves and the mixture slightly thickens. It should take 3-5 minutes.
- Once the mixture has thickened, transfer it to a bowl and add the gochugaru (Korean chili powder), vegan fish sauce, minced garlic, and ginger. Stir to make a paste.
Notes
- Do not fill the jars to the top. I highly recommend leaving at least 1/3 of your jars empty to allow the kimchi to expand a little bit during the fermentation.
- If you are not used to spicy food, reduce the amount of Gochugaru. If you prefer your kimchi with a mild spicinesss, use only half of the recommended amount of chili powder.
- After 1 day, push the cabbage back into the brine. Cabbage tends to rise above the surface at the beginning of fermentation. Use a spoon to submerge it in the brine after a day or two.
- At first, the brine will be very liquid. This is totally normal. The brine (kimchi juice) will thicken as it sits.
- Do not leave it at room temperature for too long. The longer you leave your kimchi at room temperature, the tangier it will get. I found that 48 hours at room temperature (at about 68°F/20°C) was the perfect fermentation time to get a nice sourness.
- Allow the kimchi to rest. I always find that my kimchi tastes best after 5-6 days in the refrigerator. Hence, I suggest allowing the kimchi to rest for a few days before eating to allow the flavors to merge.
Nutrition

About the Author
Thomas Pagot is the founder, photographer, and recipe developer behind Full of Plants. He created the blog in 2016 as a personal cookbook for vegan recipes. Through years of recipe development, Thomas has successfully grown Full of Plants into a trusted resource for plant-based recipes.
Leave a Comment