This post may contain affiliate links. Please read our disclosure policy.
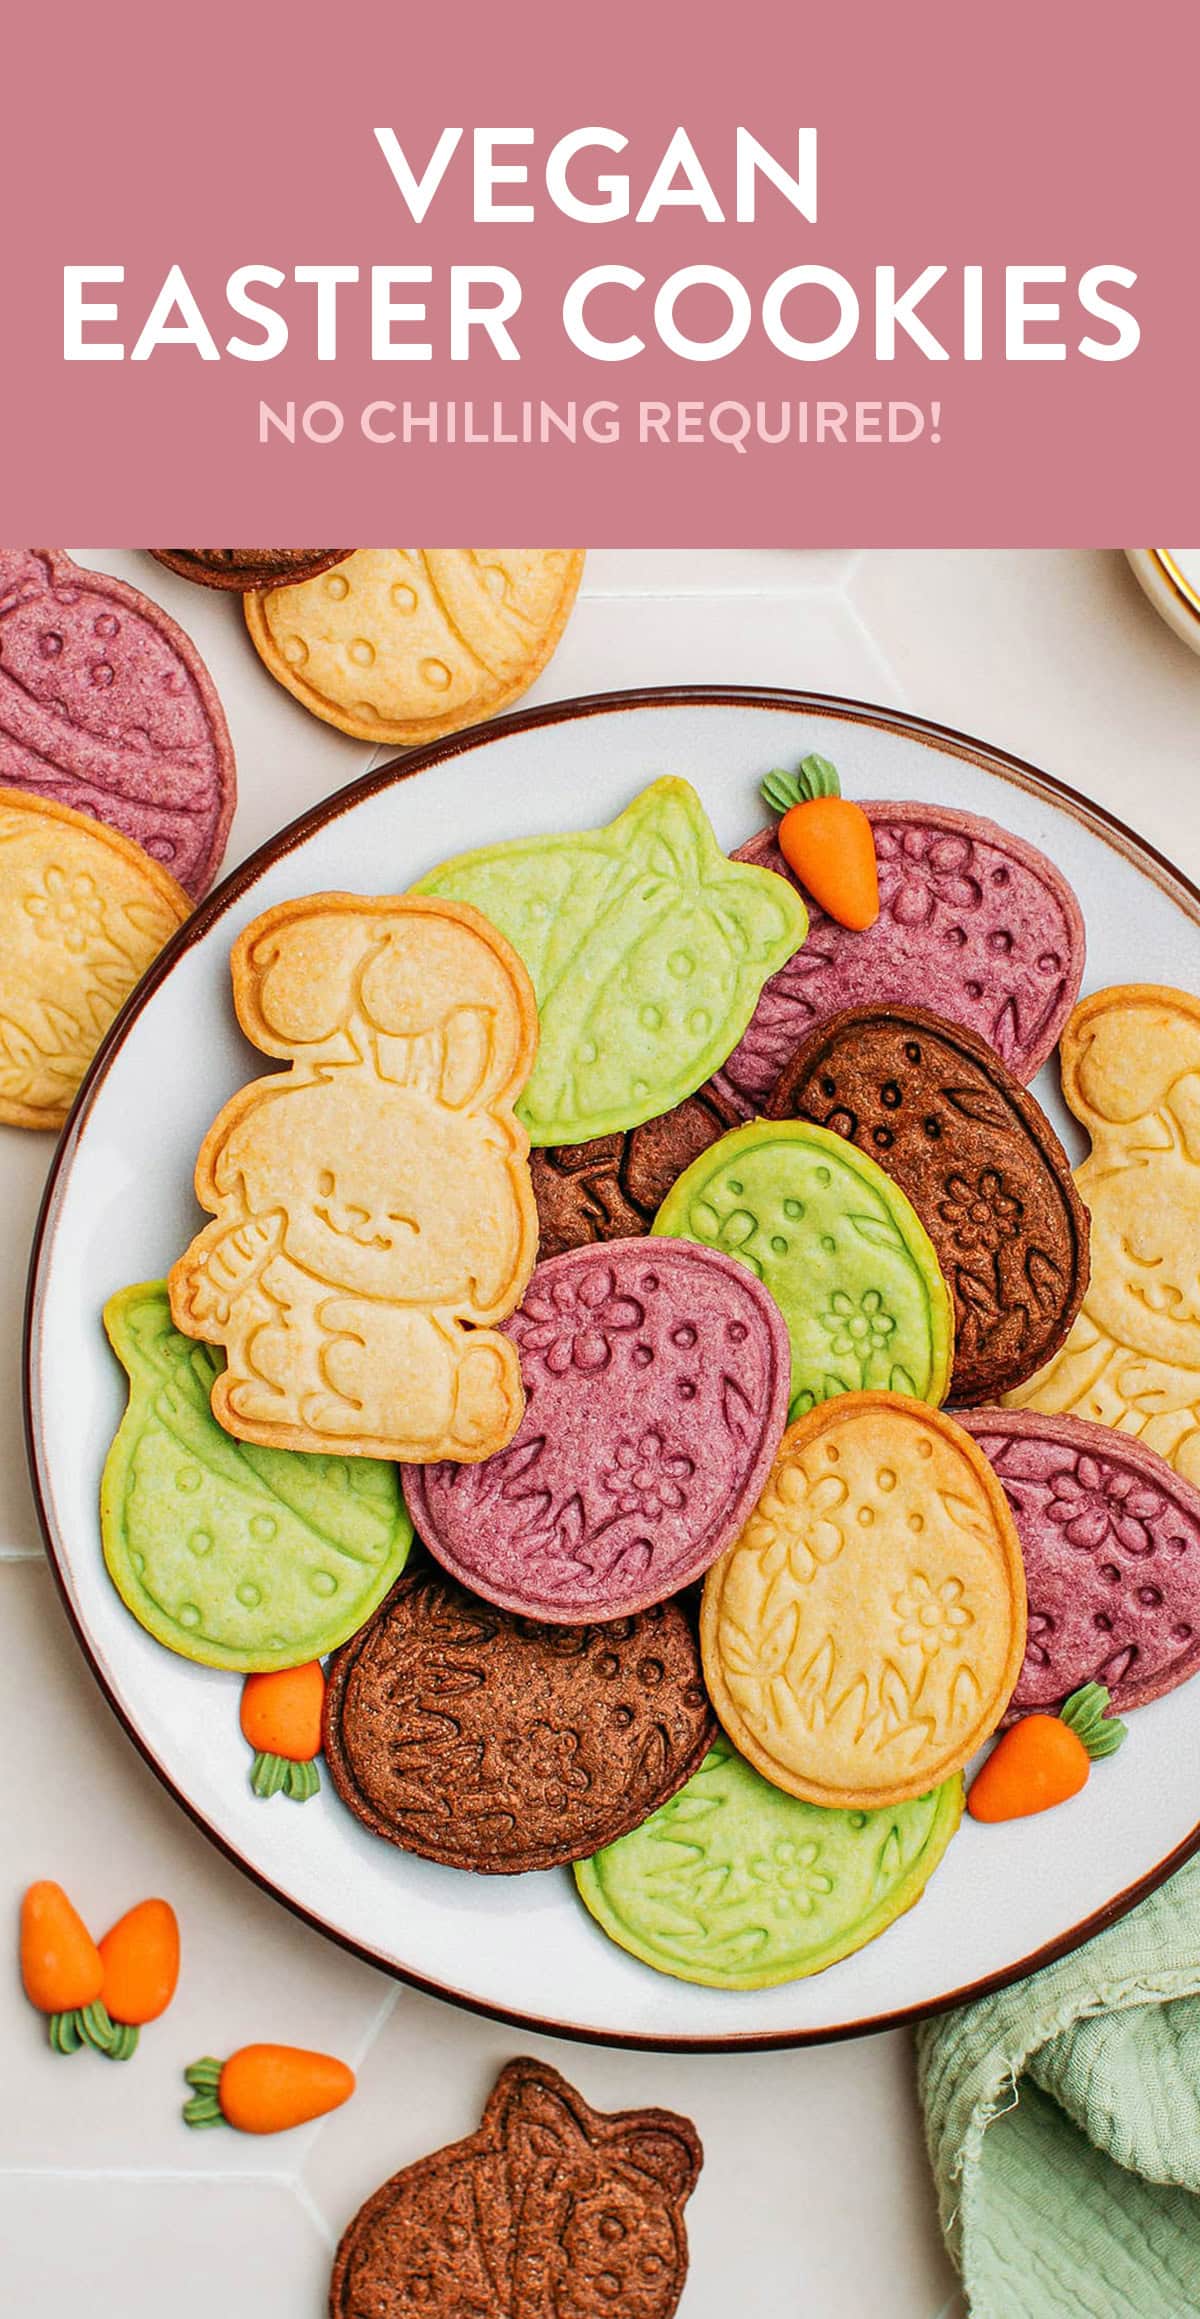
These vegan easter cookies are buttery, crispy, and infused with a fresh vanilla aroma! Just 7 pantry staples, no chilling, and ready in less than one hour. Plus, I share three ways to naturally color them, making them even more festive! These are perfect for baking with the kids during the Easter holidays!
The other day, my wife ordered some bunny and egg-shaped cookie stamps and baked some cute cookies. That reminded me that Easter is coming up soon. I almost forgot!
Her cookies turned out delicious and were super easy to make. She actually used one of my older recipes that I had completely forgotten about! I did find they were lacking a bit of color, though – hey, Easter is supposed to be festive and colorful! – so, I came up with three different ways to color the cookies naturally!
If you are looking for festive cookies to bake during the Easter holiday weekend, you’re going to love these!
⭐️ Why You Should Try It
Simple and colorful.
Out of all the cookies I have made in the past, these are most probably one of the easiest recipes. First, it relies on just a few pantry staples. Second, it’s a pretty hard-to-mess-up recipe as it involves some very straightforward steps: cream the butter, add the flour, knead the dough, and flatten it. Then, all you have to do is cut out the cookies and bake them.
That’s it! No chilling is required, so you can jump straight to the best part: cutting out your cookies, popping them in the oven, and, of course, eating them!
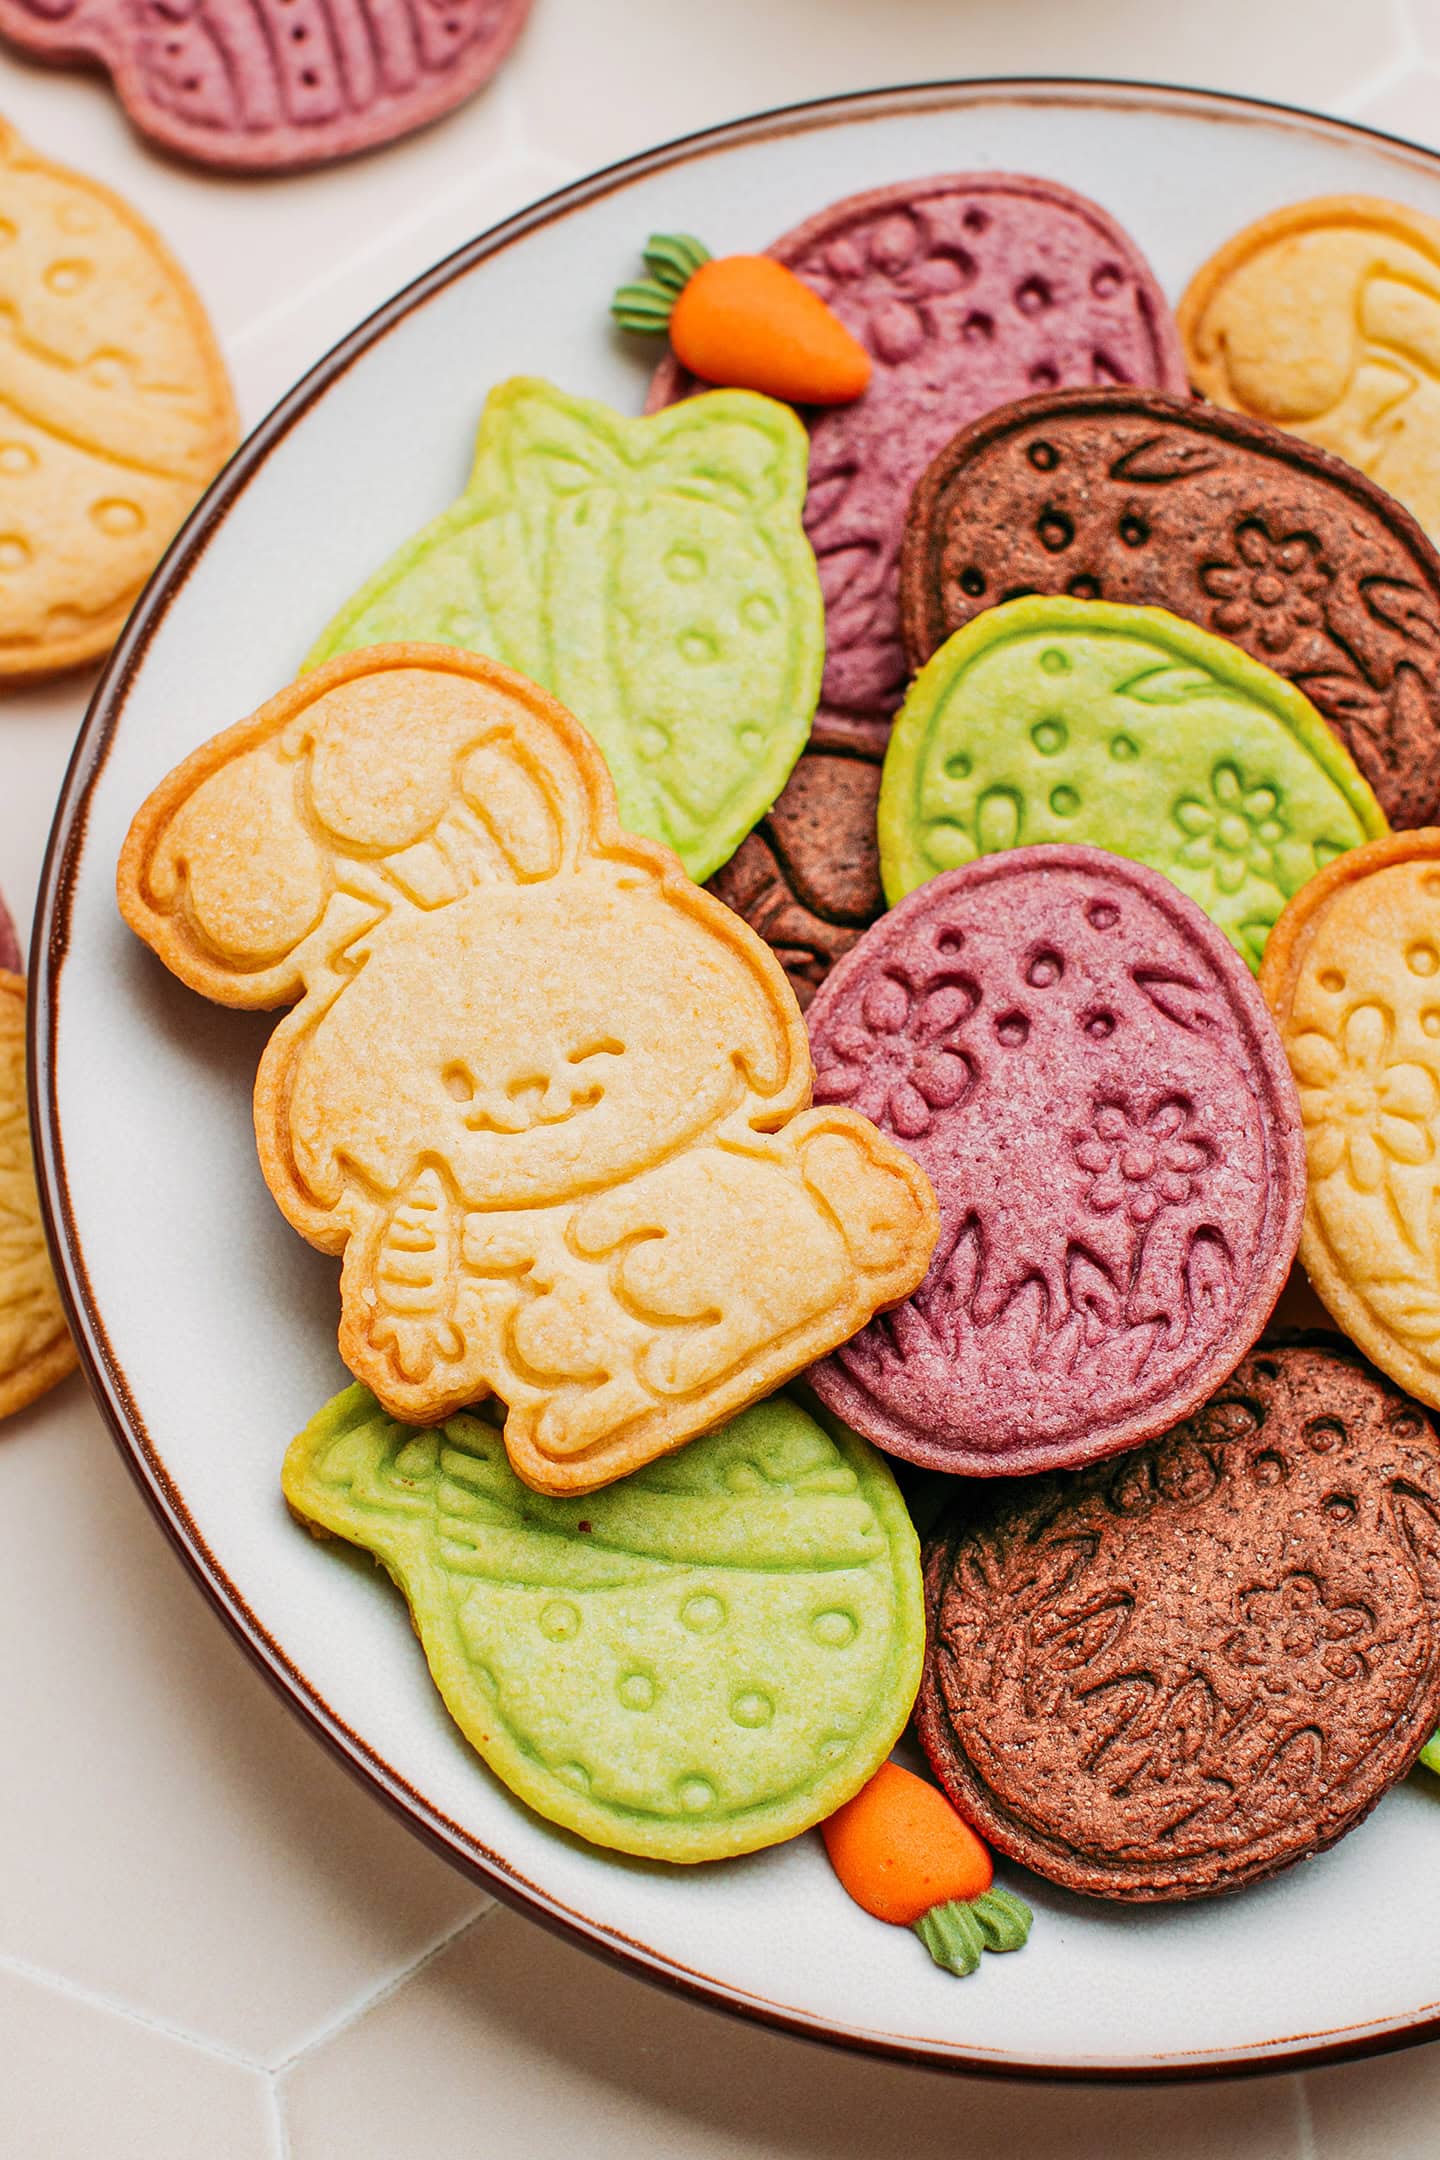
On top of that, I share three ways to naturally color the cookies. Pick the one you prefer, or bake different batches to create a rainbow of colors!
Buttery and packed with vanilla flavor.
These cookies not only look fantastic, but they also taste incredible. The sweetness is well-balanced, they have a rich buttery flavor, a hint of saltiness, and a fresh vanilla flavor. Try one bite, and you will want to eat the whole batch in one sitting!
Great for kids!
This recipe is super easy, making it a fun cooking project you can whip together with the kids on Easter Sunday. I can assure you that they will love the process and absolutely adore the cookies, especially if it involves baking cookies of different colors!
And if you would rather surprise them, arrange the cookies in a nice jar, add a cute label, and hide it in the garden for a special egg hunt!
🧈 Ingredient Notes
This recipe calls for just 7 simple ingredients that you most probably already have at home. You can find below some notes about the main ingredients.
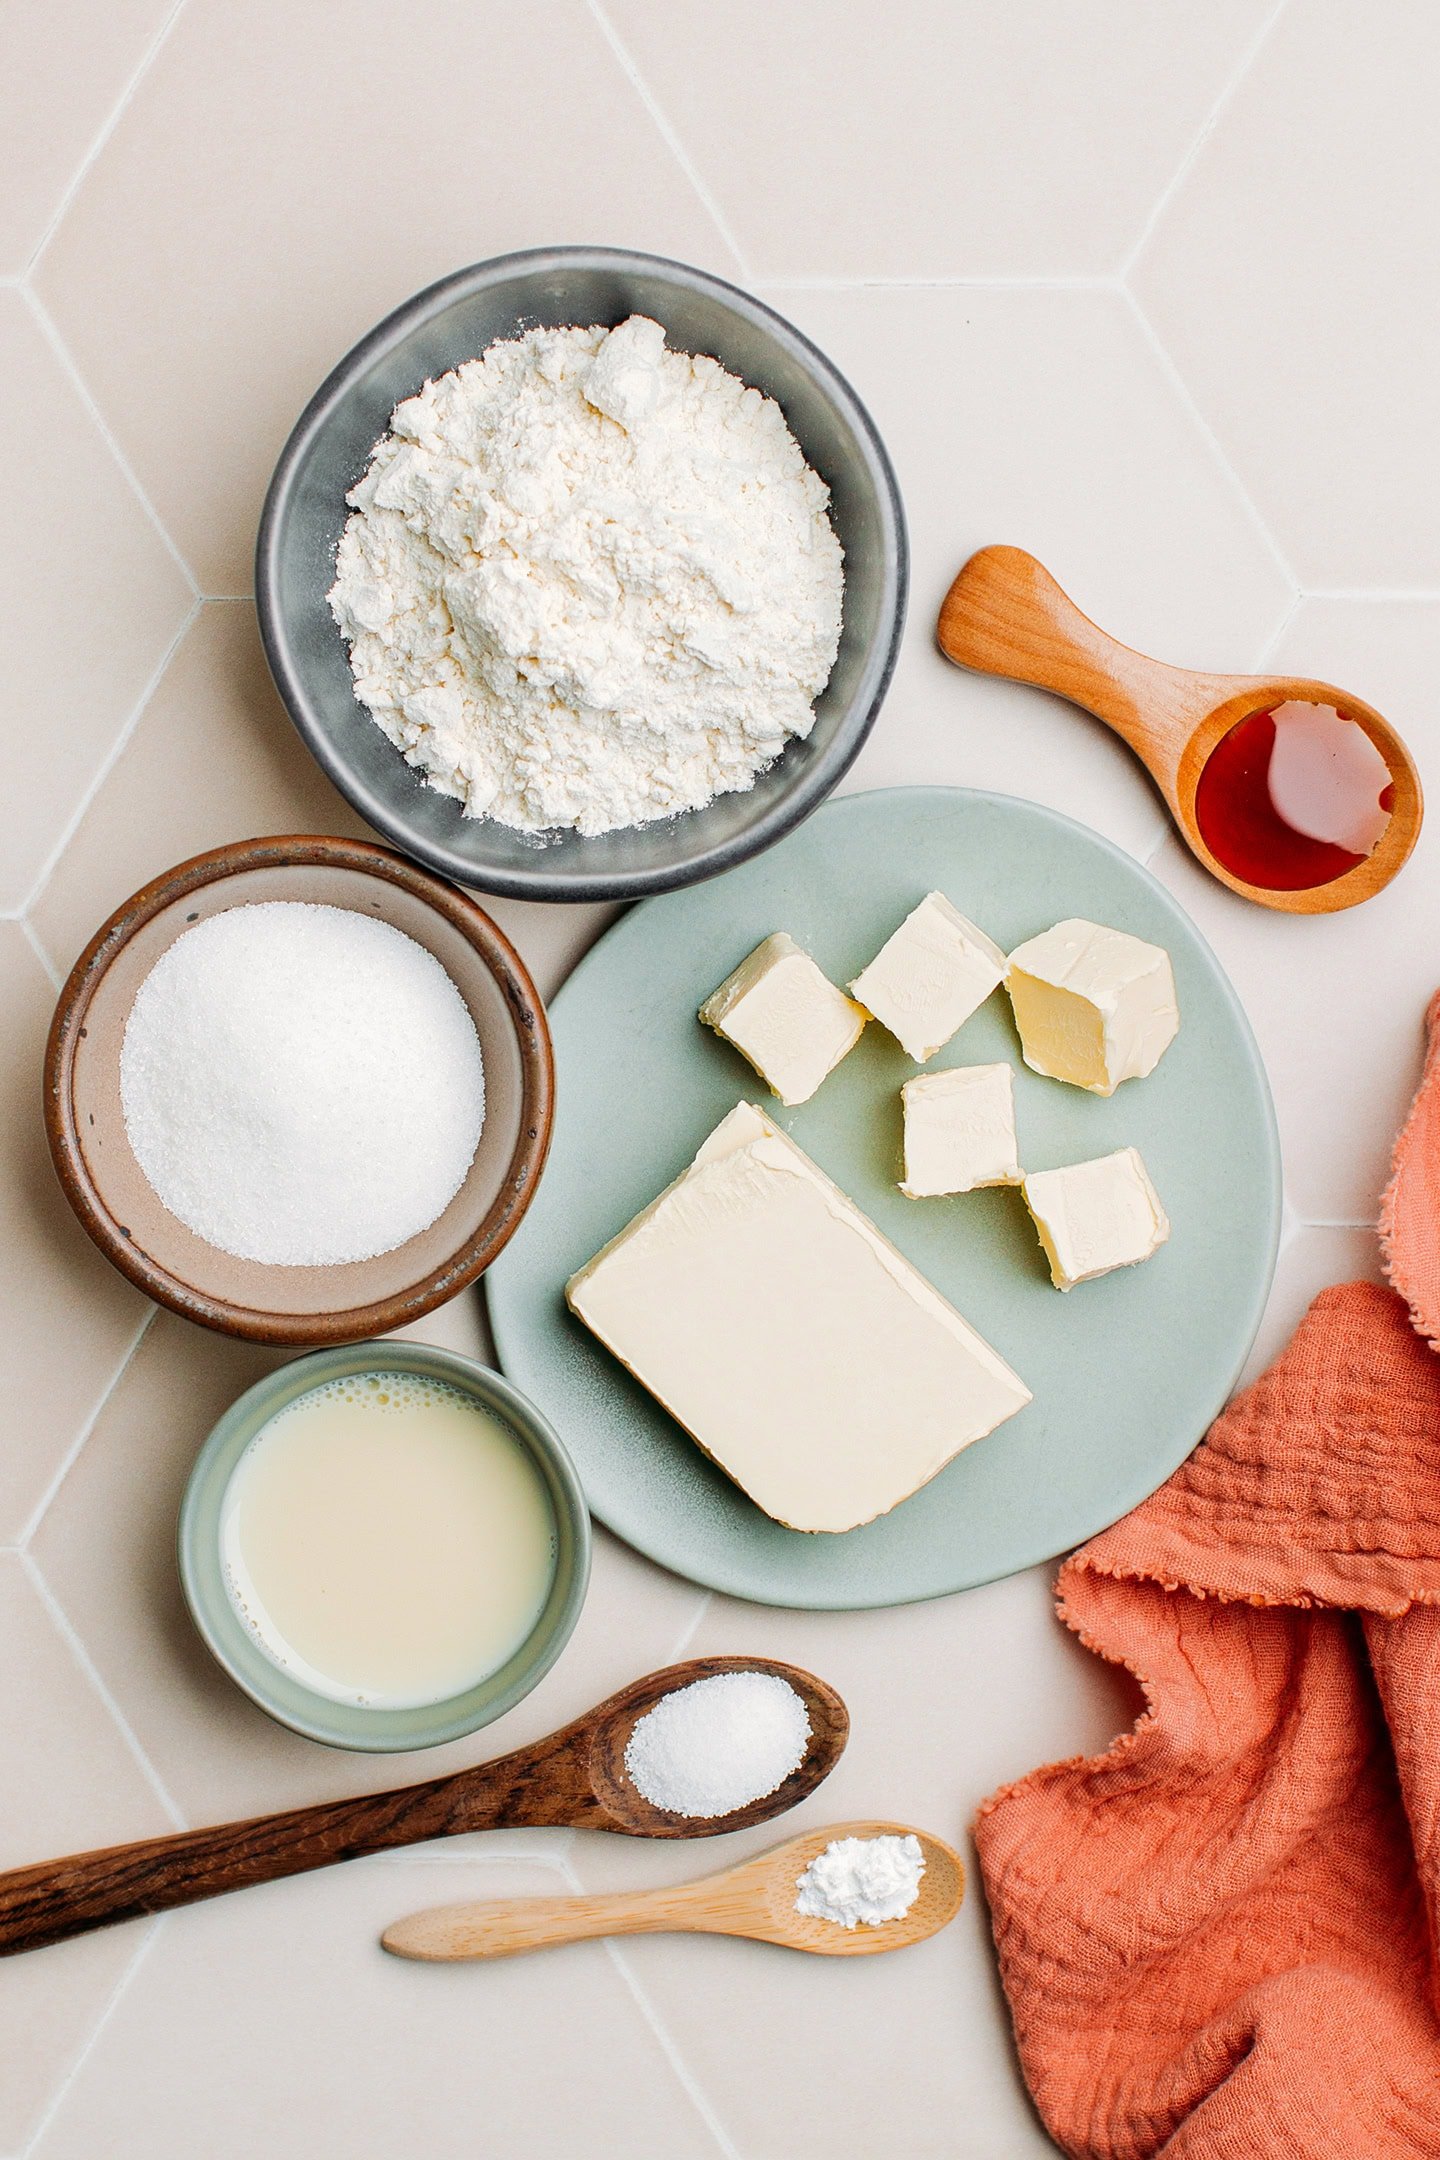
Flour
Flour makes the base of these cookies, providing structure. You don’t need to use any specific kind – the good old all-purpose flour works great here.
Butter
Butter is essential to add richness and a buttery flavor to the cookies. You can use store-bought vegan butter or my homemade vegan cultured butter.
Note: Do not use spreadable vegan butter, as it won’t work well for this recipe. You want to use a butter that stays firm in the refrigerator.
Sugar
To sweeten the cookies, I recommend using granulated white sugar. I have experimented with brown sugar and muscovado, but their stronger flavor tends to overpower the vanilla. So, I highly recommend sticking to white sugar for this recipe.
Refined sugar-free version: Coconut sugar is a good option! Keep in mind that since coconut sugar is a bit coarser than granulated sugar, your cookies might have tiny brown flecks.
Vanilla
For floral notes and a gourmand scent. Use your favorite vanilla extract or omit it and replace the white sugar with homemade vanilla sugar.
Baking powder
Baking powder helps the cookies rise a bit, creating a more airy texture. Without it, your cookies would be too dense, so do not omit it.
For the colors:
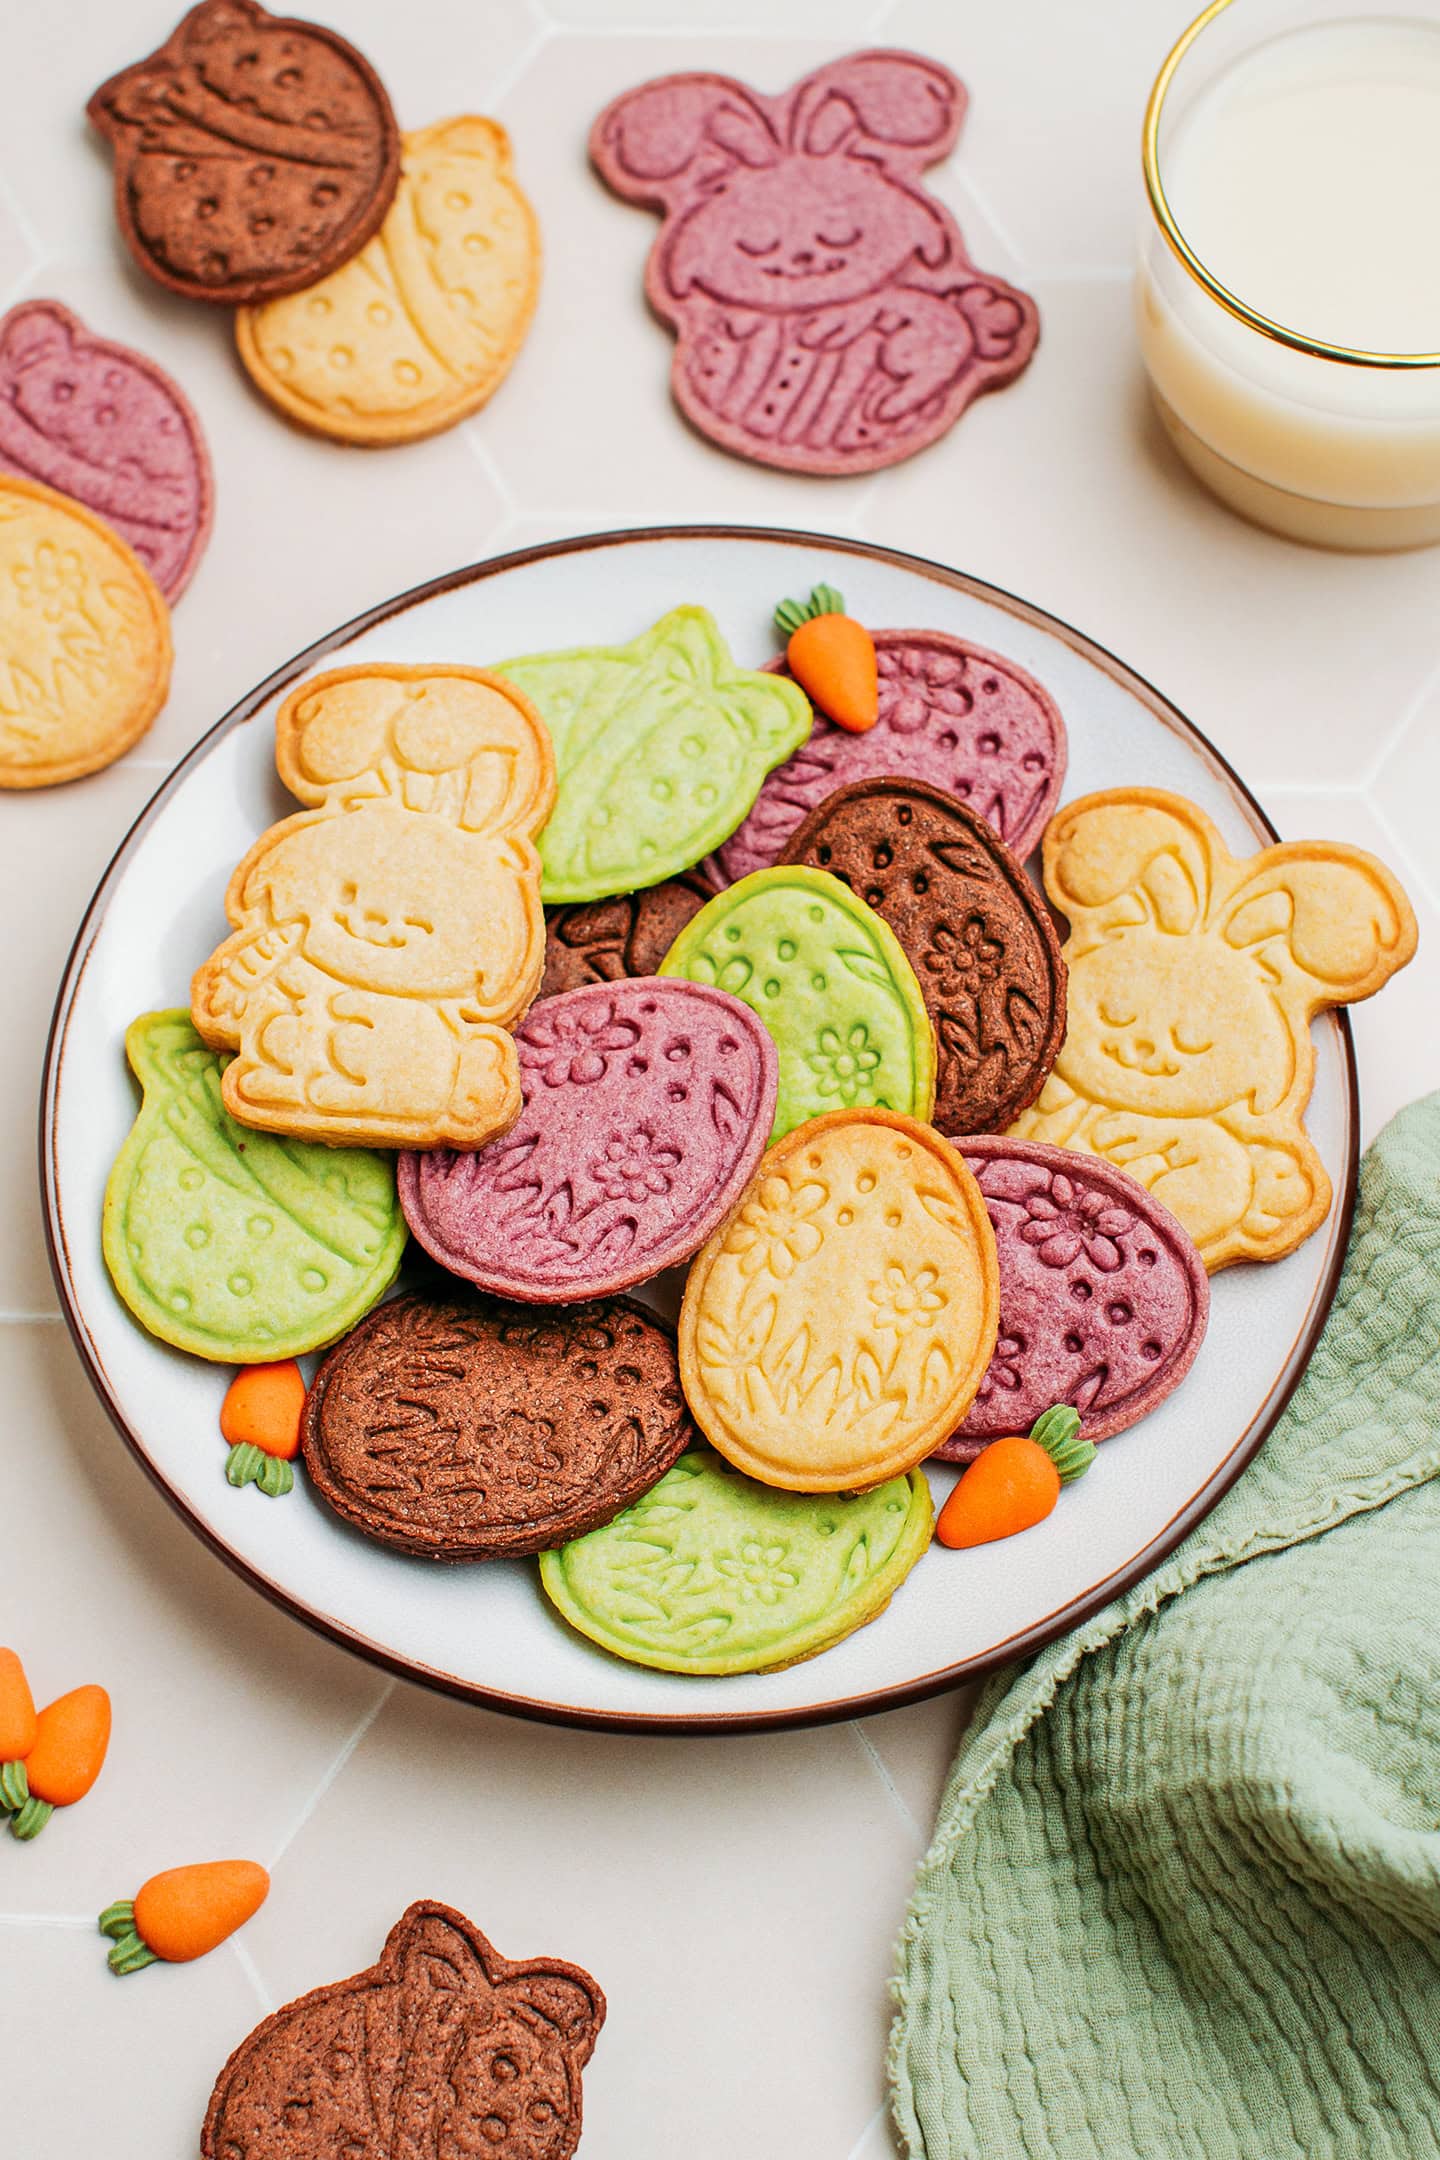
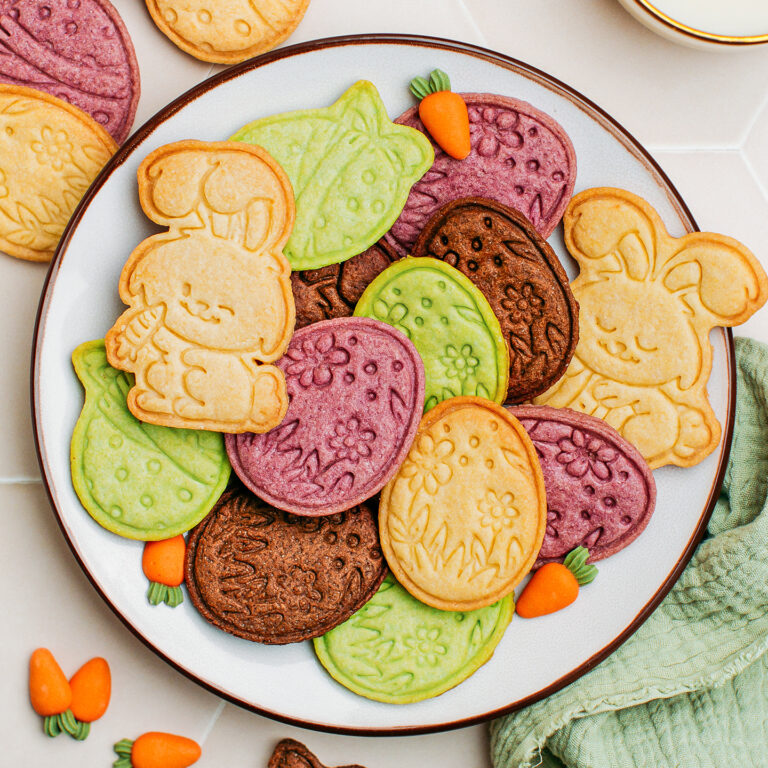
- Beige: The natural color of the cookies! Their light beige color comes from the butter and vanilla extract.
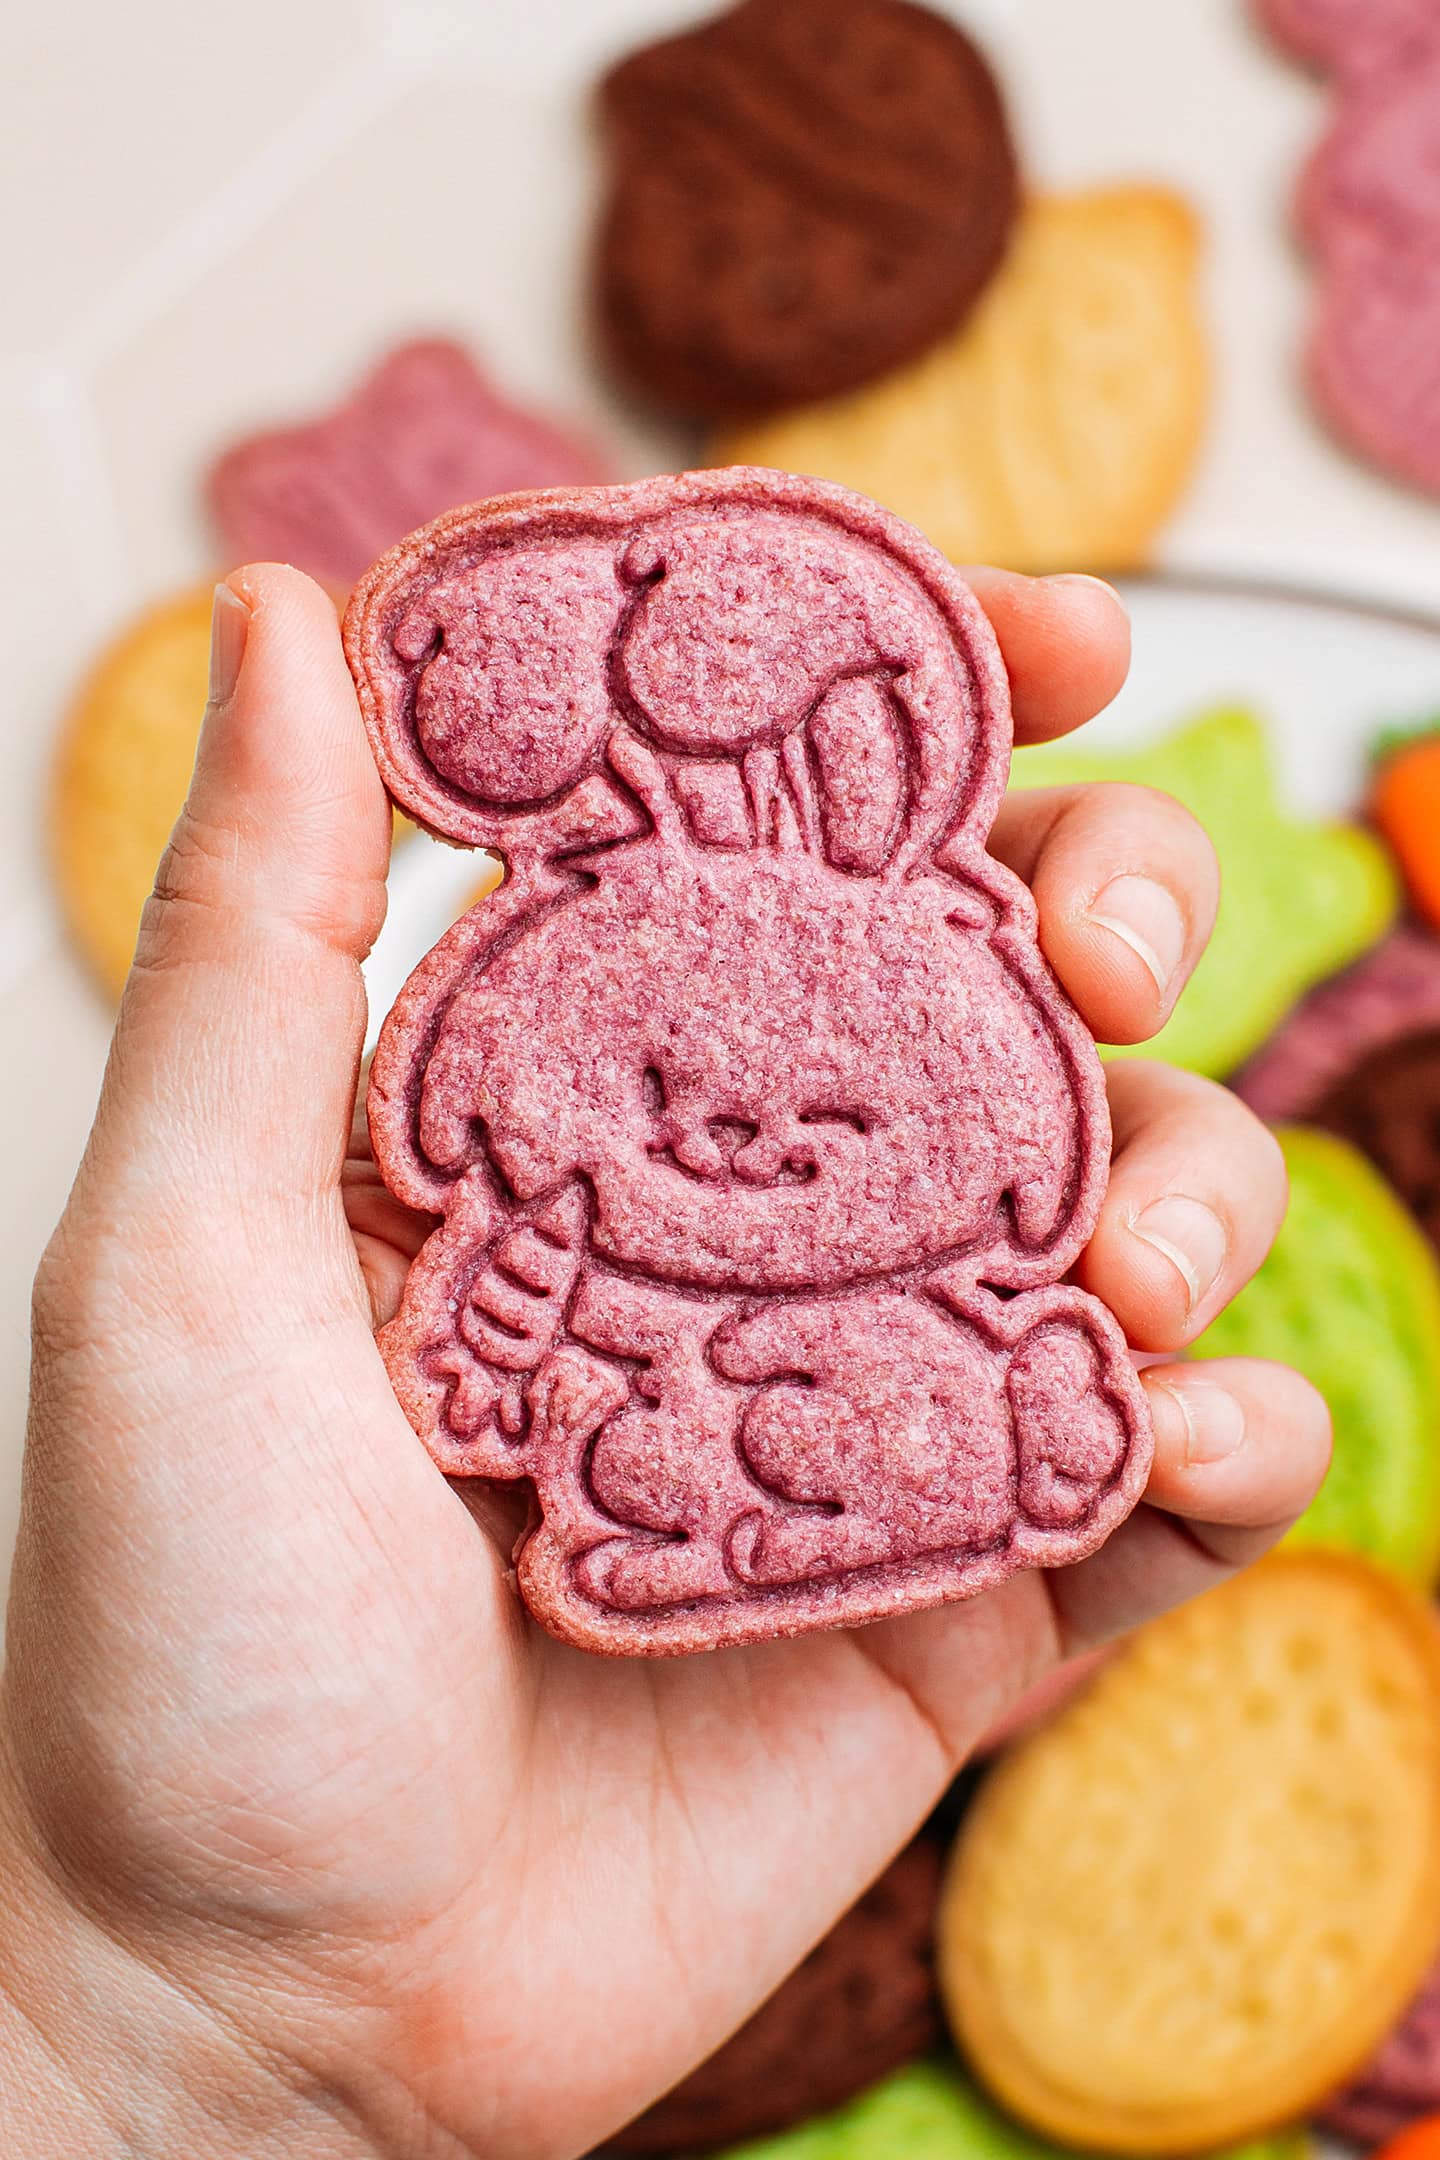
- Purple: To give the cookies a deep purple color, I rely on ube powder, also known as purple sweet potato powder. It’s 100% natural as it is made from cooked and dehydrated purple sweet potatoes! Bonus point: it adds a hint of nuttiness to the cookies! Note: I use 2 teaspoons, but if you are after a lighter hue, you can use only 1 teaspoon.
- Brown: What else could be better than unsweetened cocoa powder to give the cookies a brown color AND a hint of chocolate flavor?
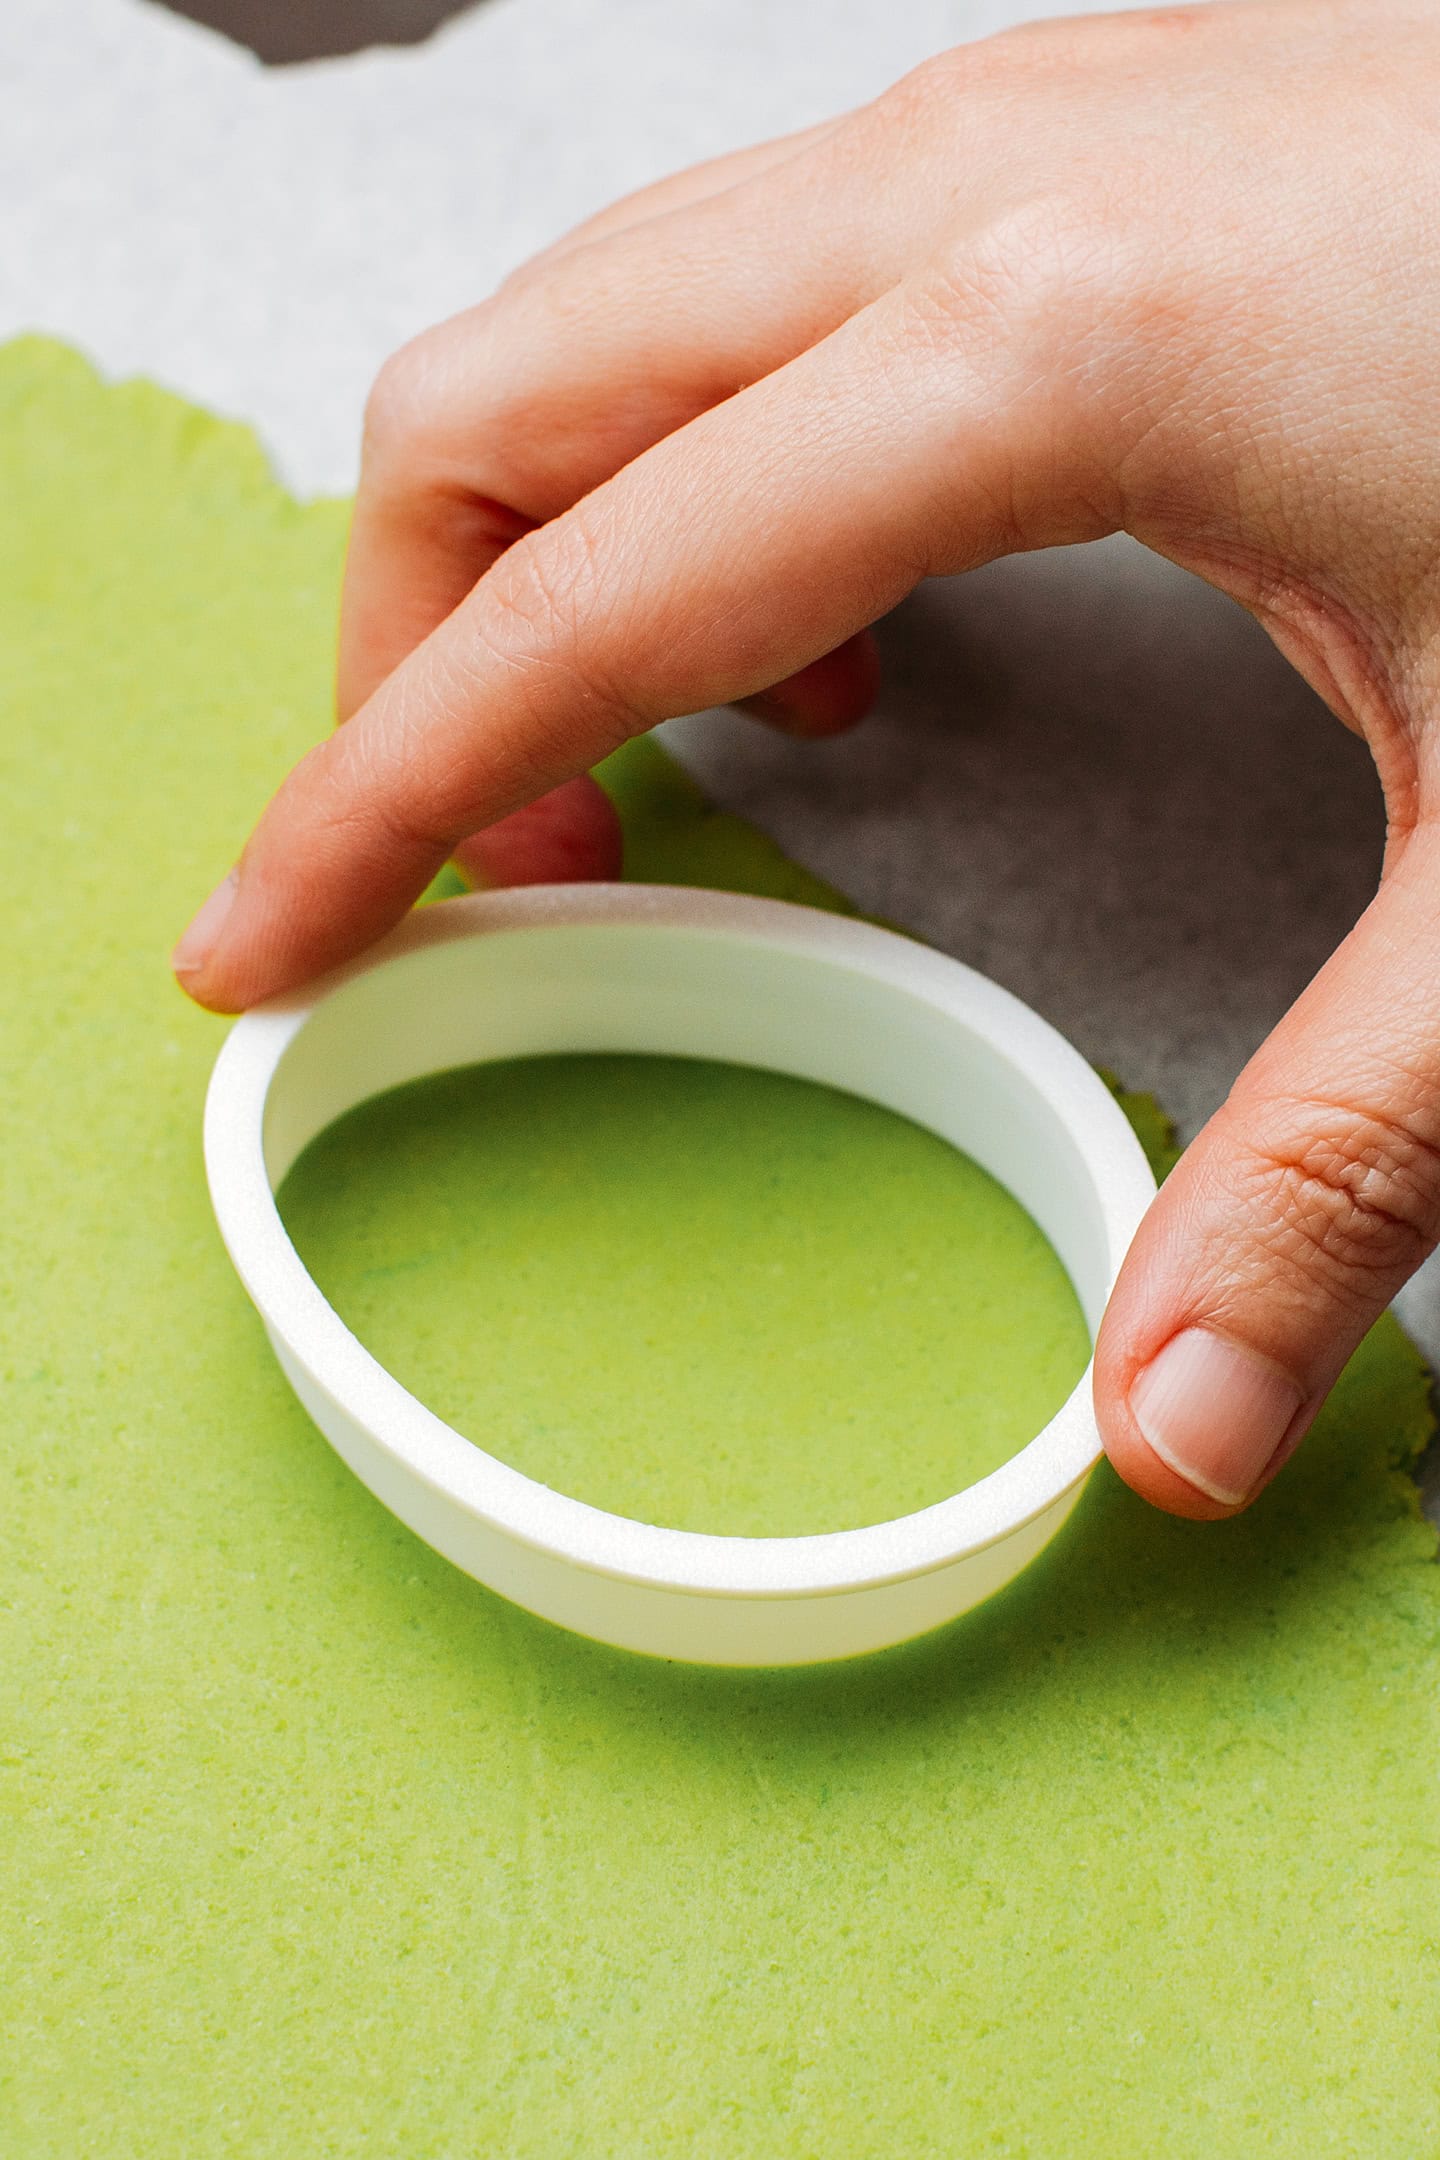
- Green: Finally, if you want some green, matcha powder works great! I suggest using a high-quality matcha powder for a bright green color. A quick tip: Unless you are drinking matcha regularly, I would not recommend buying it only for the purpose of this recipe – it’s quite expensive and goes bad after just a few months. In that case, simply replace it with green food coloring.
🥣 How to Make It
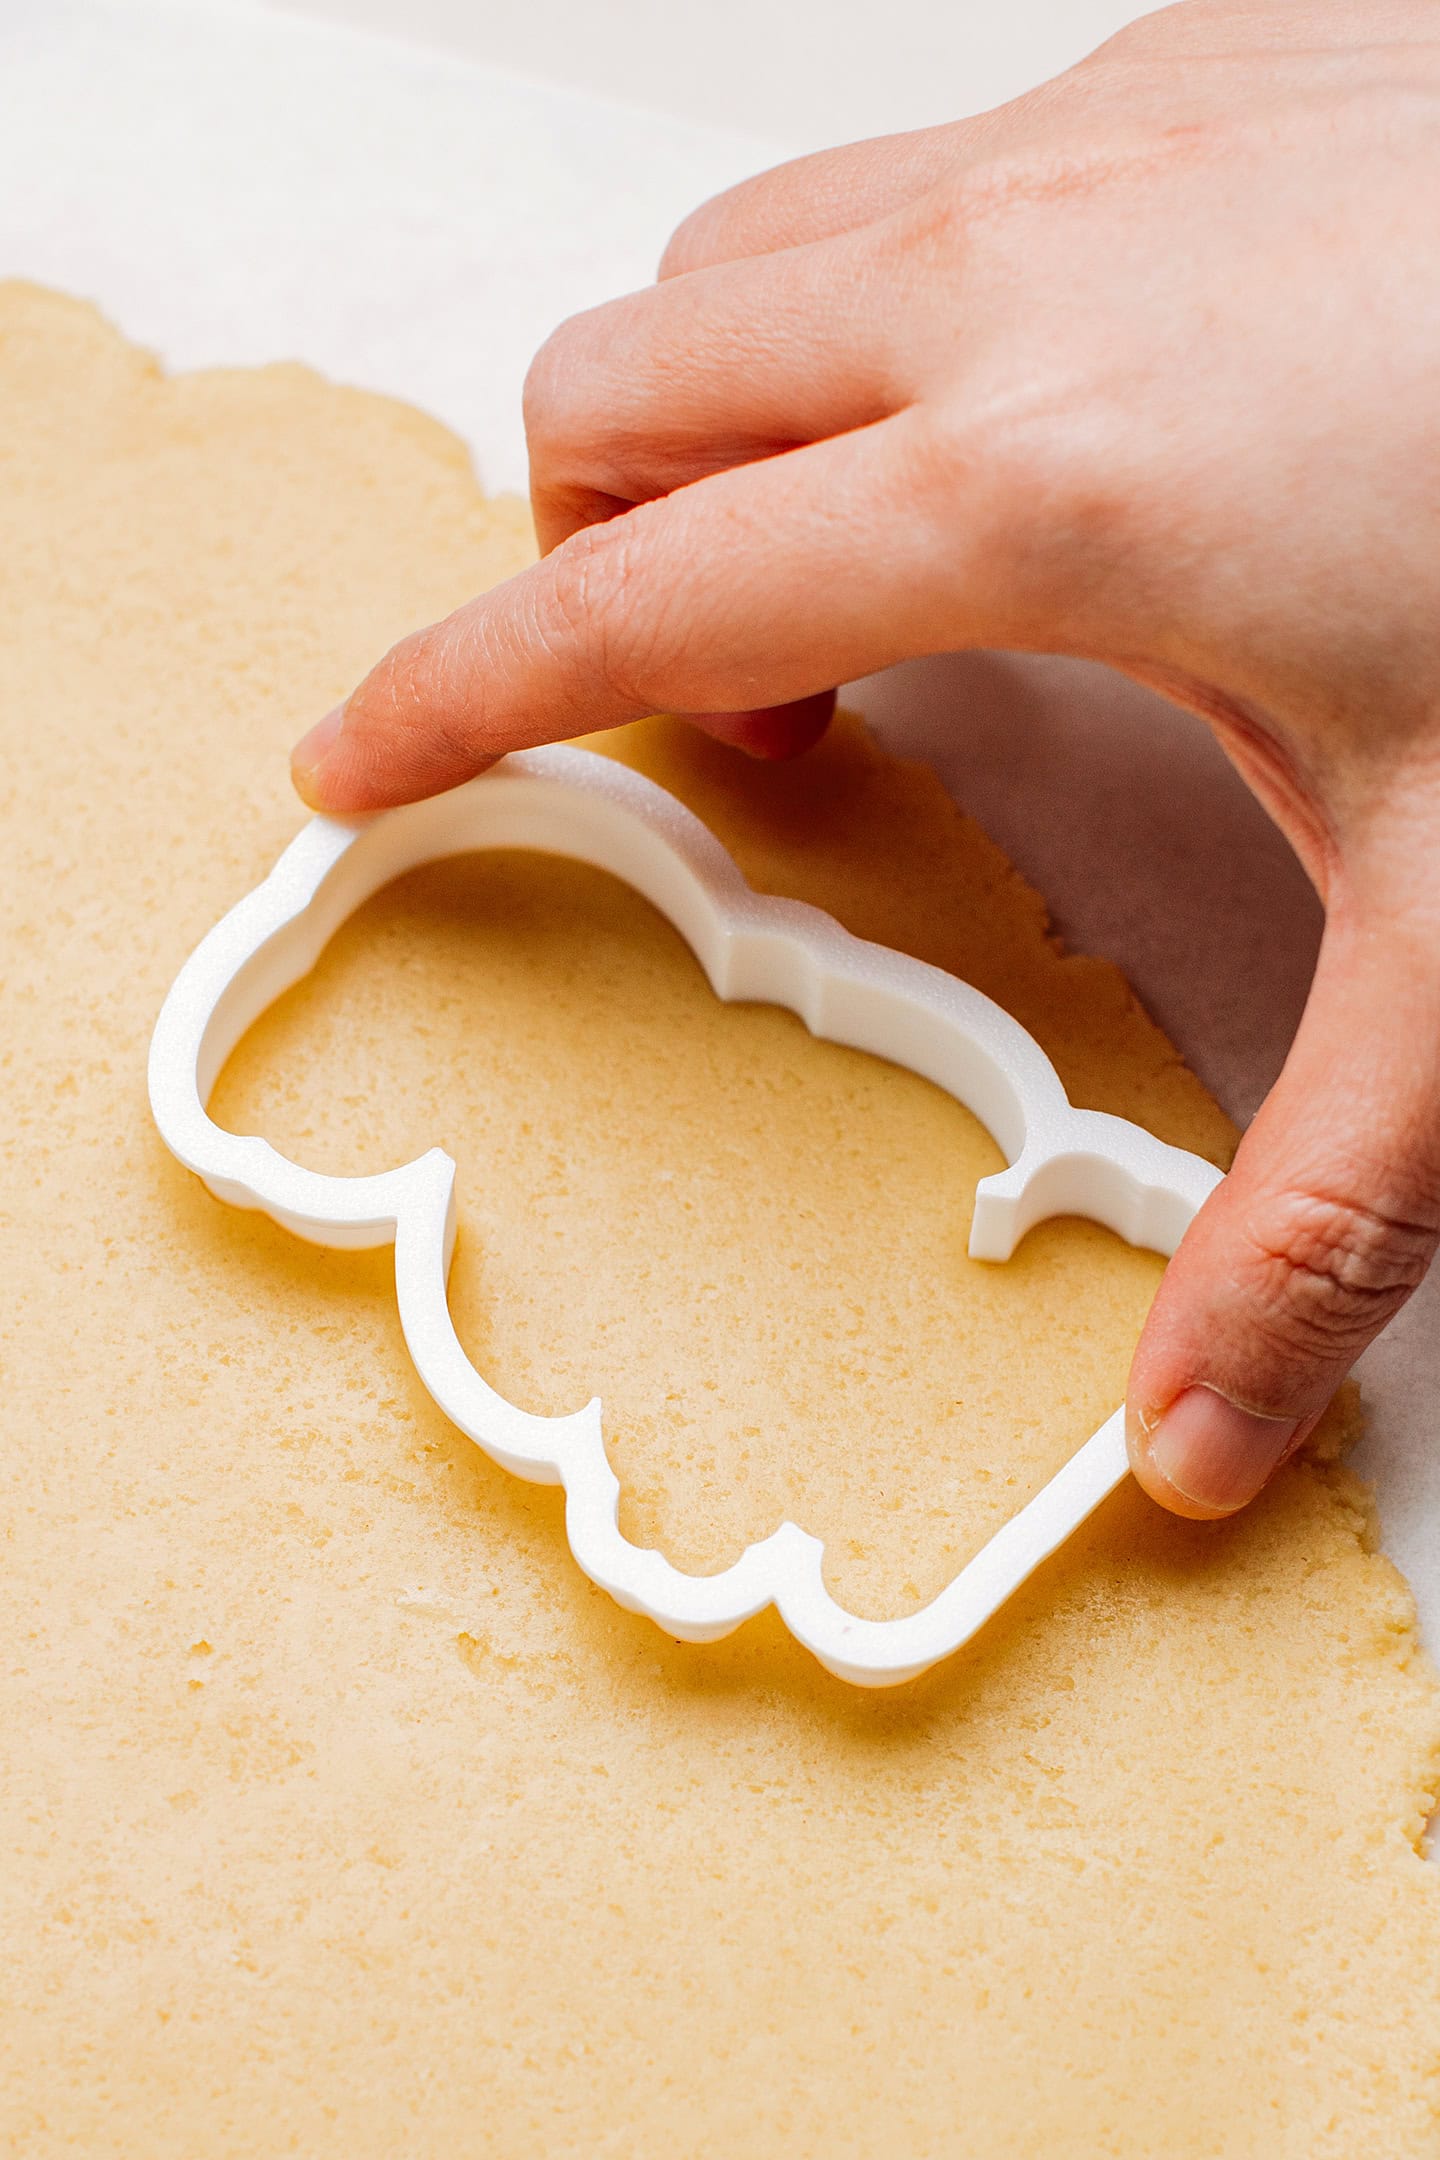
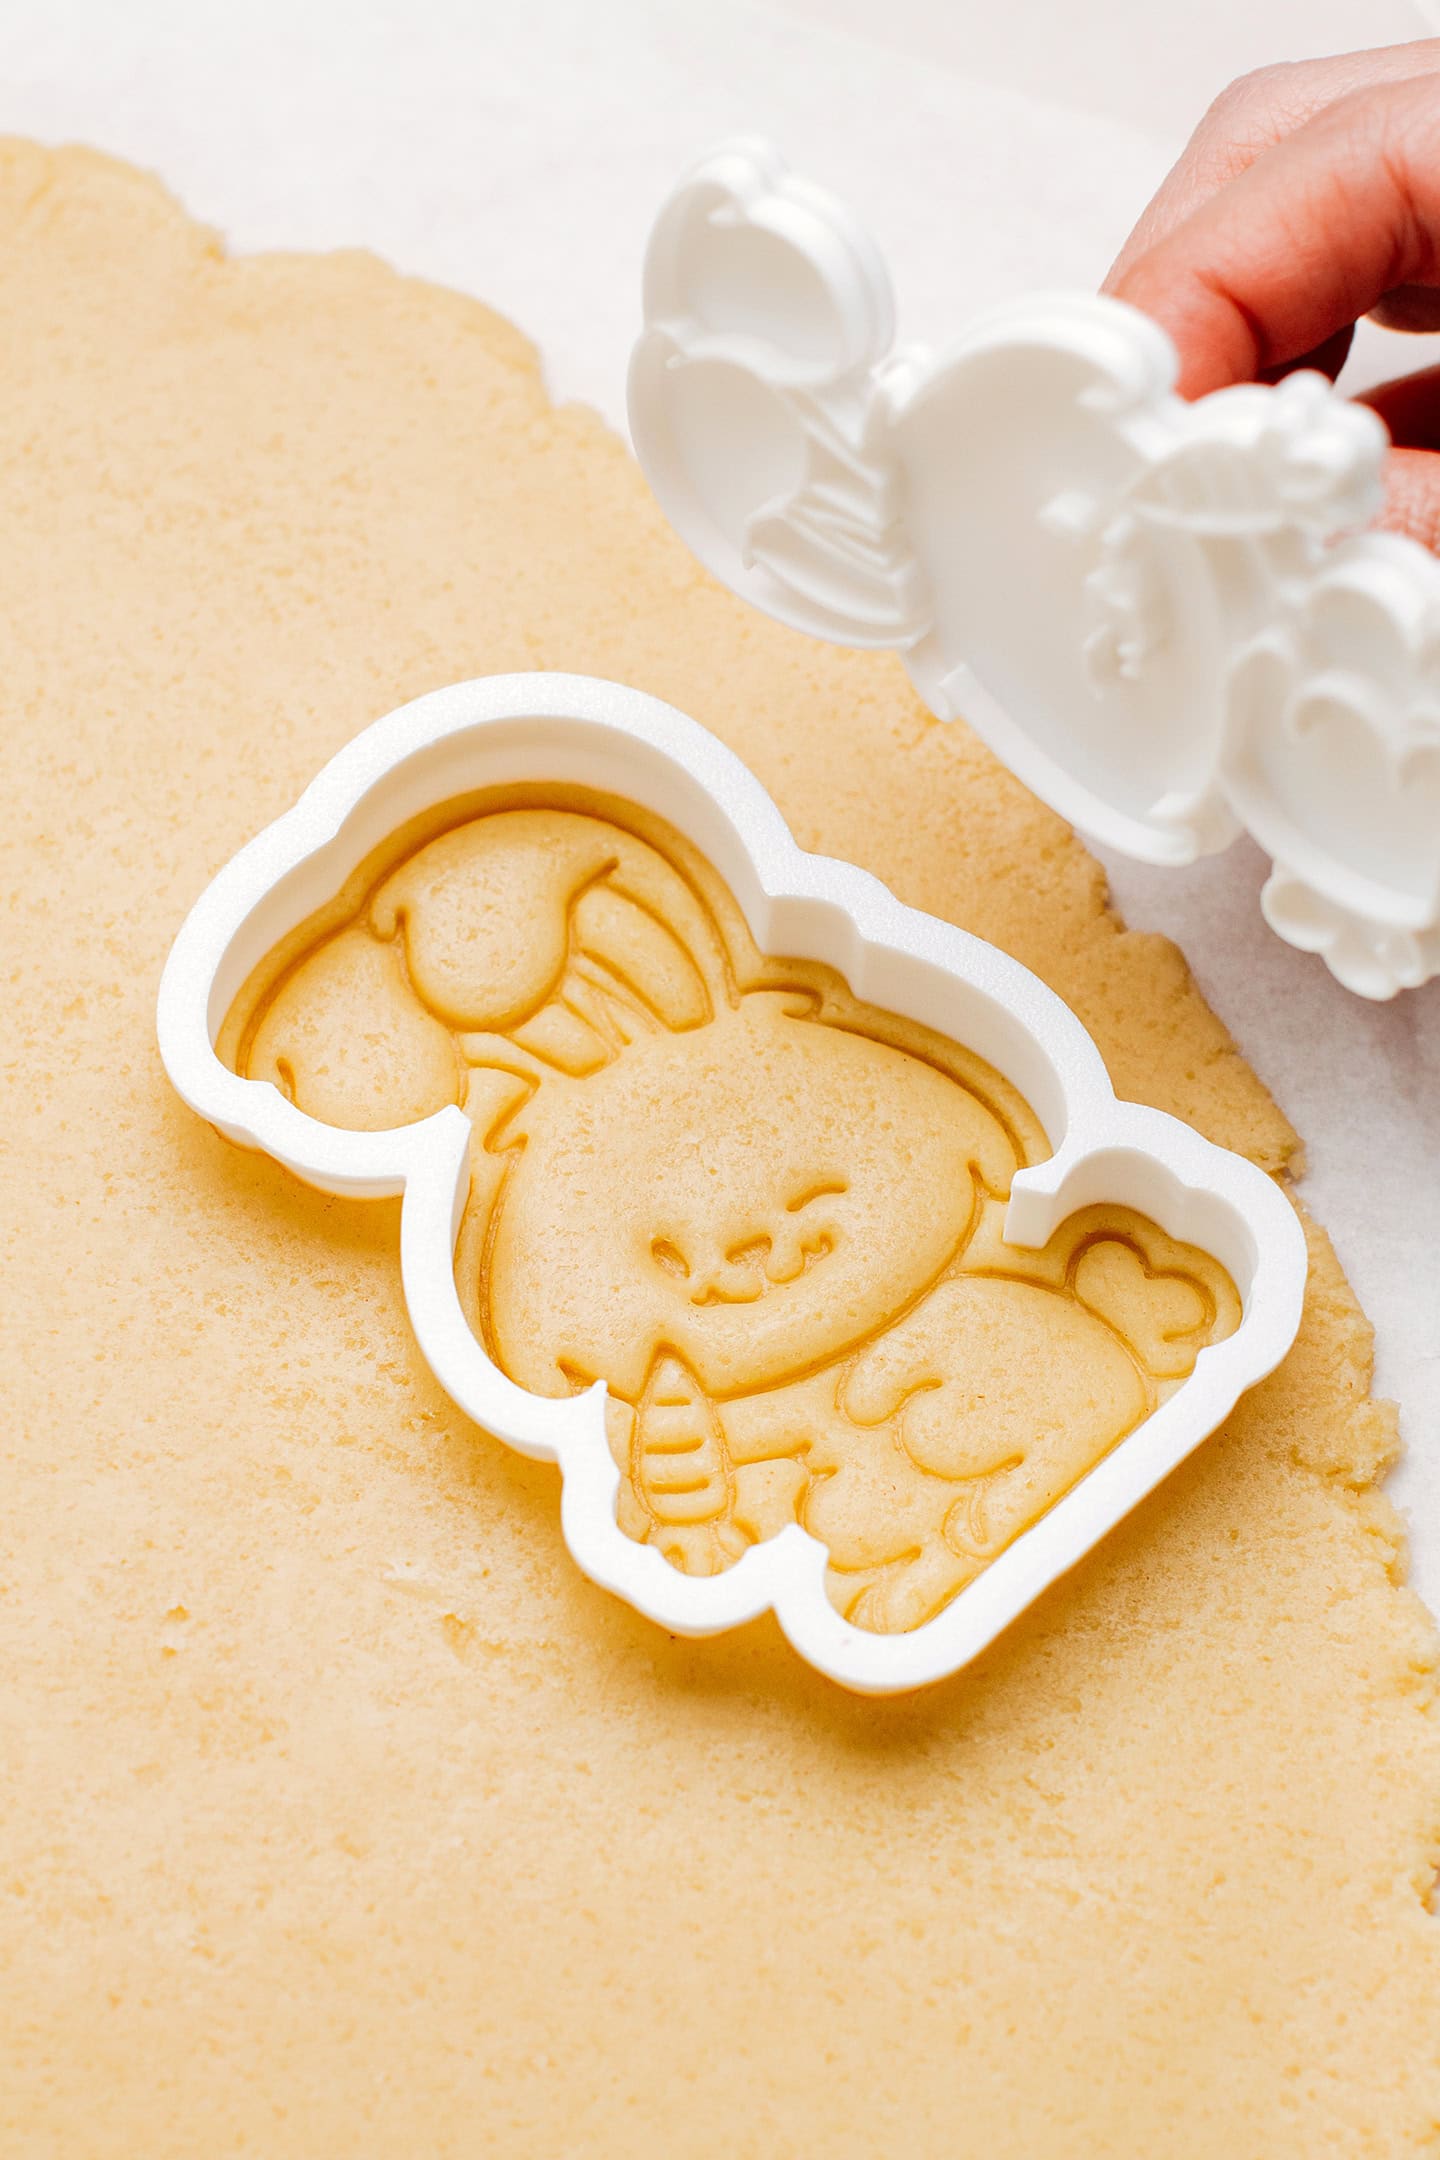
Which cookie cutter to use?
Before starting, you will need easter-themed cookie cutters/stamps. I found mine on Aliexpress as they were the best-looking I could find. Here is the link if you want to check them out. They sell them by the unit, so you can pick whichever you prefer.
Otherwise, you may also be able to find cookie cutters at your local baking supply shop or buy them online. For example, I found this set of 8 easter cookie cutters on Amazon. These are different from the ones I used, but they still look pretty cute!
1. Make the dough
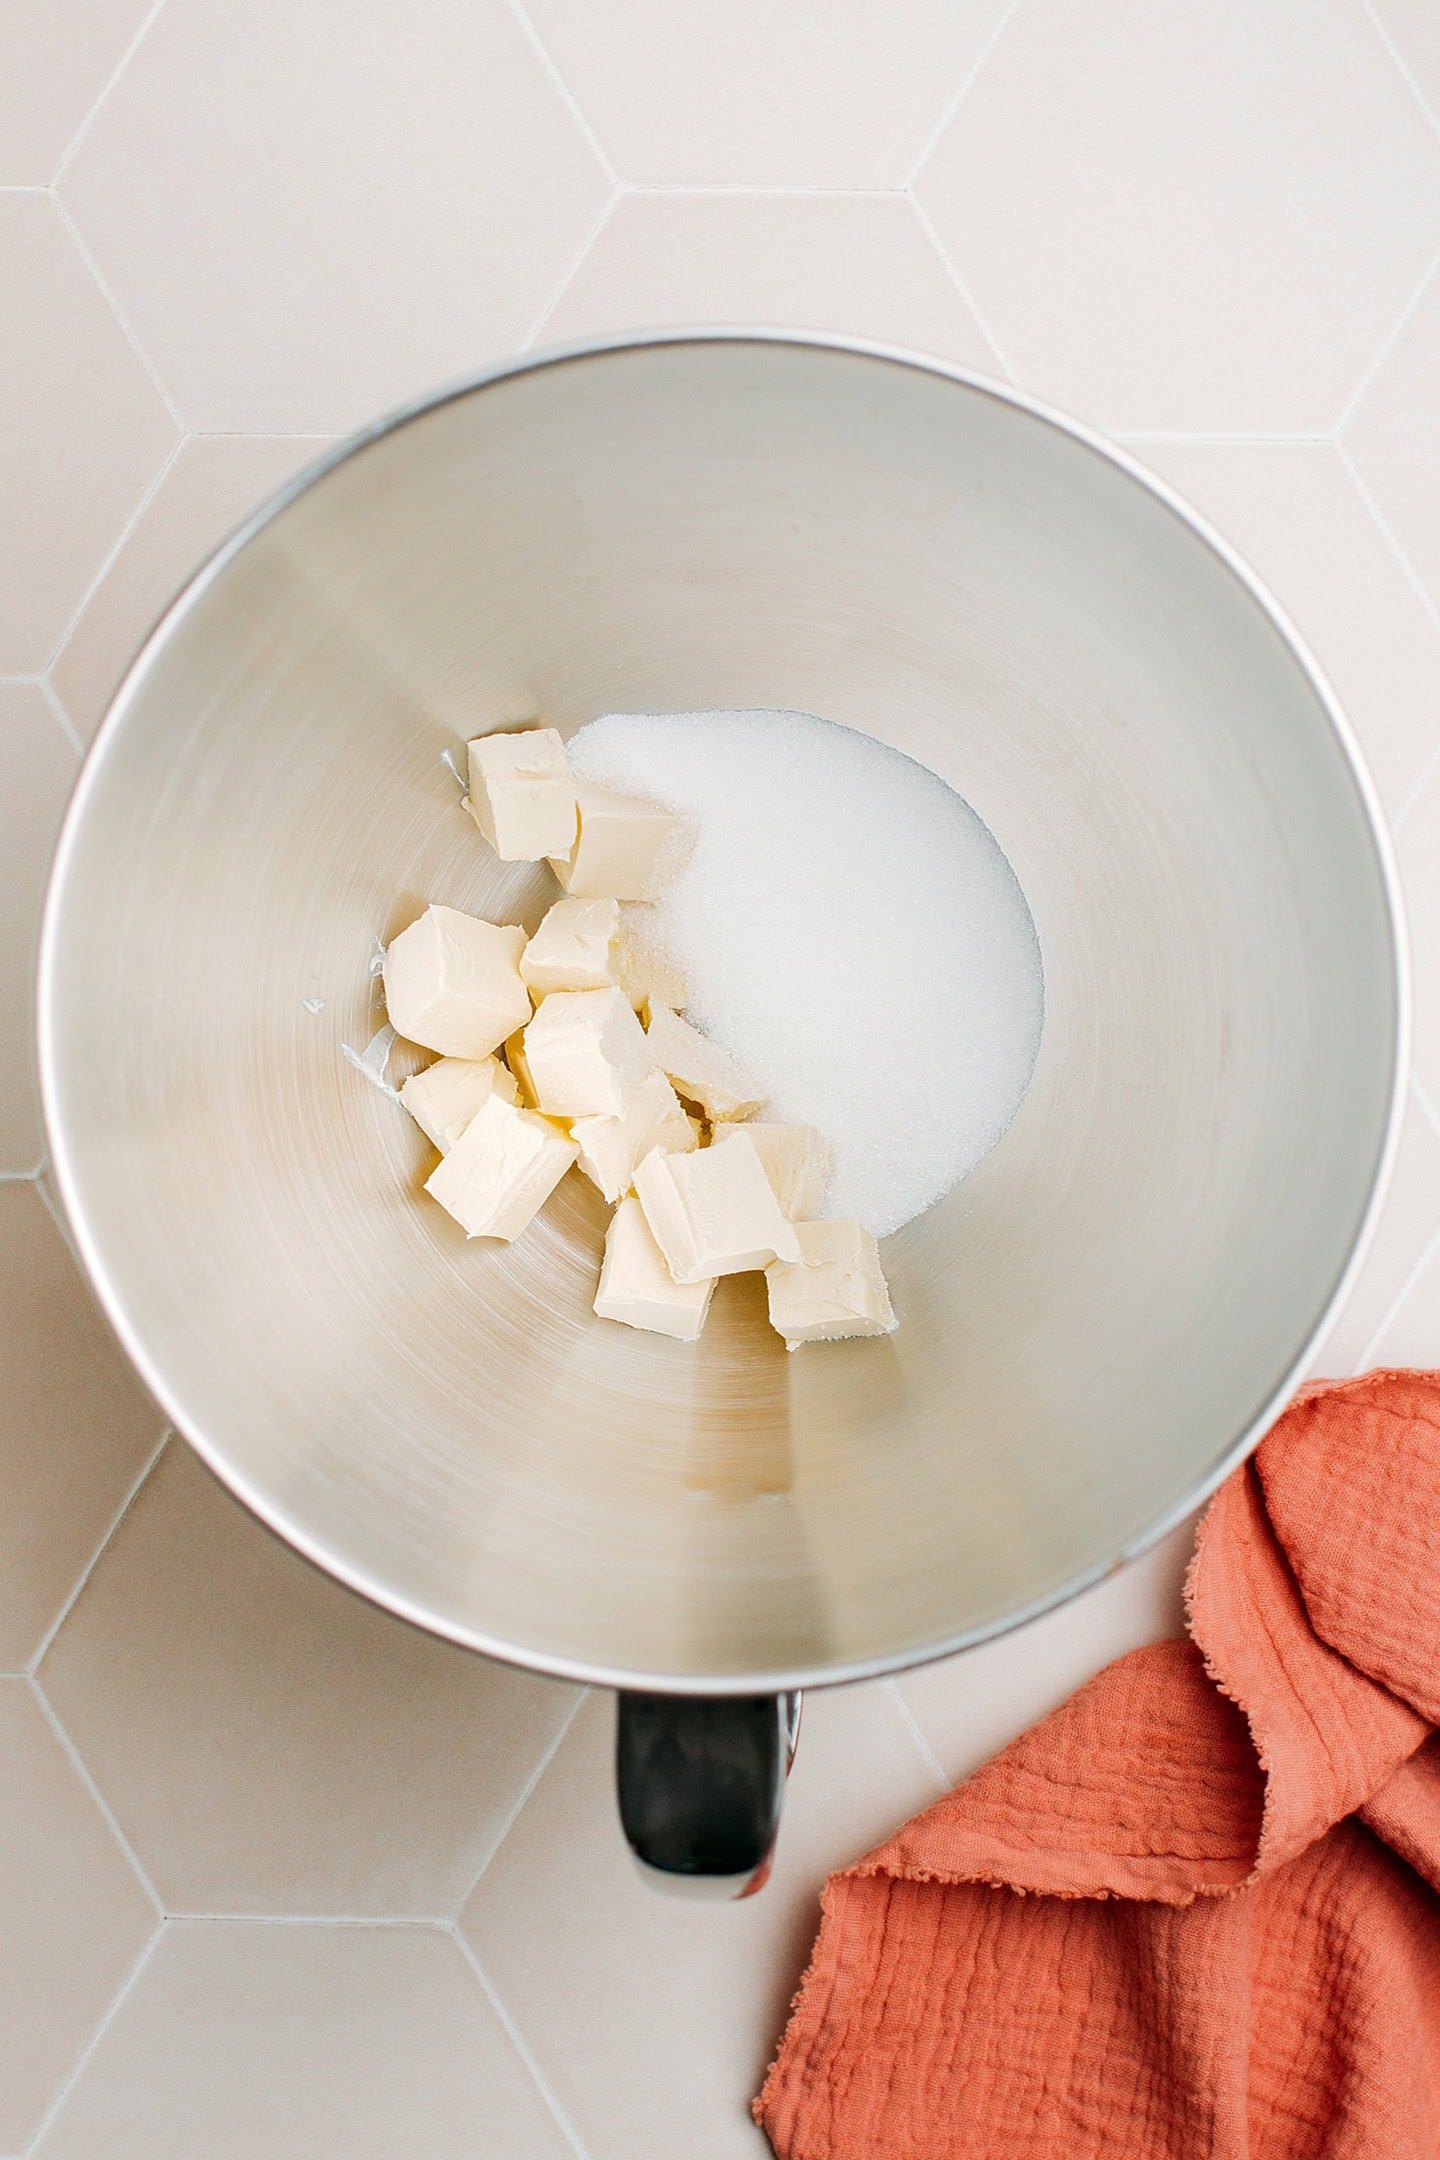
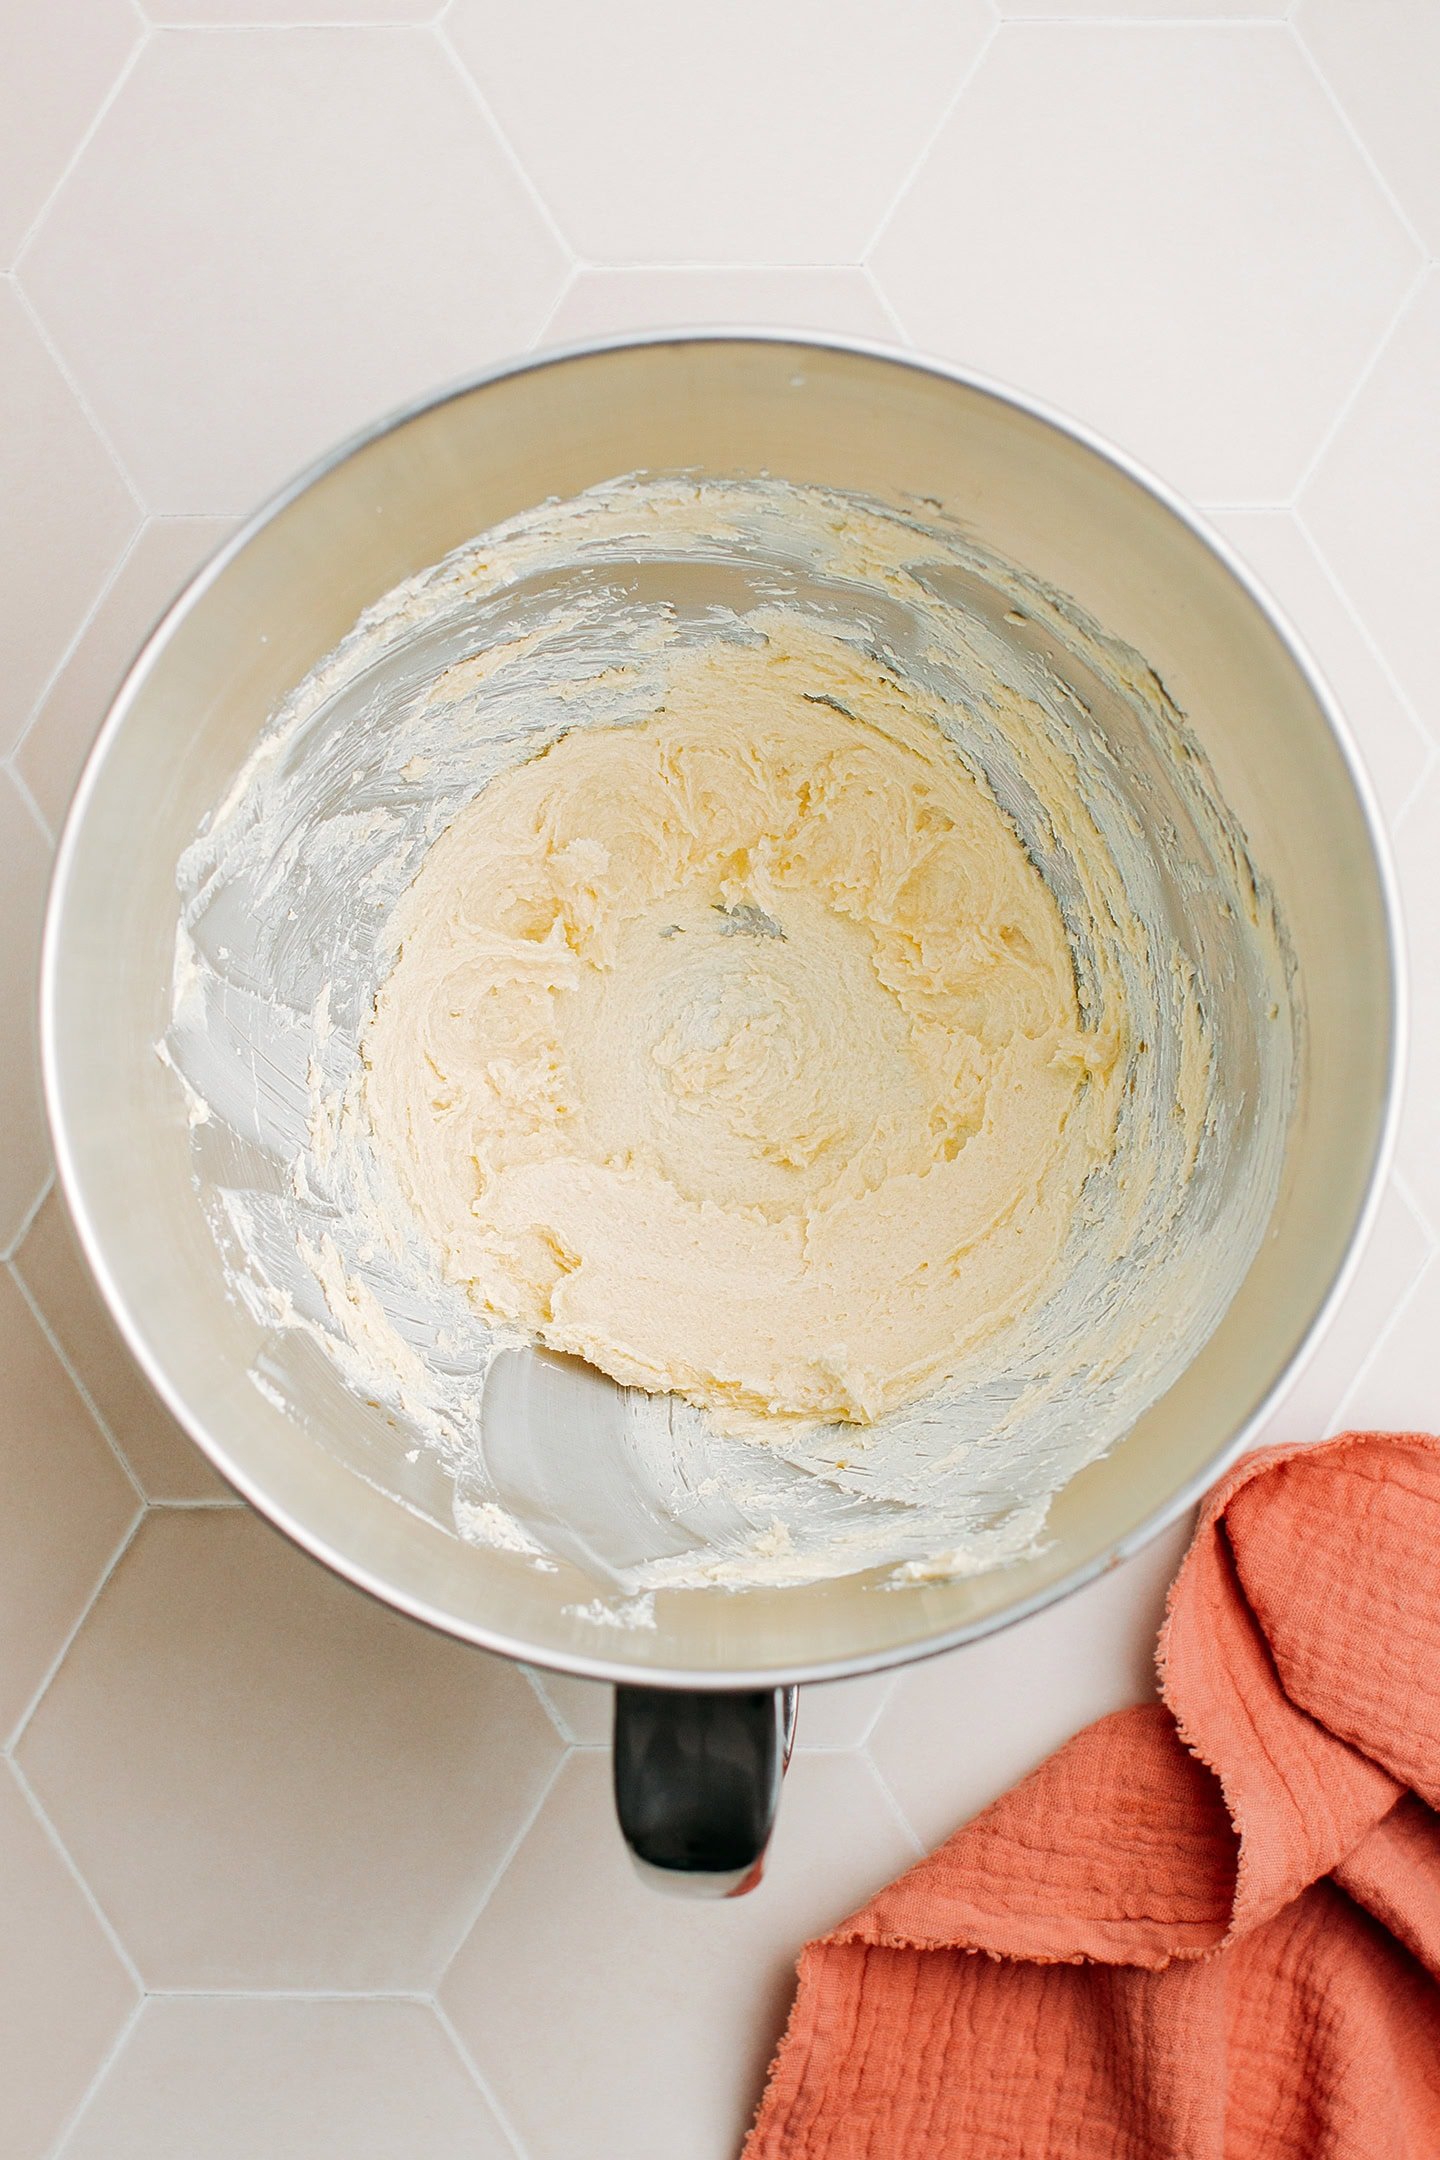
- Cream the butter. Add the room-temperature butter and sugar to a large mixing bowl or stand mixer fitted with the paddle attachment. Beat on low speed for 2-3 minutes or until the butter appears creamy and fluffy. Add the vanilla extract and milk and beat for another 10-15 seconds.
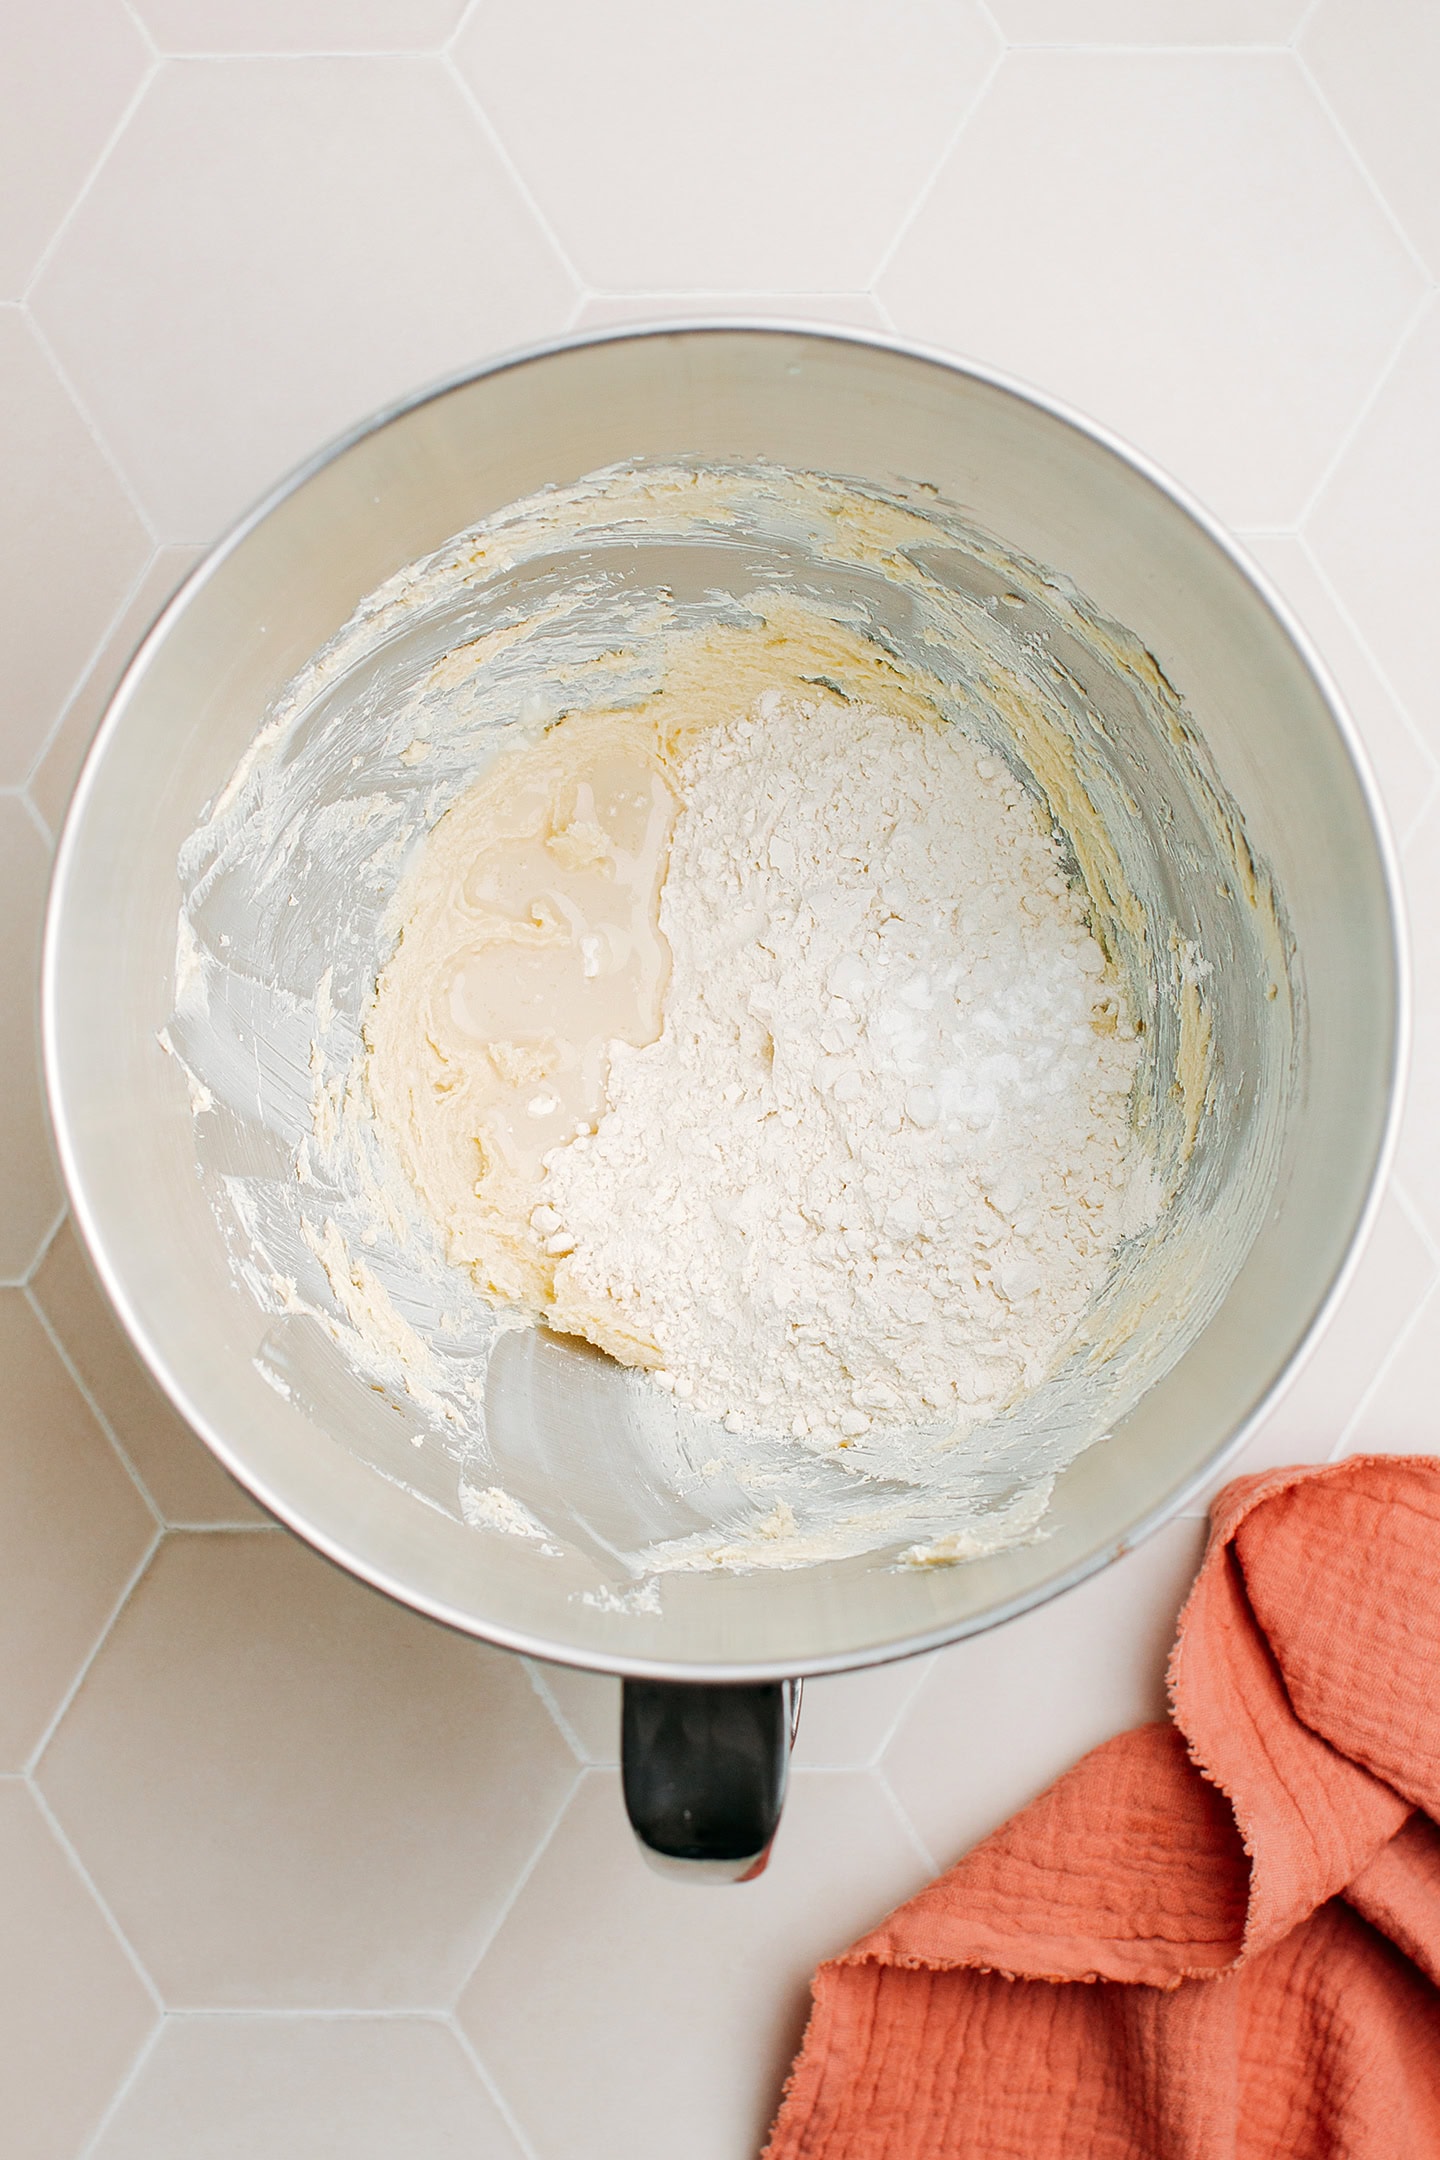
- Add the flour. Next, add the flour, baking powder, and salt.
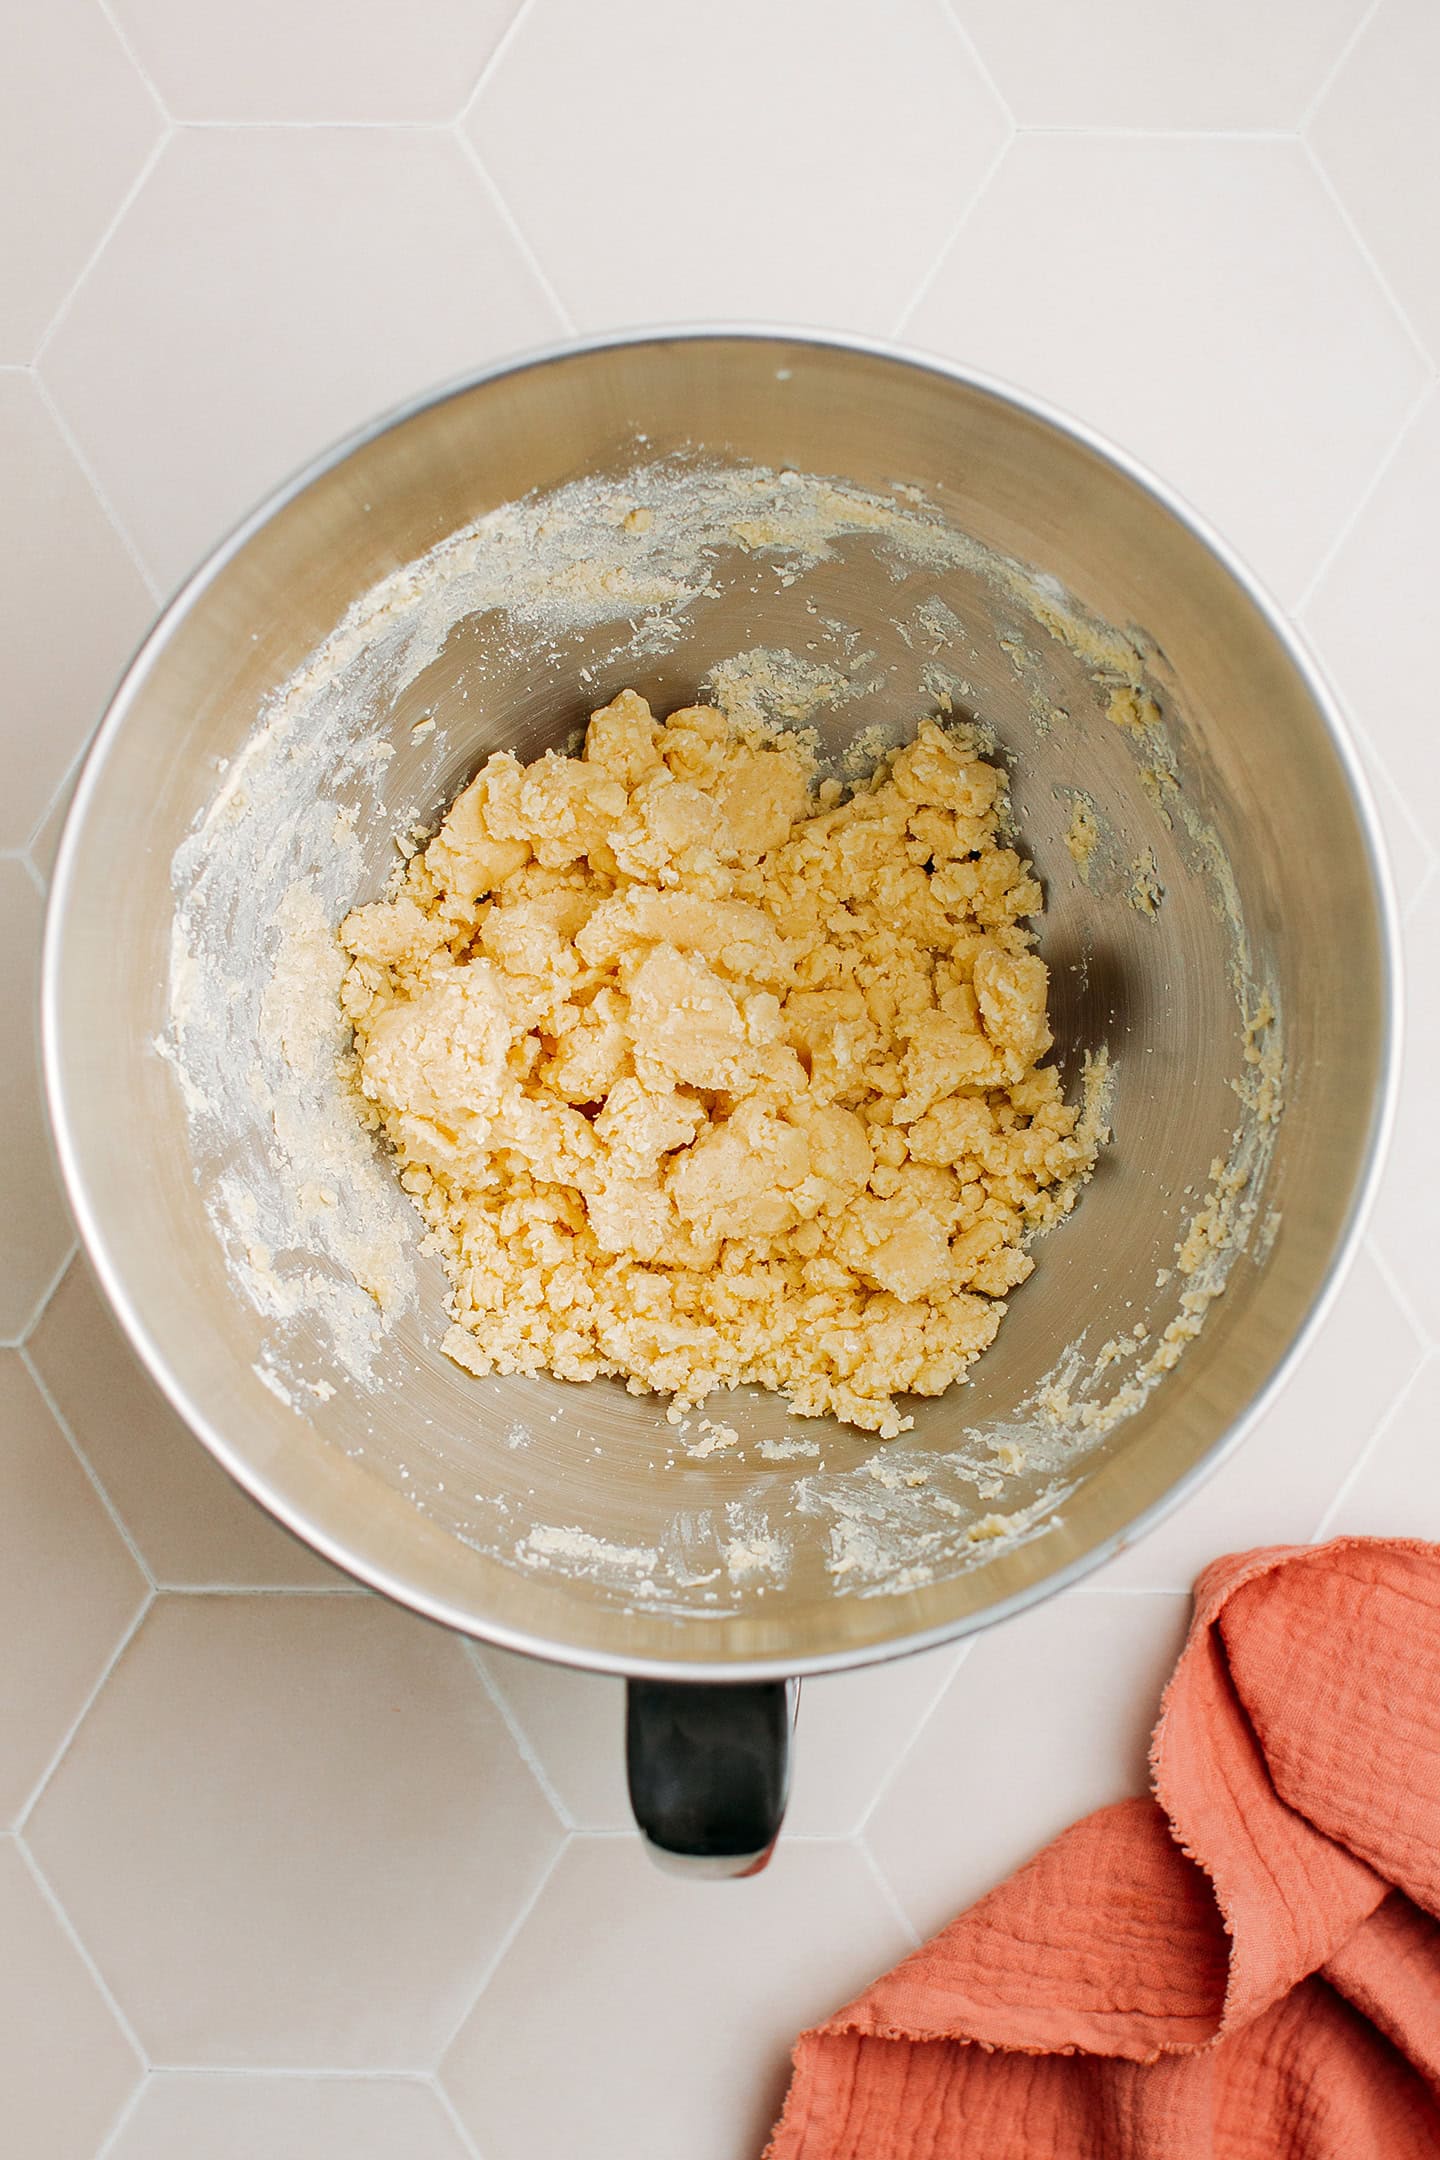
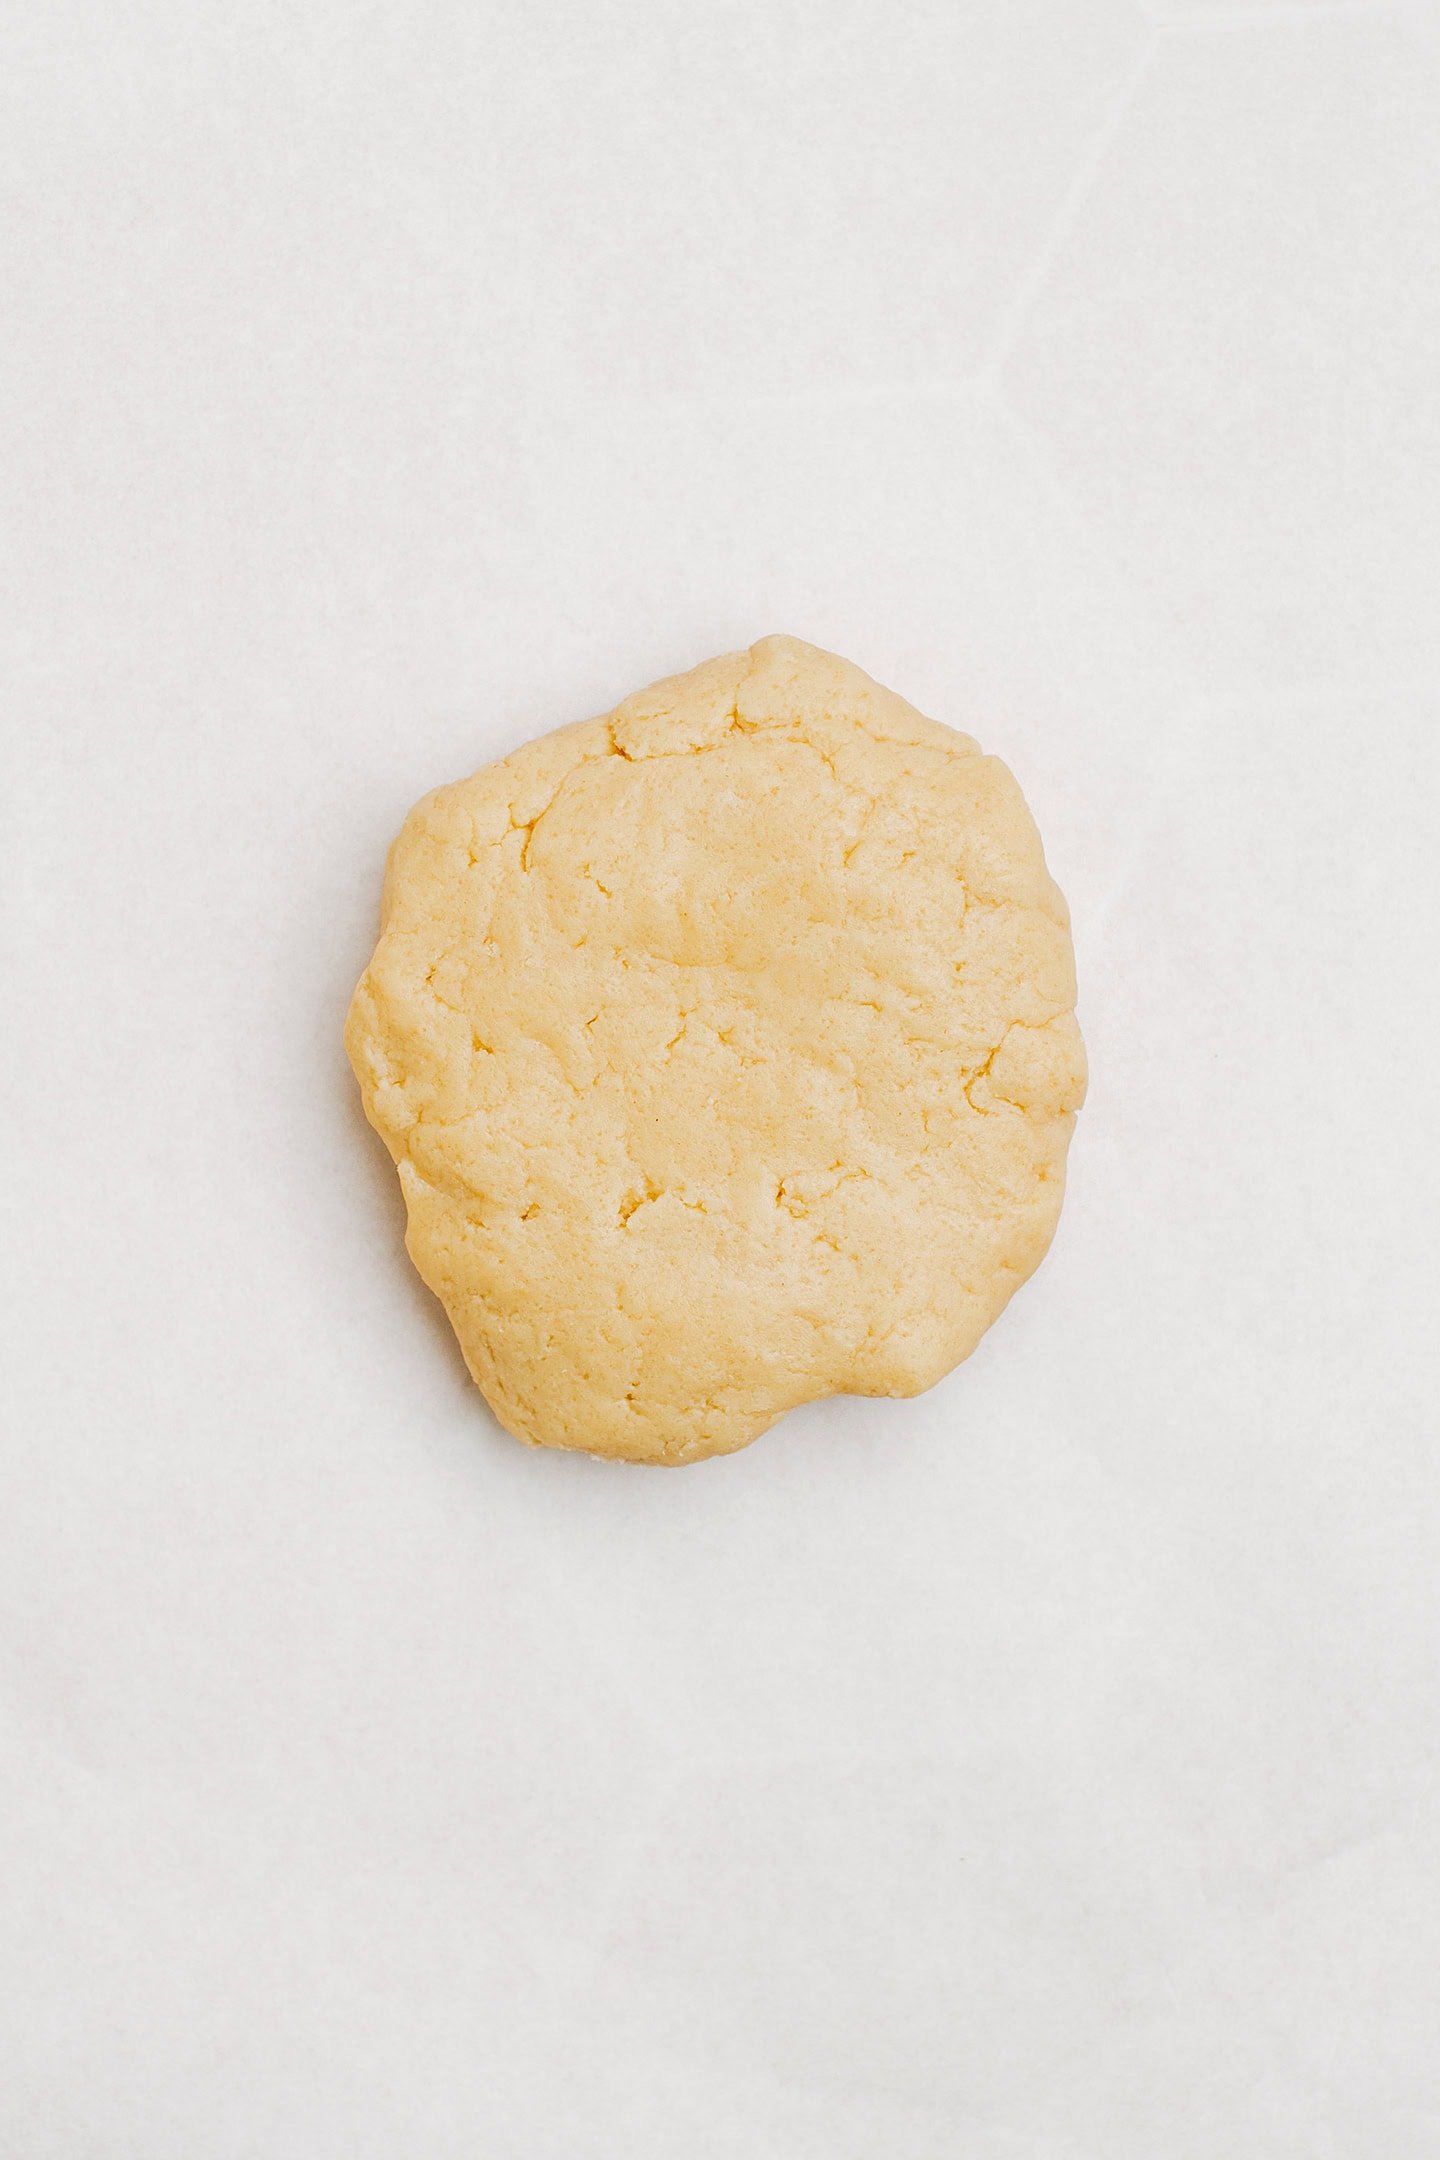
- Mix until it forms a dough. Mix on low speed for another 30 seconds or until it looks like a coarse meal. Use your hands to press the dough into a ball. The dough should hold together well. It should not be sticky or dry. If the dough appears too dry, add 1 teaspoon of milk and mix again. On the other hand, if the dough is sticky, you may need to add a bit more flour.
2. Cut out the cookies
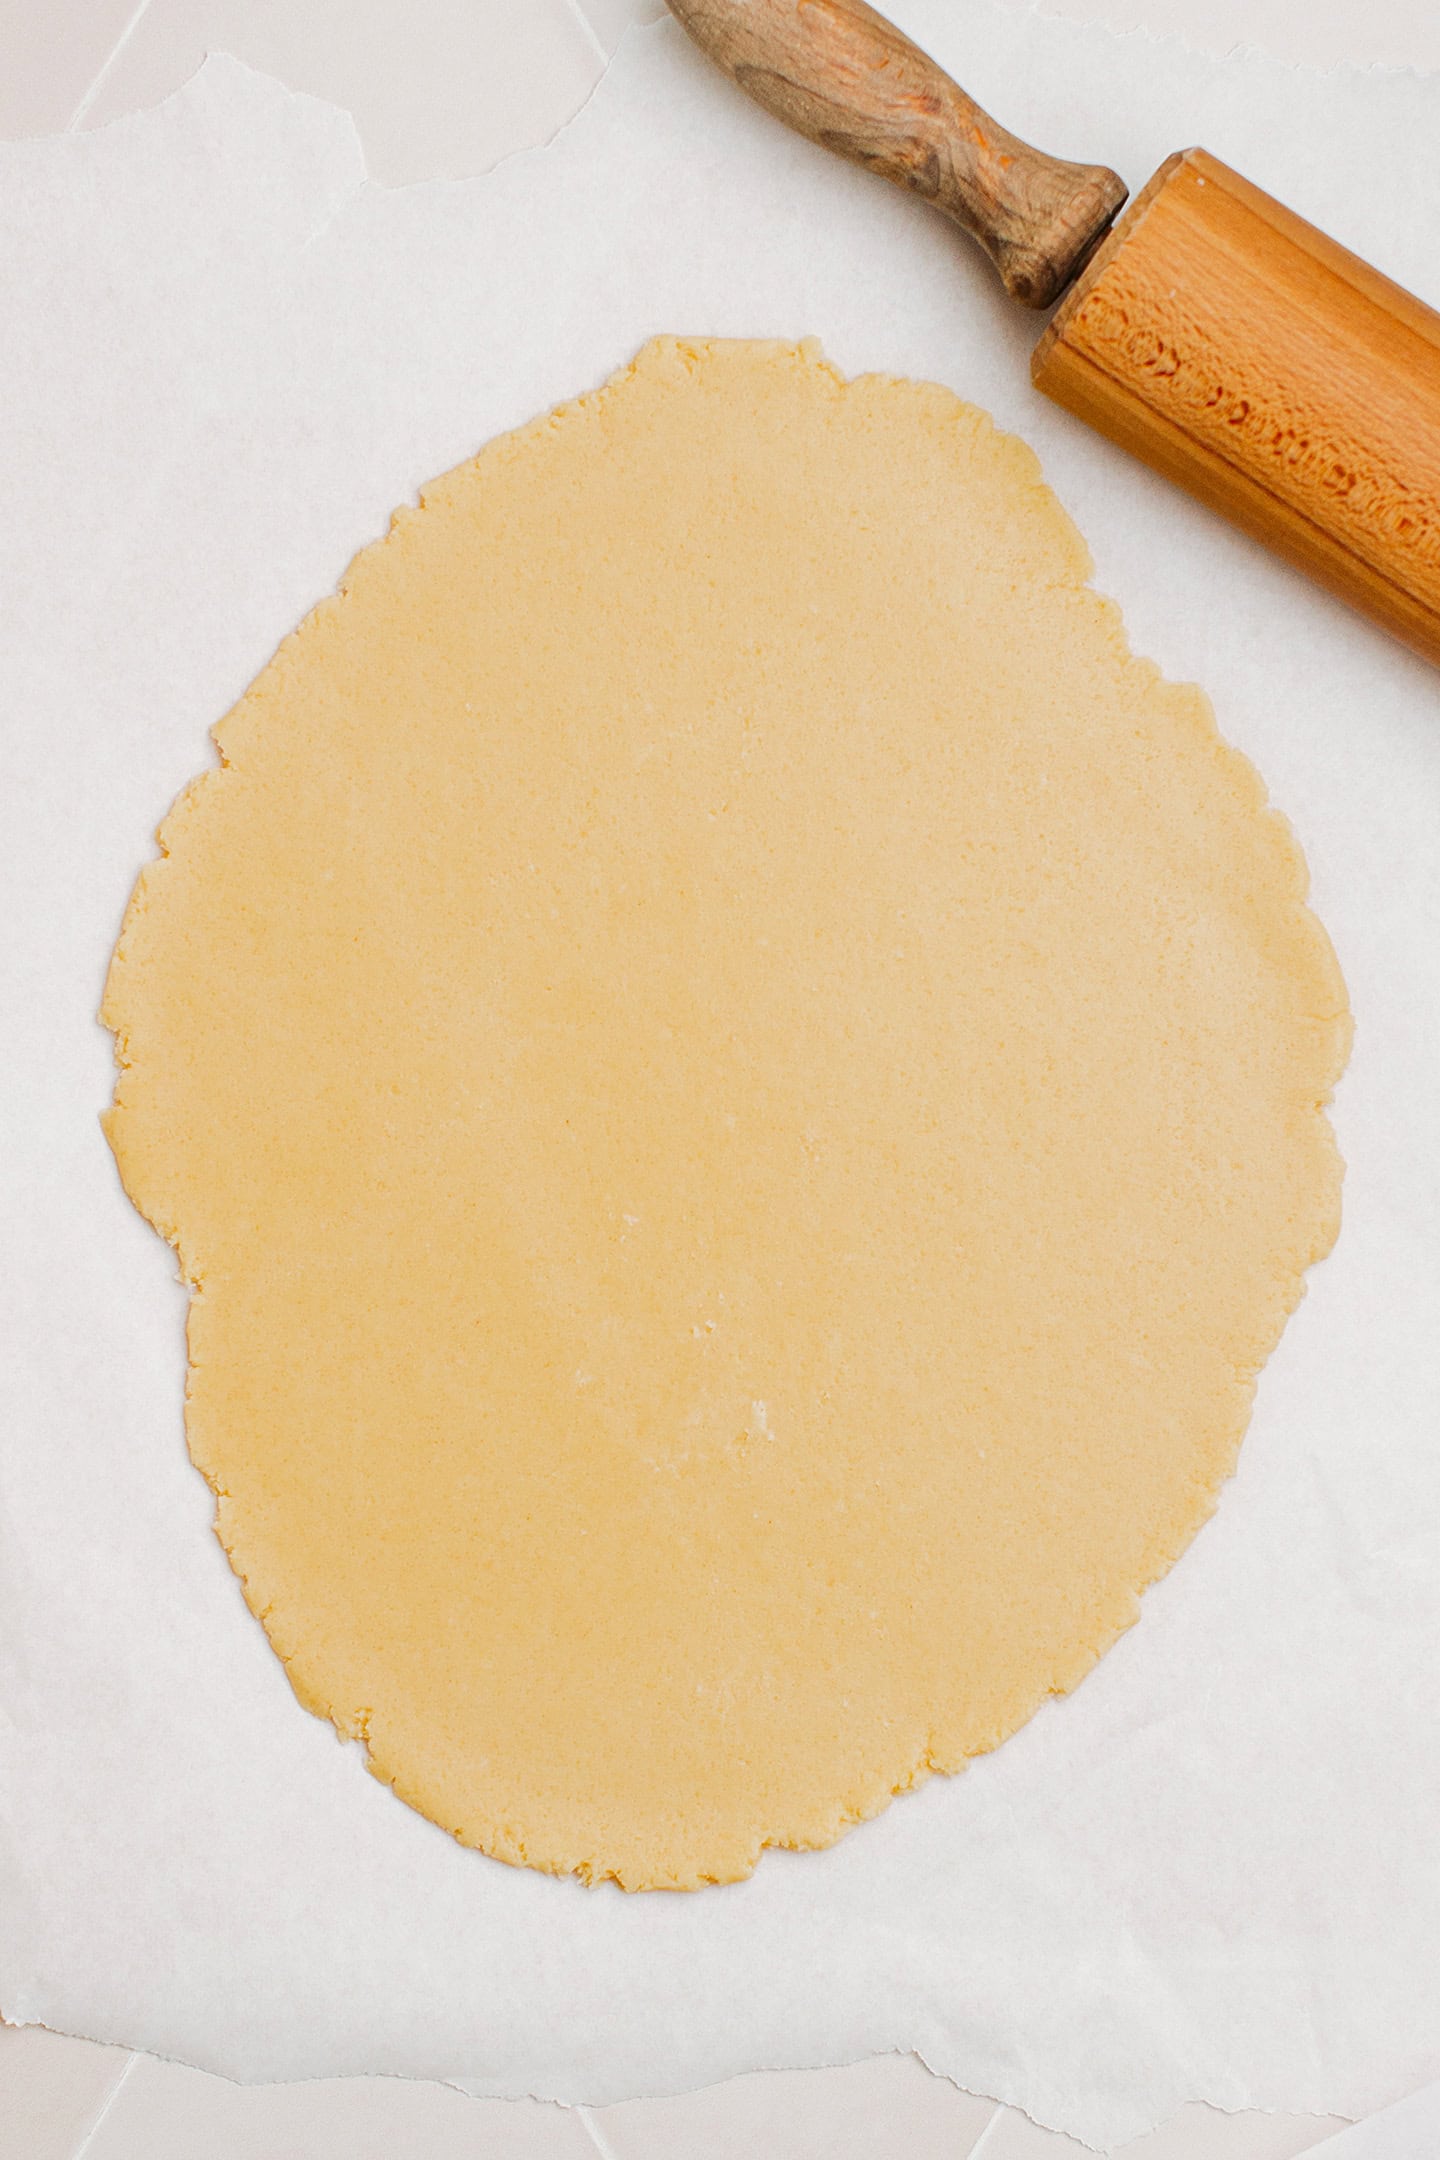
- Flatten the dough. Transfer the dough to a sheet of parchment paper. Top it with another layer of parchment paper and roll it out into a thickness of a bit over 1/8 inch (4 mm).
Should I chill the cookie dough?
You don’t have to! I’ve tried both methods: baking the cookies immediately after making the dough and baking them after chilling the dough in the refrigerator for 2 hours. The results were almost the same regarding taste and texture. The only benefit of chilling the flattened dough is that it makes it easier to cut out and handle the cookies since the dough is firmer.
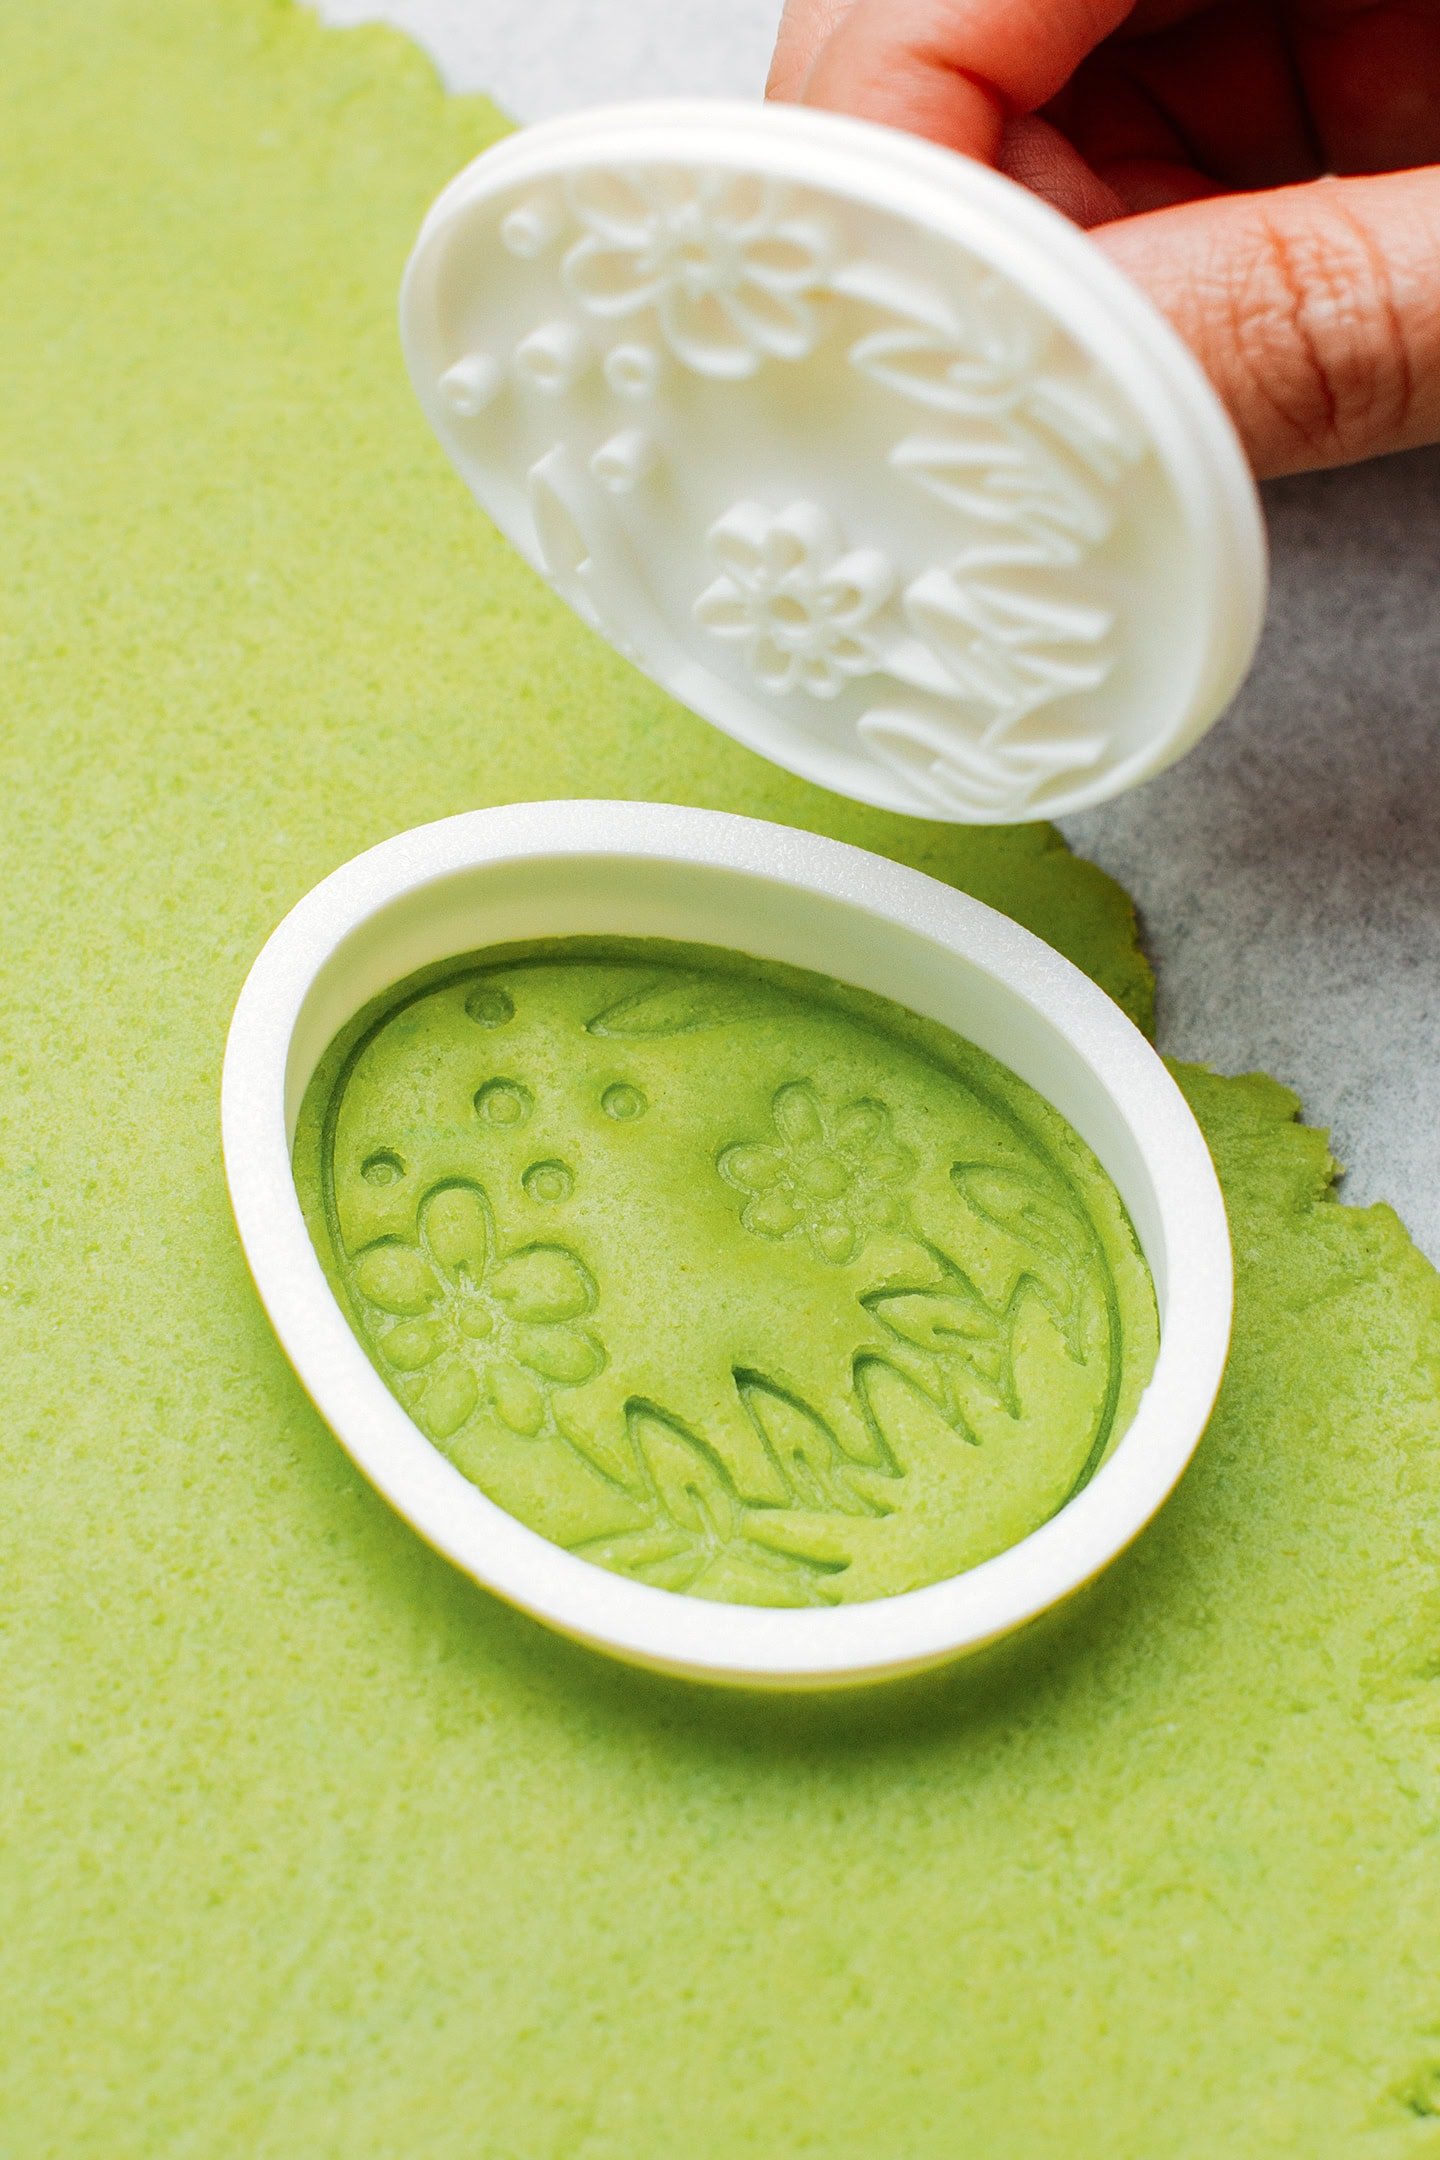
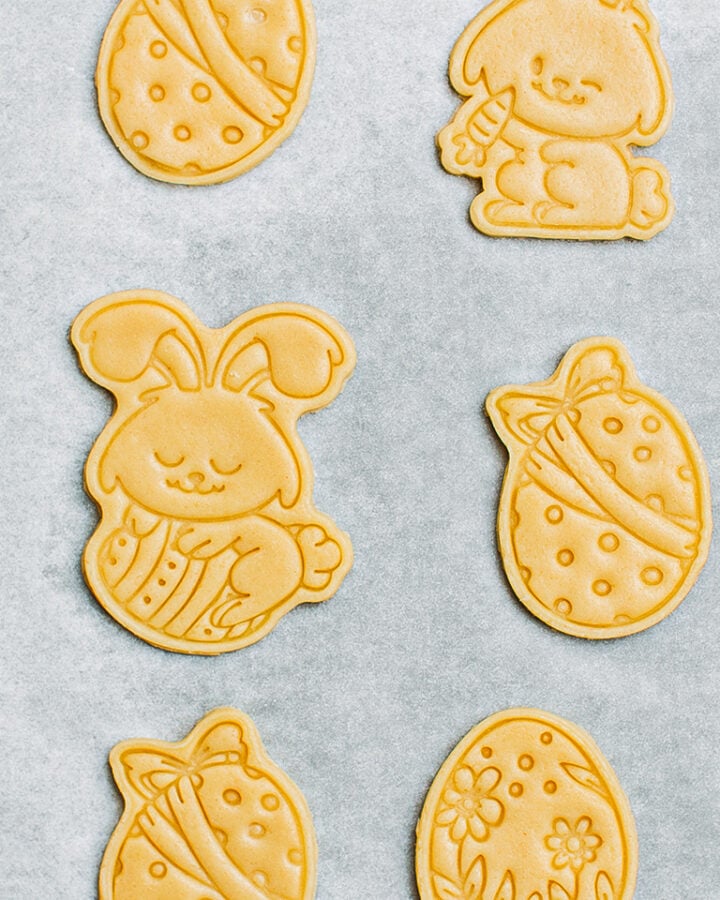
- Cut out the cookies. Using easter-themed cookie cutters, cut the dough into shapes. If you are using both cutters and stamps, follow these steps: Press the cookie cutter firmly onto the flattened dough and leave it in place. Next, insert the stamp into the cutter and press down to mark the dough. Gently lift the stamp out to reveal the design. Remove the cookie cutter and carefully transfer the cookie to the prepared baking sheet. Repeat with the remaining dough. Note that you can re-roll it to make more cookies!
Note: When it comes to pressure while stamping, finding the right balance is key. If you press too hard, you might cut into the cookie. On the other hand, if you don’t apply enough pressure, the design won’t have clear and well-defined strokes. So, do not hesitate to test and adjust the amount of pressure.
3. Bake
- Bake. Finally, bake the cookies for 10-12 minutes or until slightly golden brown on the edges.
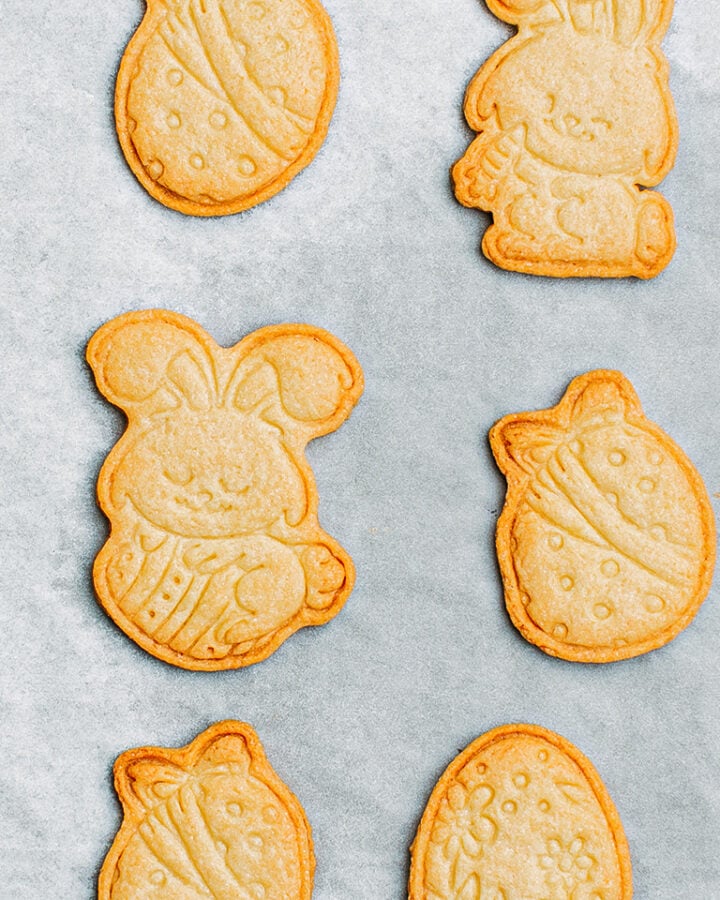
- Let them cool. Once your cookies are golden, remove them from the oven and let them cool for at least 15 minutes before removing them from the baking sheet.

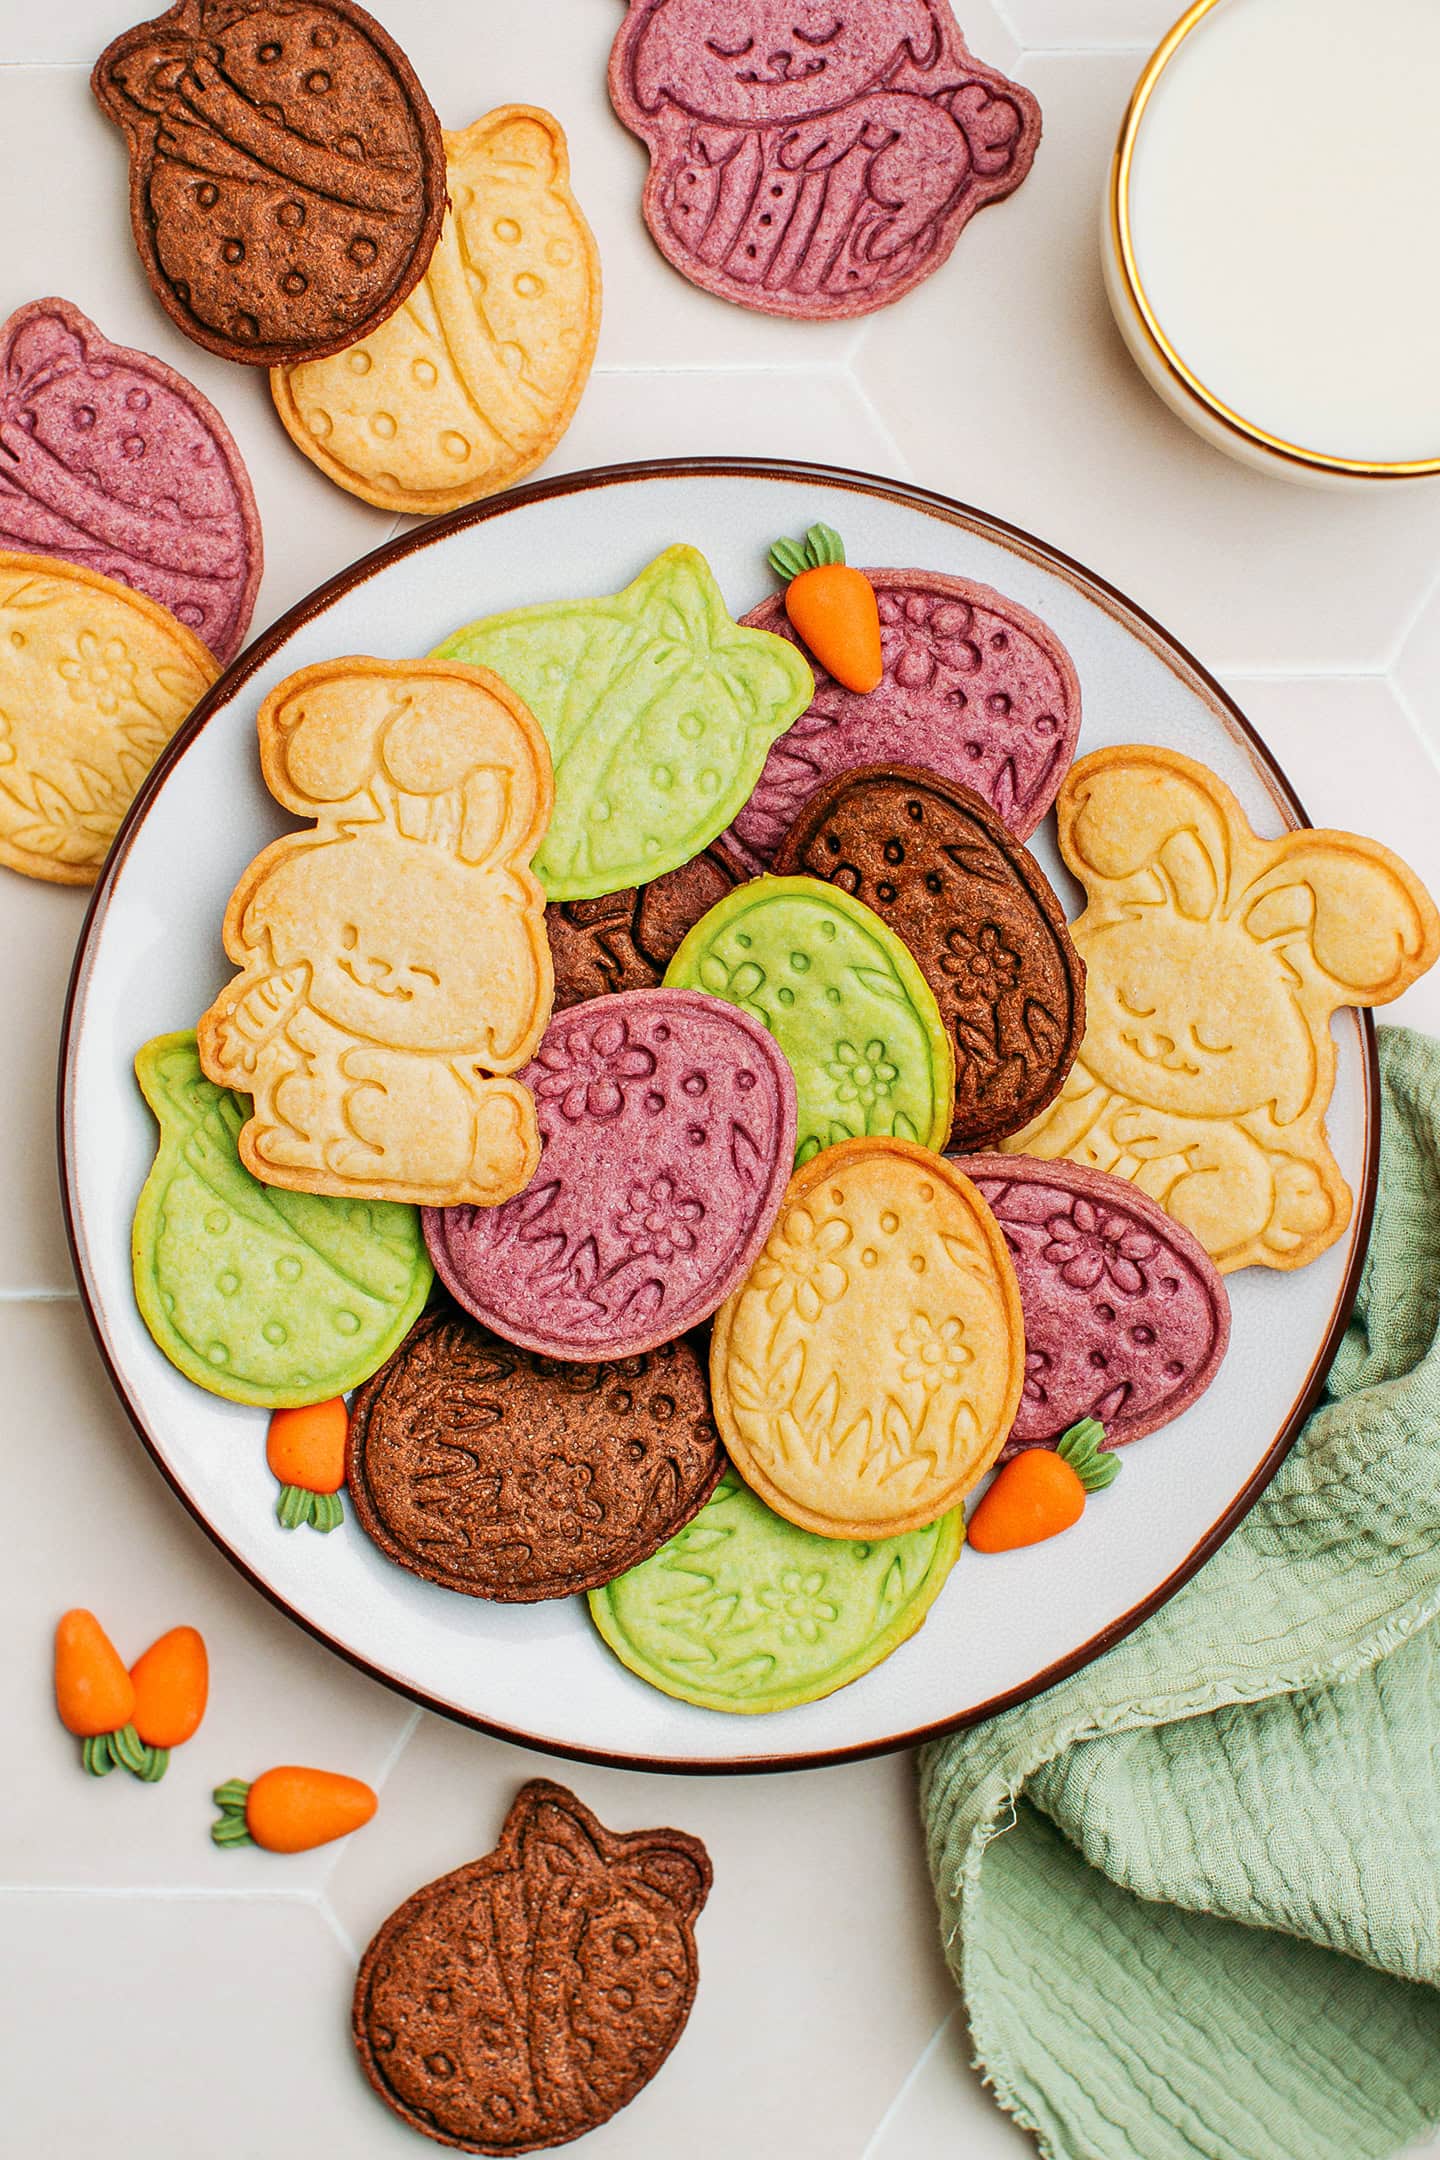
Enjoy the cookies for breakfast or as an afternoon pick-me-up. You can also arrange them with other cookies such as these spritz cookies, chocolate coconut cookie thins, or these orange chocolate chip shortbread cookies to make a delicious Easter cookie box!
📔 Tips
Weigh the ingredients.
As with most baking recipes, I highly recommend weighing the ingredients using a kitchen scale instead of relying on cup measurements. This yields more accurate and consistent results.
Do not flatten the dough too thin.
It’s important not to flatten the dough too thin, especially if you plan on using cookie stamps. I recommend aiming for a thickness of 4 to 5 mm (a bit over 1/8 inch).
Adjust the baking time.
Depending on your oven and the size of your cookies, you might have to adjust the baking time. The cookies are done when they are slightly golden brown on the edges and golden brown on the bottom side.
Also, keep in mind that if your cookies are thick, they may not be crispy all the way through unless you bake them longer.
🍫 Variations
Flavor them.
Be creative and infuse your cookies with different flavorings! How about orange blossom water or spices like cinnamon or nutmeg? You can even top them with mini chocolate chips after cutting them out!
Dip them in chocolate.
Once your cookies are completely cool, dip them in melted chocolate. You can dip them entirely, in half, or just dip the bottom side.
Glaze them.
Use a piping bag to decorate your cookies with sugar cookie icing!
❄️ Storing and Freezing
- To store: You can store the cookies in an airtight container at room temperature for up to 7 days.
- To freeze: Freeze them in a freezer-safe bag for up to 2 months. Thaw for a few hours at room temperature.
- To freeze the dough: If you prefer freezing the dough to bake the cookies later, wrap the dough in plastic wrap and freeze for up to 2 months. When you are ready to bake, simply thaw the dough for 2-3 hours at room temperature before rolling it out and cutting out the cookies.
💬 FAQ
Your dough is probably too wet. I would suggest dusting it with a little bit of flour or refrigerating it for a few hours before cutting out the cookies. Next time, use less milk or add more flour when kneading.
Yes, you can make the dough up to 3 days ahead of time. Flatten it between two sheets of parchment paper and transfer it to a baking sheet. Store it in the refrigerator before cutting out the cookies.
I have found that the best way to transfer the unbaked cookies to the baking sheet is by using a very thin spatula or a knife with a large blade. You still need to be gentle and careful, though. One more thing: you can chill the flattened dough to make it firmer and easier to handle.
I hope you will love these cute and colorful Easter cookies! They are super crispy, buttery, and taste wonderful! If you make this recipe and use different cookie cutters/stamps, do not hesitate to upload a photo in the comments. I would love to see them!


⭐️ Did you like this recipe? Let us know in the comments below, and tag us on Facebook, Instagram, or Pinterest!

Want to Save This Recipe?
Enter your email below & we’ll send it straight to your inbox! Plus, you will receive new recipes every week!
I’d like to receive more tips & recipes from Full of Plants.
This site is protected by reCAPTCHA and the Google Privacy Policy and Terms of Service apply.
Vegan Easter Cookies
Ingredients
- 5 tbsp vegan butter at room temperature
- 1/4 cup granulated sugar
- 1/2 tsp vanilla extract
- 2 tsp unsweetened plant-based milk
- 1 cup + 2 tbsp all-purpose flour
- 1/16 tsp baking powder
- 1/8 tsp salt
Instructions
- Before starting: If you want to make the dough a different color, check the notes.
- Preheat the oven to
 350 °F (175°C) and line a baking sheet with parchment paper.
 - Cream the butter. Add the room-temperature butter and sugar to a large mixing bowl or stand mixer fitted with the paddle attachment. Beat on low speed for 2-3 minutes or until the butter appears creamy and fluffy. Add the vanilla extract and milk and beat for another 10-15 seconds.
- Add the flour. Next, add the flour, baking powder, and salt.
- Mix until it forms a dough. Mix on low speed for another 30 seconds or until it looks like a coarse meal. Use your hands to press the dough into a ball. The dough should hold together well. It should not be sticky or dry. If it appears too dry, add 1 teaspoon of milk and mix again. On the other hand, if the dough is sticky, you may need to add a bit more flour.
- Flatten the dough. Transfer the dough to a sheet of parchment paper. Top it with another layer of parchment paper and roll it out to a thickness of a bit over 1/8 inch (4 mm).
- Cut out the cookies. Using easter-themed cookie cutters, cut the dough into shapes. If you are using both cutters and stamps, follow these steps: Press the cookie cutter firmly onto the flattened dough and leave it in place. Next, insert the stamp into the cutter and press down to mark the dough. Gently lift the stamp out to reveal the design. Remove the cookie cutter and carefully transfer the cookie to the prepared baking sheet. Repeat with the remaining dough. Note that you can re-roll it to make more cookies!
- Bake. Finally, bake the cookies for 10-12 minutes or until slightly golden brown on the edges.
- Let them cool. Once your cookies are golden, remove them from the oven and let them cool for at least 15 minutes before removing them from the baking sheet.
- You can store the cookies in an airtight container at room temperature for up to 7 days.
Notes
To color the cookies:
-
- Brown: Replace 20g of flour with 20g of unsweetened cocoa powder.
-
- Purple: Add 2 teaspoons of ube powder when creaming the butter.
-
- Green: Add 2 teaspoons of matcha powder when creaming the butter.
Weigh the ingredients.
As with most baking recipes, I highly recommend weighing the ingredients using a kitchen scale instead of relying on cup measurements. This yields more accurate and consistent results.Do not flatten the dough too thin.
It’s important not to flatten the dough too thin, especially if you plan on using cookie stamps. I recommend aiming for a thickness of 4 to 5 mm (a bit over 1/8 inch).Adjust the baking time.
Depending on your oven and the size of your cookies, you might have to adjust the baking time. The cookies are done when they are slightly golden brown on the edges and golden brown on the bottom side. Also, keep in mind that if your cookies are thick, they may not be crispy all the way through unless you bake them longer.
About the Author
Thomas Pagot is the founder, photographer, and recipe developer behind Full of Plants. He created the blog in 2016 as a personal cookbook for vegan recipes. Through years of recipe development, Thomas has successfully grown Full of Plants into a trusted resource for plant-based recipes.
Leave a Comment
Hi Thomas. These are some of the easiest and yummiest cookies I’ve ever baked! The dough was so very easy to work with, and the cookies kept their shape beautifully in the oven. I especially loved the cocoa flavor, it really stands out. My family couldn’t stop eating them.