This post may contain affiliate links. Please read our disclosure policy.
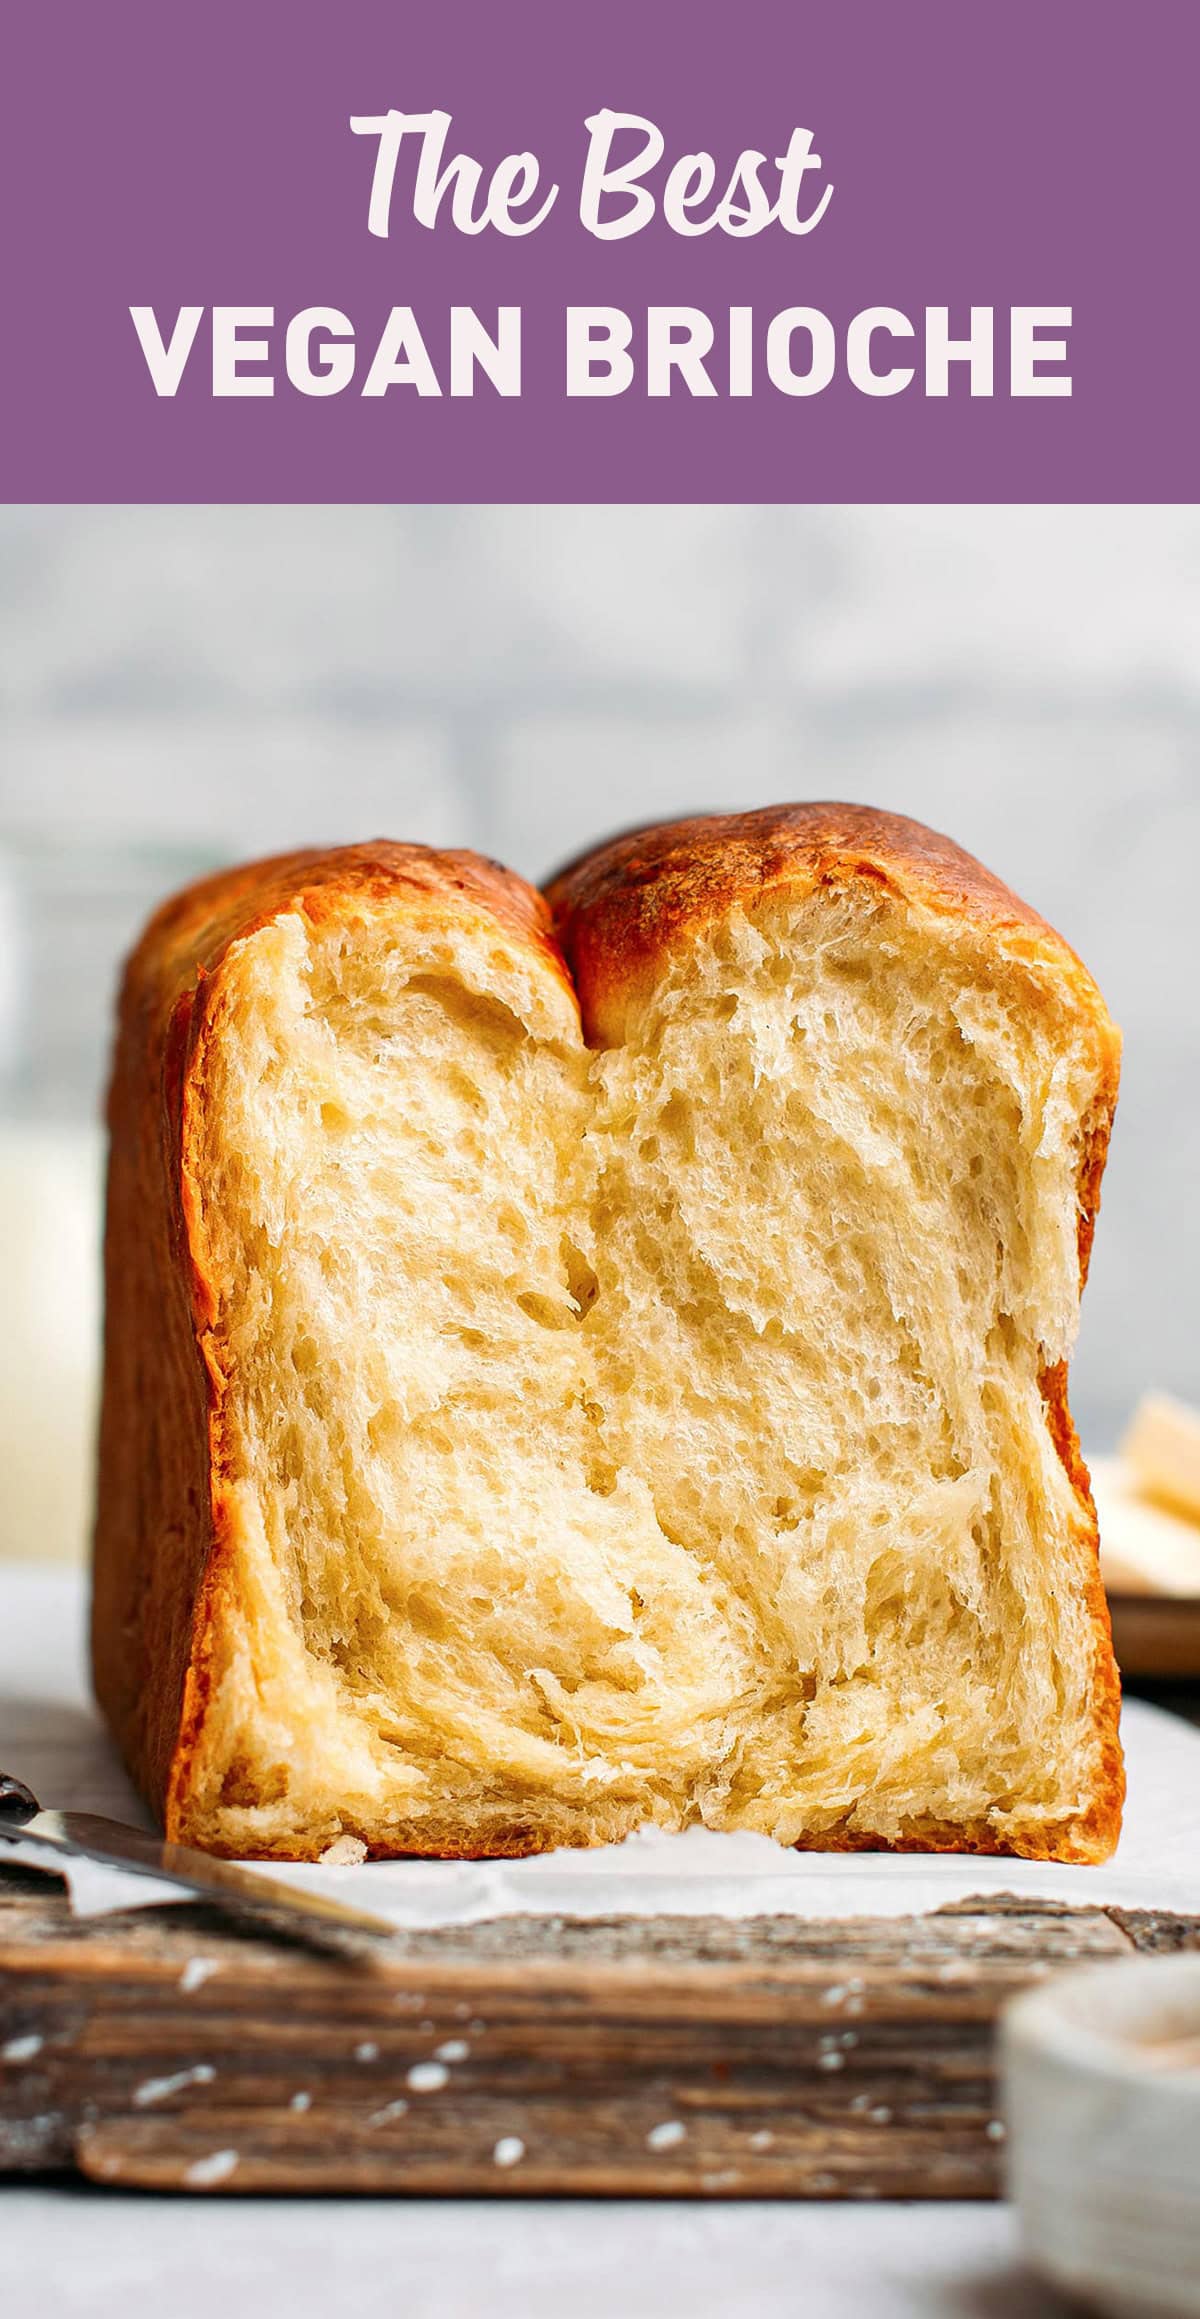

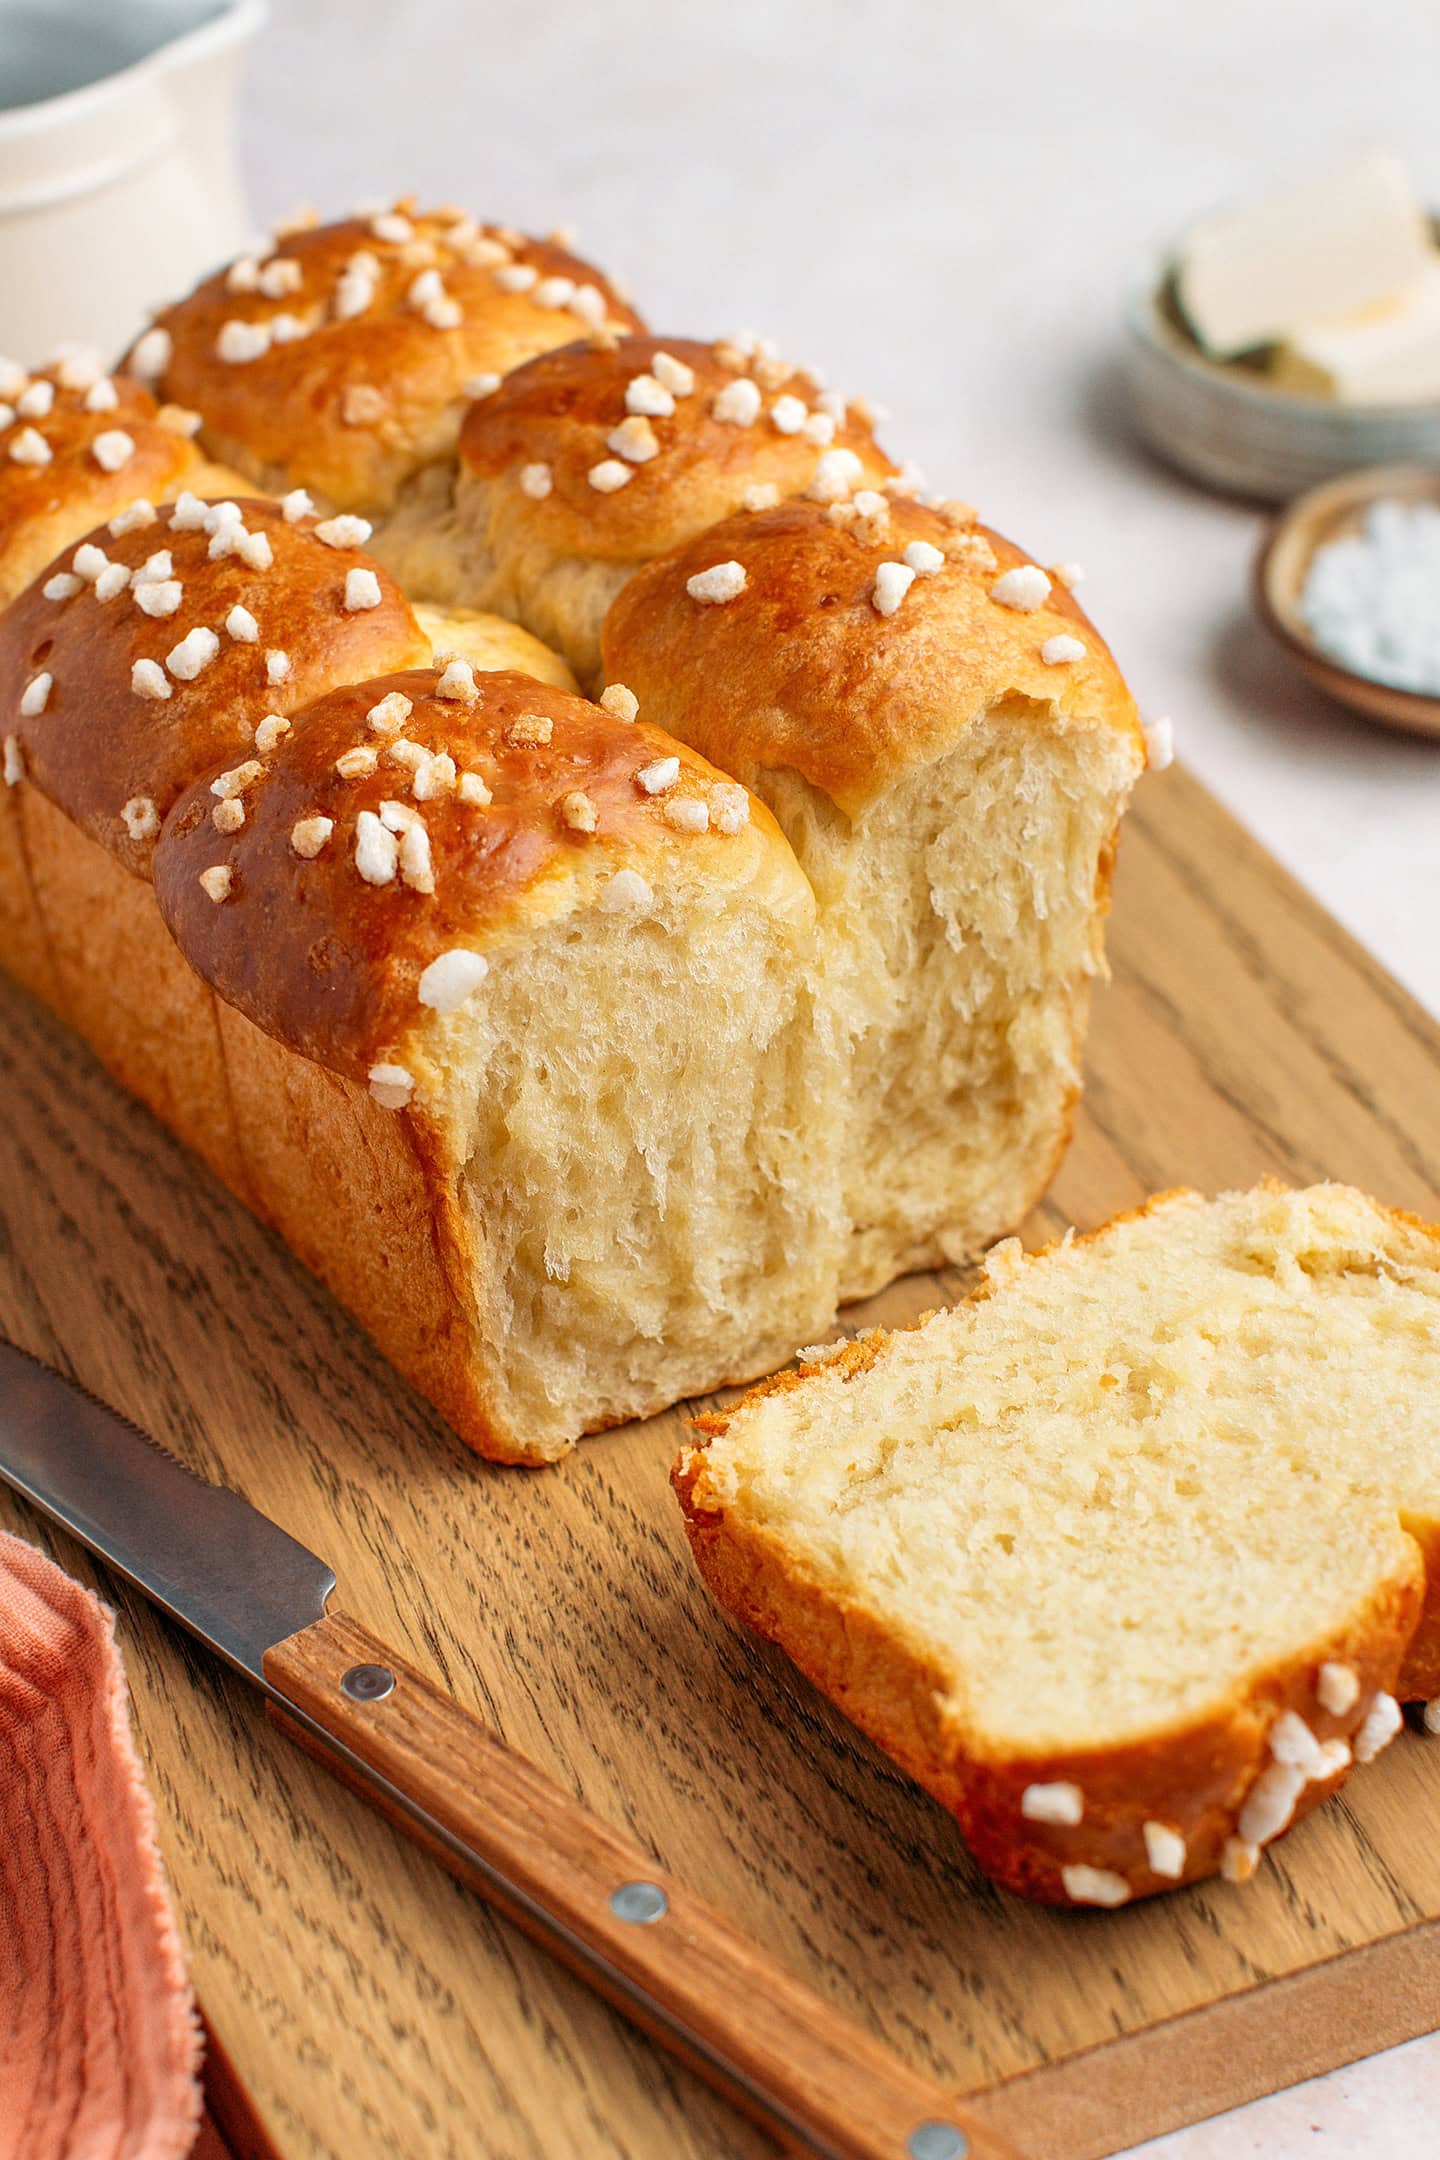
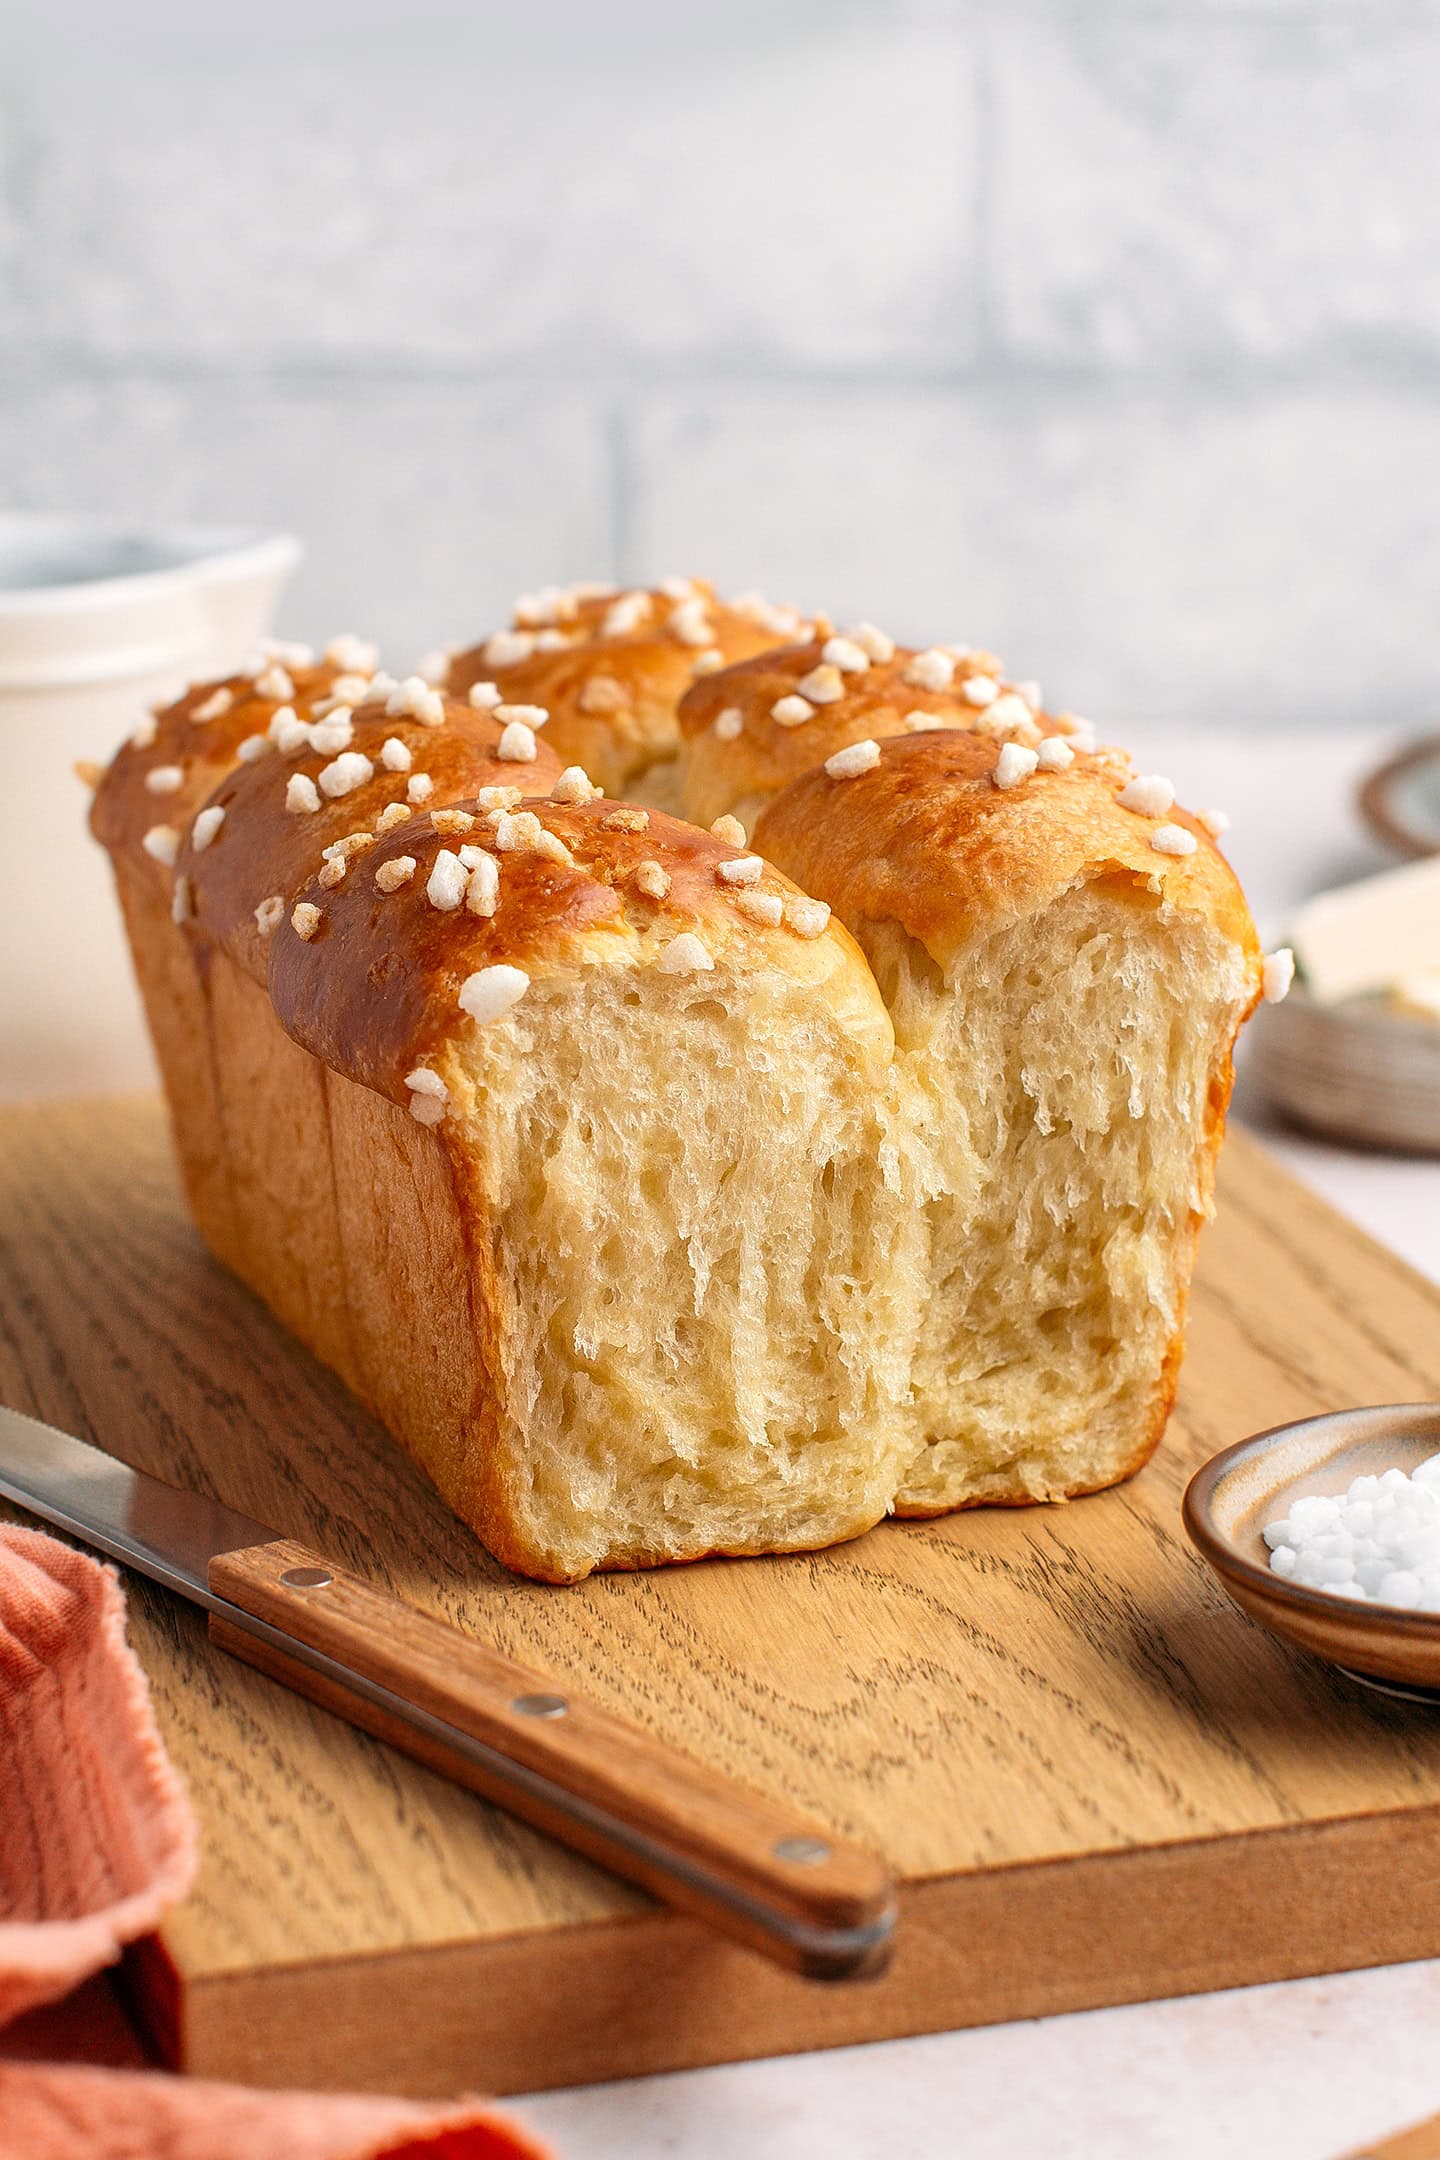
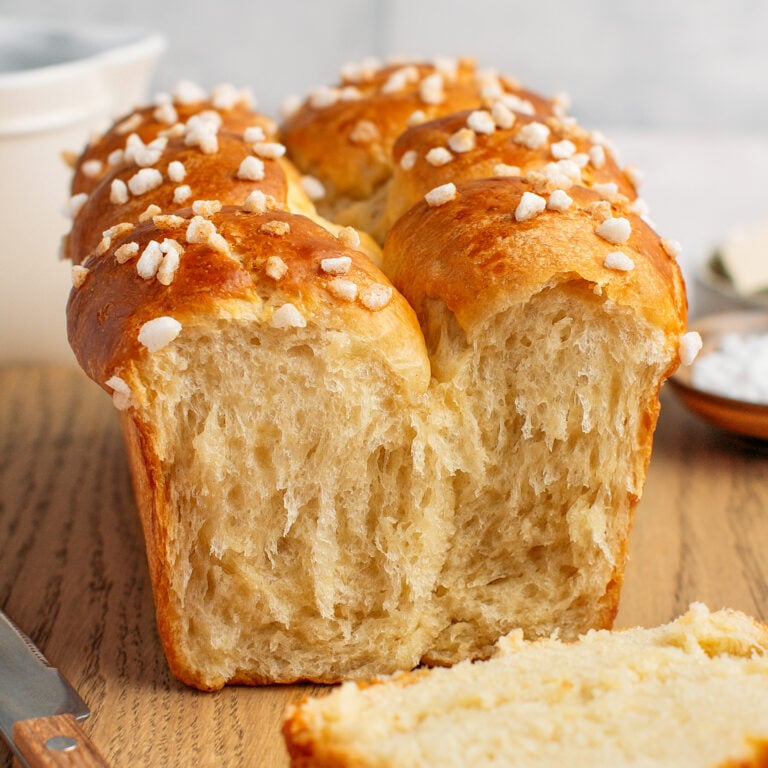
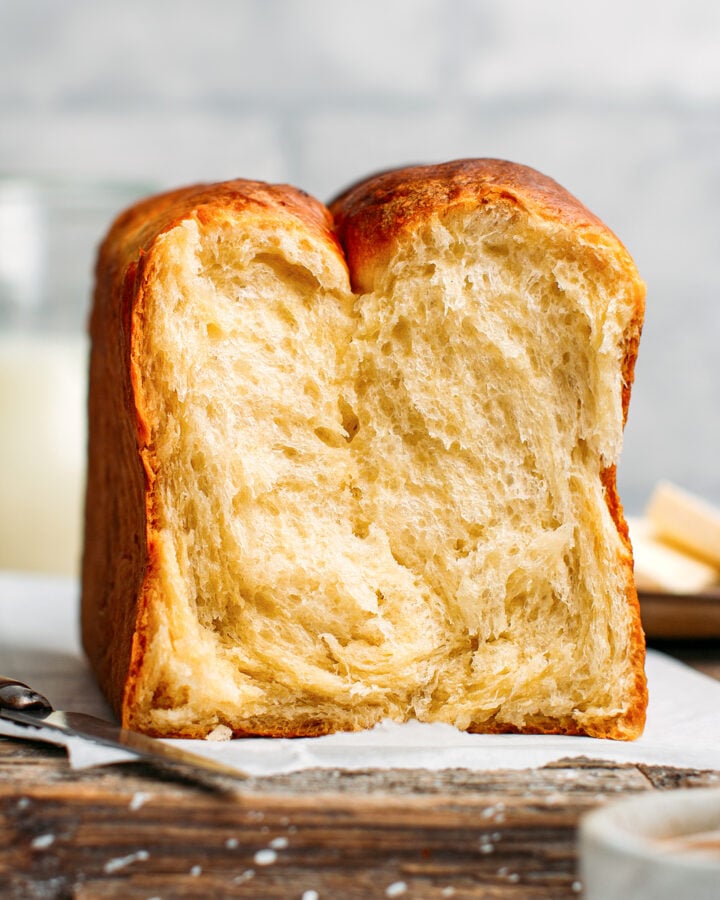
Introducing the best vegan brioche! Entirely plant-based, this brioche has a rich buttery aroma and the most incredible texture – it’s light, stringy, and cottony! Plus, it is infused with a hint of orange blossom water and vanilla for delicate floral notes. You will never believe this brioche is eggless!
As a Frenchman, I can say that I’m a brioche connoisseur. I’ve literally tasted hundreds of different brioches during my childhood, from the ones sold at French bakeries to the ones sold at the supermarket. You name it I have tried it. My mom also used to make it regularly when we were kids. So as you can imagine – when it comes to brioche, I am quite picky.
For a long time, I have been experimenting in the kitchen in order to create a vegan brioche that would have nothing to envy the original. The task was a real challenge, to say the least, but after weeks of development, I’m super excited to finally share my vegan brioche recipe!
It’s incredibly rich and buttery with a light and stringy texture, exactly what you want from a brioche! To be honest, this vegan brioche tastes even BETTER than the one my mom used to make (but that will stay between us).
⭐️ Why This Recipe Works
Developed with real food science.
I’m confident no other recipe can rival my vegan brioche. Why? Simply because I have used food science and lots of testing to come up with a texture and flavor that will make you WOW. I started by calculating the nutritional information of authentic brioche and compared different techniques, rising times, and ingredients until reaching a point where I could not tell the difference between the original and the vegan one.
Seriously, I have tested this recipe multiple times, and it’s foolproof, especially if you follow all the tips I share in this post. I can assure you that with patience and care, you will bake the most amazing brioche you have ever tried.
So, what are the secrets to making the best vegan brioche?
- A high-protein flour. To create the stringy texture of the brioche, you will absolutely need to use wheat flour with a high protein content, preferably between 10 and 12% protein. It’s the gluten that, while kneaded long enough, will develop a strong network. Once the gluten network is strong enough, the dough will produce a fibrous/ribbony texture.
- The use of two dough improvers. If, like me, you are tired of spending hours making brioche only for it to be dry the next day, I have got you covered. I used two specific ways to increase the shelf life of this brioche. First, I used a Japanese technique called Yudane, which consists of gelatinizing the flour, allowing the dough to retain more moisture. Second, I added a pinch of Vitamin C that not only enhanced the texture but also helped the brioche stay softer longer.
- A rise in the refrigerator. Letting the dough rise slowly and rest for a few hours in the refrigerator allows it to absorb the butter, resulting in a richer flavor and softer texture. It’s like biting into a pillowy loaf saturated with butter!
- A combination of two flavorings. Brioche, by itself, while buttery can lack flavor. Hence, I used a combination of vanilla extract and orange blossom water to infuse the brioche with a delicate floral aroma.
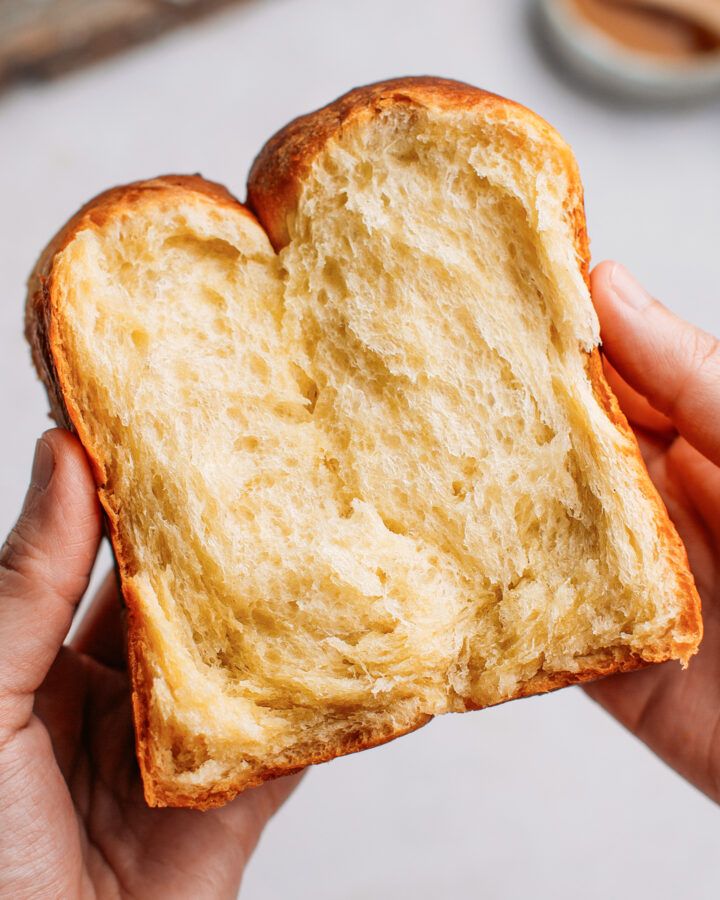
Luxurious cotton-like texture.
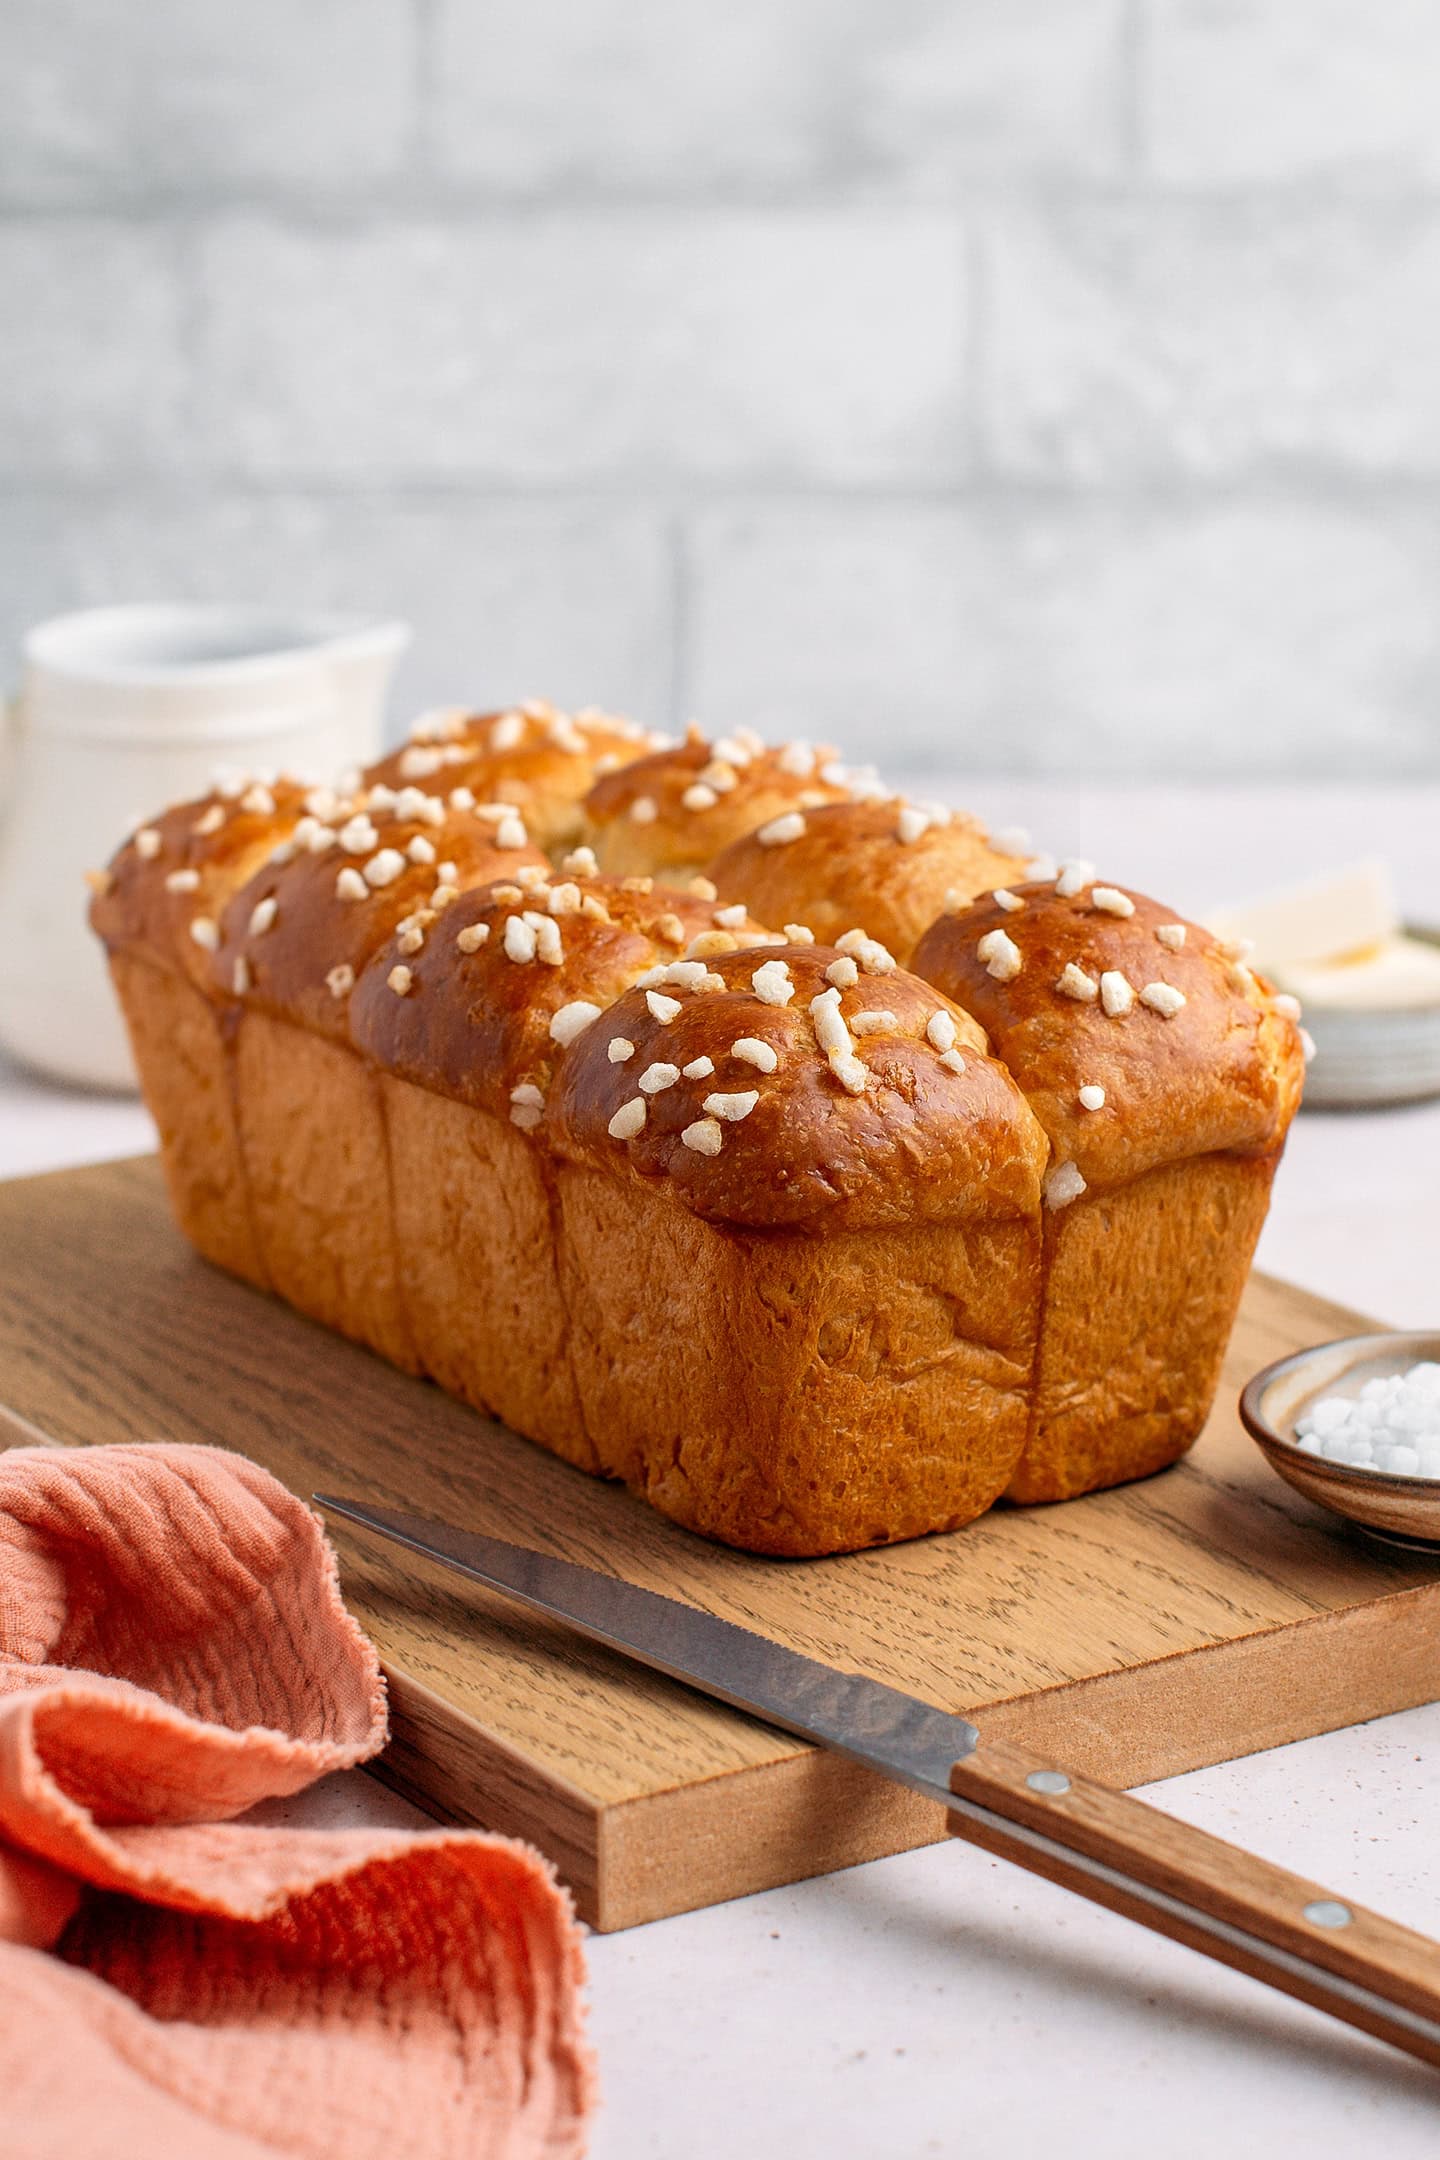
In my book, there is no good brioche without a super stringy crumb (like cotton candy strands), a fluffy and pillowy texture, and a rich buttery flavor. This recipe delivers all three!
The crumb is saturated with butter yet remains light, moist, and slightly chewy. When it comes to the flavor: imagine a mix of salted butter, a hint of fresh vanilla, and a subtle citrus note.
Ready to get started?
🧈 Ingredient Notes
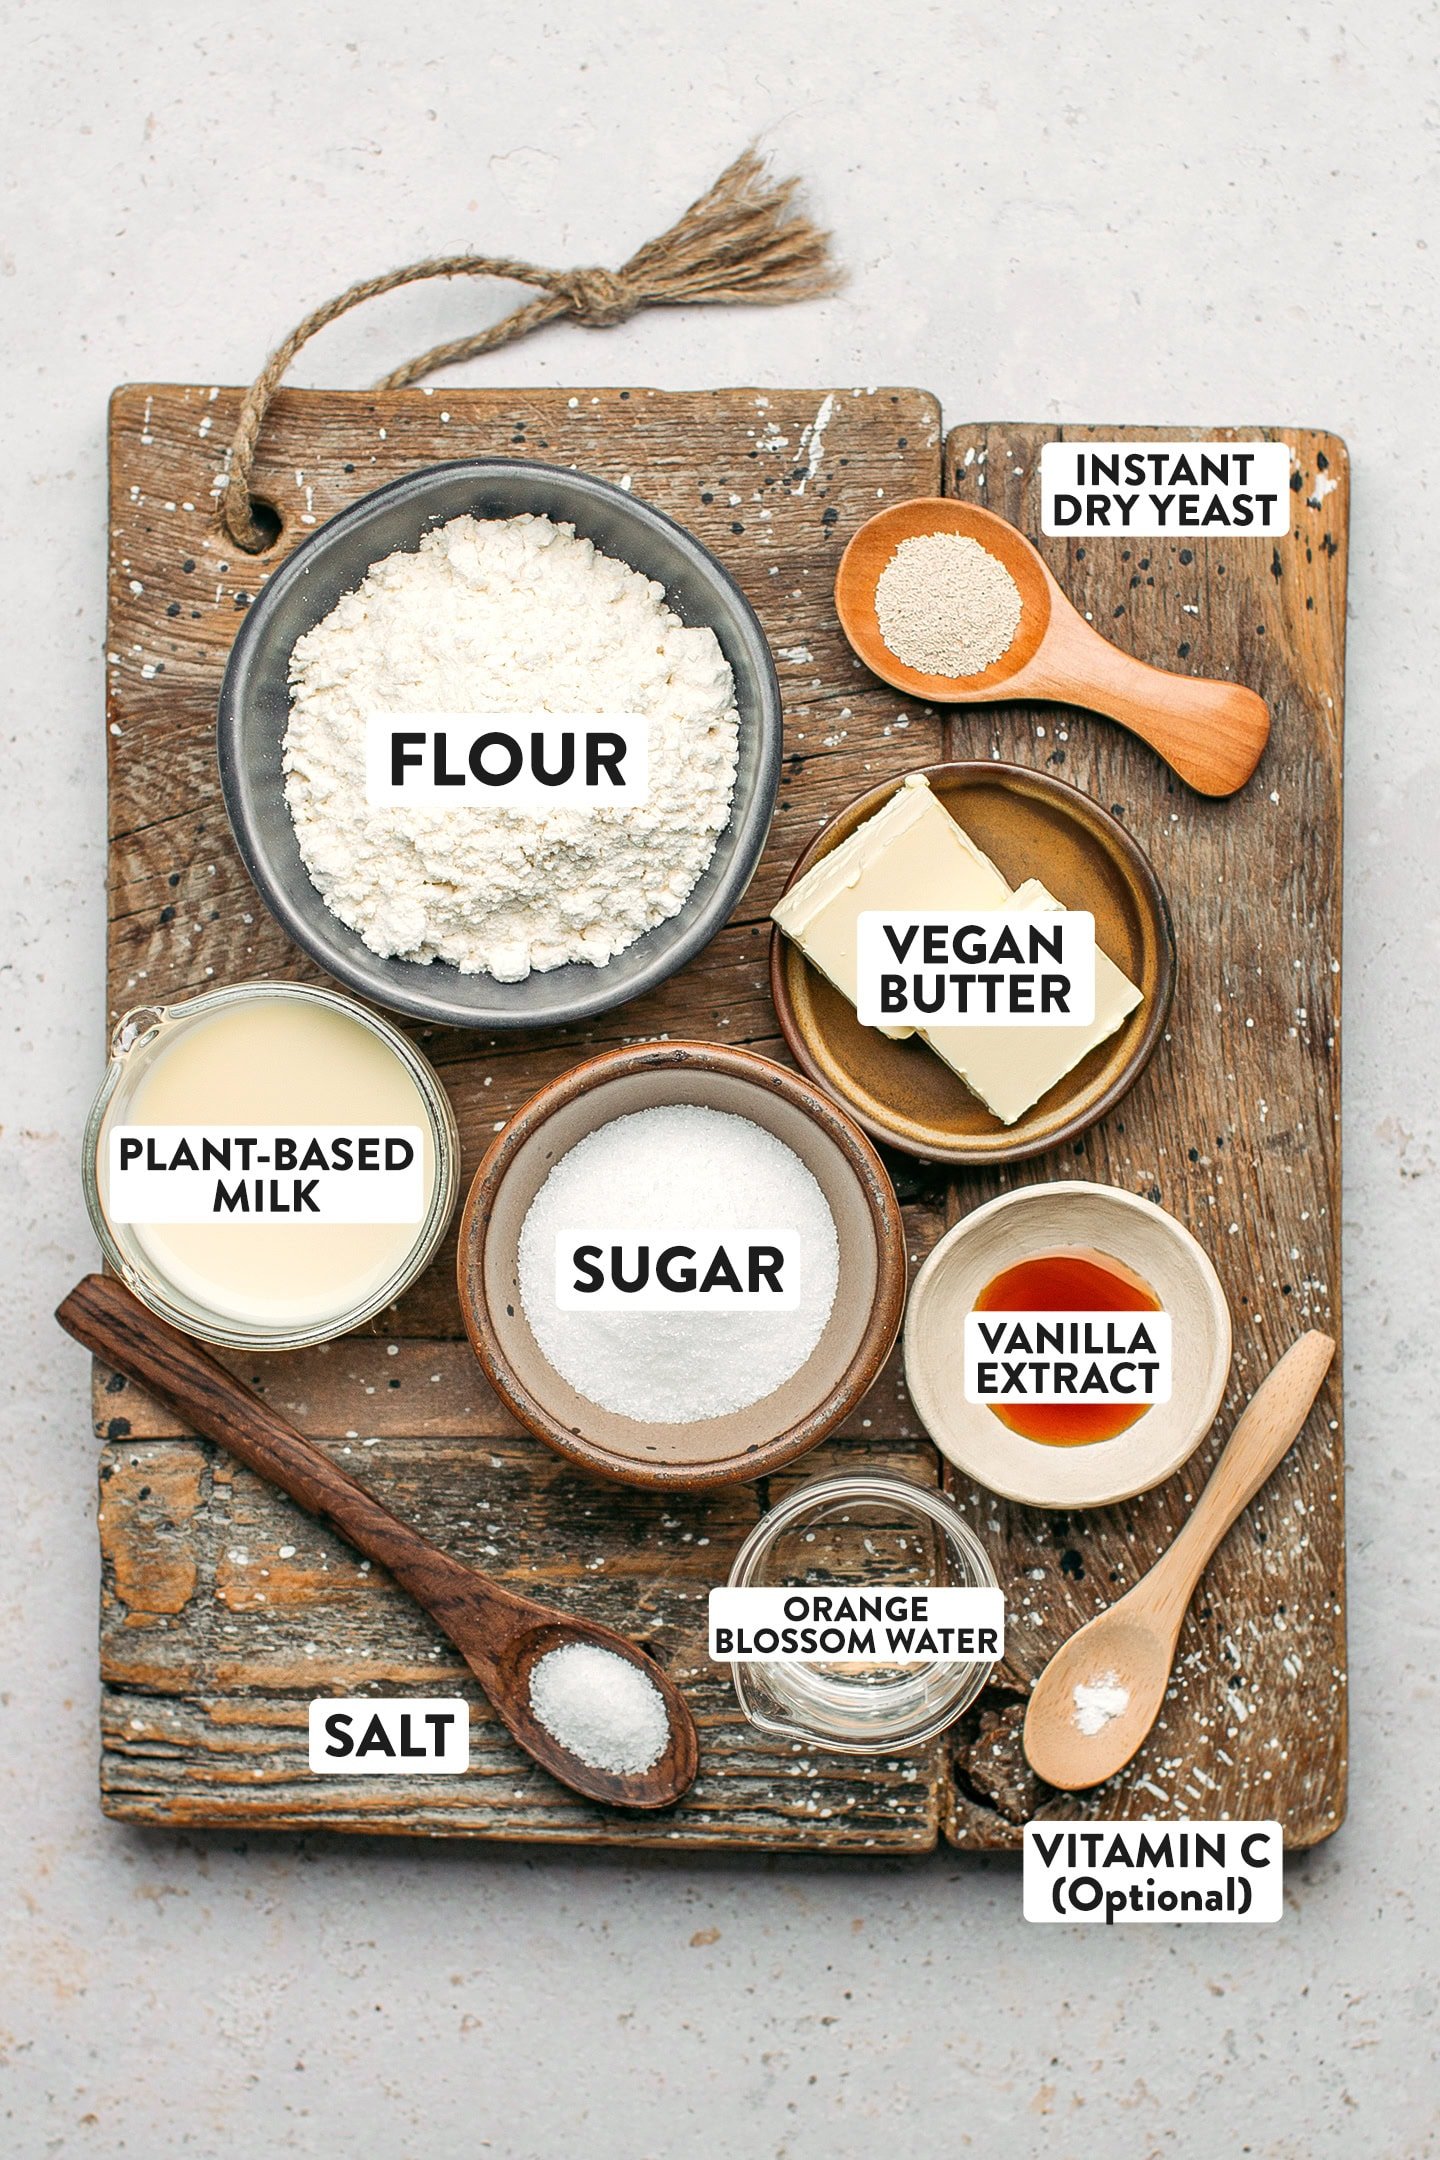
Here are the ingredients that you will need:
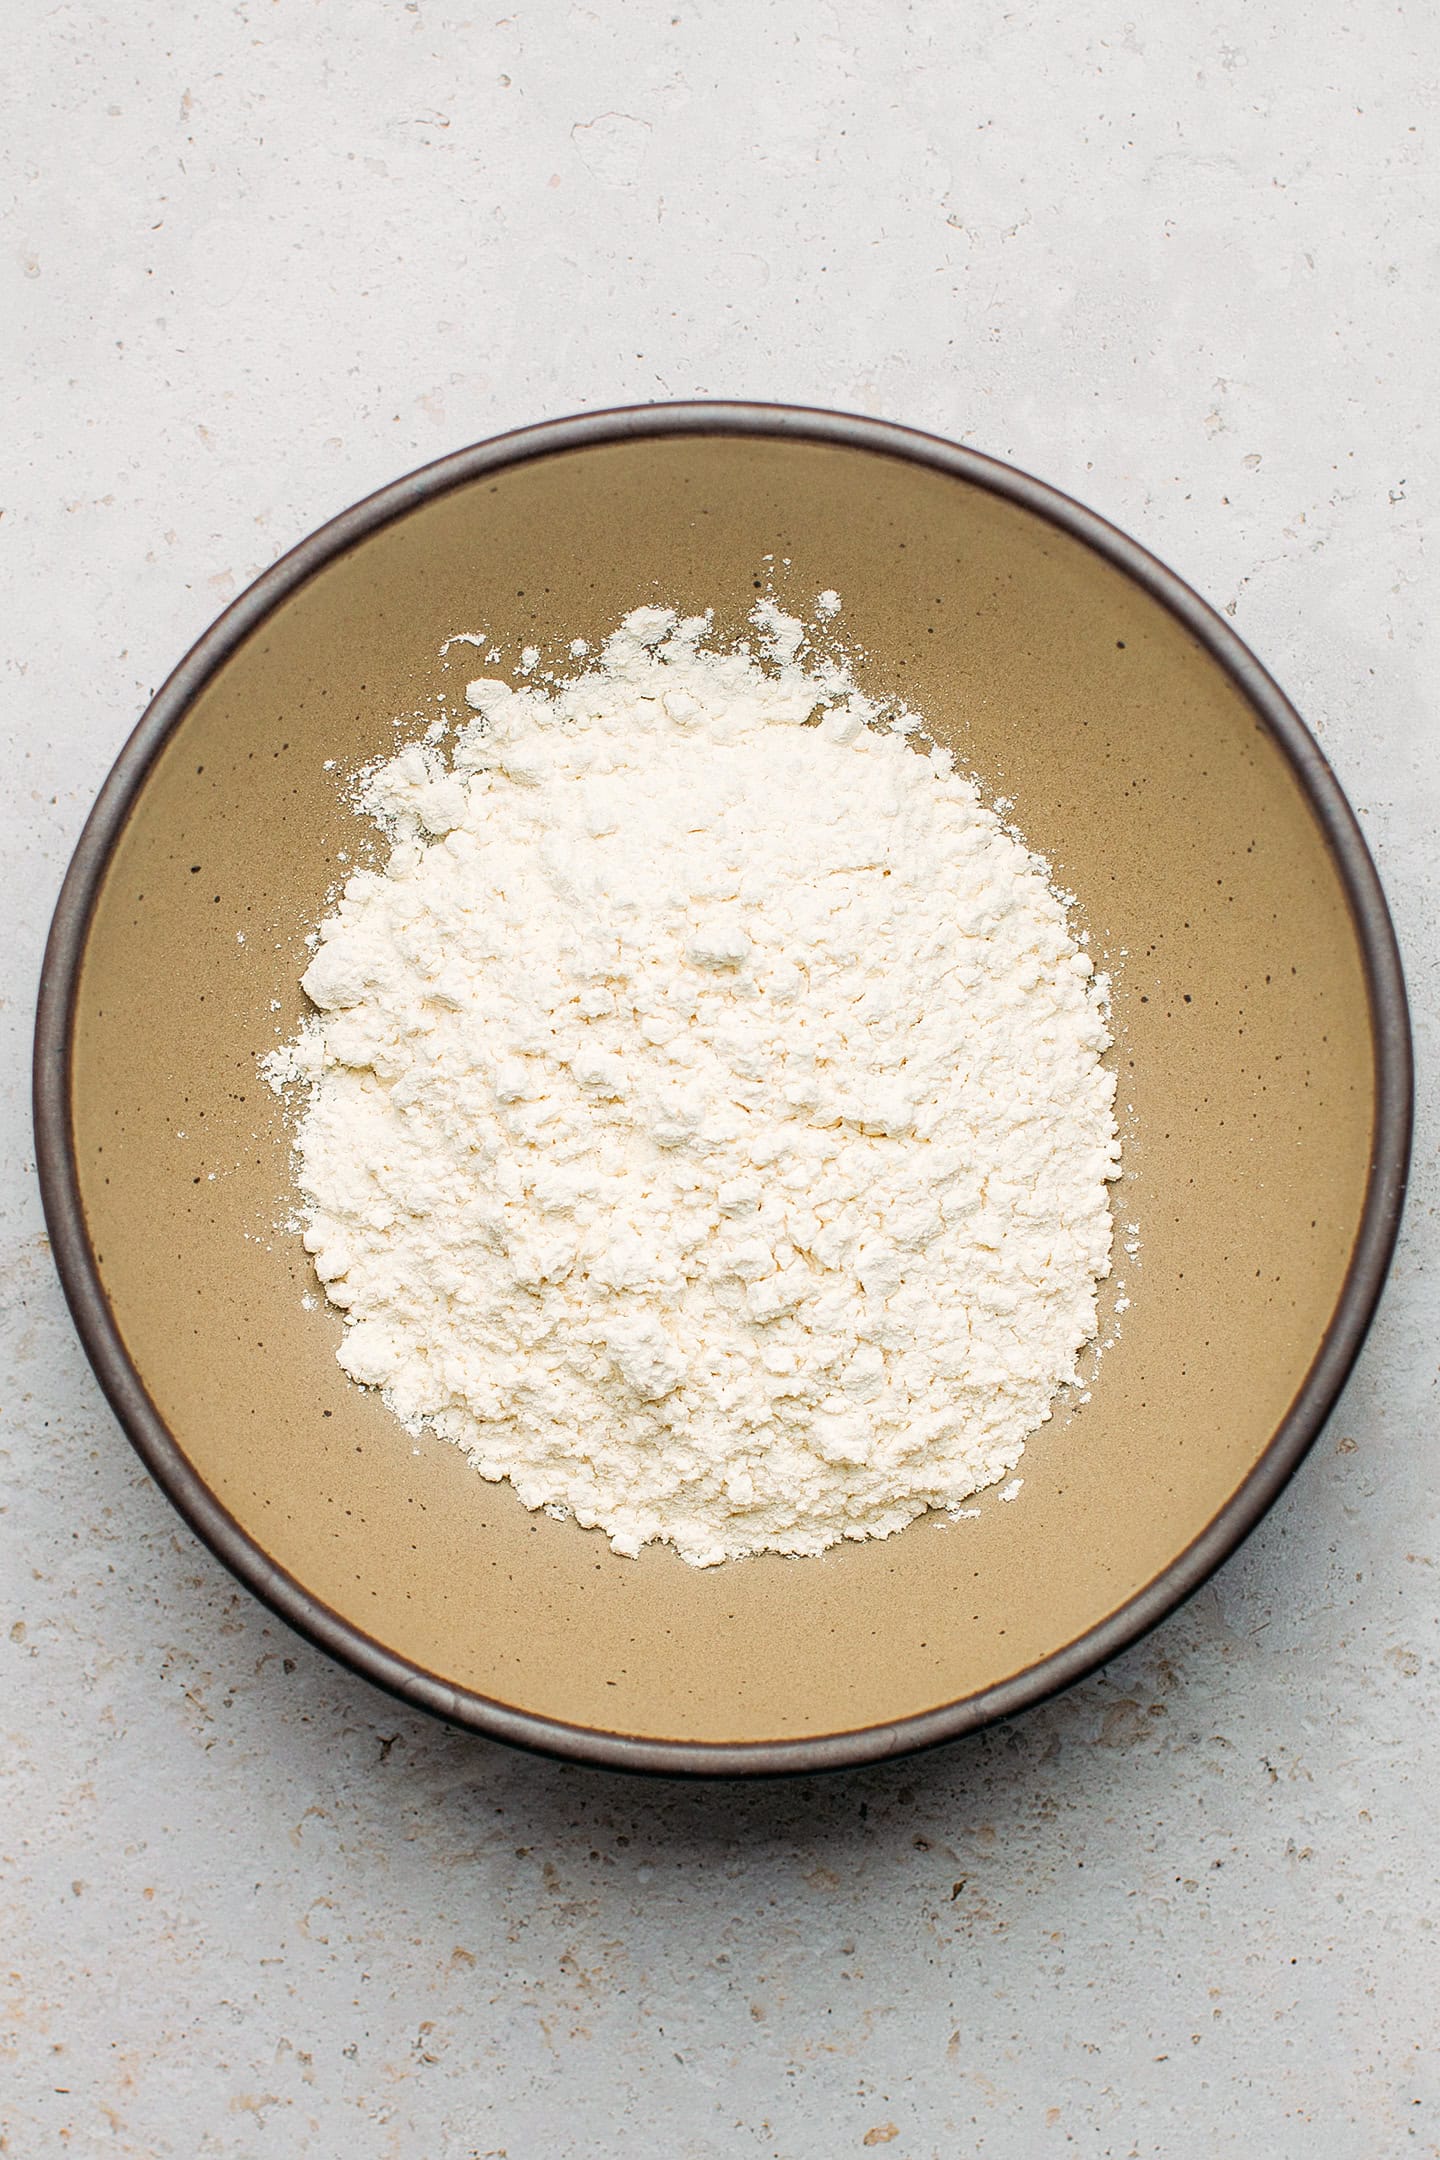
Bread flour
For the best results, I recommend using flour with at least 10% protein. Bread flour is a great choice as it generally contains 11-12% protein. Please do not try this recipe with gluten-free flour as it simply won’t work.
Butter
My brioche dough is RICH in butter, and that’s one of the reasons it tastes so good! Since butter is used in generous amounts here, I suggest using high-quality vegan butter. You can use homemade vegan butter or store-bought. A few of my recommendations for the commercial brands are Flora plant butter, Violife, and Country Crock plant butter.
Do not use vegan buttery spread. You should use vegan butter that is hard when refrigerated.
Sugar
While this brioche is not overly sweet, it benefits from a hint of sweetness. The addition of sugar also helps with the caramelization, giving it a golden brown crust. I use granulated white sugar but light brown sugar or coconut sugar will also work.
Plant-based milk
Any unsweetened and neutral plant-based milk will work. I generally use soy milk, but cashew, almond, or oat milk will also work. I recommend avoiding milk with a strong flavor, such as hazelnut or walnut milk.
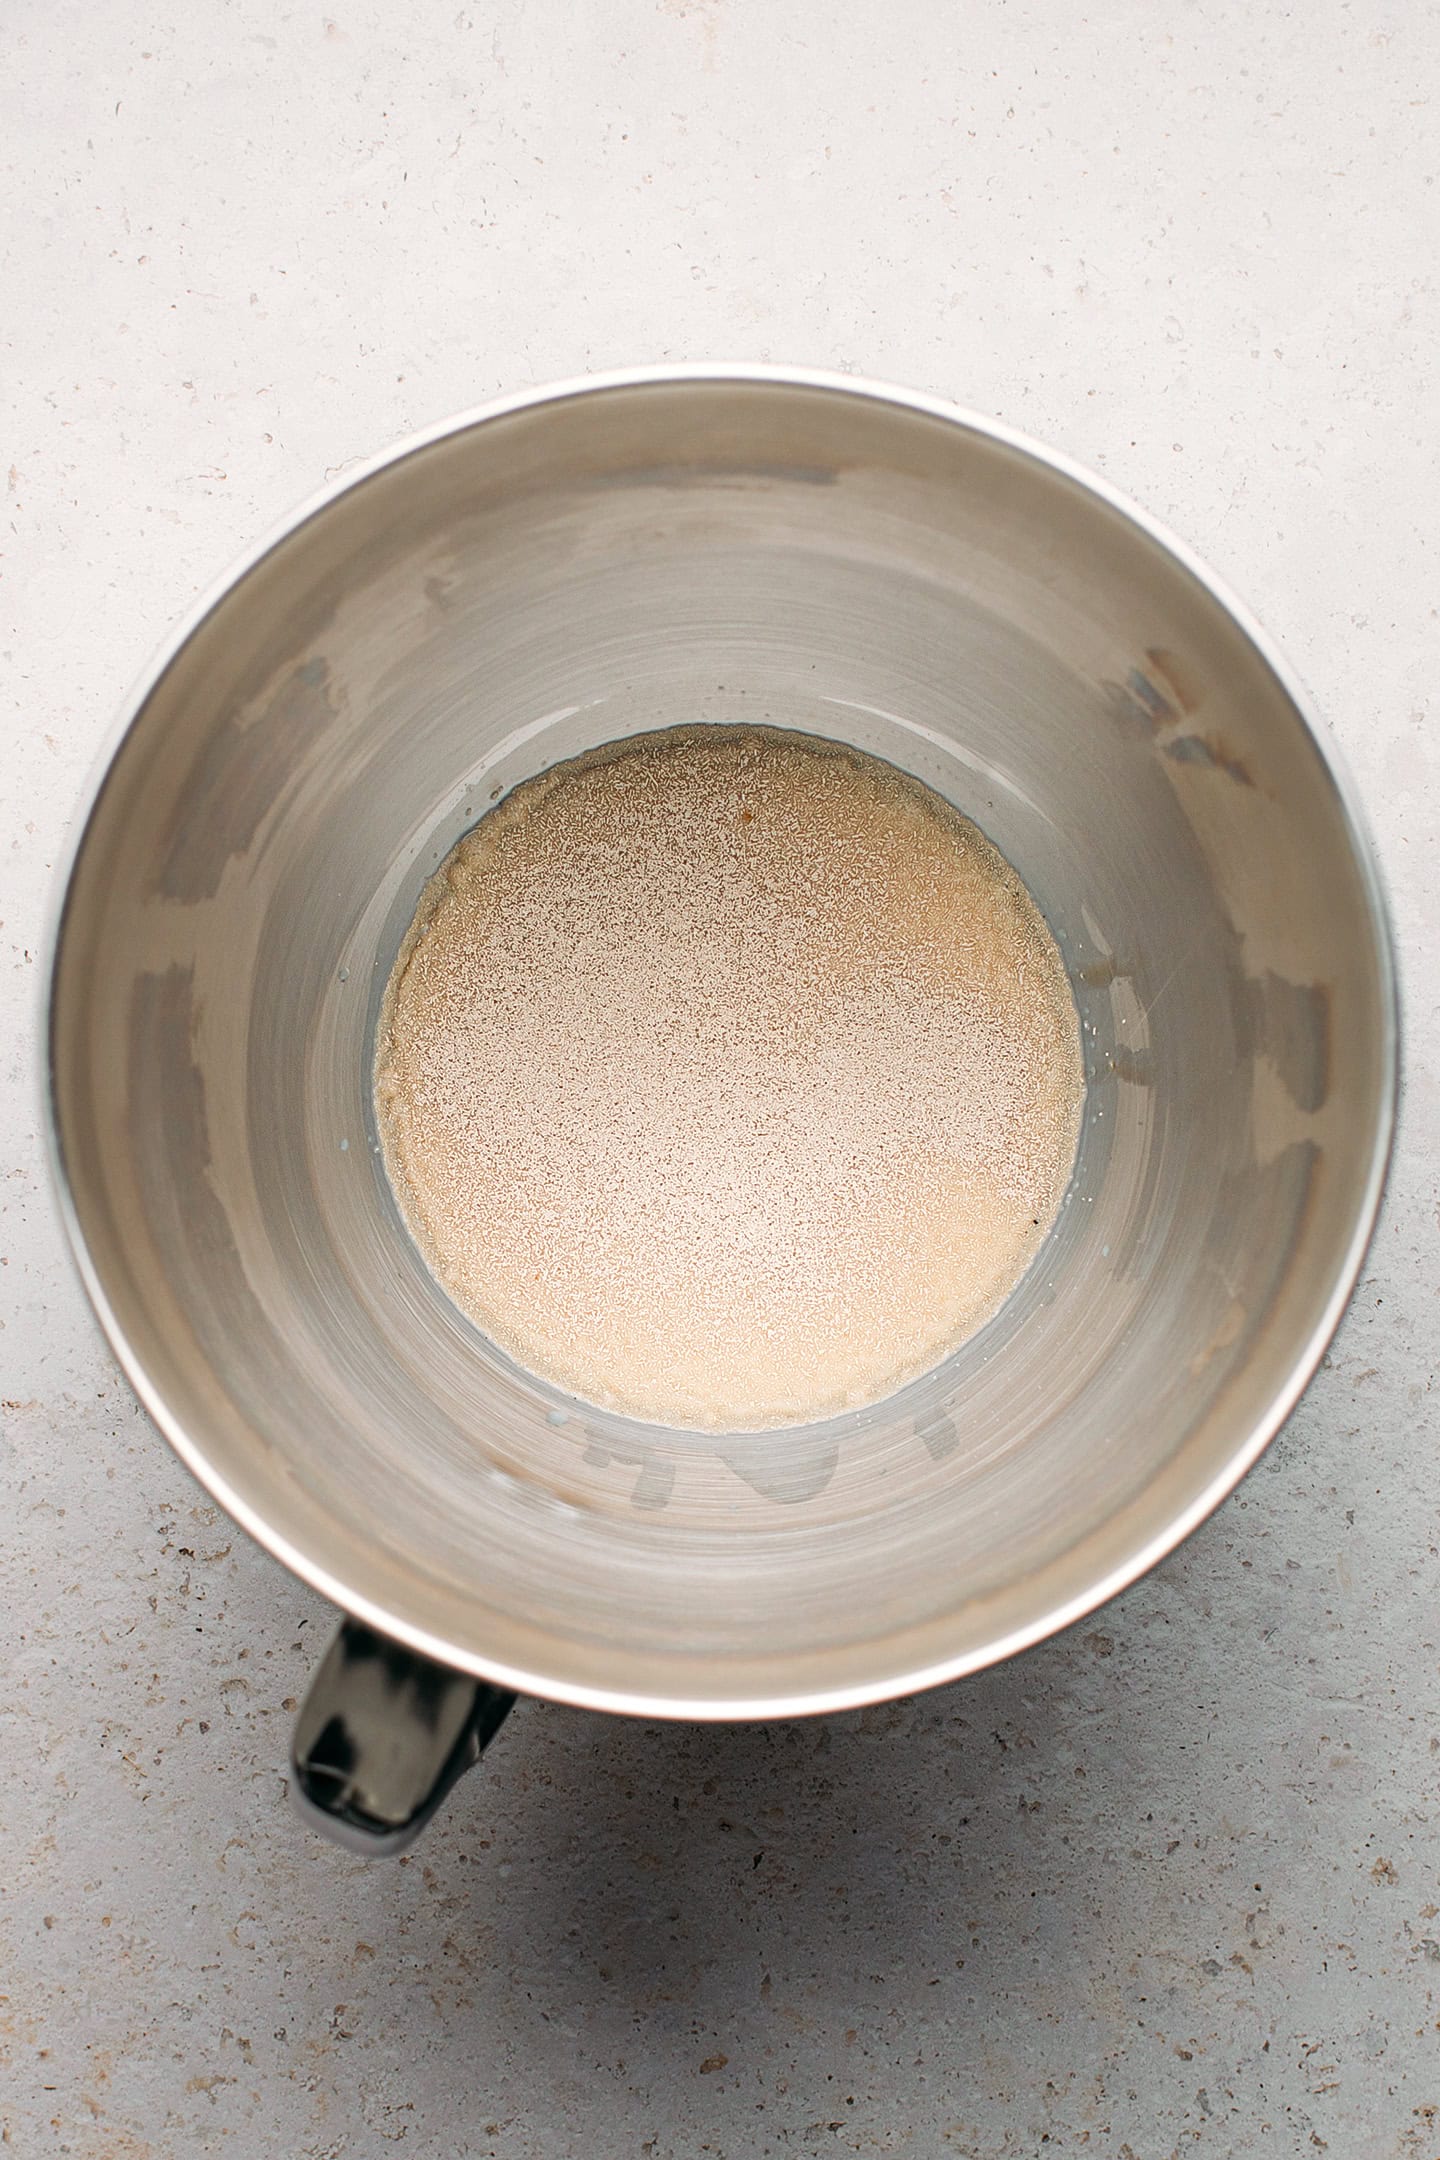
Yeast
Yeast is a key ingredient that allows the dough to rise and adds a fruity and buttery flavor.
Traditionally, we use fresh yeast in France to make brioche but to make it easier, I am using instant yeast. The main reason is that it’s easier to find and can be stored for a long time, as opposed to fresh yeast, which will only last a couple of weeks in the refrigerator. If you prefer to use fresh yeast, use about 15 grams.
Vitamin C
Also known as ascorbic acid, I use a tiny amount of it to strengthen and stabilize the gluten structure. This means that the resulting crumb is slightly finer and more tender. It also helps extend the shelf life of the brioche slightly.
Is vitamin C mandatory in this recipe? No, you can leave it out if you don’t want to use it. I have tried this brioche without it and still had great results. I would say that you will get 95% similar results.
Note: If you don’t have Vitamin C powder on hand, you can replace it with 2 tablespoons of lemon juice. It contains the same amount of vitamin C, and while it will add a very subtle tang, it won’t change the flavor of your brioche much. If using lemon juice, remember to reduce the milk in the recipe by two tablespoons to compensate for the extra liquid.
Orange blossom water
I am using just enough orange blossom water to give the brioche a bakery-style aroma. While not all brioches in France are infused with orange blossom water, many are, especially the ones sold in January during the Epiphany holiday. I really like that unique flavor, hence I used it in this recipe.
Note: At first, the dough will have a strong orange blossom water scent, but once baked the flavor mellows down.
If you omit the orange blossom water, replace it with extra milk to make up for the loss of liquid.
Vanilla extract
A tablespoon of vanilla extract brings a fresh and floral aroma to the brioche. I highly recommend using good-quality store-bought vanilla extract or, even better, homemade vanilla extract.
Salt
Salt acts as a flavor enhancer. Although the brioche does not taste salty, the added salt brings out the complex flavors of the butter. It also helps strengthen the gluten structure, so do not leave it out.
🥣 How to Make It
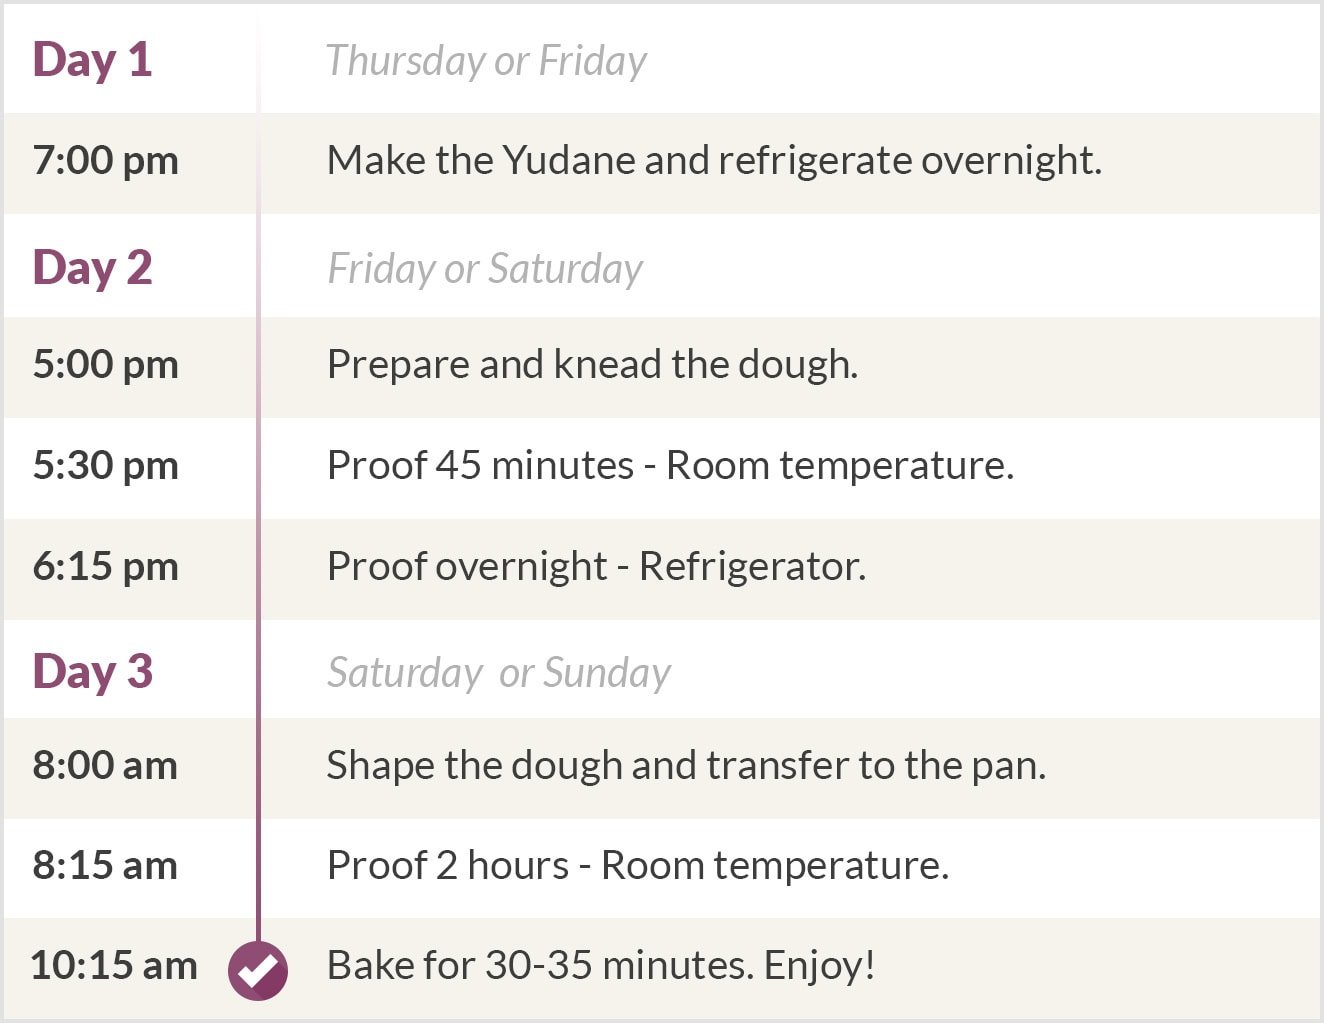
Planning for the busy cooks
For those with busy schedules, I created this plan that you can follow on a weekend. You can start by making the Yudane on Thursday evening, then make the dough on Friday evening and let it proof overnight in the fridge. Finally, you can bake the brioche on Saturday morning so the whole family can enjoy it!
1. Prepare the Yudane
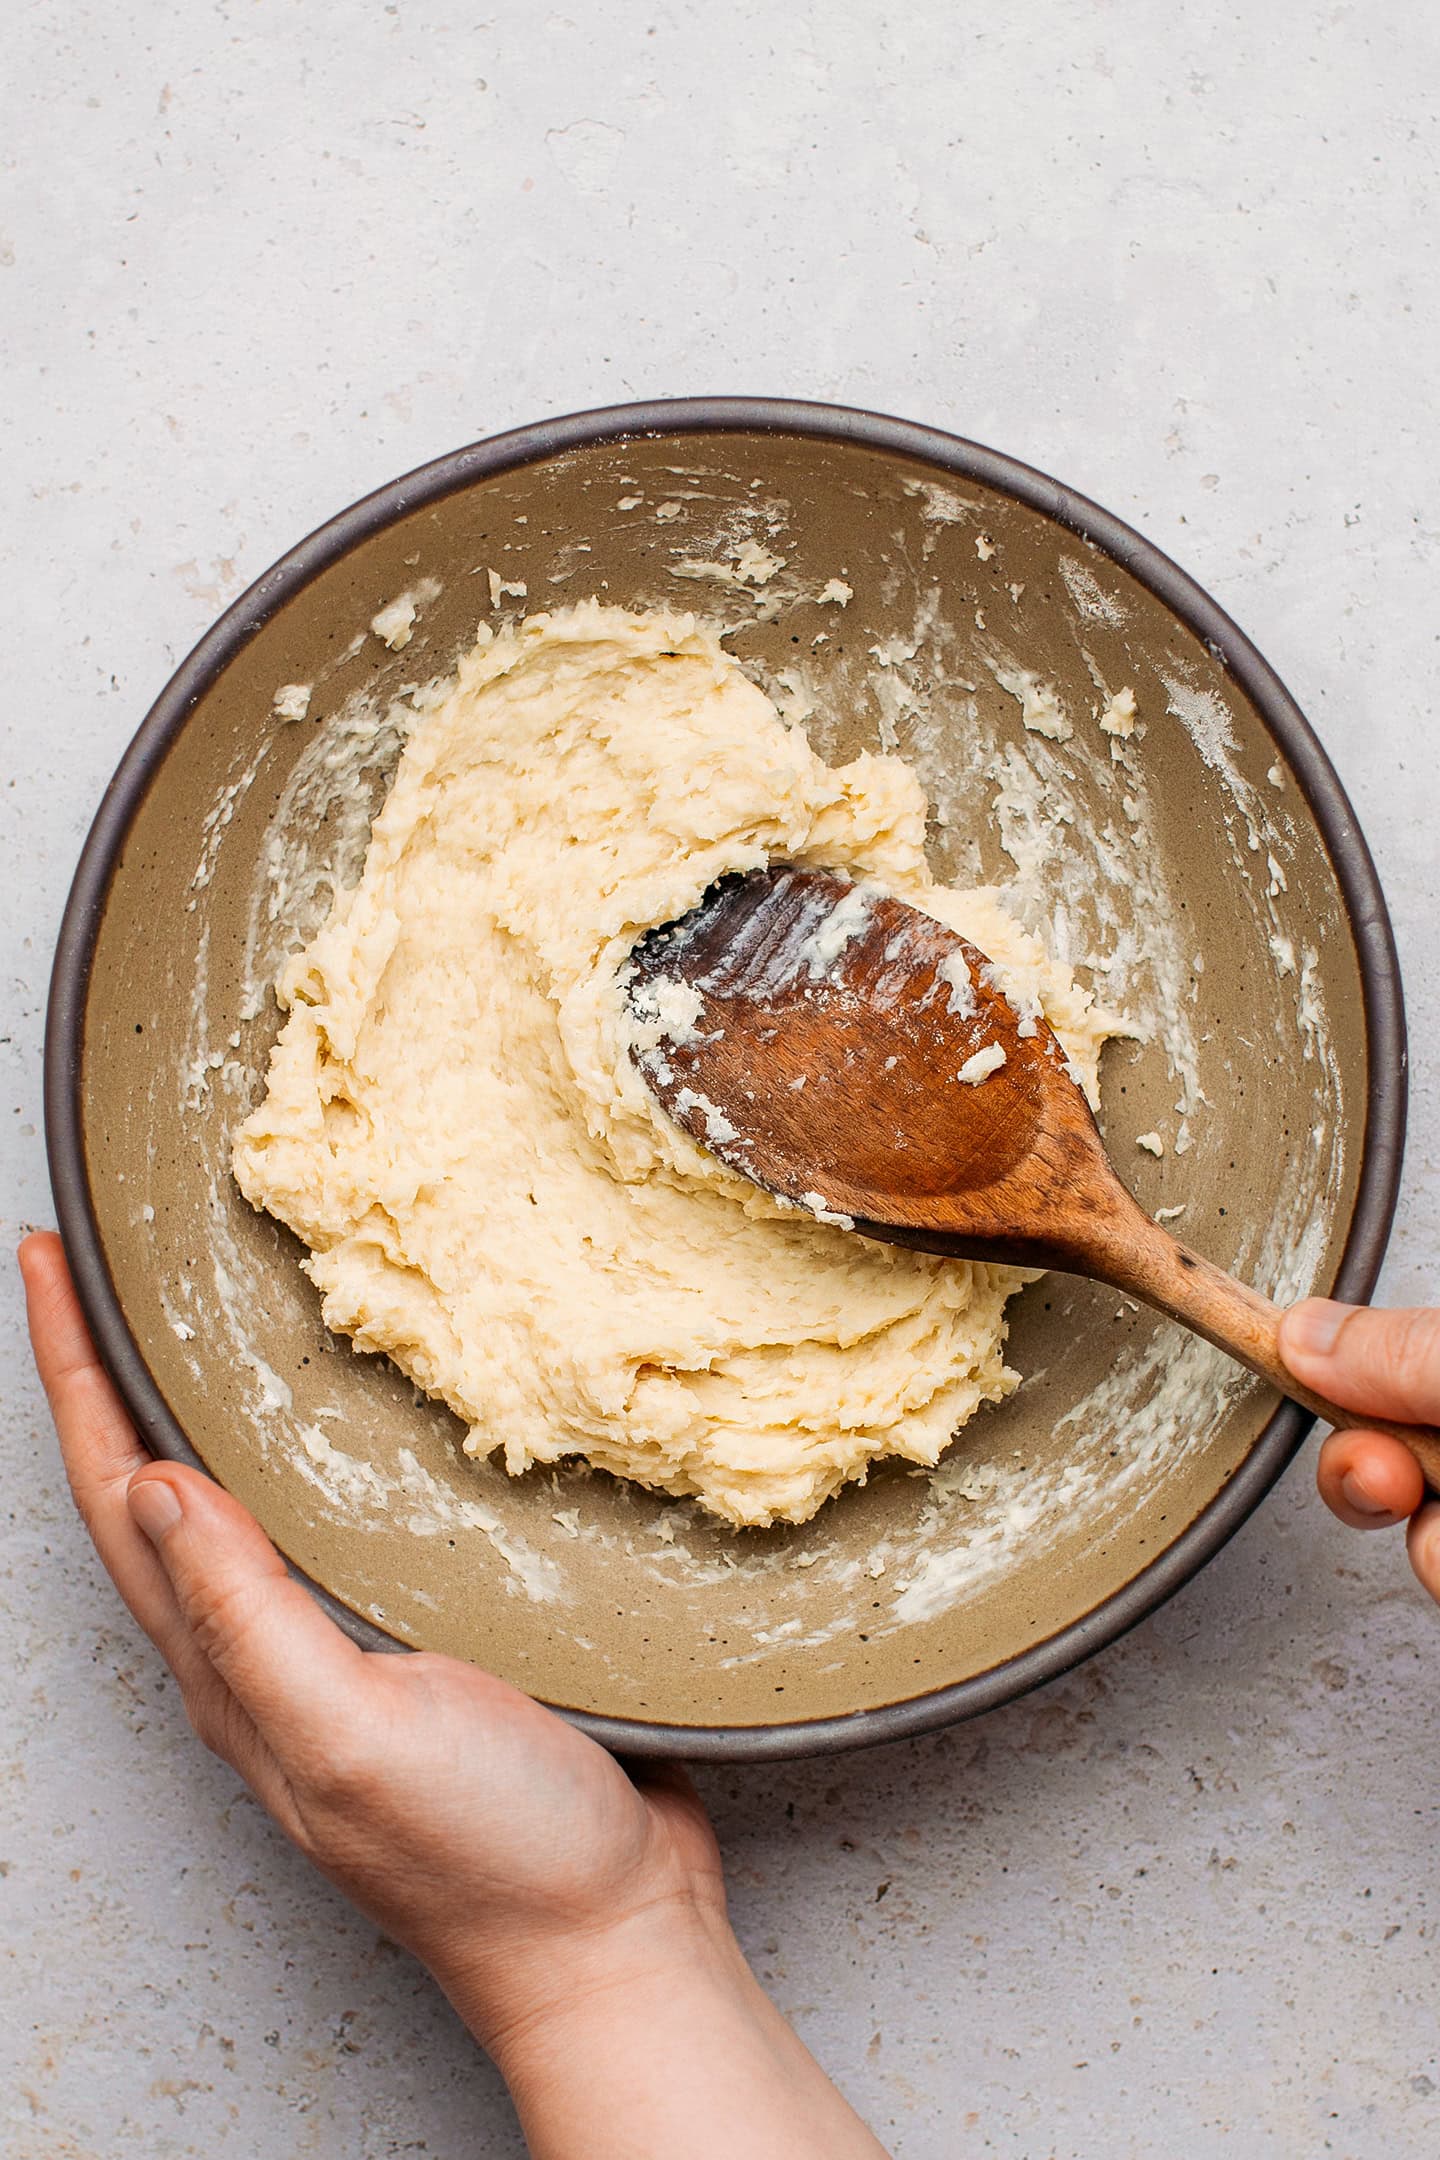
- Mix the water with the flour. Start by adding the flour to a mixing bowl. Next, bring the water to a boil and pour it into the bowl containing the flour. Using a wooden spoon, mix the flour with the water until it forms a thick paste.
- Cover and refrigerate. Cover with plastic wrap and refrigerate for at least 5 hours, preferably overnight.
2. Make the dough
Once the Yudane has rested long enough, you can prepare the brioche dough:
- Add the wet ingredients to a stand mixer. To the bowl of a stand mixer, add the plant-based milk, orange blossom water, and vanilla extract.
- Add the dry ingredients. Then, add the instant yeast, bread flour, sugar, vitamin C powder, and Yudane. Note: Do not add the salt yet, as it could kill the yeast. We will add the salt a bit later.
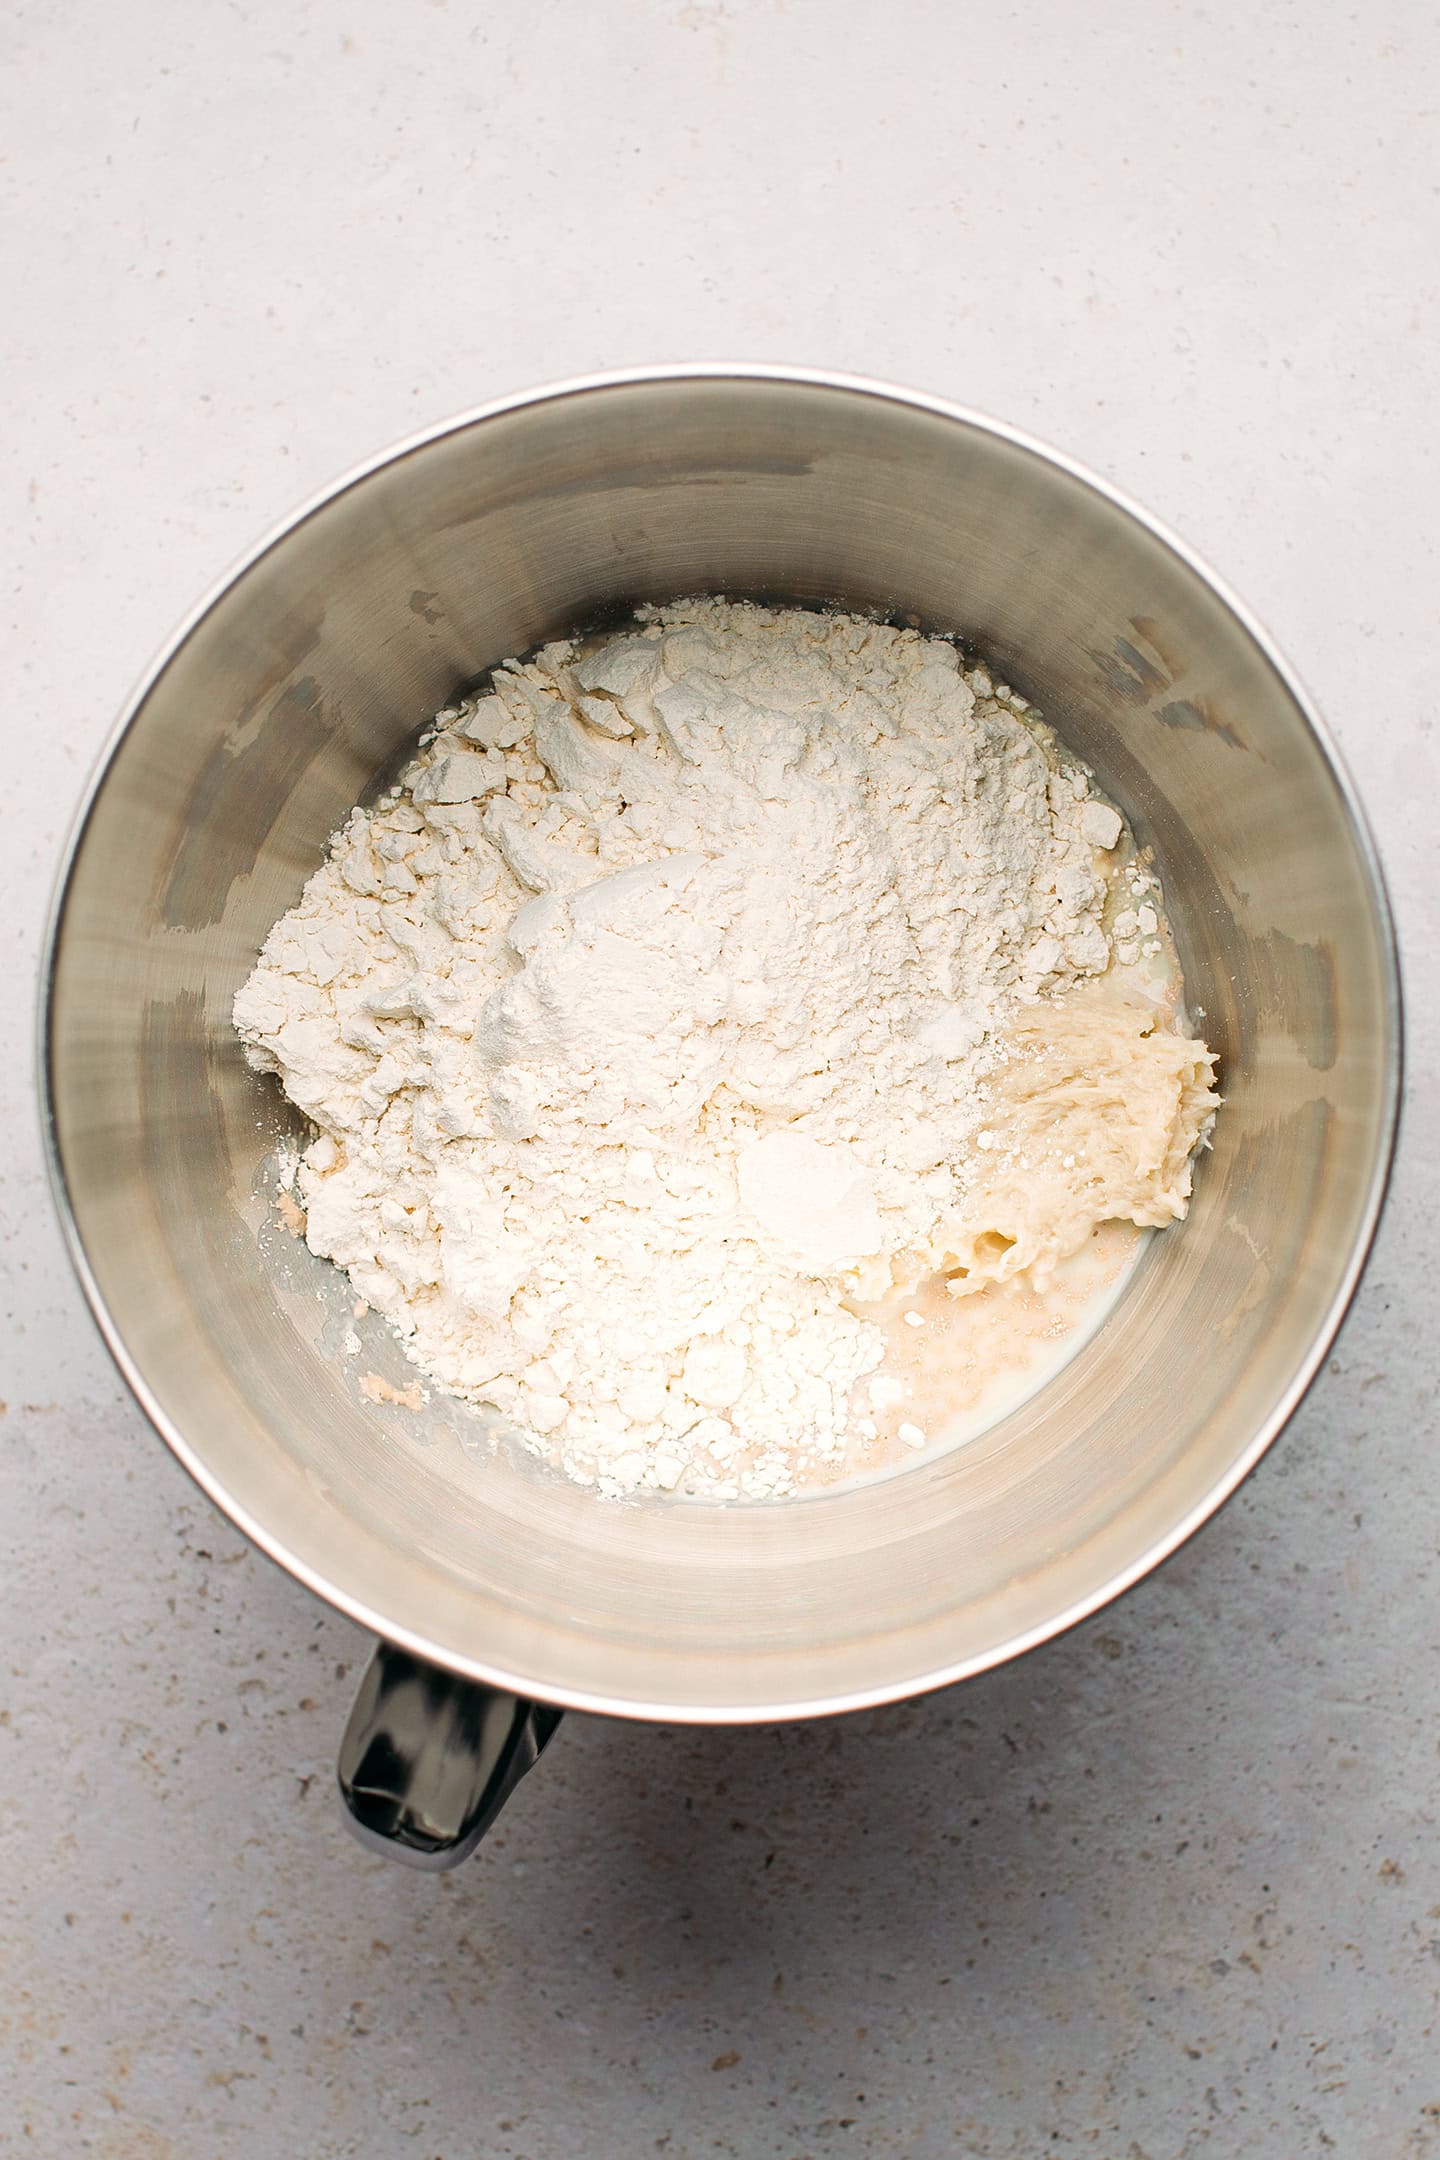
- Knead on low speed. Using the dough hook attachment, knead the dough on speed 2 for 5-7 minutes. At this point, the dough will still have a slightly grainy texture.
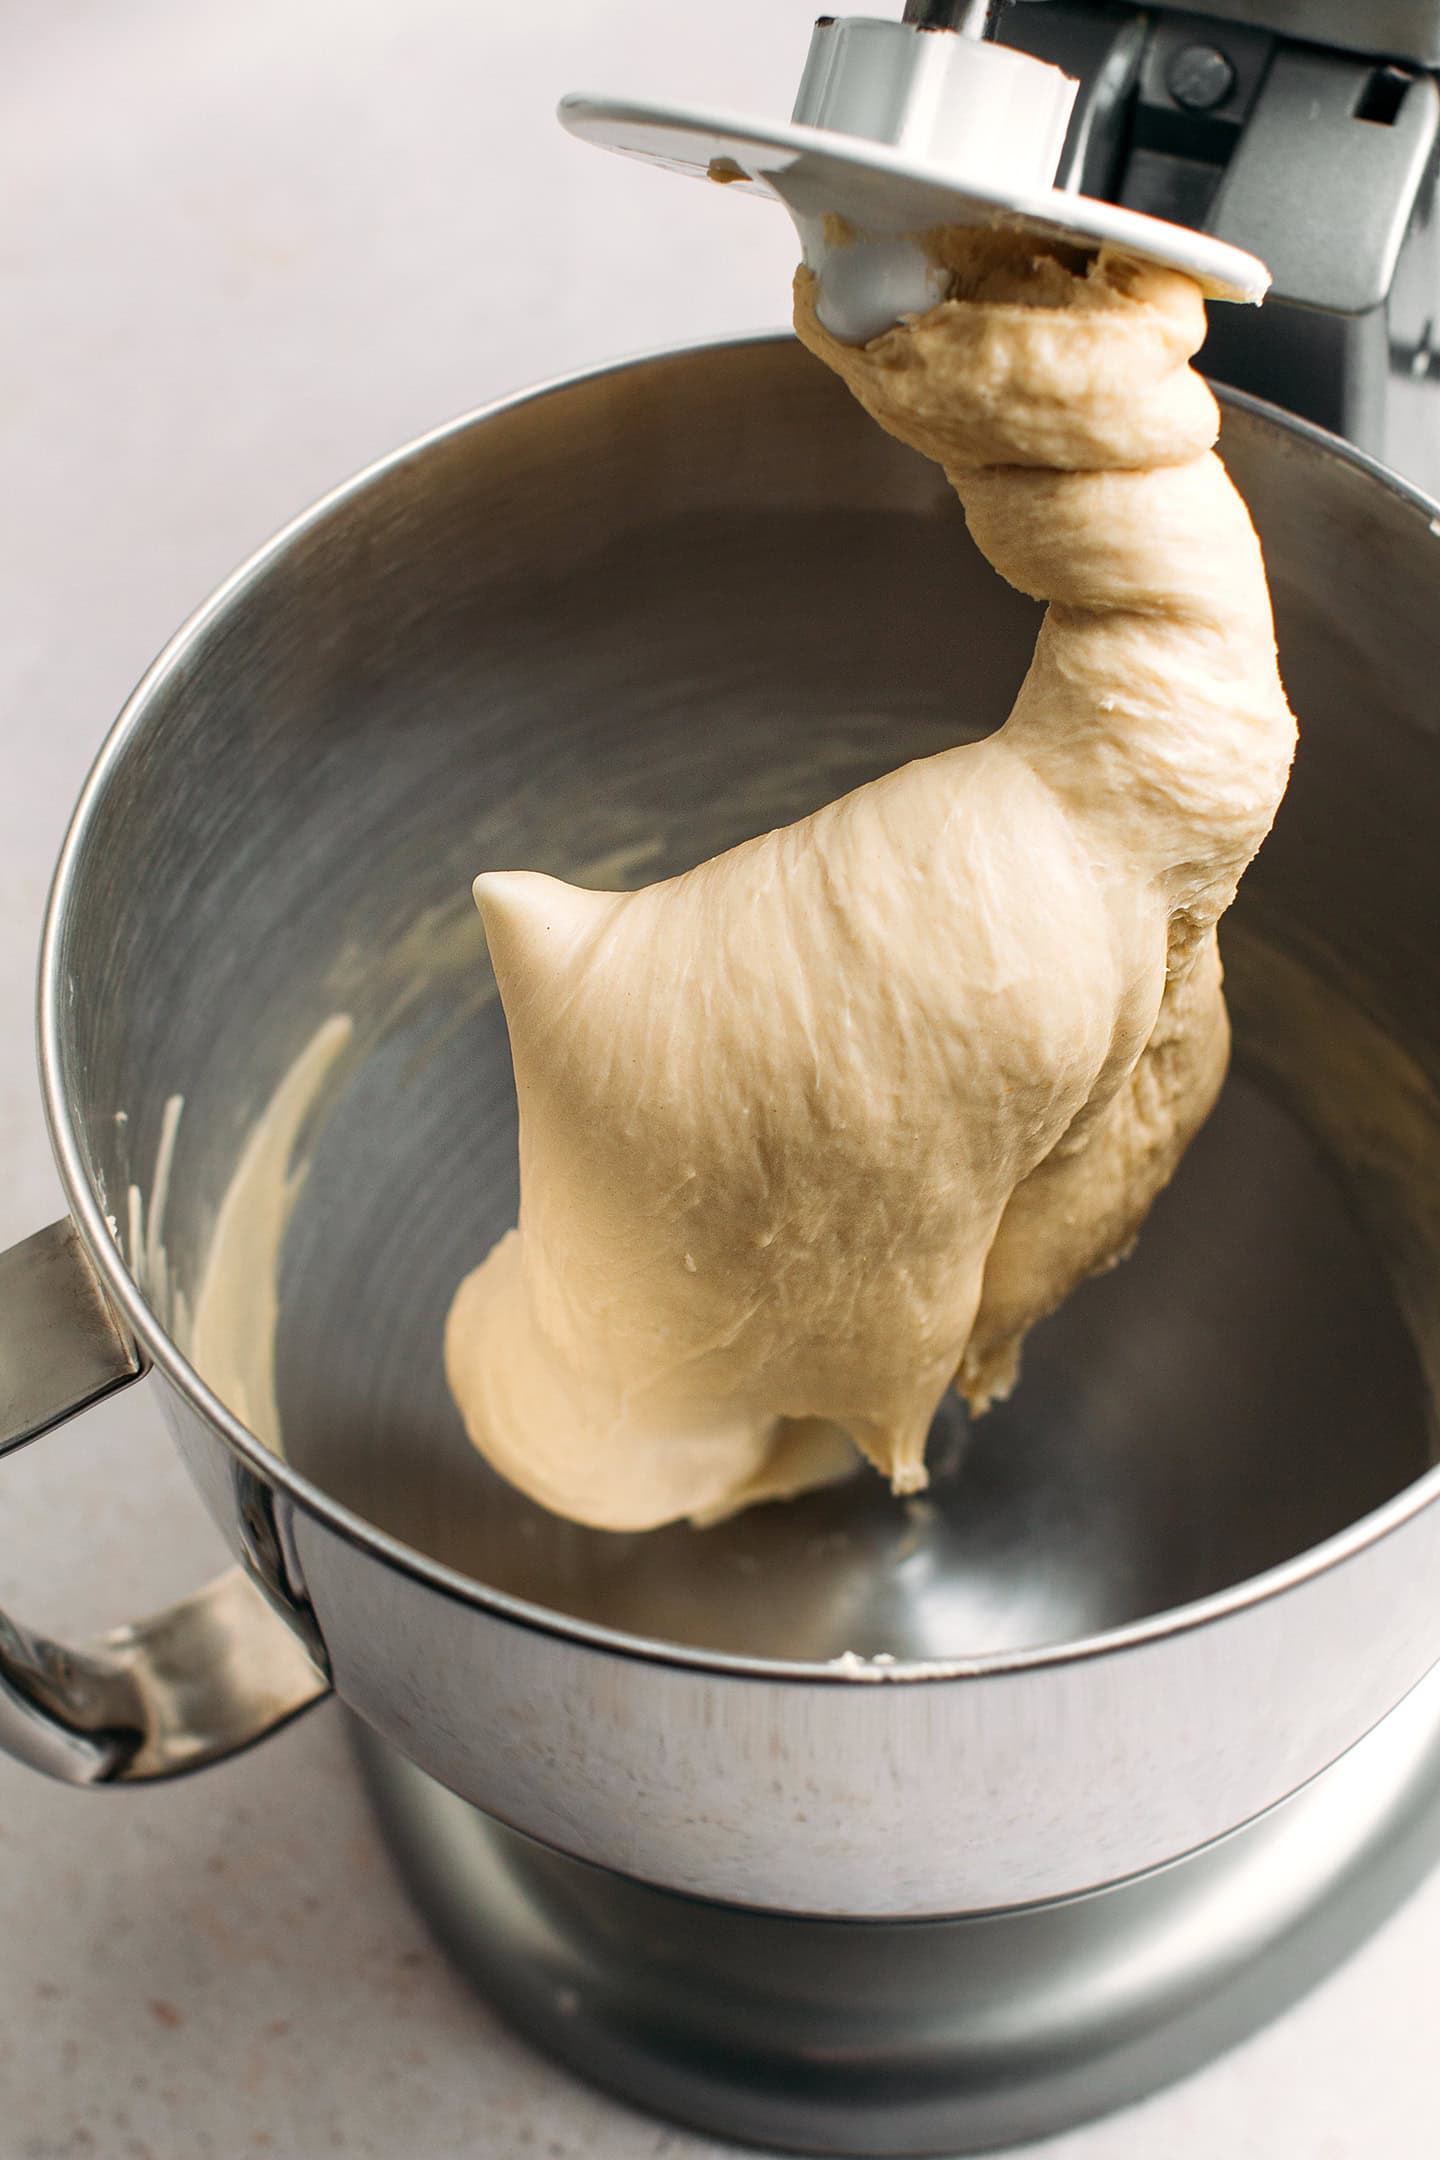
- Knead on medium speed. Add the salt and knead on speed 4-5 for about 20 minutes or until the dough passes the windowpane test. The dough should be very smooth and stretchy. Do not add more flour, the dough is supposed to be soft and sticky.
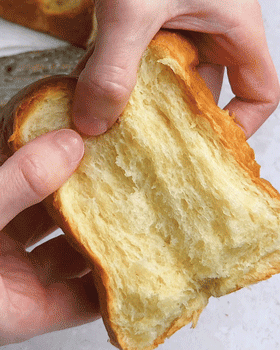
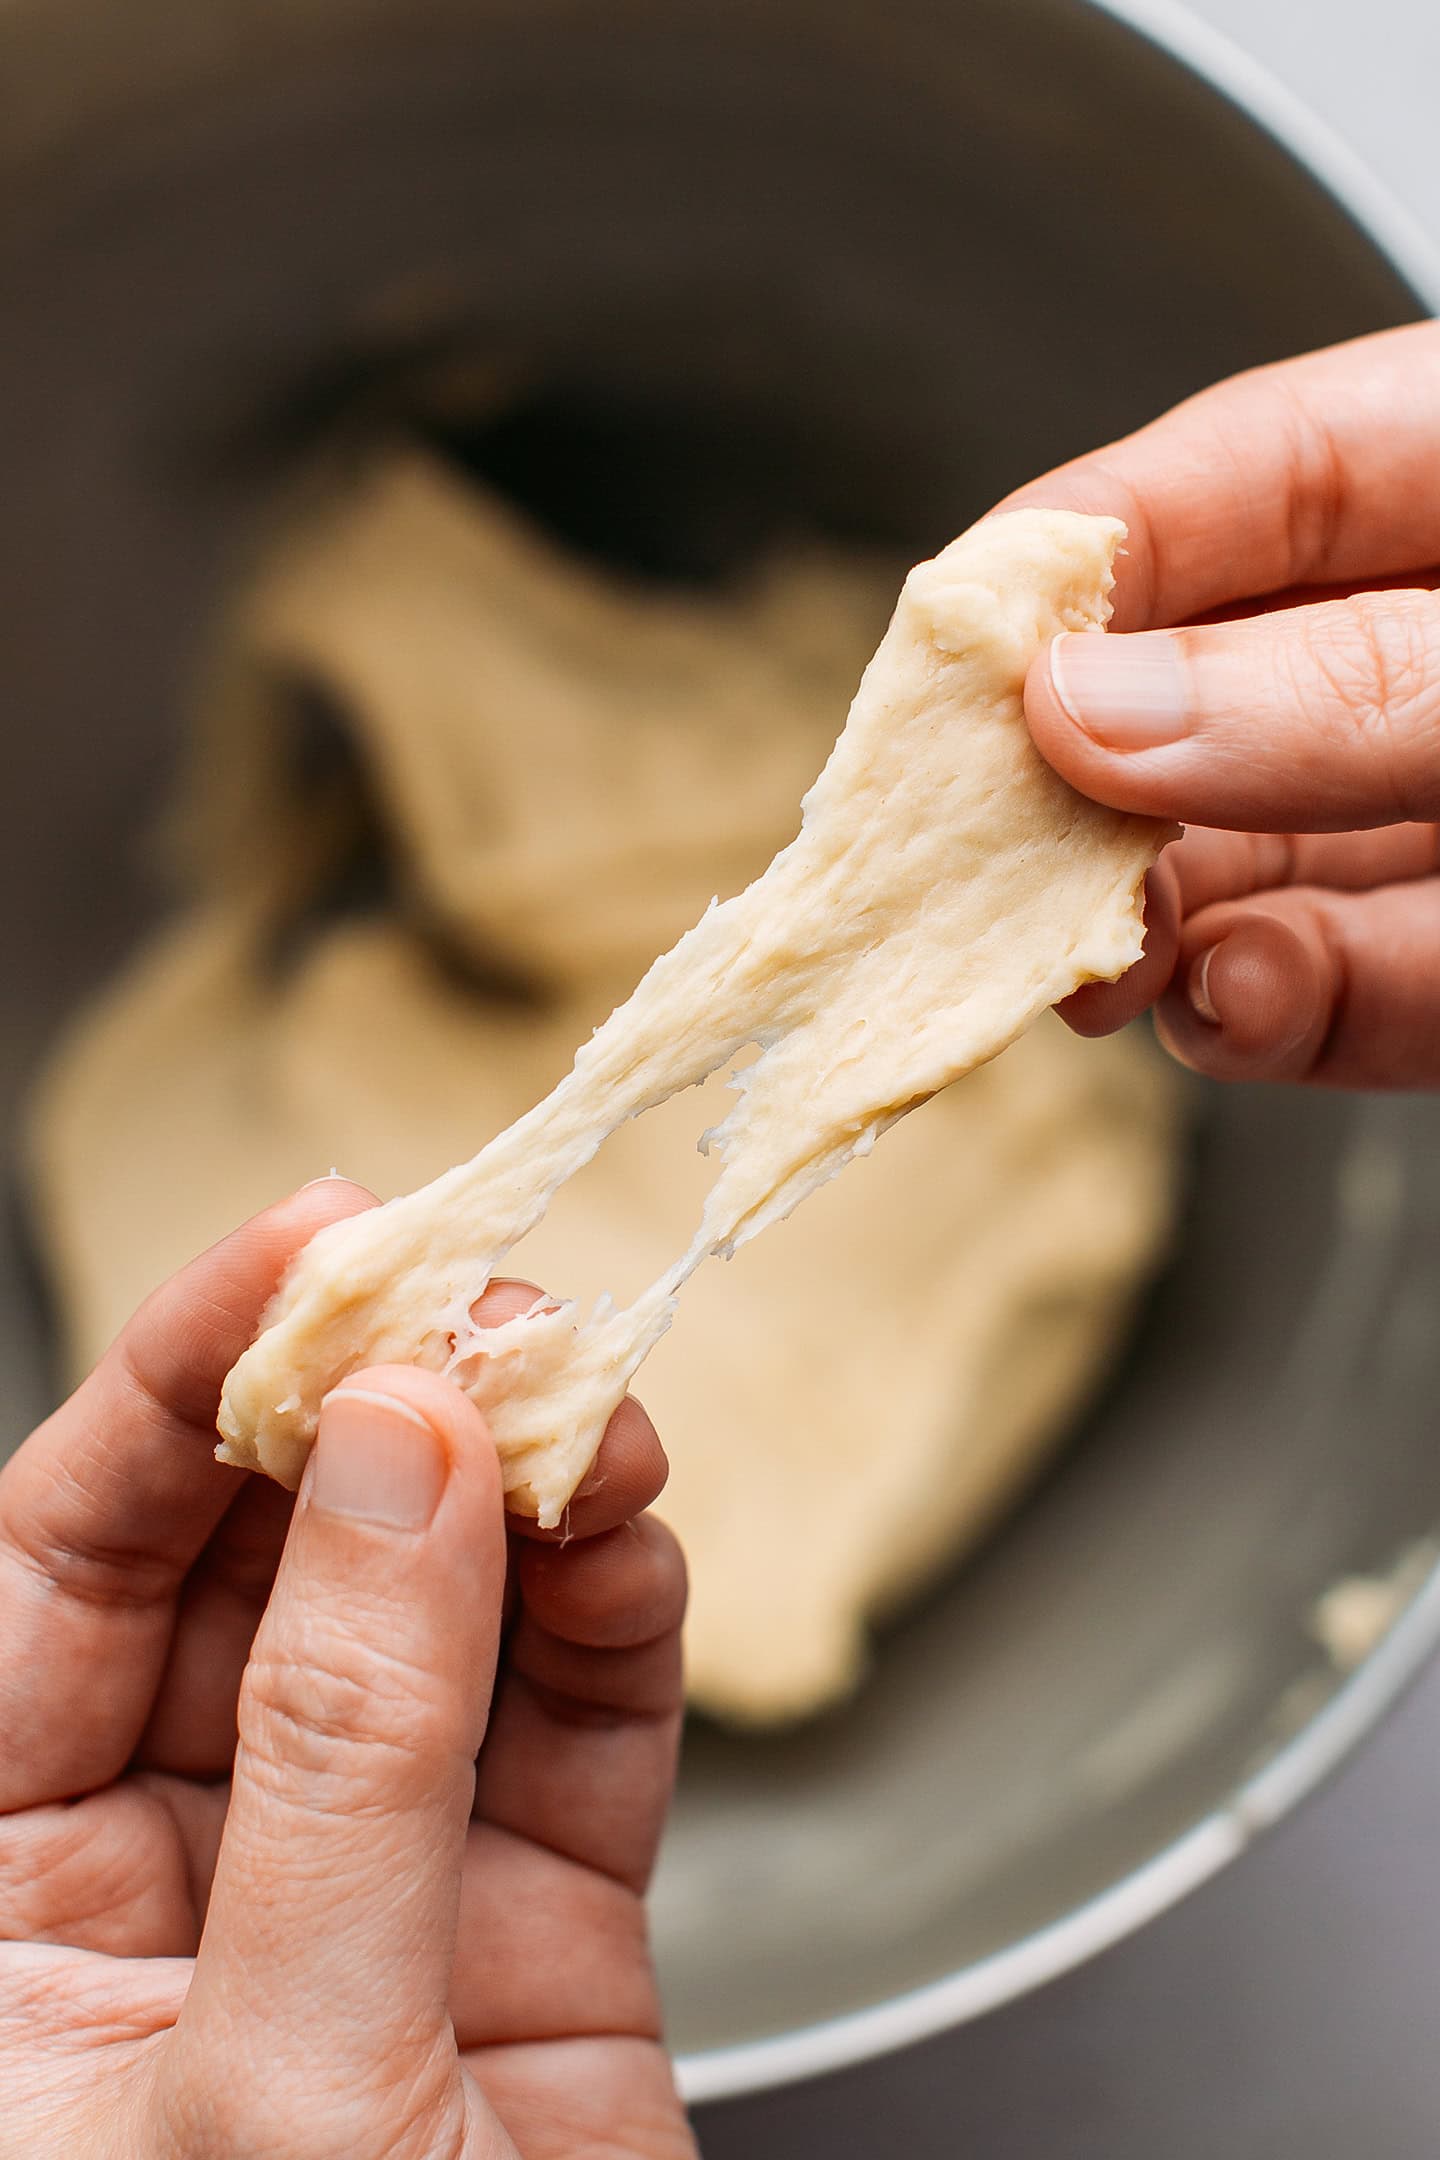
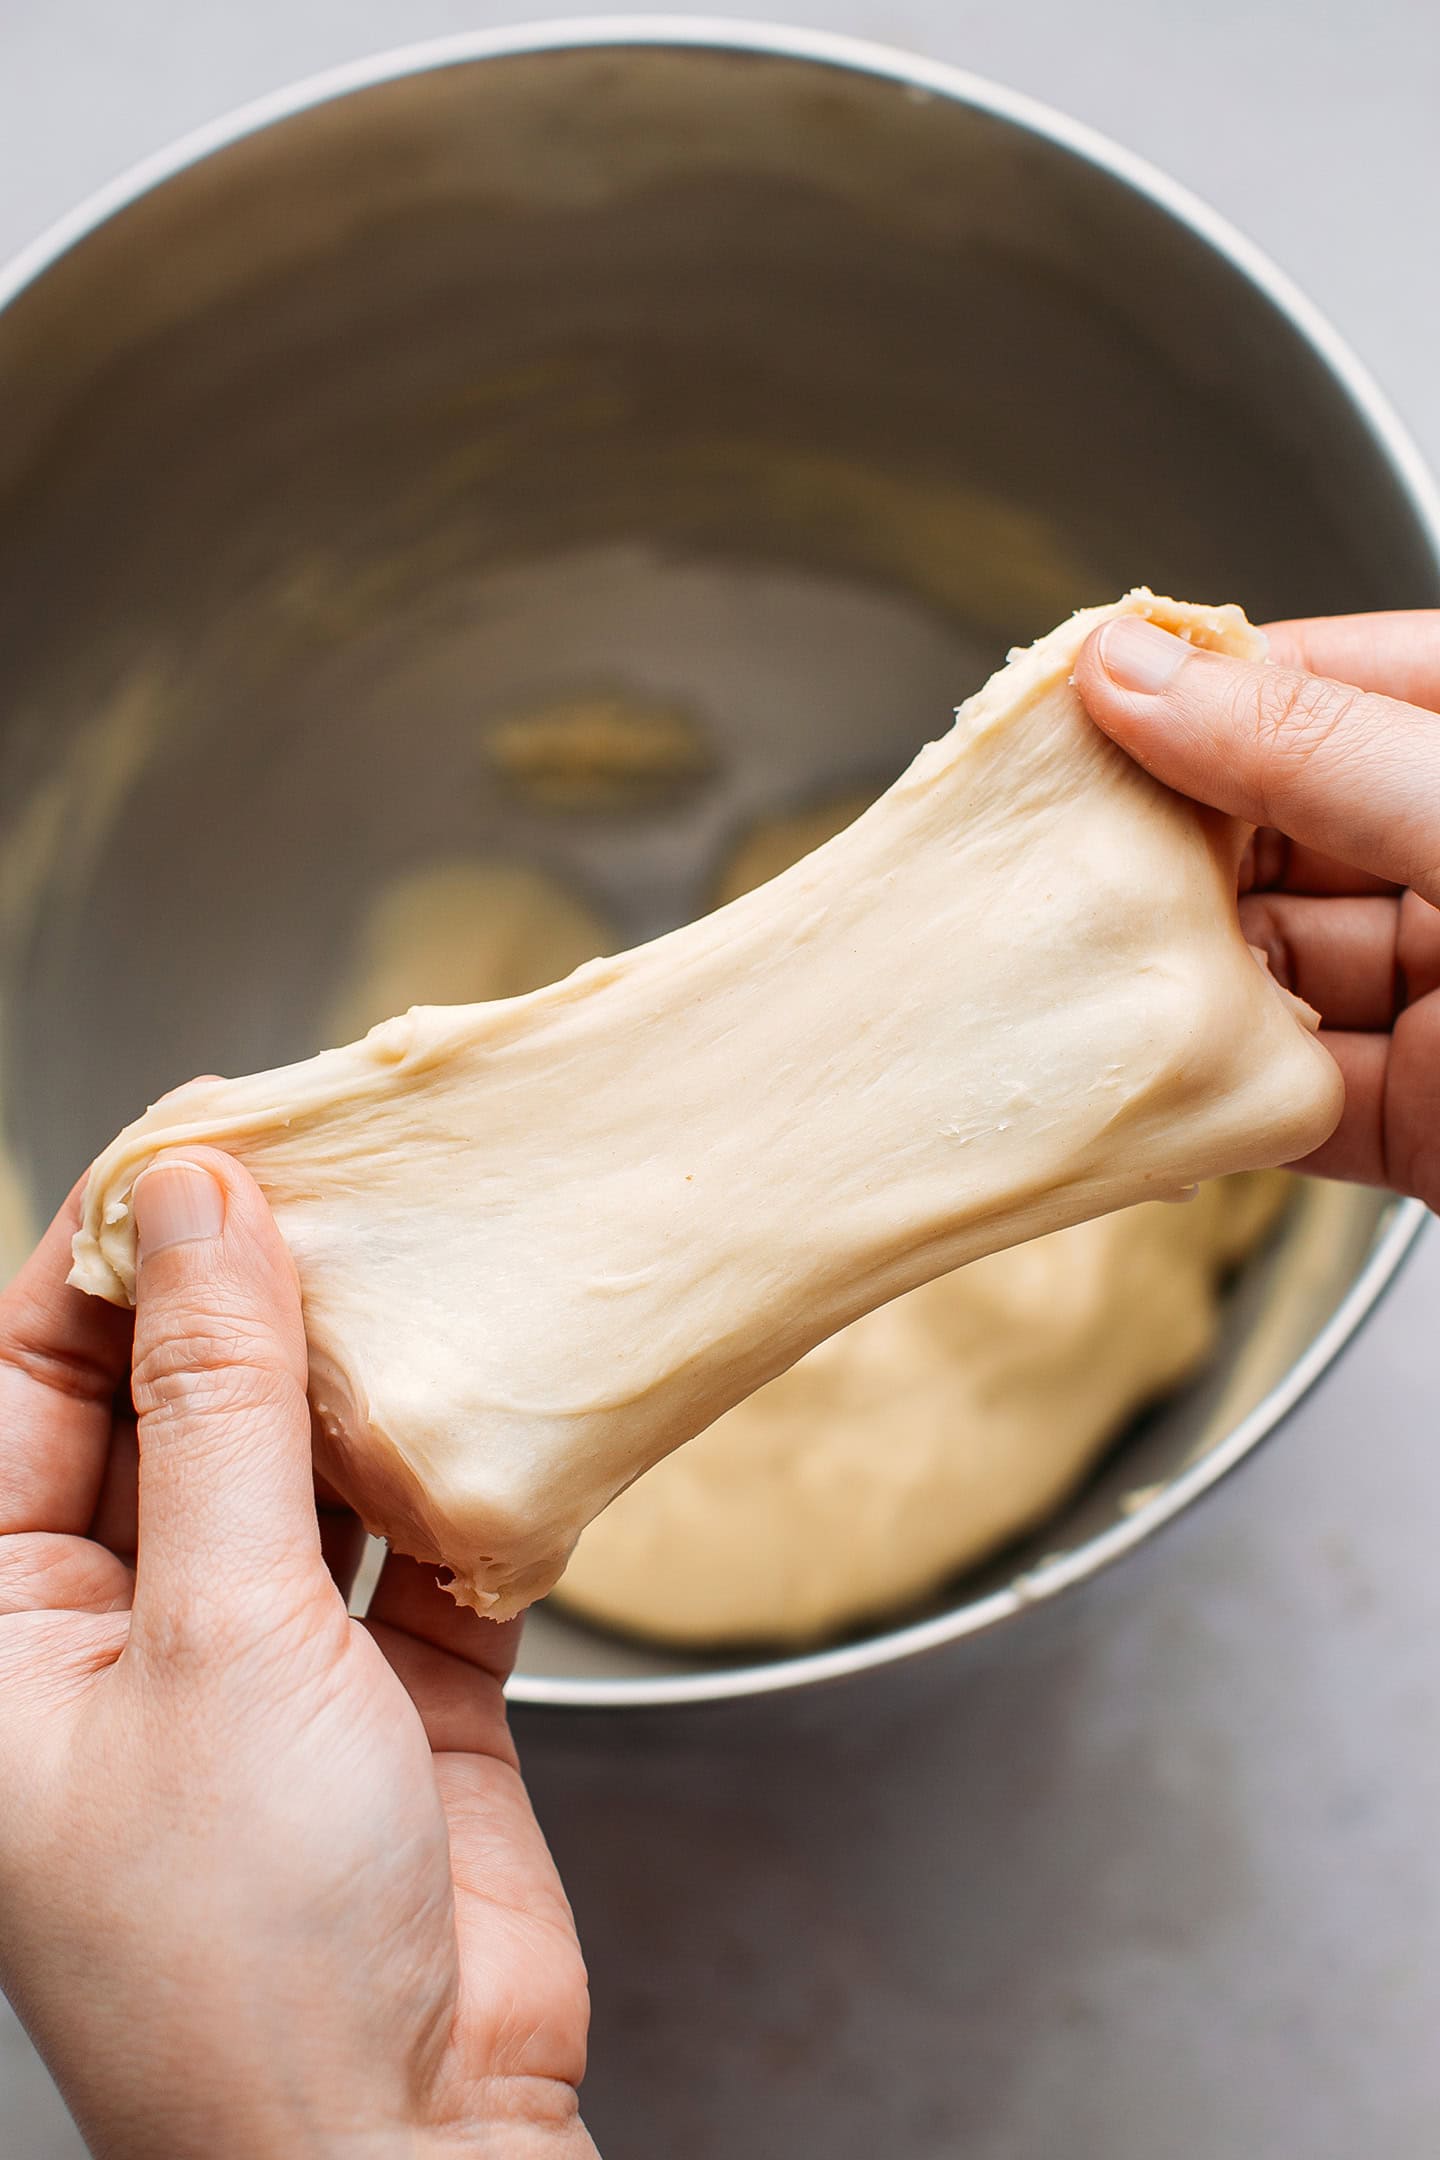
Windowpane test
During my early tests, I didn’t knead the dough enough and could not get the stringy texture I was looking for (it was more like a spongy crumb). The secret to achieving this stringy crumb lies in the kneading process. The dough must be kneaded until it develops a strong gluten network.
How to do the windowpane test: Take a small ball of dough, flatten it, and stretch it into a rectangle between your hands. As you stretch it, the dough should become very thin, almost see-through, and should not break easily. That means the gluten network is strong enough. On the opposite, if the dough is not elastic enough and you cannot stretch it into a thin layer, it means you must knead it for a longer period of time.

After 8 minutes of kneading – The dough breaks when you try to stretch it. It doesn’t pass the windowpane test and needs to be kneaded more. After 25 minutes of kneading – The dough can be stretched into a thin layer without breaking. It passes the windowpane test.
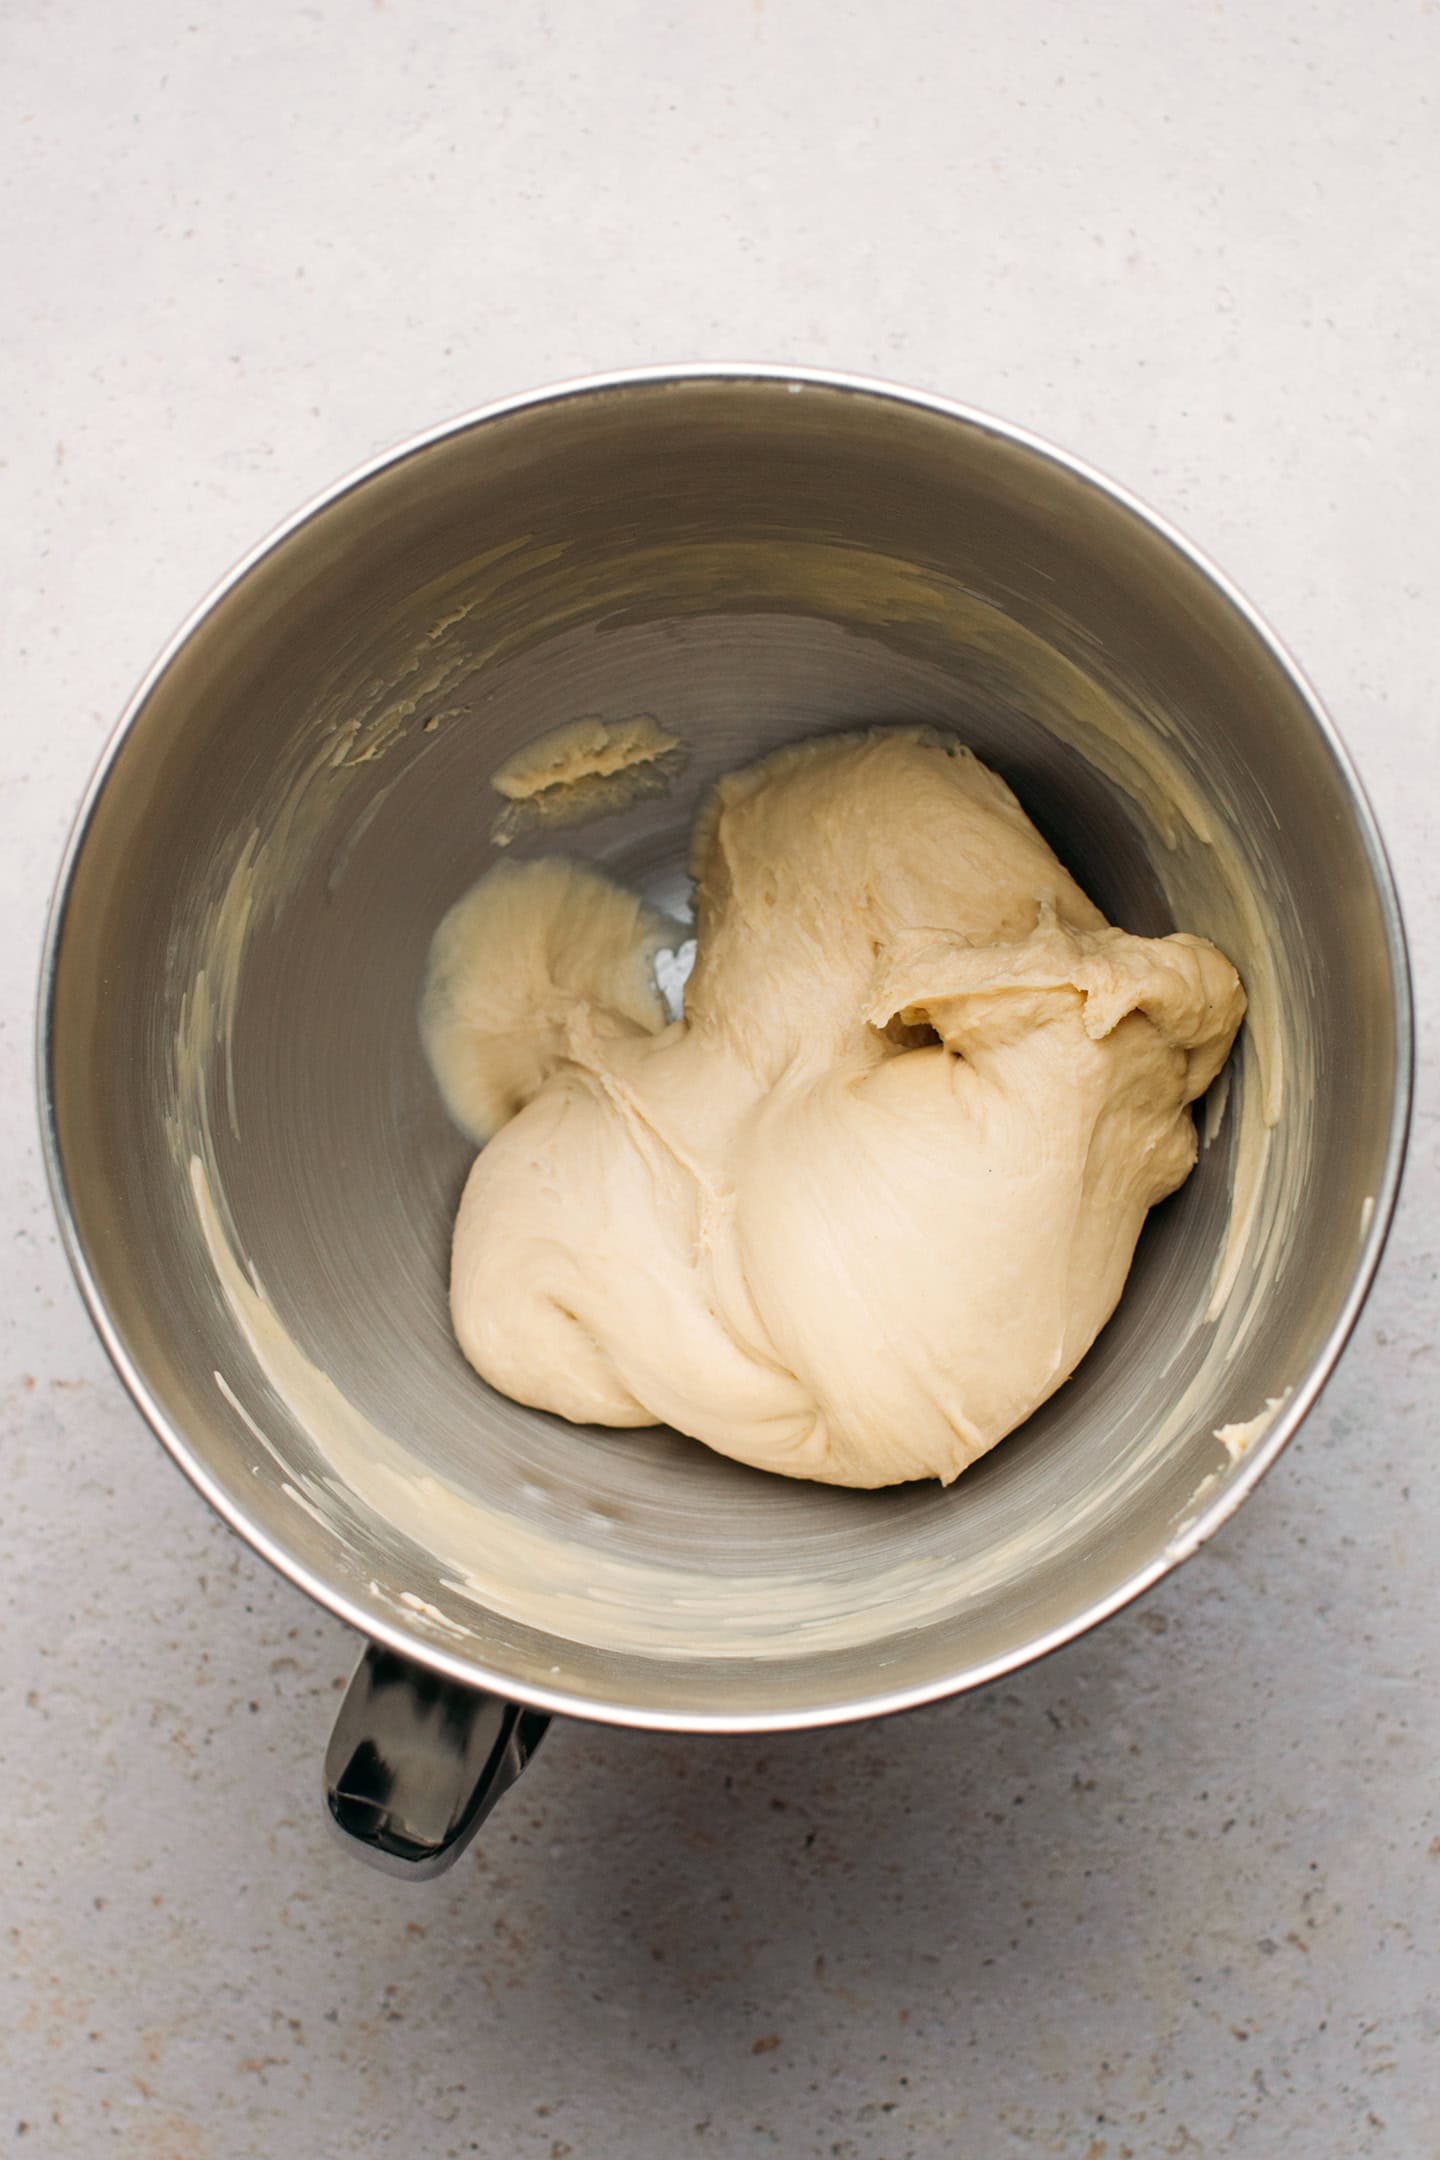
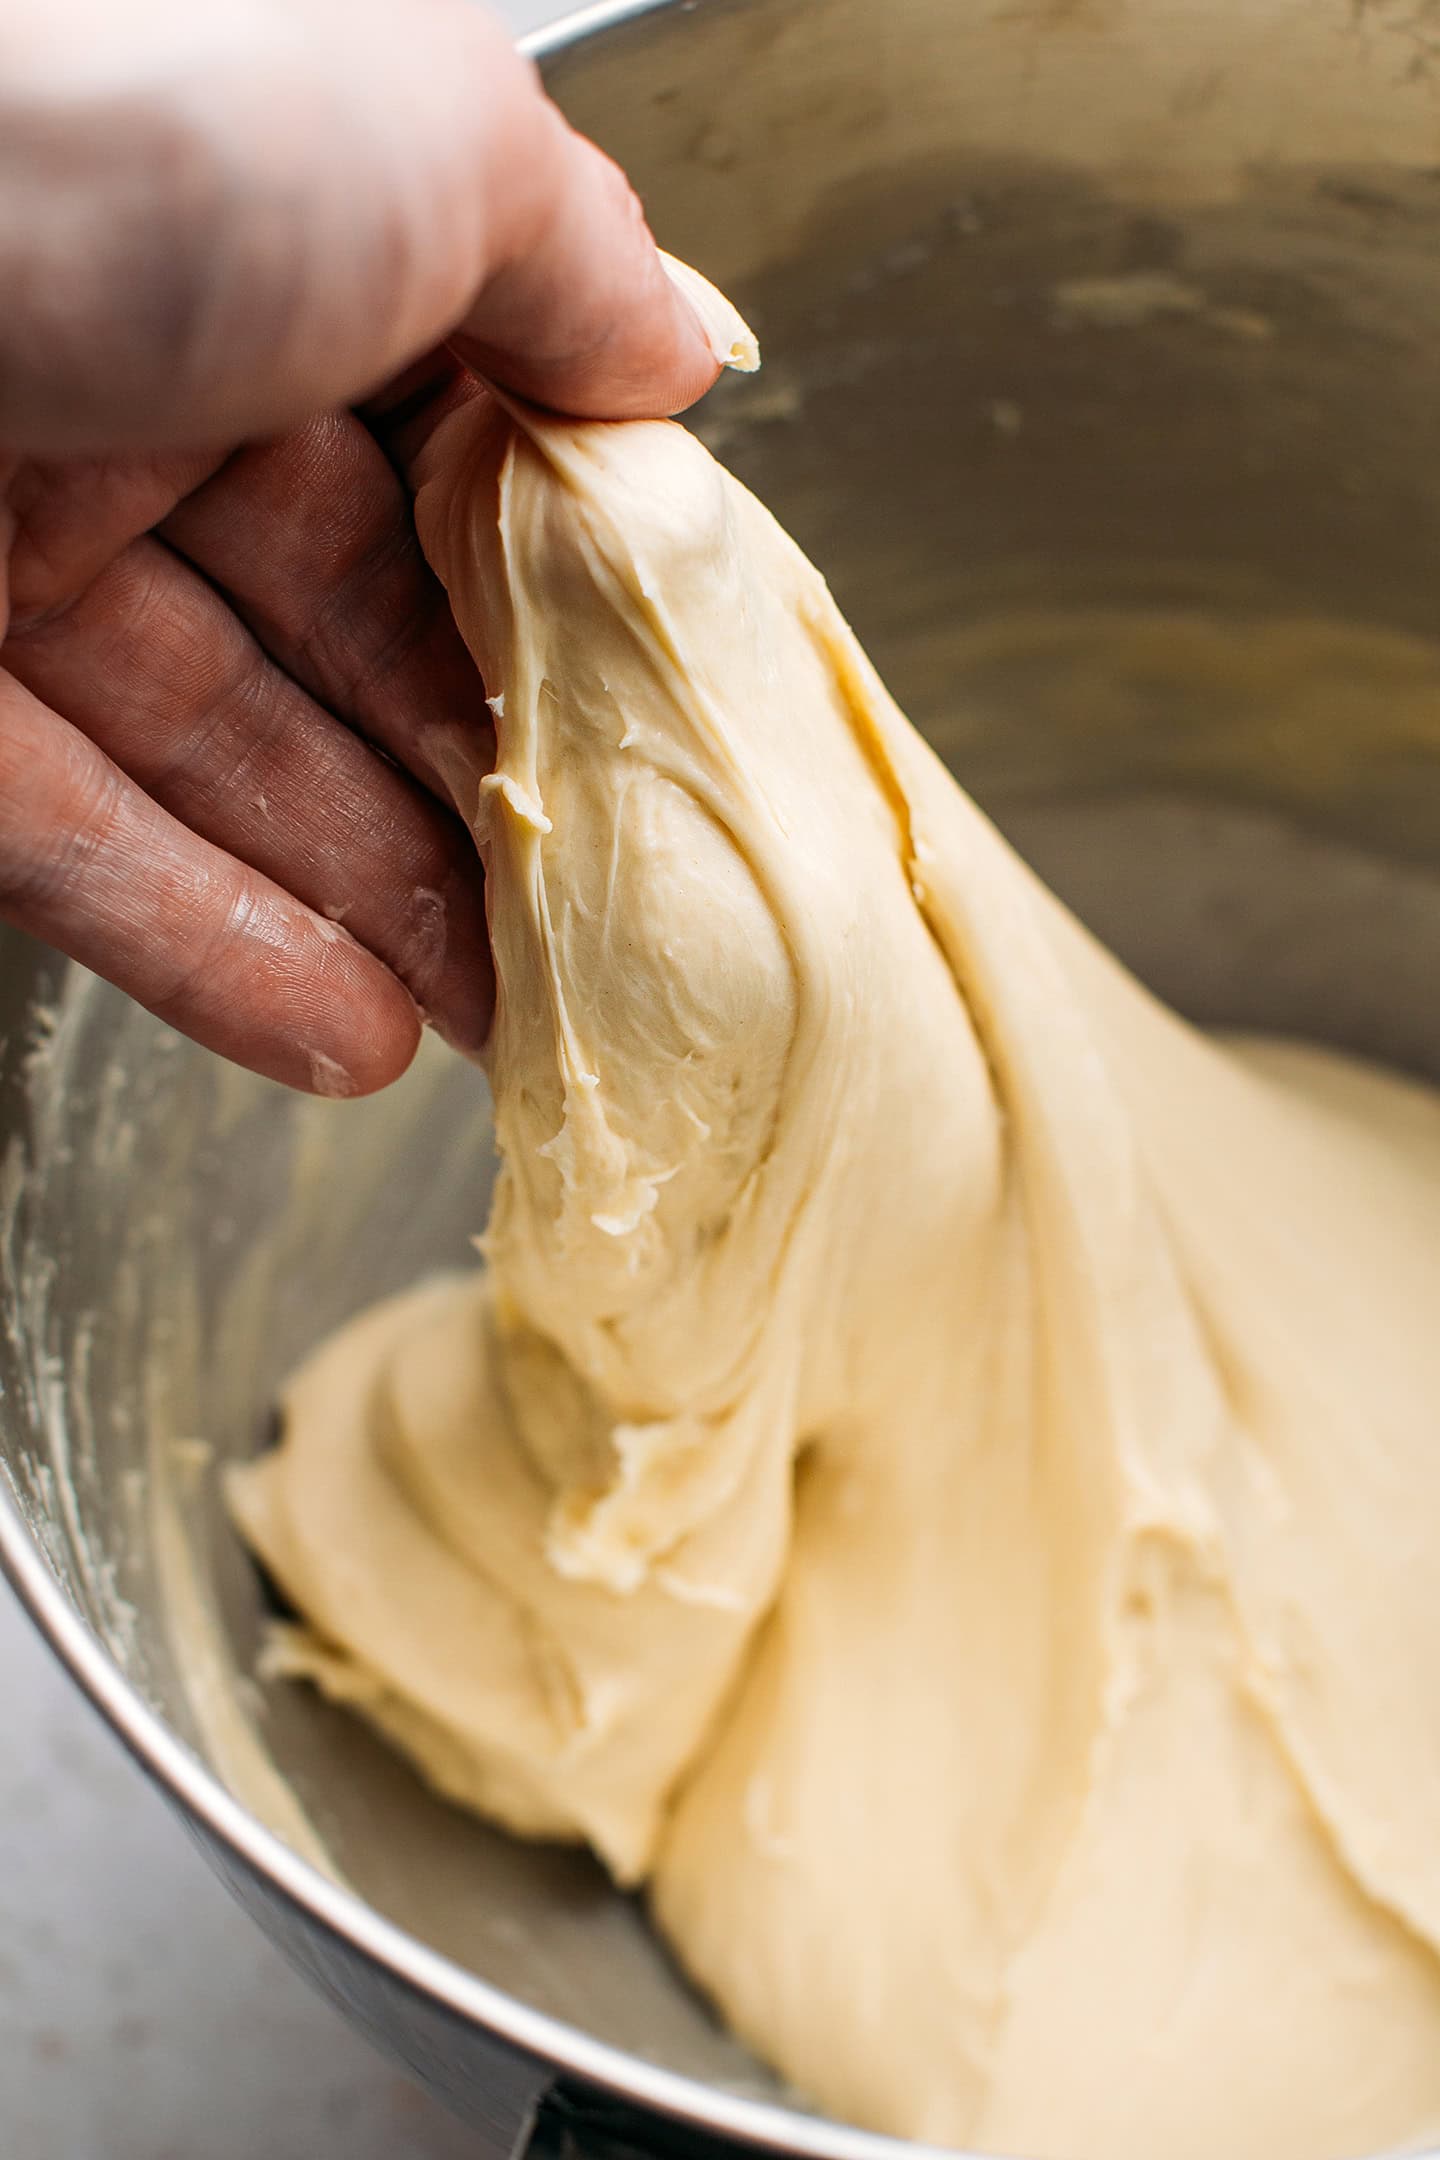
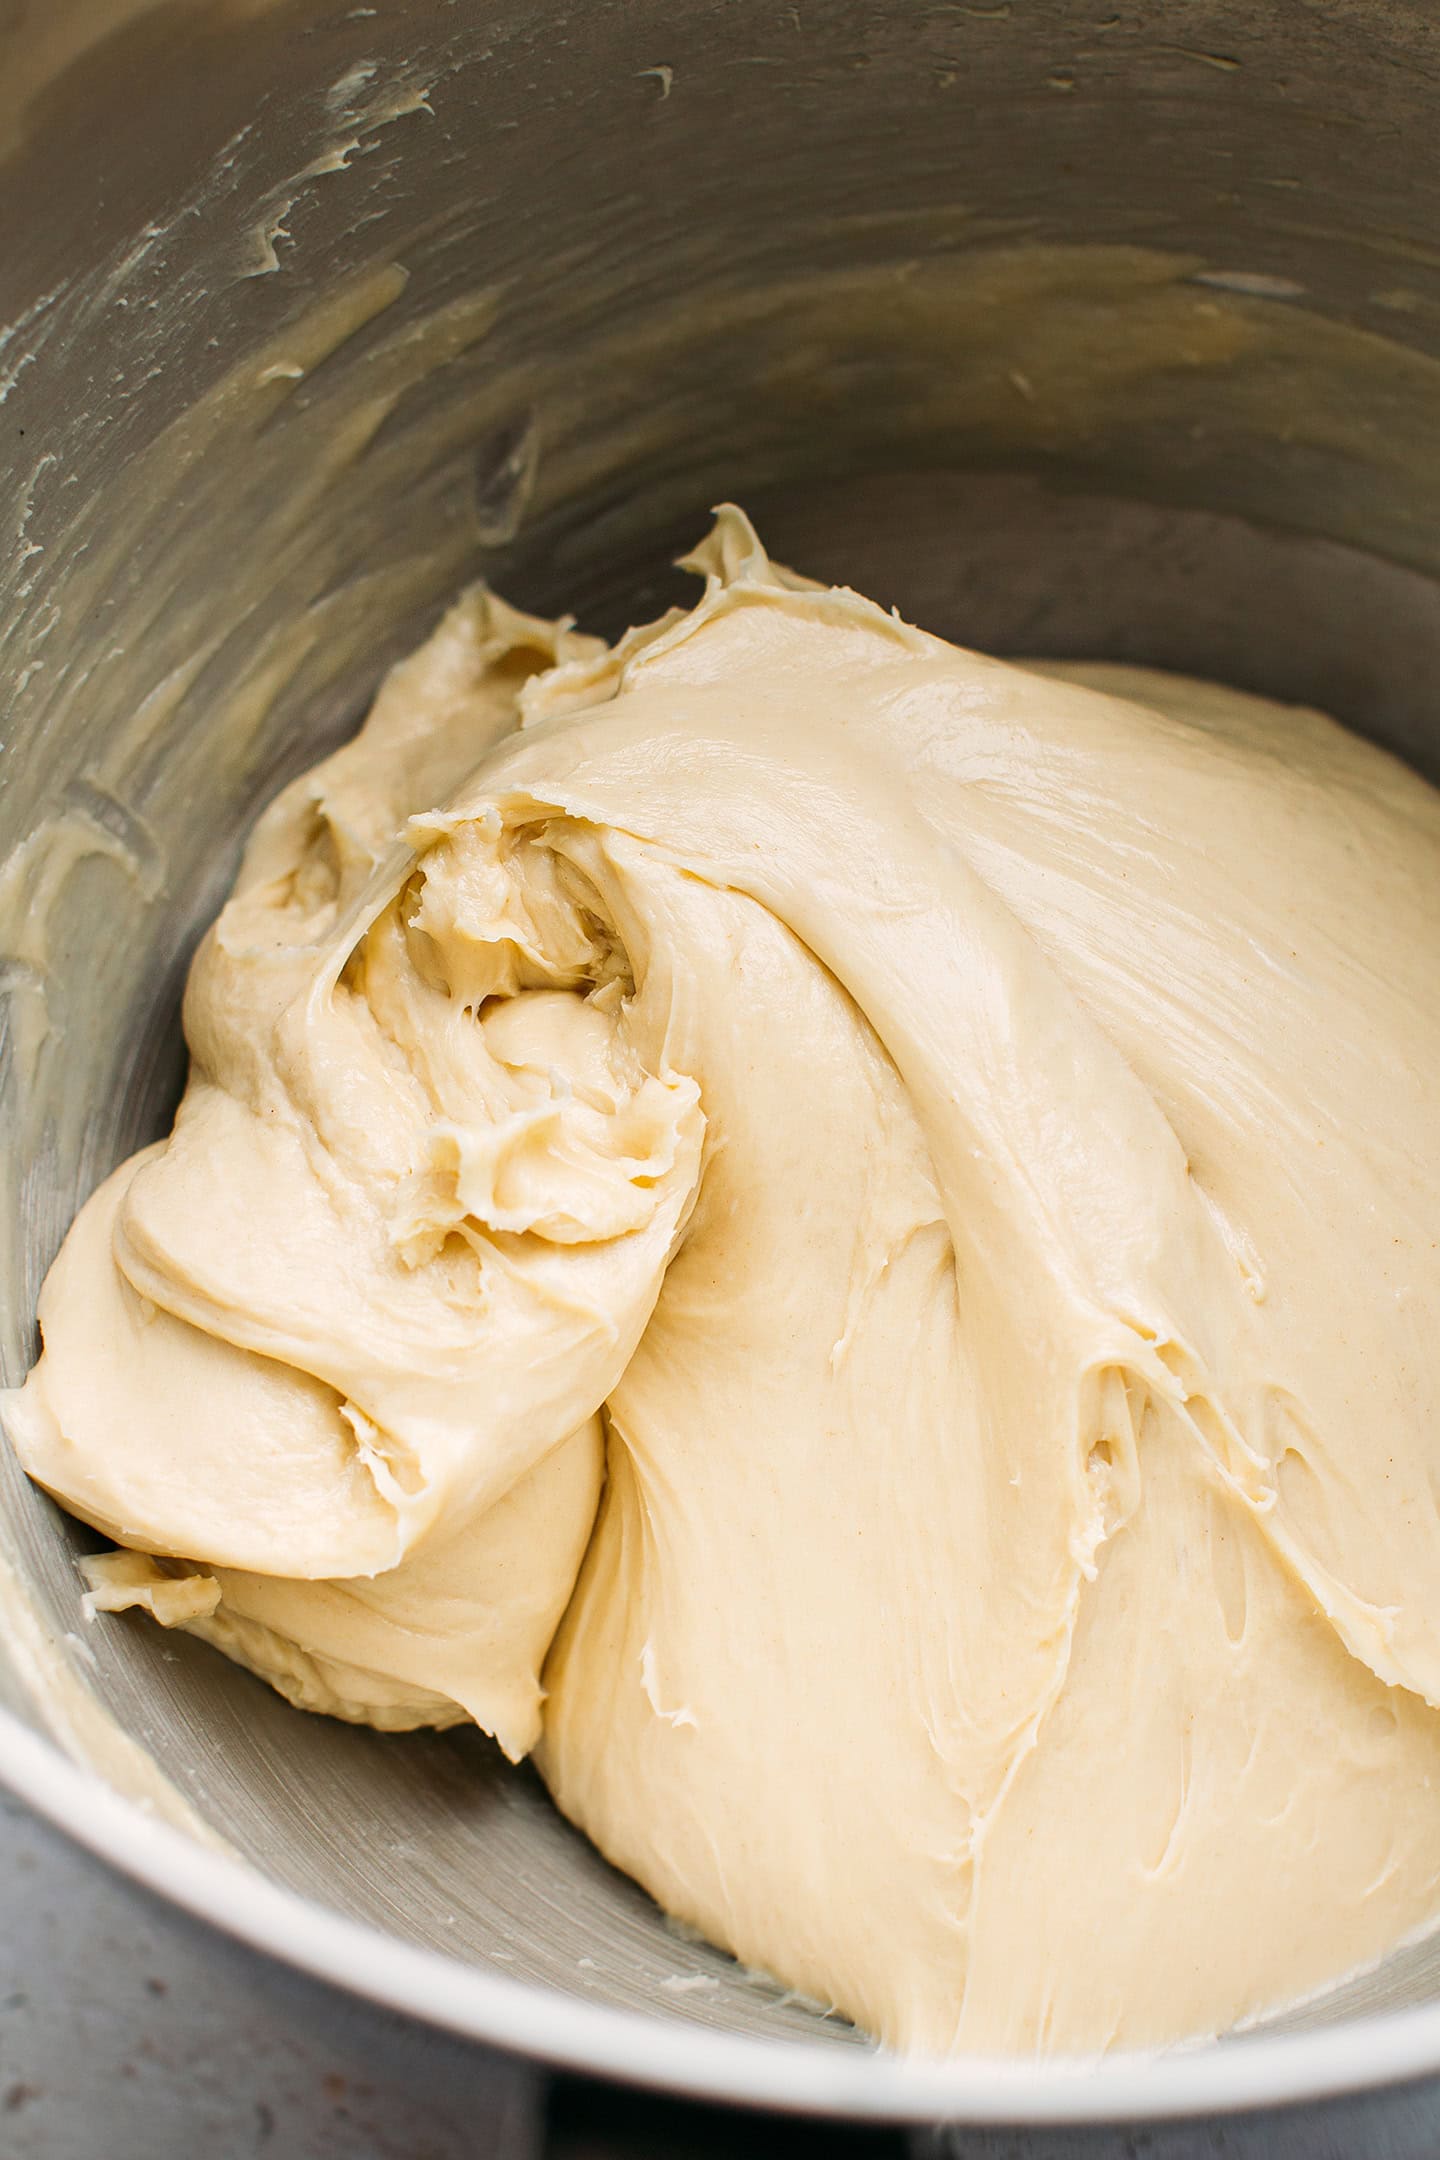
- Slowly add the butter. Once your dough has passed the windowpane test, it’s time to incorporate the butter. As the stand mixer runs on speed 4-5, slowly add the diced butter. I recommend adding just a few cubes of butter at a time and adding more once it is fully incorporated. It should take about 5 minutes for all of the butter to be fully incorporated into the dough.
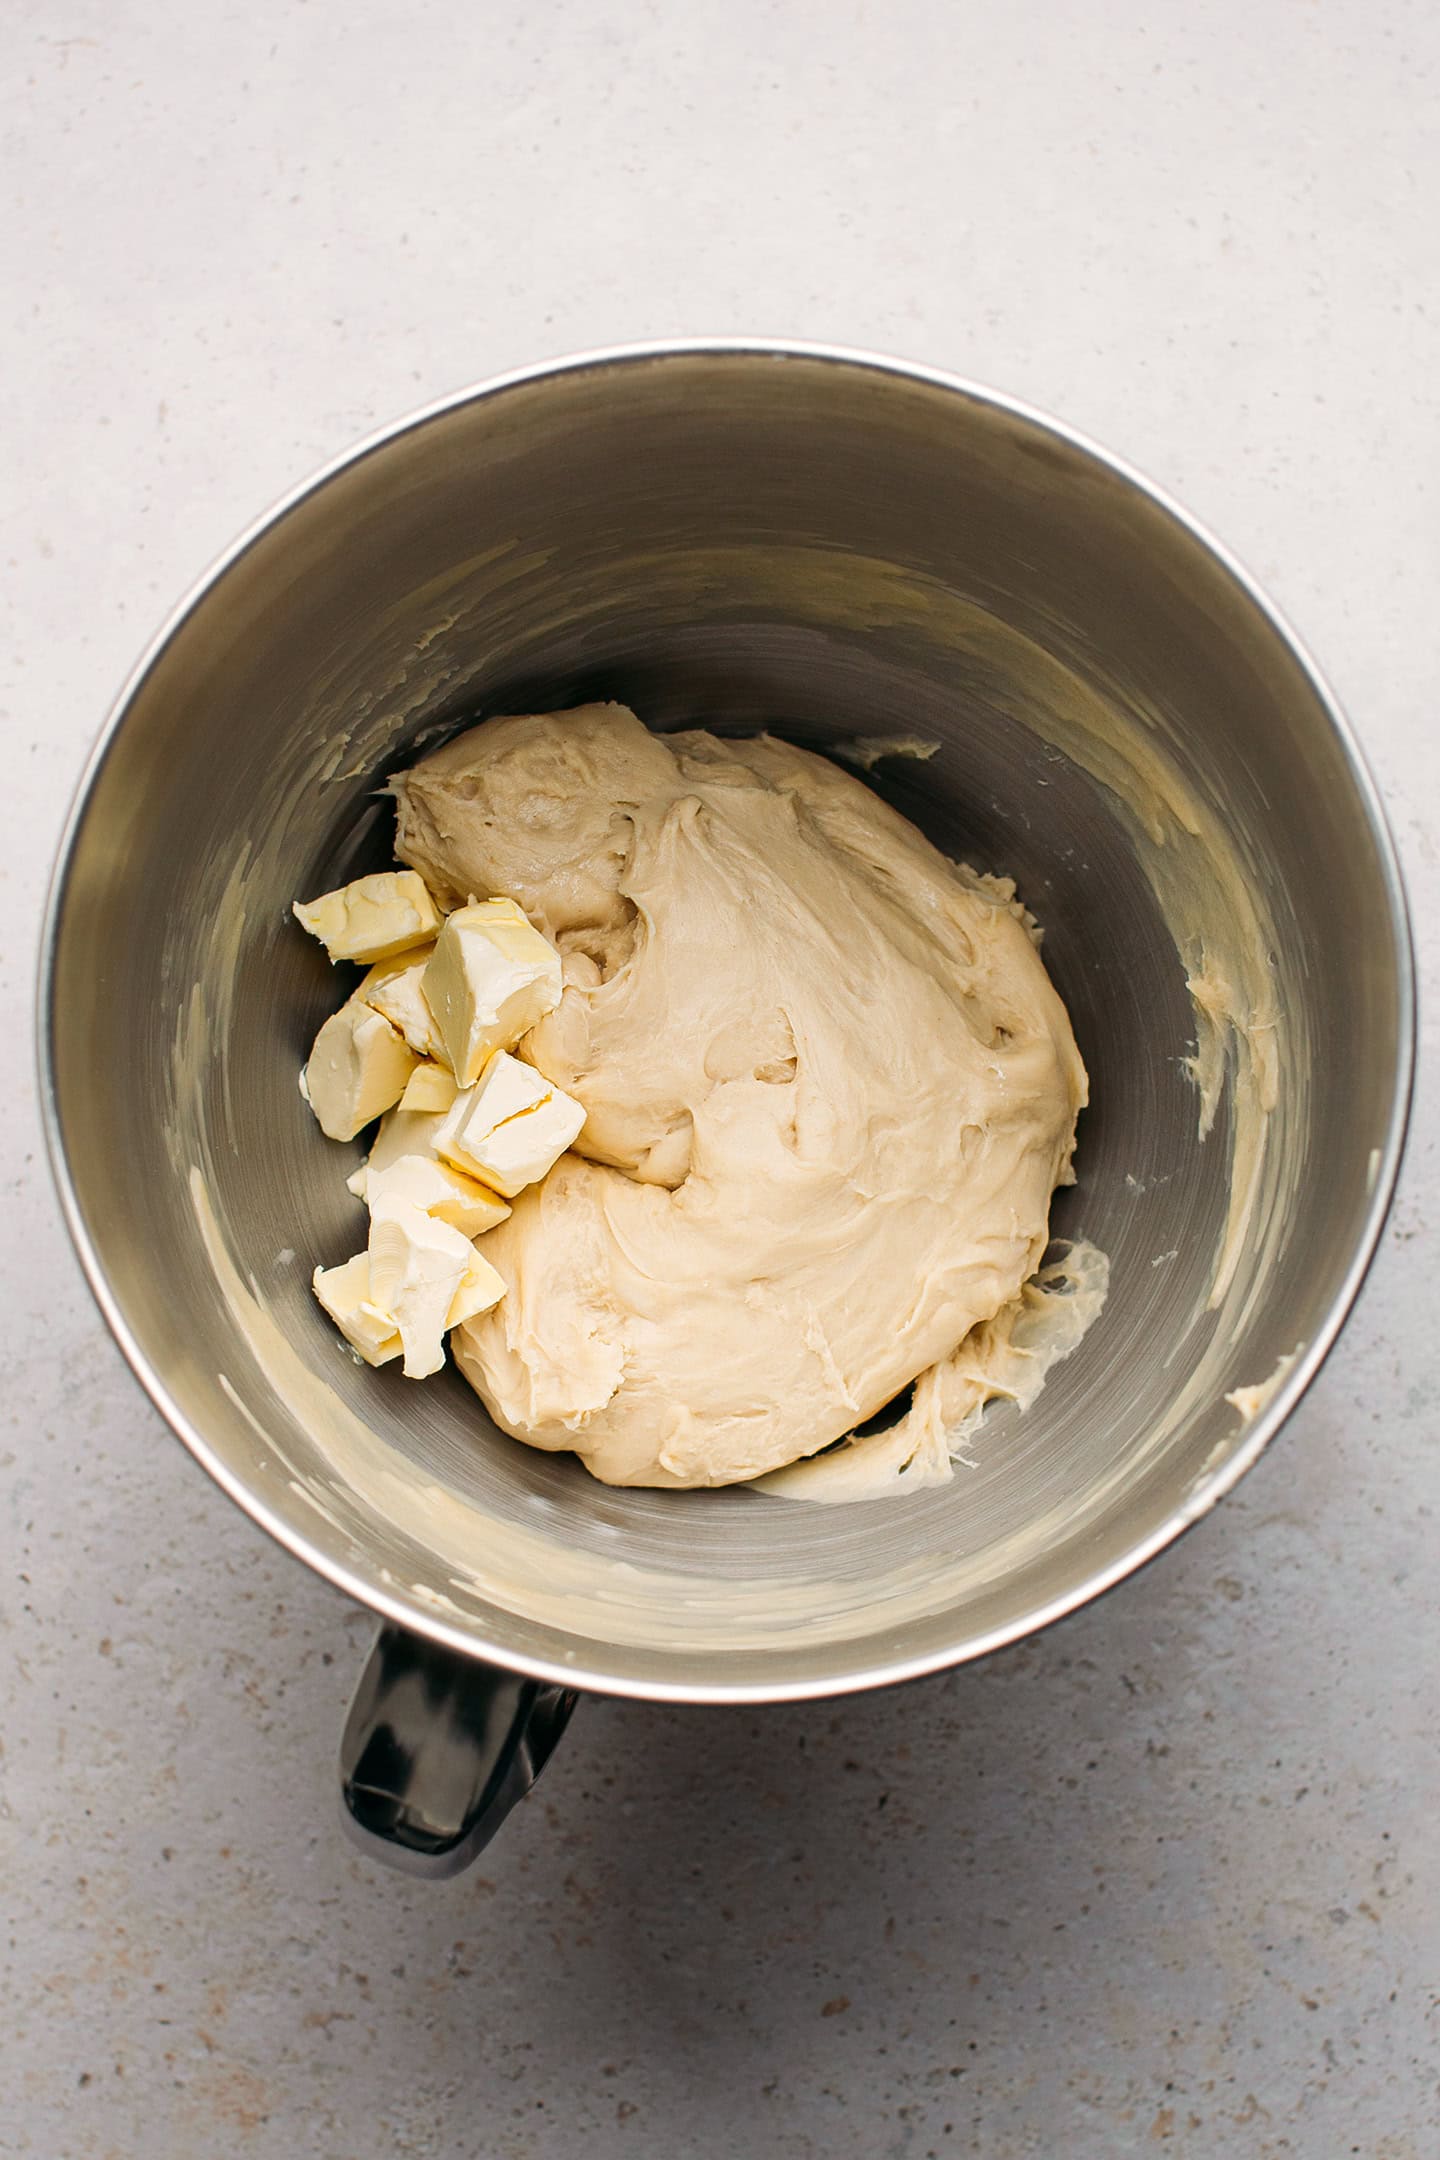
Dough consistency: At this point, the dough will be incredibly smooth and shiny. It’s also very soft and sticky. Again, do not add any more flour, the dough is supposed to have this consistency.
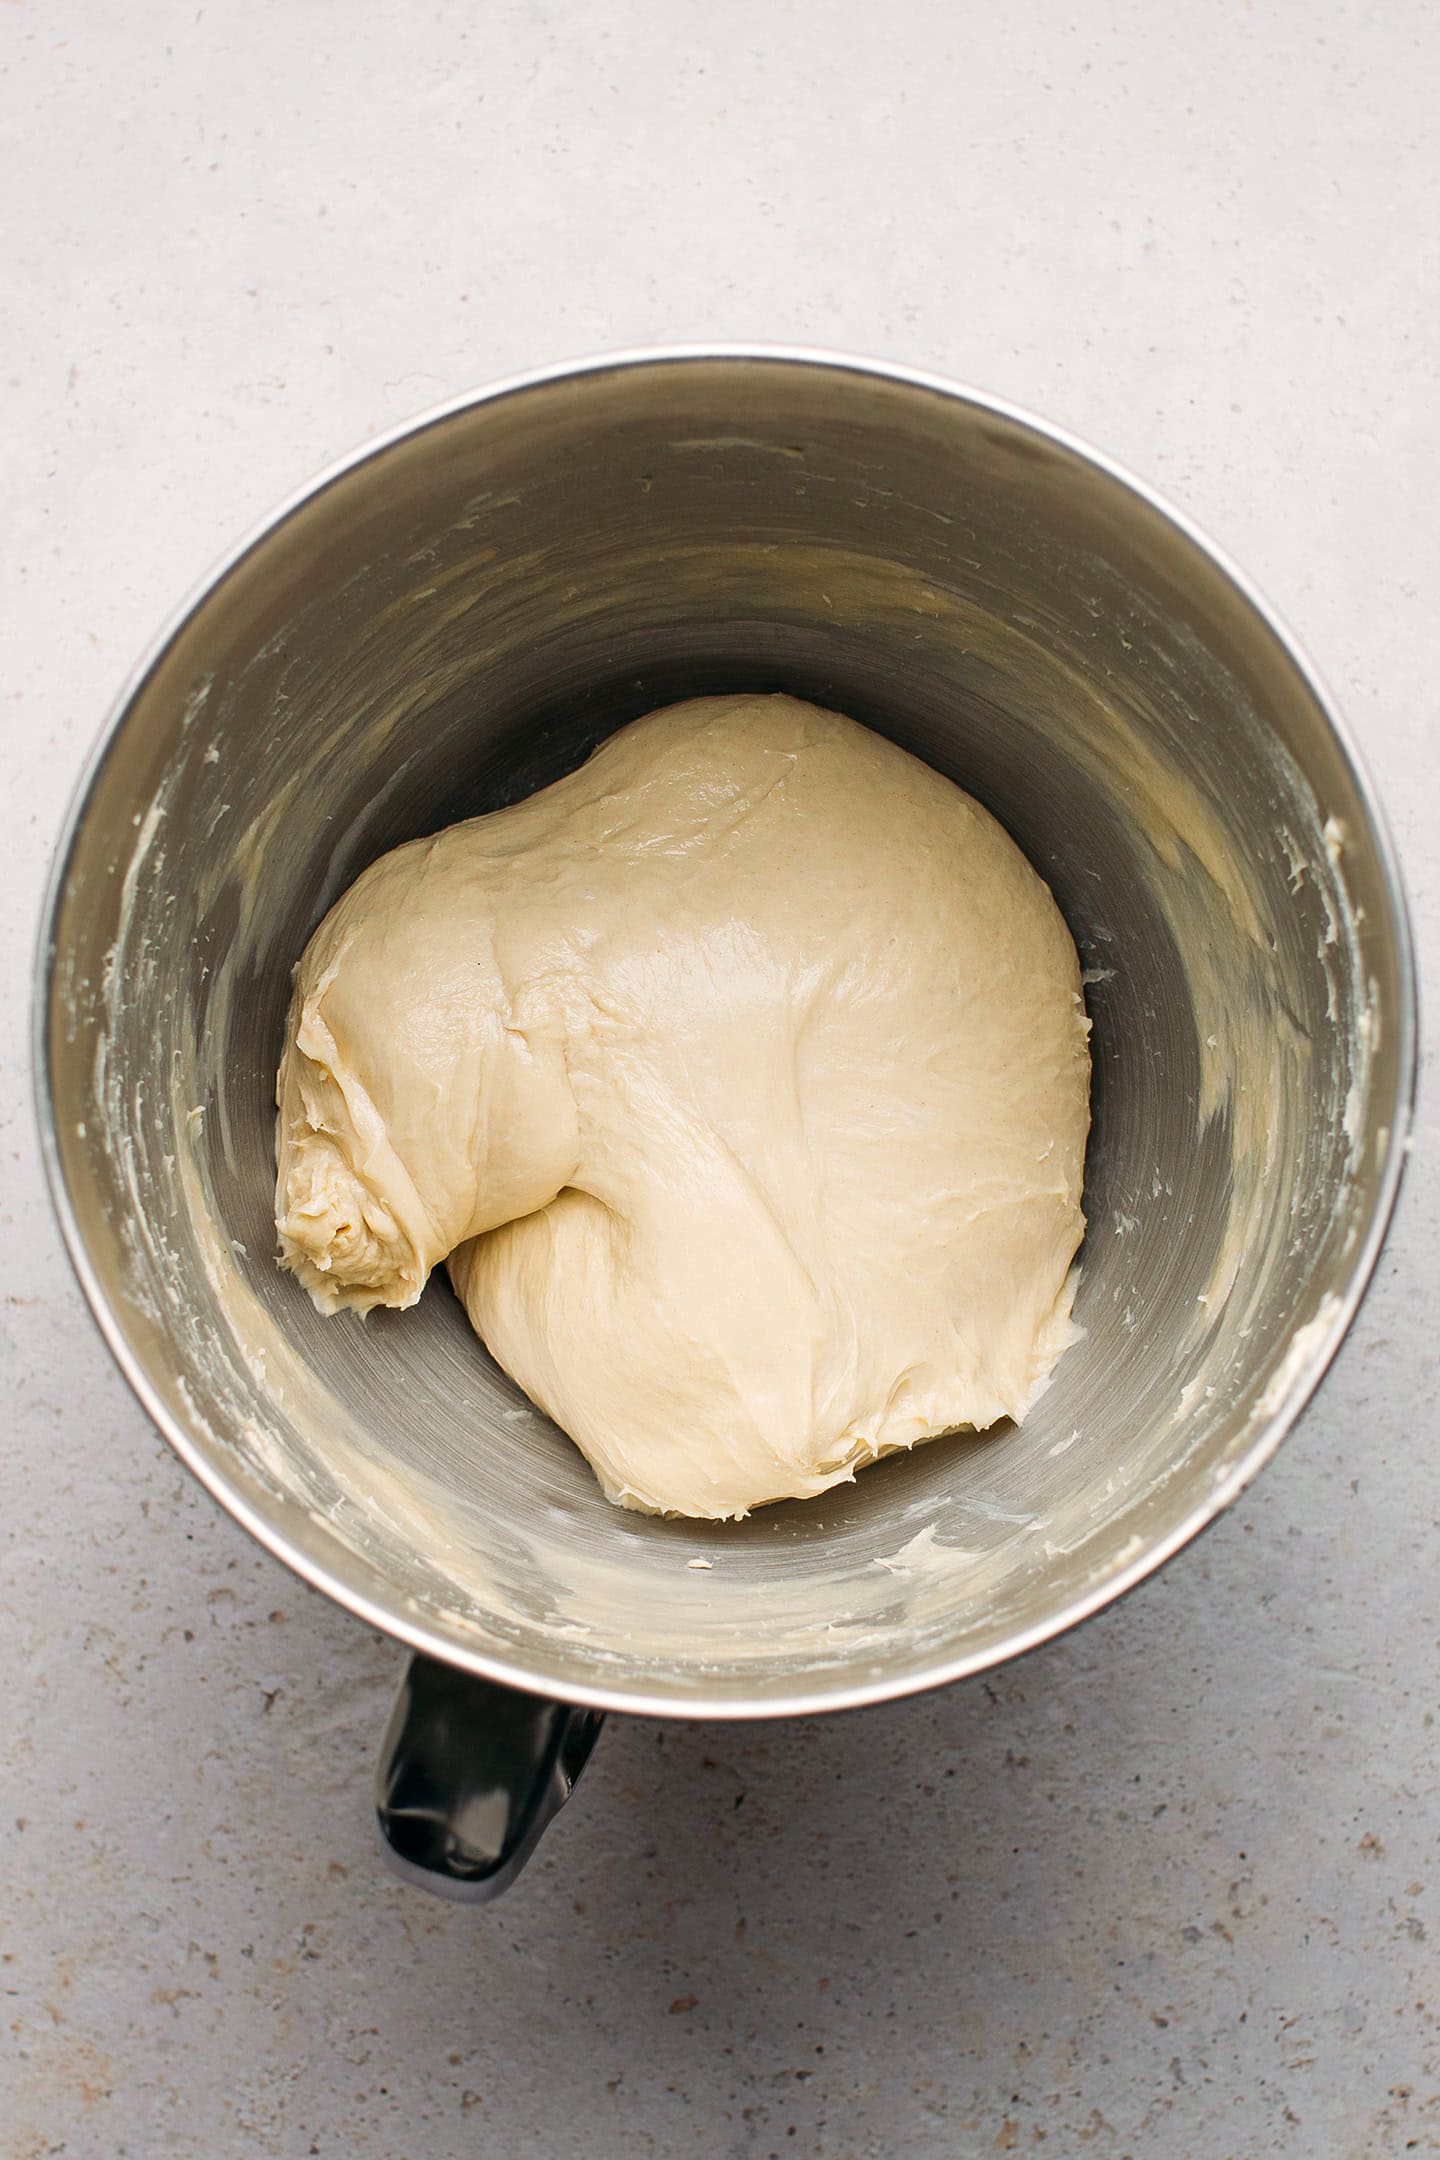
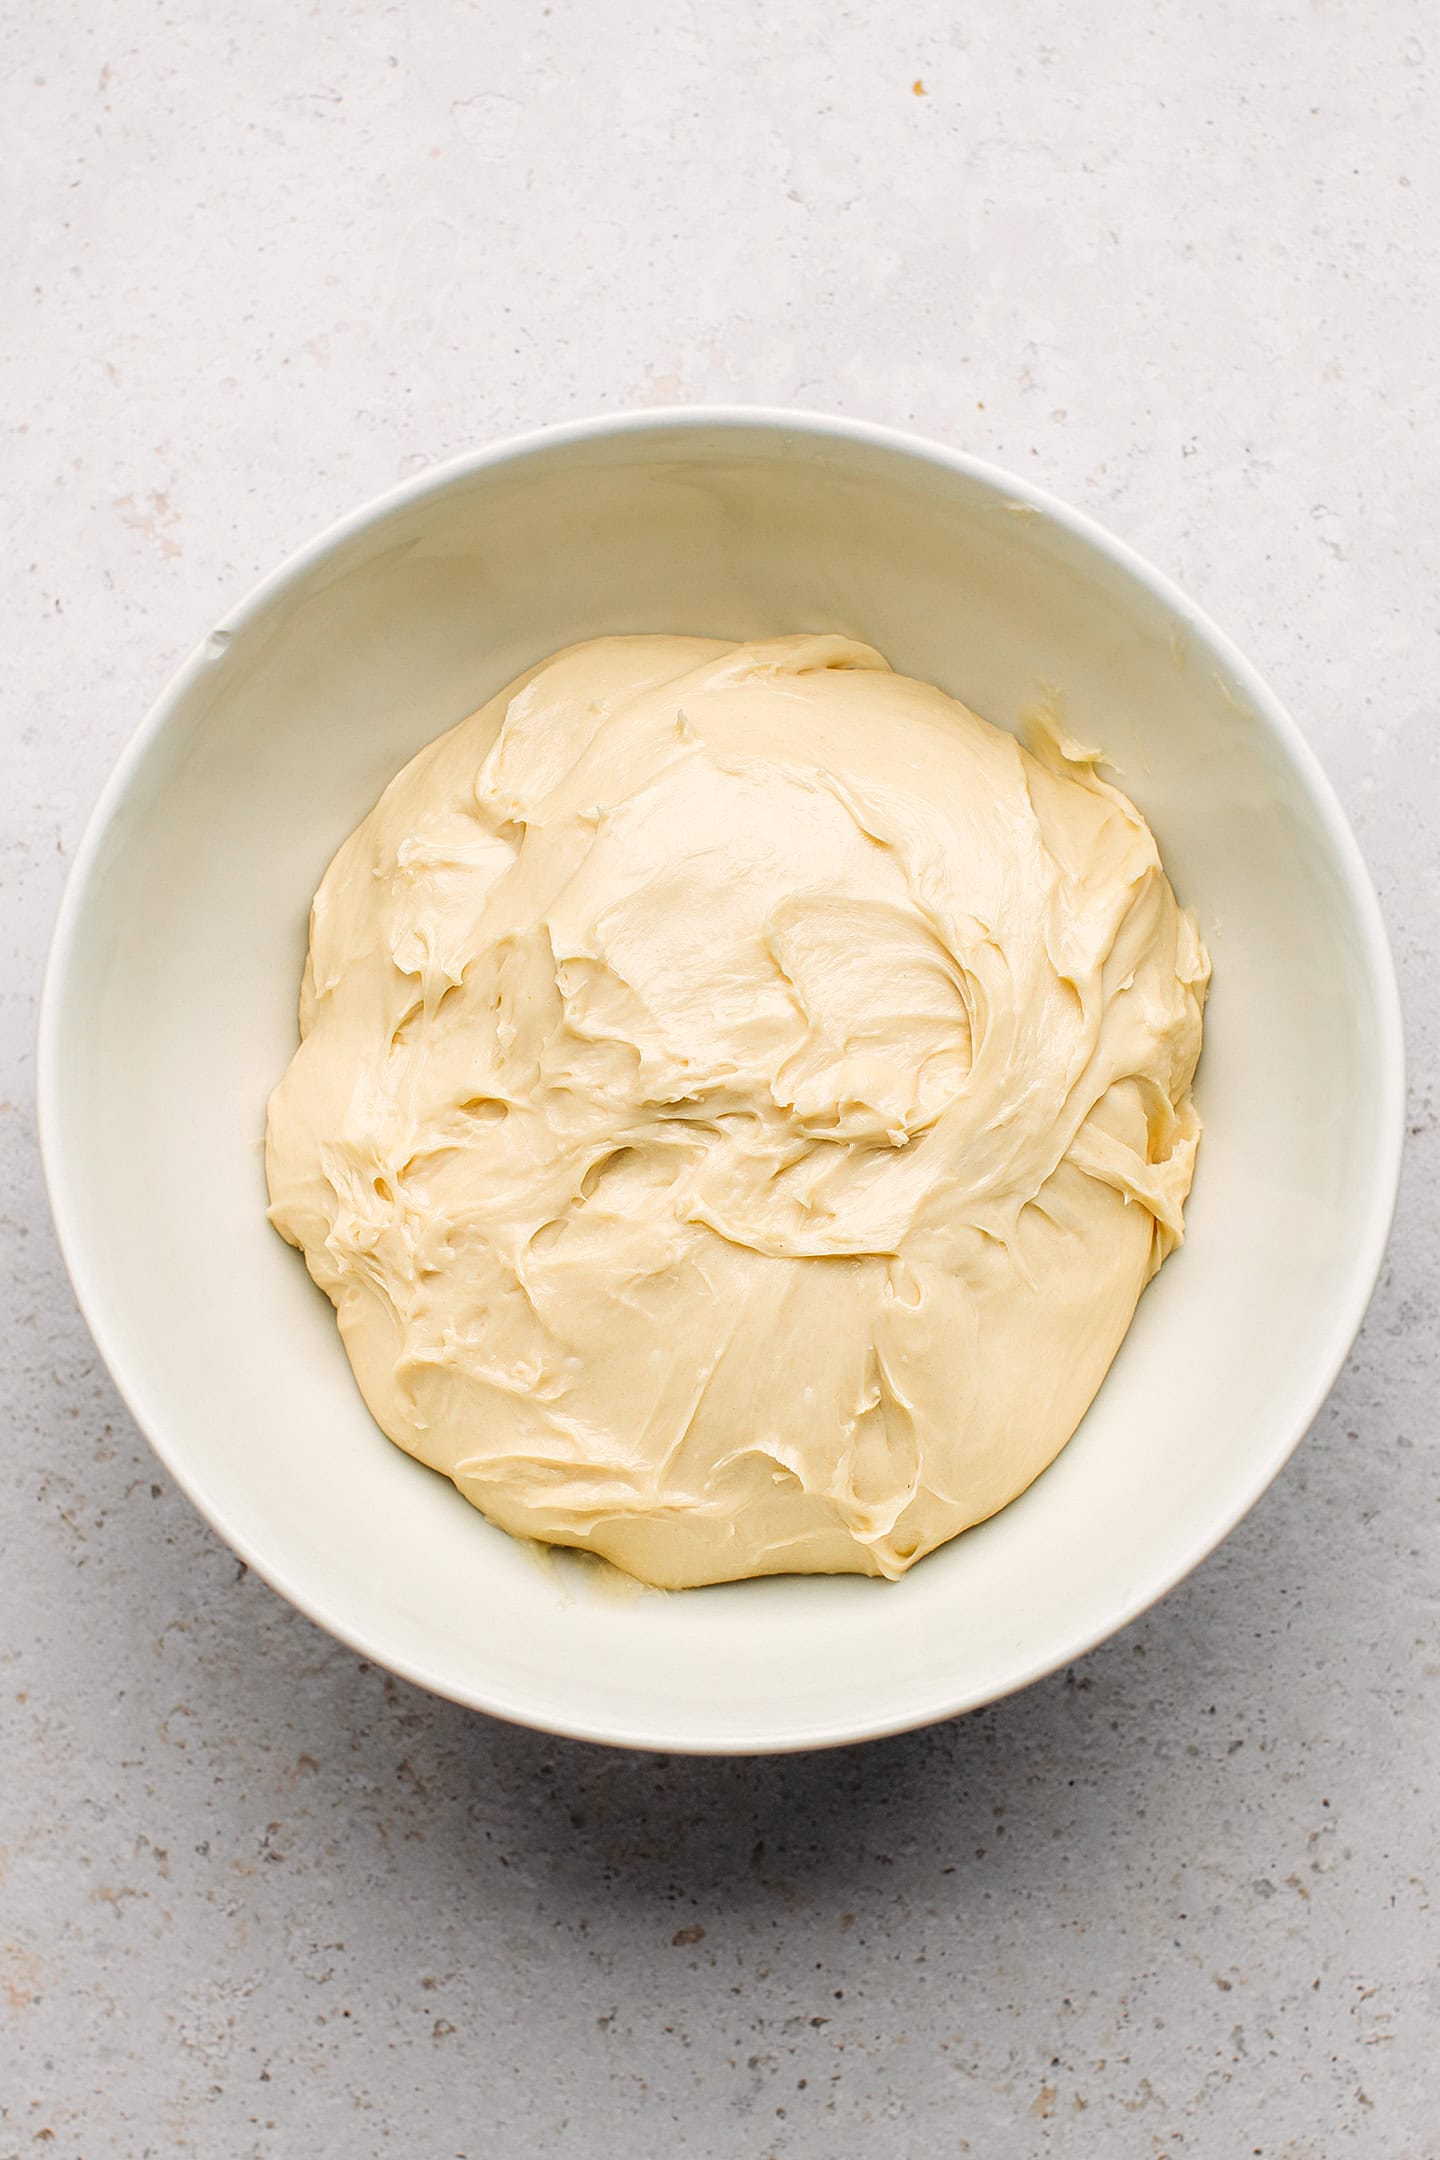
3. Let it rise
- First rise. Transfer the dough to a mixing bowl and cover it with plastic wrap touching the dough. This will prevent it from forming a crust. Let the dough rise in a warm place for about 45 minutes.
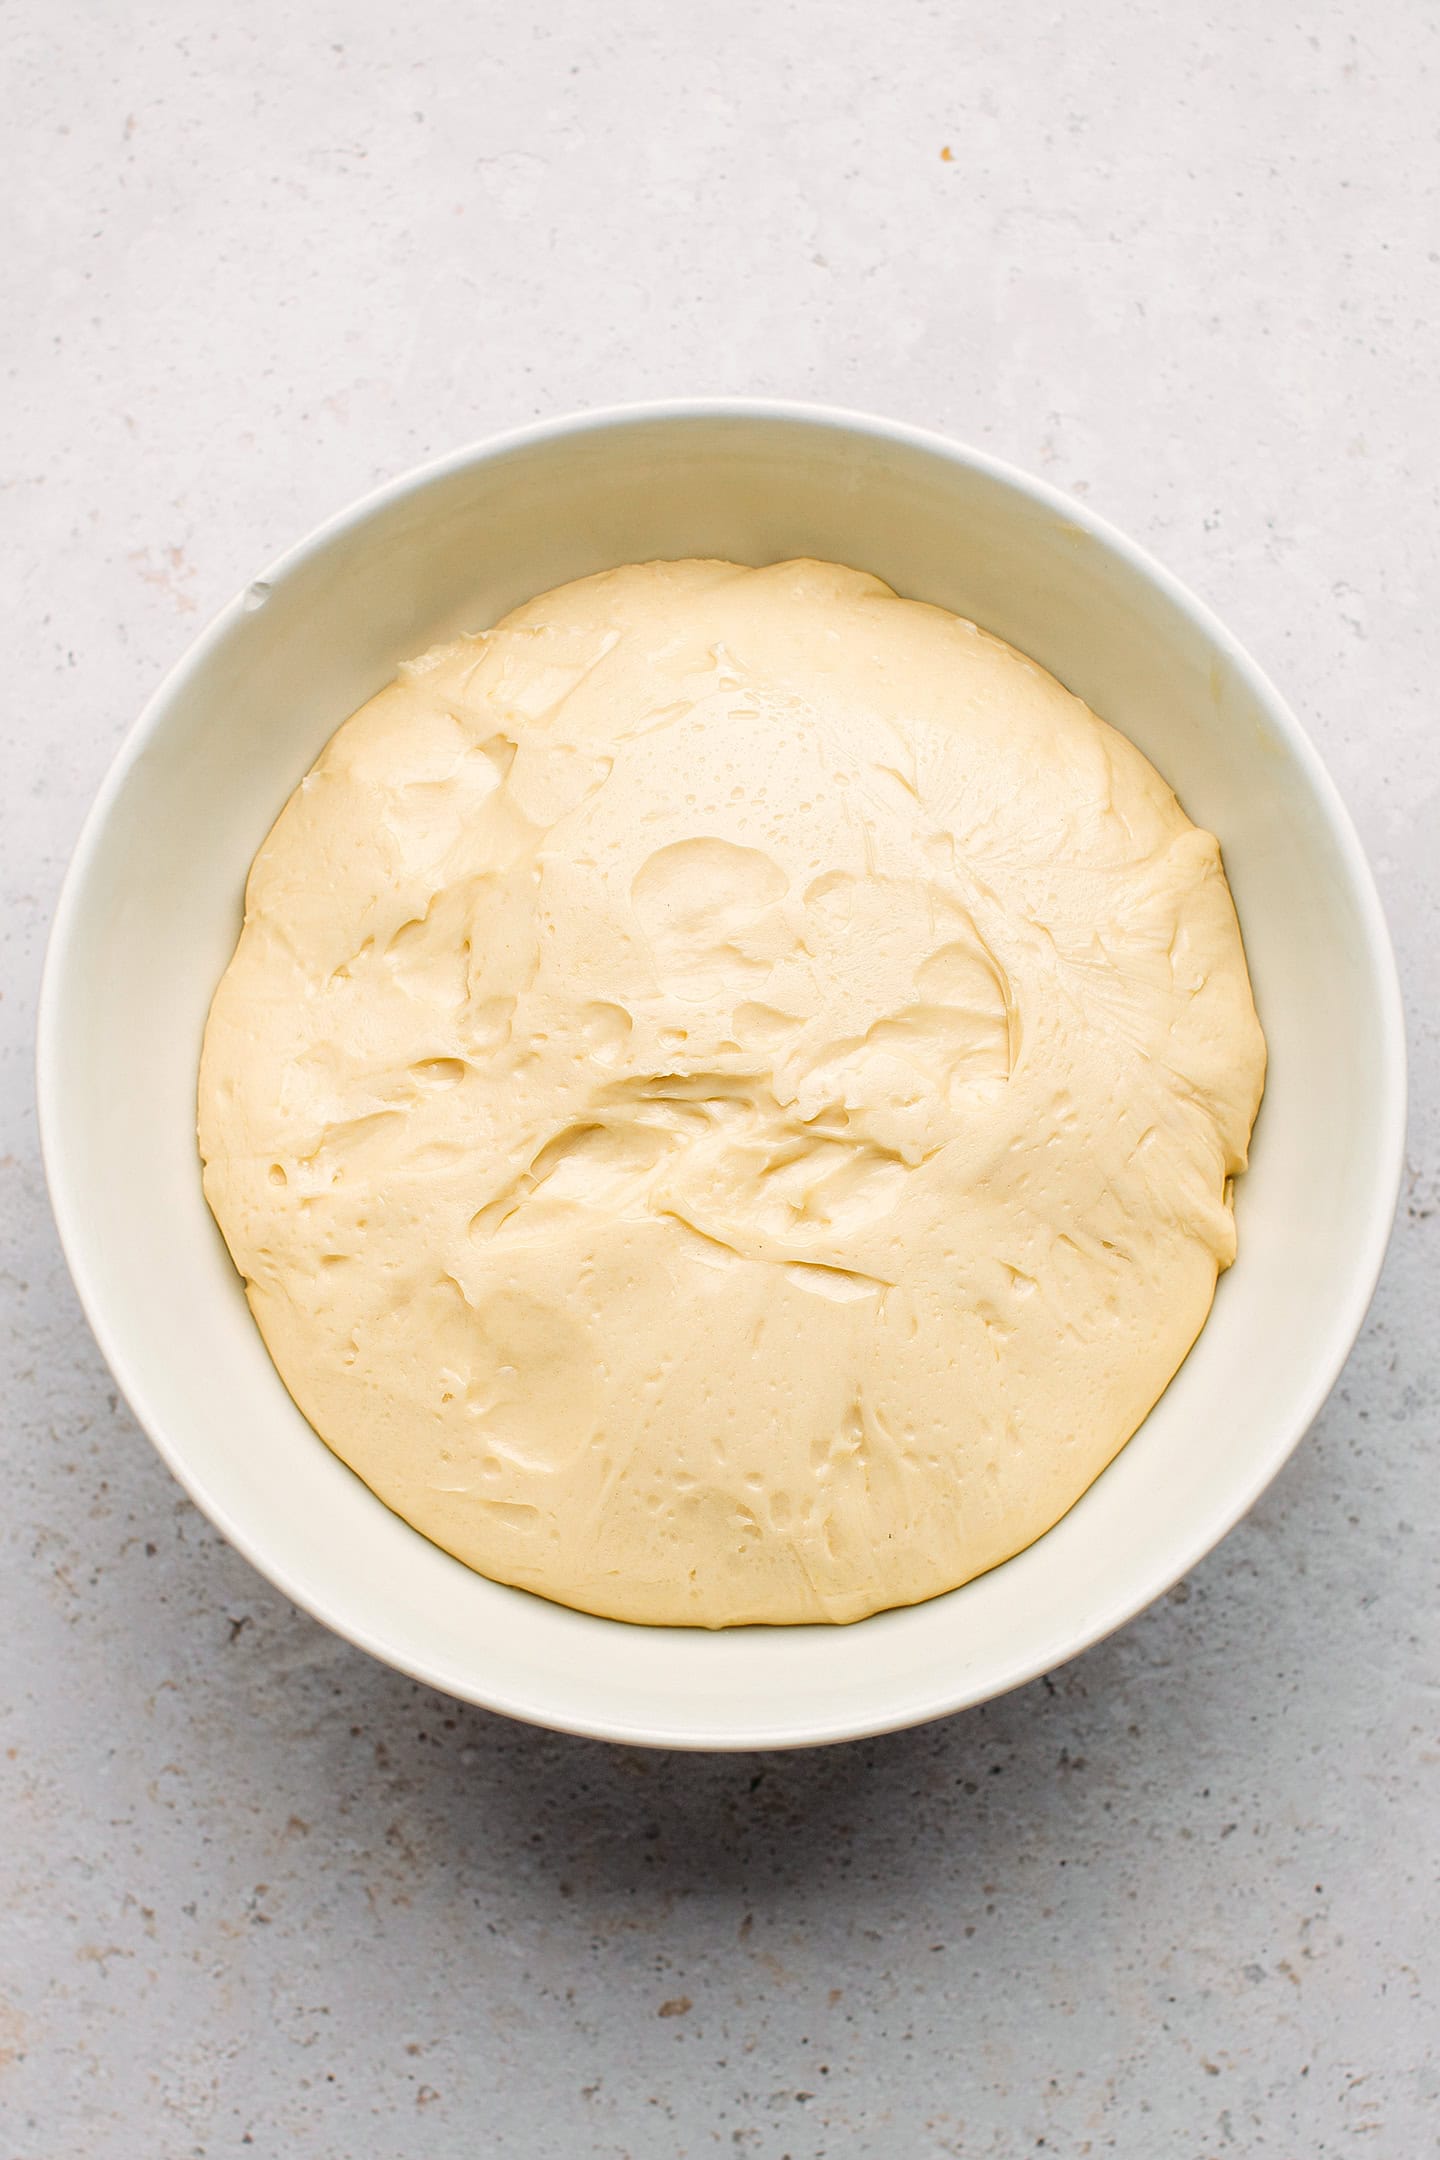
- Second rise. Next, punch the dough to deflate it and cover it with plastic wrap again. Allow it to rise slowly in the refrigerator for at least 4 hours, preferably overnight. This will allow the flour to absorb the butter, resulting in a better flavor.
4. Shape and bake
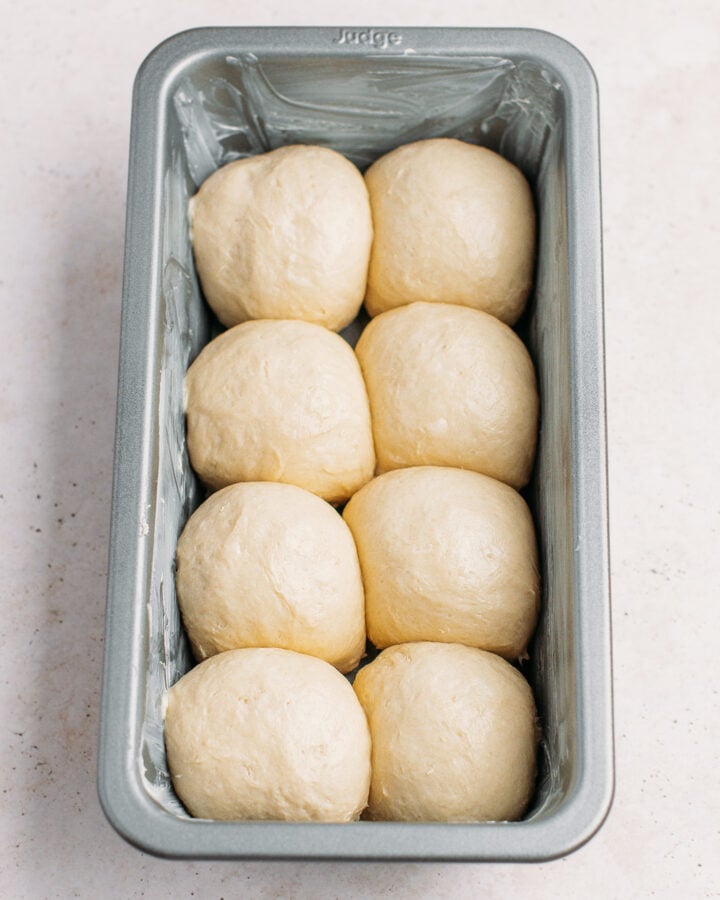
- Prepare a loaf pan. Lightly grease a 9×5-inch loaf pan with butter.
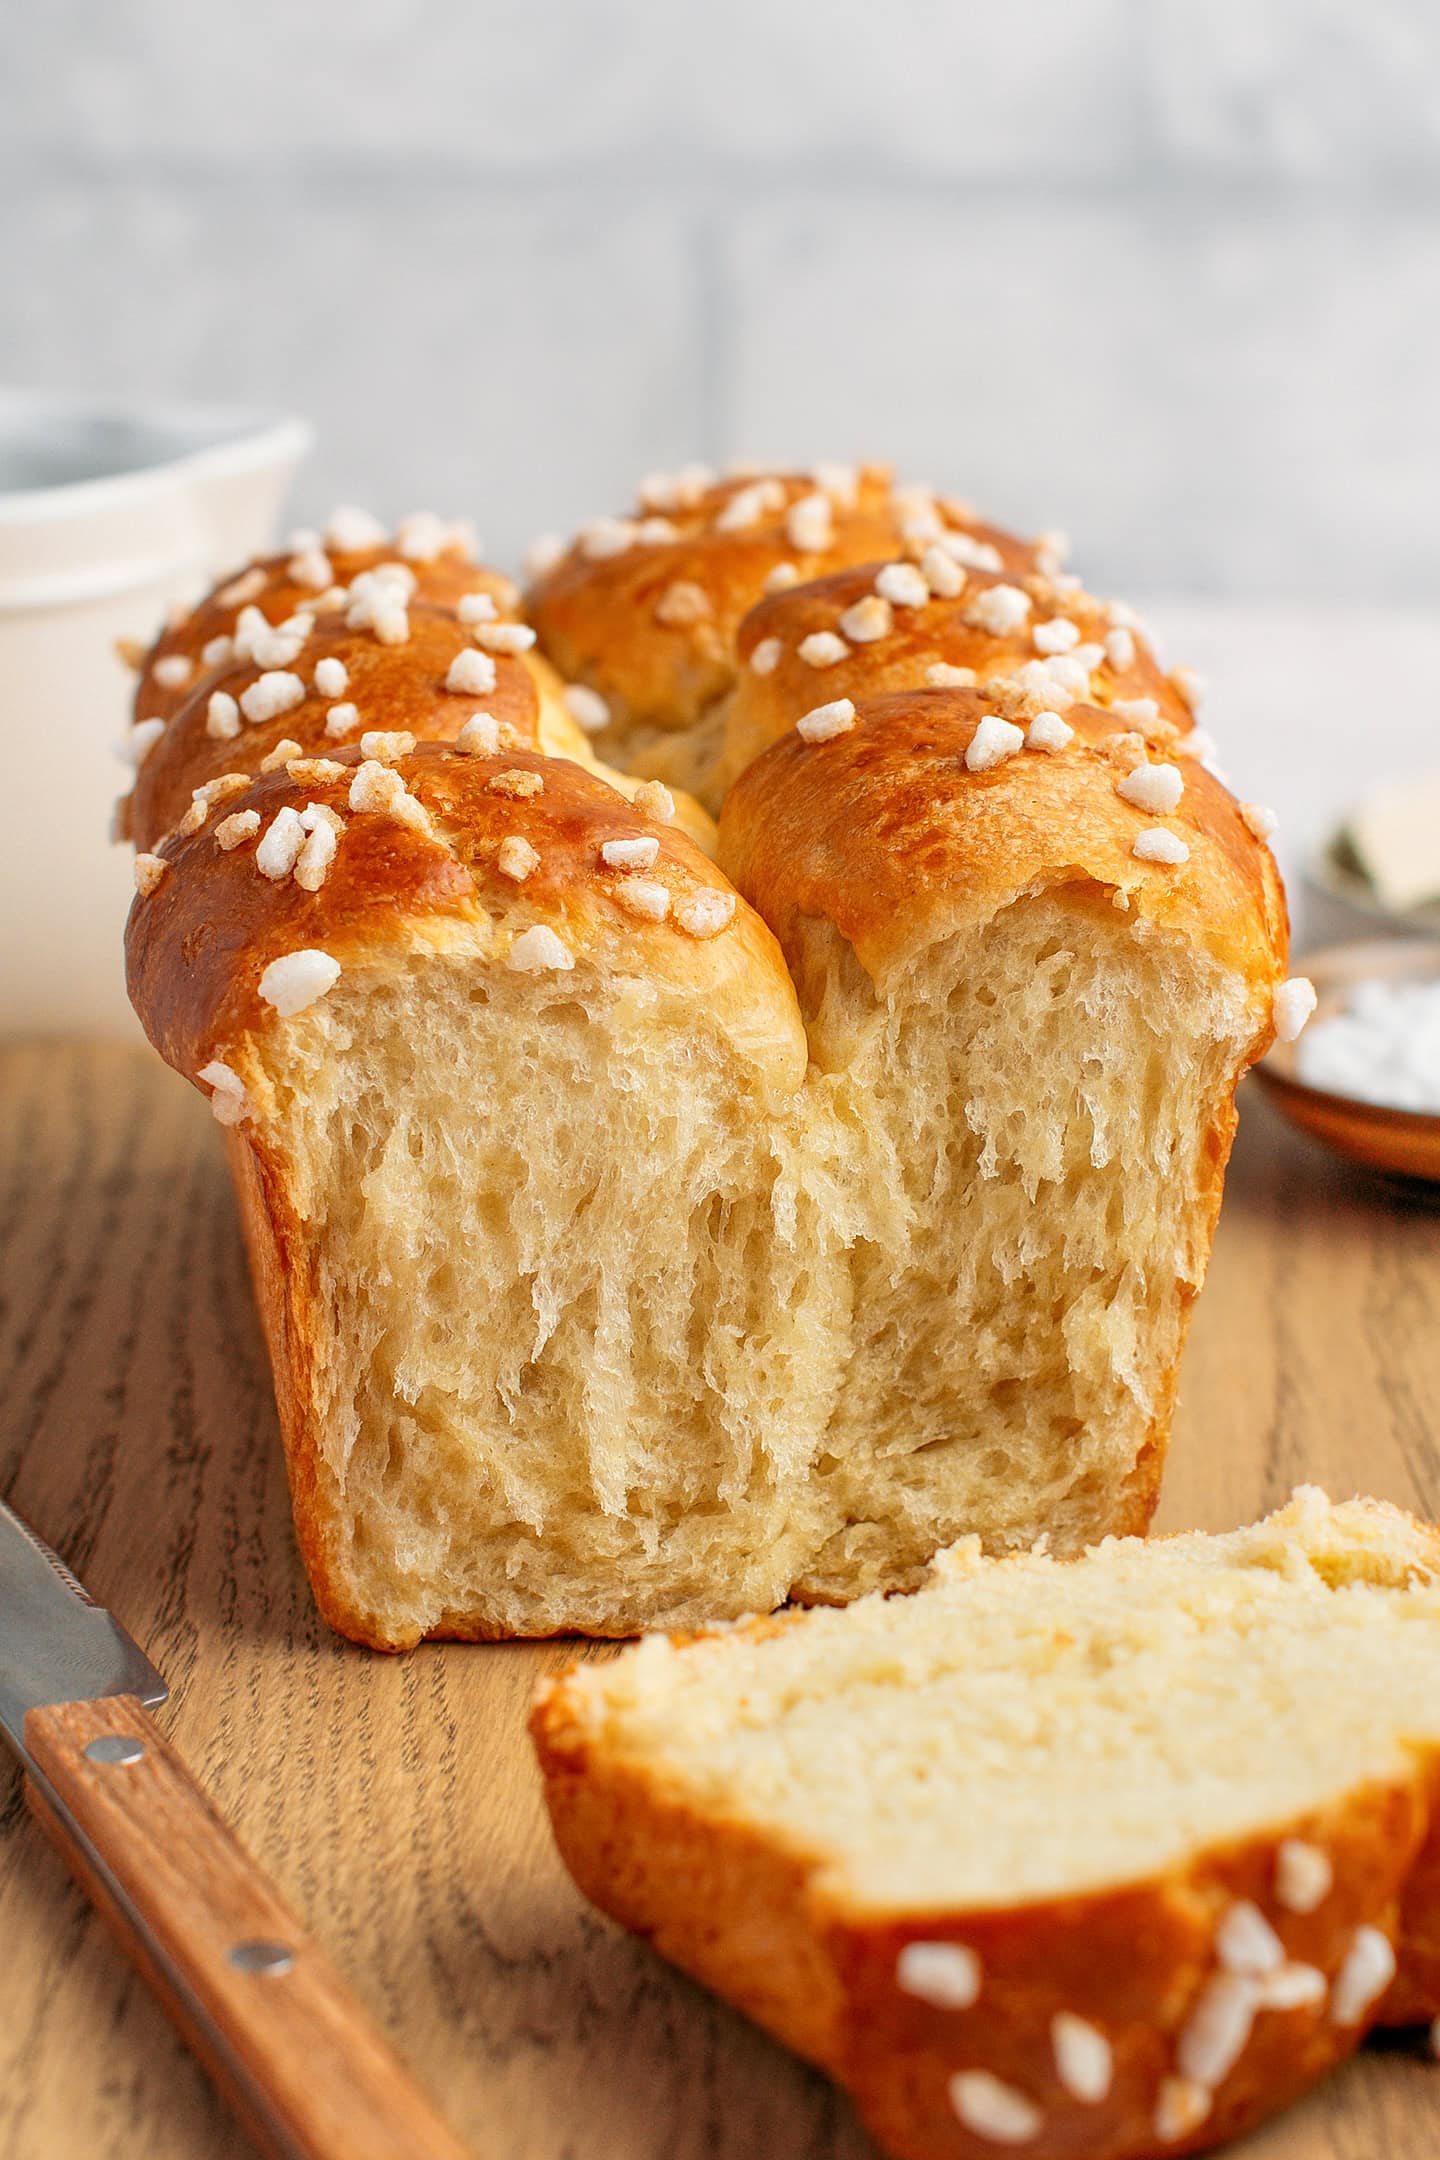
- Divide the dough. Remove the dough from the refrigerator and gently punch it to release the air. Divide it into 8 pieces of 3 ounces (85g). Note: You will have some leftover dough. You can use it to make small buns or individual brioche.
- Roll into balls. Working with one piece of dough at a time, roll it into a smooth ball on a lightly floured (or oiled) work surface.
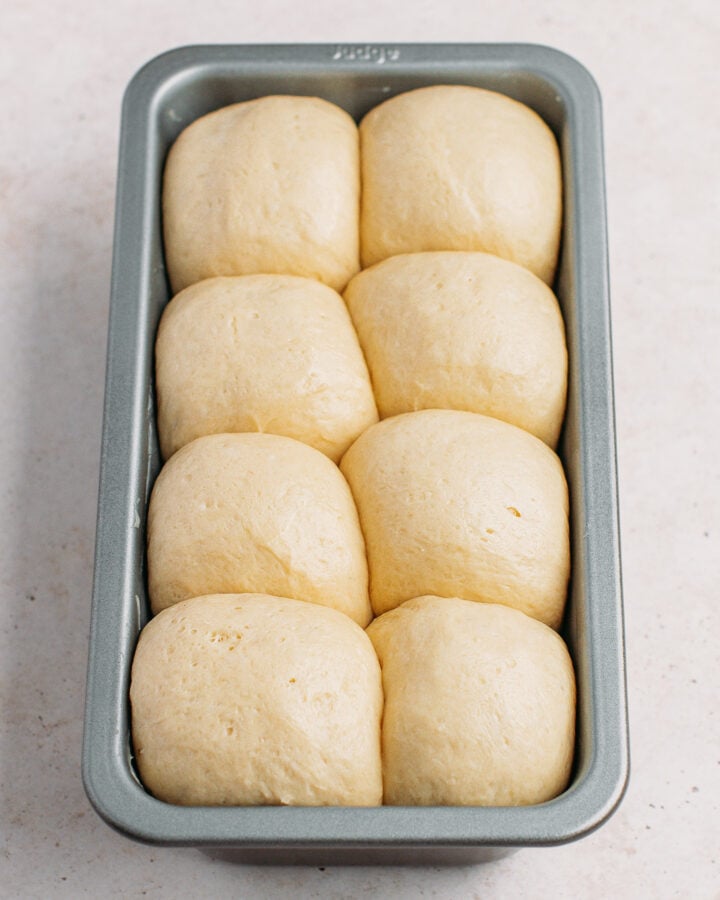
- Transfer to a loaf pan. Transfer each ball of dough to the prepared loaf pan and arrange them in four rows of two.
- Let it rise. Cover the pan with plastic wrap and let the dough rise in a warm spot for 90-120 minutes, or until it has risen almost to the top of the pan.
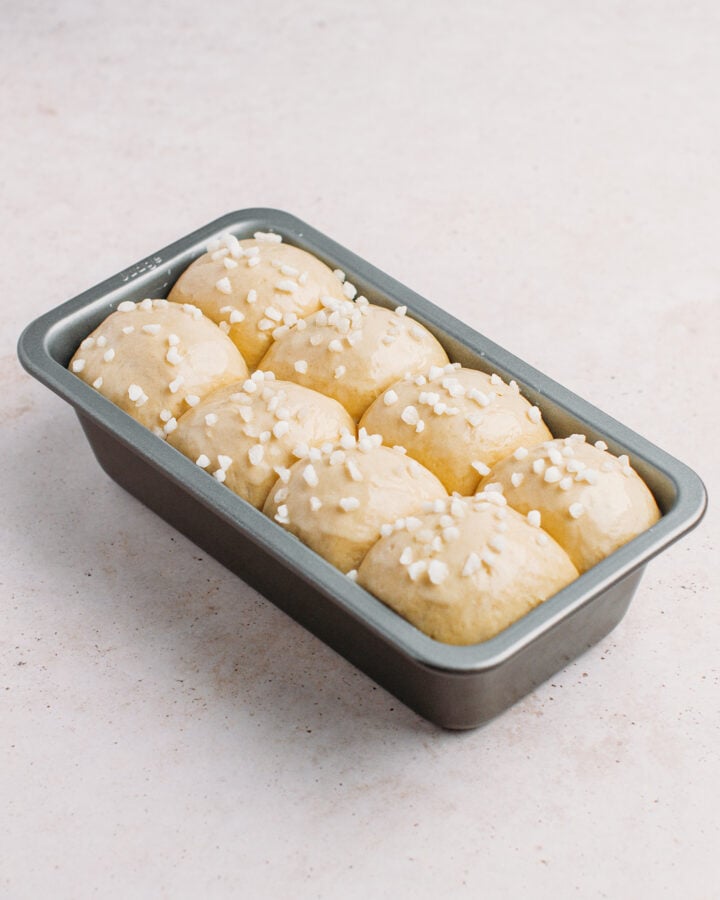
- Make the “egg wash”. In a small bowl, mix together 1 teaspoon of maple syrup with 1 tablespoon of plant-based milk. Set aside.
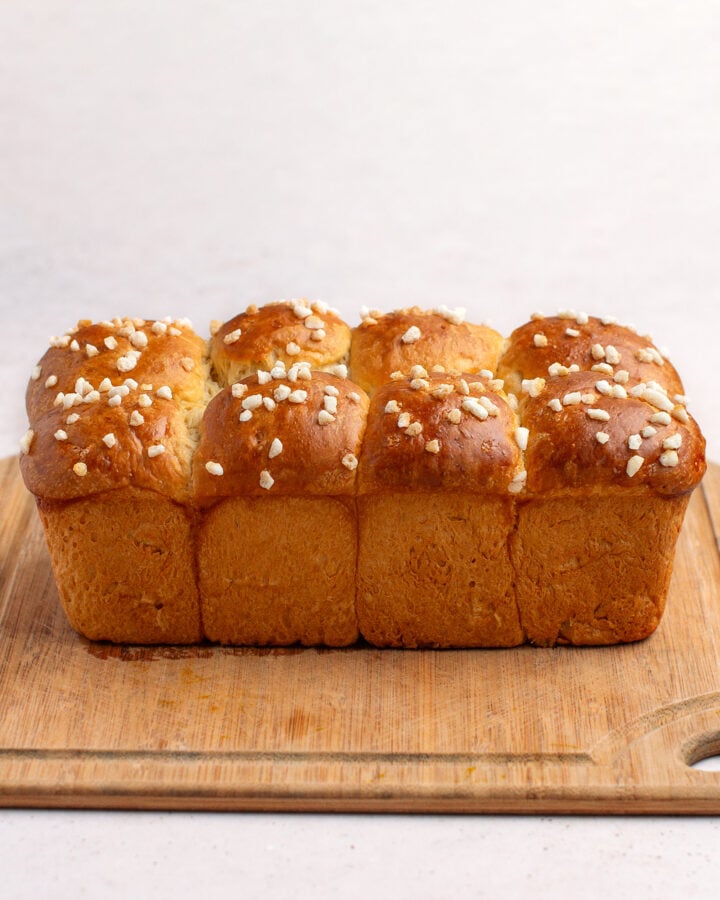
- Bake. Finally, brush the brioche with the vegan “egg wash” and bake for about 30 minutes or until the top of the brioche is golden brown.
📔 Tips
Use the metric measurements.
I am sharing the amounts for each ingredient in grams for more accuracy. I highly advise against trying to convert this recipe into cups, as you won’t get consistent results.
Stay near the stand mixer.
Since the stand mixer will be running for 20-25 minutes, you may want to do something else and leave it alone. Wrong, stand nearby! With that kind of speed, the stand mixer tends to move on the kitchen counter and could easily fall if you don’t readjust its position from time to time.
Do not overproof.
Keep an eye on the dough during the third rise, which occurs once it is placed inside the pan. Once the dough has risen to about 1 inch below the top of the pan, it’s ready to be baked. Allowing it to rise beyond this point won’t result in a better texture. In fact, it may result in a less pillowy crumb.
Knead long enough.
The dough should pass the window pane test BEFORE incorporating the butter. Kneading the dough for a long period of time is essential to developing a fibrous/stringy texture.
Do not reduce the amount of butter.
I advise against reducing the amount of butter. Brioche is supposed to be very buttery, and that’s the secret to its incredible mouthfeel.
Do not rush the process.
Please, do not try to shorten some steps. Making brioche is not complicated but it takes time and care. I promise the result is completely worth it!
Remove the brioche from the pan after 10 minutes.
To prevent the bottom of your brioche from getting soggy, do not leave the brioche inside the pan too long. I recommend carefully transferring it to a cooling rack 10-15 minutes after baking.
🍫 Variations
Looking for ways to customize this brioche to your liking? Here are a few ideas:
- Chocolate chip: Stir in about 3/4 cup of dark chocolate chips before the final rise for a delicious chocolate chip brioche.
- Cinnamon raisin: Flavor the dough with 1/2 teaspoon of ground cinnamon (add it at the same time as the flour). Then, incorporate 1 cup of raisins into the dough before the final rise. Note: instead of shaping the dough into balls, roll out each ball into a rectangle, sprinkle the raisins evenly over the surface, and then roll it up into a log. This will help incorporate the raisins more evenly.
- Pearl sugar: Top the dough with pearl sugar just before baking.
🥛 What to Serve It With
You can serve this brioche with jam, vegan Nutella, or your favorite spread. It’s also delicious dipped in coffee or milk. You can even use thick slices of brioche to make the most buttery French toast! Looking to upgrade your sandwich game? Use slightly toasted brioche instead of sandwich bread!
❄️ Storing
- To store: Transfer the brioche to a large freezer bag and close it with a twist-tie. The brioche will stay soft for up to 7 days at room temperature.
Make It Warm & Soft!
If your brioche begins to lose its soft, buttery goodness after a few days, don’t worry! I’ve got a little secret to revive it!
Reheat the brioche. Preheat your oven or air fryer to 350°F (175°C). Wrap a slice of brioche in aluminum wrap and reheat it for 5-7 minutes in the oven or air fryer. Your brioche will be super tender again with slightly crispy edges. Oh, and a bonus point: your house will smell like a small bakery!
💬 FAQ
Yes! It’s completely normal for the dough to be very soft and sticky. A dough with a higher hydration yields a softer, fluffier crumb. Do not try to add more flour.
During the first rise, the dough will only expand by about 50%. This is normal. During the second rise in the refrigerator, it will almost double in volume.
I have tried flattening the balls of dough and rolling them into a log before baking. I didn’t see any difference in the final texture compared to simply shaping the dough into balls. The stringy and cottony texture really comes from the kneading process.
I do not recommend kneading the dough by hand, as it would take forever for it to develop the same texture as with a stand mixer.

I hope you will love my vegan brioche recipe! It’s so buttery, flaky, and tender that it’s hard to believe it doesn’t contain any egg. The best part is that it stays soft for several days, meaning you can enjoy it throughout the week as a breakfast, snack, or dessert!
🇫🇷 More French-Inspired Sweets


⭐️ Did you like this recipe? Let us know in the comments below, and tag us on Facebook, Instagram, or Pinterest!
Save this recipe!
Enter your email below and I’ll send it to your inbox!
Plus, you will receive new recipes every week!
The Best Vegan Brioche
Equipment


Ingredients
Yudane
- 100 g bread flour
- 100 g boiling water
Dough
- 100 ml unsweetened plant-based milk
- 30 ml orange blossom water
- 15 ml vanilla extract
- 2.5 g instant yeast
- 320 g bread flour
- 60 g sugar
- 1/16 tsp vitamin C (from a crush vitamin C tablet, optional)
- 6 g salt
- 170 g vegan butter diced and softened
Instructions
Yudane
- Mix the water with the flour. Start by adding the flour to a mixing bowl. Next, bring the water to a boil and pour it into the bowl containing the flour. Using a wooden spoon, mix the flour with the water until it forms a thick paste.
- Cover and refrigerate. Cover with plastic wrap and refrigerate for at least 5 hours, preferably overnight.
Dough
- Once the Yudane has rested long enough, you can prepare the brioche dough.
- Add the wet ingredients to a stand mixer. To the bowl of a stand mixer, add the plant-based milk, orange blossom water, and vanilla extract.
- Add the dry ingredients. Then, add the instant yeast, bread flour, sugar, vitamin C powder, and Yudane. Note: Do not add the salt yet as it could kill the yeast. We will add the salt a bit later.
- Knead on low speed. Using the dough hook attachment, knead the dough on speed 2 for 5-7 minutes. At this point, the dough will still have a slightly grainy texture.
- Knead on medium speed. Add the salt and knead on speed 4-5 for about 20 minutes or until the dough passes the windowpane test. The dough should be very smooth and stretchy. Do not add more flour, the dough is supposed to be soft and sticky.
- How to do the windowpane test: Take a small ball of dough, flatten it, and stretch it into a rectangle between your hands. As you stretch it, the dough should become very thin, almost see-through, and should not break easily. That means the gluten network is strong enough. On the opposite, if the dough is not elastic enough and you cannot stretch it into a thin layer, it means you must knead it for a longer period of time.
- Slowly add the butter. Once your dough has passed the windowpane test, it’s time to incorporate the butter. As the stand mixer runs on speed 4-5, slowly add the diced butter. I recommend adding just a few cubes of butter at a time and adding more once it is fully incorporated. It should take about 5 minutes for all of the butter to be fully incorporated into the dough.
- First rise. Transfer the dough to a mixing bowl and cover it with plastic wrap touching the dough. This will prevent it from forming a crust. Let the dough rise in a warm place for about 45 minutes.
- Second rise. Next, punch the dough to deflate it and cover it with plastic wrap again. Allow it to rise slowly in the refrigerator for at least 4 hours, preferably overnight. This will allow the flour to absorb the butter, resulting in a better flavor.
- Prepare a loaf pan. Lightly grease a 9×5-inch loaf pan with butter.
- Divide the dough. Remove the dough from the refrigerator and gently punch it to release the air. Divide it into 8 pieces of 3 ounces (85g). Note: You will have some leftover dough. You can use it to make small buns or individual brioche.
- Roll into balls. Working with one piece of dough at a time, roll it into a smooth ball on a lightly floured (or oiled) work surface.
- Transfer to a loaf pan. Transfer each ball of dough to the prepared loaf pan and arrange them in four rows of two.
- Let it rise. Cover the pan with plastic wrap and allow the dough to rise in a warm spot for 90-120 minutes, or until it is just about 1 inch under the top of the pan.
- Preheat the oven to
 350 °F (175°C).
 - Make the “egg wash”. In a small bowl, mix together 1 teaspoon of maple syrup with 1 tablespoon of plant-based milk. Set aside.
- Bake. Finally, brush the brioche with the vegan “egg wash” and bake for about 30 minutes or until the top of the brioche is golden brown.
- Allow the brioche to cool for about 10 minutes before removing it from the pan. Let it cool for another 25 minutes before enjoying it!
- You can store this brioche in a large freezer bag closed with a twist-tie. The brioche will stay soft for up to 7 days at room temperature.
Notes
I am sharing the amounts for each ingredient in grams for more accuracy. I highly advise against trying to convert this recipe into cups, as you won’t get consistent results. Stay near the stand mixer.
Since the stand mixer will be running for 20-25 minutes, you may want to do something else and leave it alone. Wrong, stand nearby! With that kind of speed, the stand mixer tends to move on the kitchen counter and could easily fall if you don’t readjust its position from time to time. Do not overproof.
Keep an eye on the dough during the third rise, which occurs once it is placed inside the pan. Once the dough has risen to about 1 inch below the top of the pan, it’s ready to be baked. Allowing it to rise beyond this point won’t result in a better texture. In fact, it may result in a less pillowy crumb. Knead long enough.
The dough should pass the window pane test BEFORE incorporating the butter. Kneading the dough for a long period of time is essential to developing a fibrous/stringy texture. Do not reduce the amount of butter.
I advise against reducing the amount of butter. Brioche is supposed to be very buttery, and that’s the secret to its incredible mouthfeel. Do not rush the process.
Please, do not try to shorten some steps. Making brioche is not complicated but it takes time and care. I promise the result is completely worth it! Remove the brioche from the pan after 10 minutes.
To prevent the bottom of your brioche from getting soggy, do not leave the brioche inside the pan too long. I recommend carefully transferring it to a cooling rack 10-15 minutes after baking.
Nutrition
Update: This recipe has been updated with new photos in October 2025. You can find the older photos below.

About the Author
Thomas Pagot is the founder, photographer, and recipe developer behind Full of Plants. He created the blog in 2016 as a personal cookbook for vegan recipes. Through years of recipe development, Thomas has successfully grown Full of Plants into a trusted resource for plant-based recipes.
Leave a Comment