This post may contain affiliate links. Please read our disclosure policy.
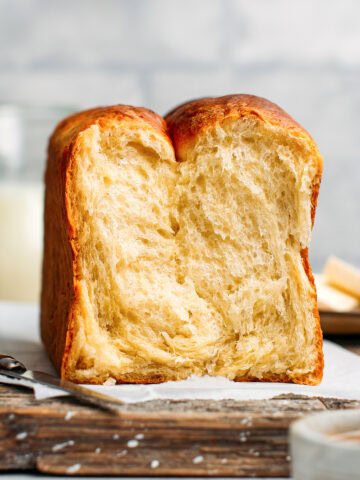
This homemade sandwich bread made with just 5 ingredients is exceptionally tender and pillowy! The process is so simple and easy to follow that you will never want to buy sandwich bread at the store again!

⭐️ Why You Should Try It
- Minimal ingredients and simple process. You will only need 5 very basic ingredients that can be found everywhere. No weird or fancy ingredients and no preservatives are needed, making it much healthier than commercial sandwich bread.
- Perfectly seasoned. This sandwich bread is not overly sweet like the store-bought ones. It has the perfect balance of sweetness and saltiness.
- Incredibly soft and tender. Thanks to the use of a Japanese technique called Tangzhong, this bread stays soft for up to 5 days! Plus, it has a light and fluffy texture!
🍞 What Is Sandwich Bread
Sandwich bread, also called Pullman loaf or “Pain de Mie,” is a type of white bread baked in a rectangular lidded pan. It is commonly used to make grilled cheese, butter, or jam sandwiches.

🌾 Ingredient Notes
Since this recipe requires basic ingredients, there are high chances you already have everything in your pantry! Here is what you will need:
- Flour – Use bread flour or high-protein flour for the best texture.
- Yeast – You can use instant yeast or dry active yeast. If using the latter, dissolve it in a tablespoon of warm water and let it sit for 10 minutes before using.
- Sugar – Preferably granulated white sugar, which will not alter the flavor of the bread. Sugar enhances the overall taste without making the bread too sweet. It also acts as a natural preservative.
- Oil – Use a neutral cooking oil like canola, grapeseed, or sunflower oil. The addition of oil gives the bread a moist and soft crumb.
- Salt – For flavor.
🥣 How to Make It


Here is the process to make this sandwich bread:
- Knead the dough. Add all of the ingredients to a stand mixer fitted with the dough attachment. Knead for about 5 minutes or until the dough is smooth. If you have been making bread before, you might find the dough a bit too soft/wet. This is normal. Refrain from adding more flour.
- Let it rise. Transfer the dough to a lightly greased bowl and cover it with plastic wrap or a clean kitchen towel. Let it rise for about 1 hour in a warm environment.
- Transfer to the loaf pan. Once the dough has doubled in volume, punch it down to release the air and transfer it to your loaf pan.
- Let it rise again. Close the loaf pan with the lid and let the dough rise for another 45-60 minutes. The dough will fill the pan completely, so do not try to open the lid.
- Bake. Finally, bake the loaf for 30 minutes!
Which Sandwich Pan To Use
While you can use a regular loaf pan, I highly recommend baking this sandwich bread in a 1-lb capacity Pullman loaf pan that comes with a lid.
Baking the loaf in a closed pan has 3 main advantages:
- It keeps the bread moister. Since the loaf is baked in a closed environment, the steam cannot escape, keeping the bread moister.
- It creates a slightly denser crumb. The lid prevents the bread from rising too much, giving the crumb a denser and chewier texture.
- It gives it a perfect shape. By baking the bread in a Pullman loaf pan, you will get a perfect-looking loaf that has nothing to envy to the commercial ones. Plus, it will have a beautiful light brown crust on all sides!

📔 Tips
- Use high-protein flour. While all-purpose flour works great, I prefer bread flour or high-protein flour. It gives the crumb a chewier texture.
- Do not omit the Tangzhong step. This extra step not only helps tenderize the bread but also helps the bread stay fresher longer.
- Use grams. For more accurate results, ingredients are given in grams.
- Check the expiry date of your yeast. Yeast may be a dry product. It can expire and won’t have any rising power, so always make sure to check the expiry date.
- Let the loaf inside the pan for 15 minutes after baking. This will allow it to steam and keep its moisture.
- Store in a plastic bag. Keep the plastic bag that comes from store-bought sandwich bread to store your homemade bread. It will stay soft for up to 5 days. Check out below for the freezing option.
- Choose a serrated knife over a plain one. While I used a plain edge knife for photo purposes, cutting this sandwich bread using a serrated knife into 1-inch slices is better.

❄️ Freezing
You can freeze this sandwich bread for up to 3 months. It can be frozen as a full loaf or in slices. Freezing in slices allows it to thaw more quickly, plus you can use exactly what you need.
🥪 Where to Use It
This homemade sandwich bread can be used to prepare:
- Lunch or dinner: Cucumber sandwich, BLT, grilled cheese sandwiches, or as a topping for French Onion Soup. You can also use it to make garlic croutons!
One of my favorite ways to use it is to spread some vegan pâté on top, a bit of vegan mayo, top with lettuce leaves, thin slices of marinated tofu or seitan, and some cucumber slices! - Breakfast: Peanut butter and jelly sandwich or French toast.
It’s also great as a dip for soups, curries, and so much more!

💬 FAQ
I recommend using bread flour as it gives the bread a chewier texture.
No, this recipe hasn’t been designed to be gluten-free.
You can but be aware that sugar acts as a natural preservative. Hence, the bread won’t stay soft for long.
This homemade sandwich bread will keep for up to 5 days at room temperature.

If you have never made sandwich bread before, I highly recommend you give it a try! It’s not as complicated as it looks, and it tastes so much better than store-bought! It smells fantastic and has a soft and delicate crumb!
⭐️ Did you like this recipe? Let us know in the comments below, and tag us on Facebook, Instagram, or Pinterest!


Want to Save This Recipe?
Enter your email below & we’ll send it straight to your inbox! Plus, you will receive new recipes every week!
I’d like to receive more tips & recipes from Full of Plants.
This site is protected by reCAPTCHA and the Google Privacy Policy and Terms of Service apply.

Homemade Sandwich Bread (Super Tender!)
Equipment
Ingredients
Tangzhong
- 20 g bread flour
- 100 g water
Bread
- 450 g bread flour
- 8 g instant yeast
- 50 g granulated sugar
- 210 ml water at room temperature
- 52 ml oil
- 6 g salt
Instructions
Tangzhong
- Add the flour and the water to a saucepan. Heat over low-medium heat, constantly whisking, until it reaches a temperature of 150°F (65°C). Note: If you don't have a thermometer, remove from the heat as soon as the flour mixture has thickened.
- Transfer to a small bowl and cover with plastic wrap. Let it sit at room temperature for 2 hours or overnight in the refrigerator.
Bread
- Knead: Add the bread flour, instant yeast, and sugar to the bowl of a stand mixer fitted with the dough hook. Add the prepared Tangzhong, water, oil, and salt.
- Knead on medium speed for about 5 minutes or until the dough is smooth. Be aware that the dough will be very soft; this is normal. Do not add more flour.
- First rise: Lightly grease a glass bowl with oil. Transfer the dough to the bowl and cover it with plastic wrap or a clean kitchen towel. Let the dough rise in a warm place for about 1 hour or until it has doubled in volume.
- Lightly grease a 1 Pound Pullman Loaf Pan with oil (or line it with parchment paper).
- Once the dough has risen, punch it down to release the air inside. On a well-floured surface, shape the ball into a log the size of your loaf pan. Transfer the dough to the prepared loaf pan and close with the lid.
- Second rise: Let the dough rise a second time for 45-60 minutes in a warm environment (you can place it in the oven with the light on). Do not try to open the lid.
- Bake: Near the end of the rising time, preheat the oven to 355°F (180°C). Bake the loaf for 30 minutes. Remove the pan from the oven and let it cool for 15 minutes before opening the lid.
- Transfer the sandwich bread to a cooling rack to cool completely. Store the sandwich bread wrapped for up to 5 days at room temperature or 7 days in the refrigerator.
Notes
- Use high-protein flour. While all-purpose flour works great, I prefer bread flour or high-protein flour. It gives the crumb a chewier texture.
- Do not omit the Tangzhong step. This extra step not only helps tenderize the bread but also helps the bread stay fresher longer.
- Use grams. For more accurate results, ingredients are given in grams.
- Check the expiry date of your yeast. Yeast may be a dry product, it can expire and won’t have any rising power, so always make sure to check the expiry date.
- Let the loaf inside the pan for 15 minutes after baking. This will allow it to steam and keep its moisture.
- Store in a plastic bag. Keep the plastic bag that comes from store-bought sandwich bread to store your homemade bread. It will stay soft for up to 5 days. Check out below for the freezing option.
- Choose a serrated knife over a plain one. While I used a plain edge knife for photo purposes, cutting this sandwich bread using a serrated knife into 1-inch slices is better.
Nutrition

About the Author
Thomas Pagot is the founder, photographer, and recipe developer behind Full of Plants. He created the blog in 2016 as a personal cookbook for vegan recipes. Through years of recipe development, Thomas has successfully grown Full of Plants into a trusted resource for plant-based recipes.


Leave a Comment
I baked the bread In a loaf pan since I do not have a Pullman. Came out very well, but to reach internal temp of 190 I baked about 45 min
Happy to hear you got great results, Linda!
Thank you for your rating 🙂
Recipe is great. I halved the sugar as 50g seemed excessive for one loaf. Also would suggest listing the water and oil in grams as everything else is listed that way.
Thanks for your feedback!
OK, this will sound stupid: I’m careful about not over proofing for the second rise, but when I baked it, dough oozed out. Weird. Any suggestions? Once when I let it rise in my oven it also oozed out (before baking). What a mess, but bread turned out fine. Just wondering how to not let this happen. But the bread tastes great!
I would recommend trying to put just a bit less dough into your pan.
Thanks! I will do that now as I am just beginning that portion. This is a great recipe and my go-to sandwich bread.
Just made this today! Fabulous recipe. Tastes delicious, great texture. Question–how about using some whole wheat flour? How can that be accomplished and still turn out a decent loaf?
Thanks for your feedback Catherine!
I guess the recipe would need to be re-developed to use whole wheat flour as the amount of liquid would be different.
Thanks a bunch for the recipe! It really did work. My first loaf of this recipe came out tender and moist, the way I had expected it. I had left my Tangzhong in a jar (I had made it in a microwave to save time stirring on a stove) overnight, and it really helped tenderize the bread in this recipe. I used my left-over spelt and oat flour, and melted vegan butter for oil, and it also worked.
I’m so glad you had success with this recipe! Thanks for your feedback!
I purchased the Pullman loaf pan, tried the recipe, and it was delicious, and really came out perfect and was a hit with my family.
I’d like to check with you about measurements:
I weighed everything as suggested, but had trouble measuring the 52 mil of oil, please tell me what you used to measure it. I think my conversion was 3.5 US tablespoons. Thank you so much!
I’m so happy to hear you liked this sandwich bread, Mary!
I measured 1 tablespoon of oil equals about 13g. So you would want to use about 4 tablespoons of oil.
I just tried this recipe and it turned out perfect! I wrapped the loaf in cling film, so I will see how long it stays tender. Thank you for sharing Thomas!
Hi Thomas, I went to purchase this Pullman Loaf Pan & I was reading some reviews. Some of them said the coating comes off after the first couple of uses, have you had any problem with this?
Thank you!!
Hi Christine,
It seems this loaf pan is sold under different brands, so I am not entirely sure if I own the exact same (although it looks like it).
Personally, I have baked bread 7-8 times in it to date, and the coating didn’t come off. I always lightly oil it and even line it with parchment paper. Hope this helps!