This post may contain affiliate links. Please read our disclosure policy.


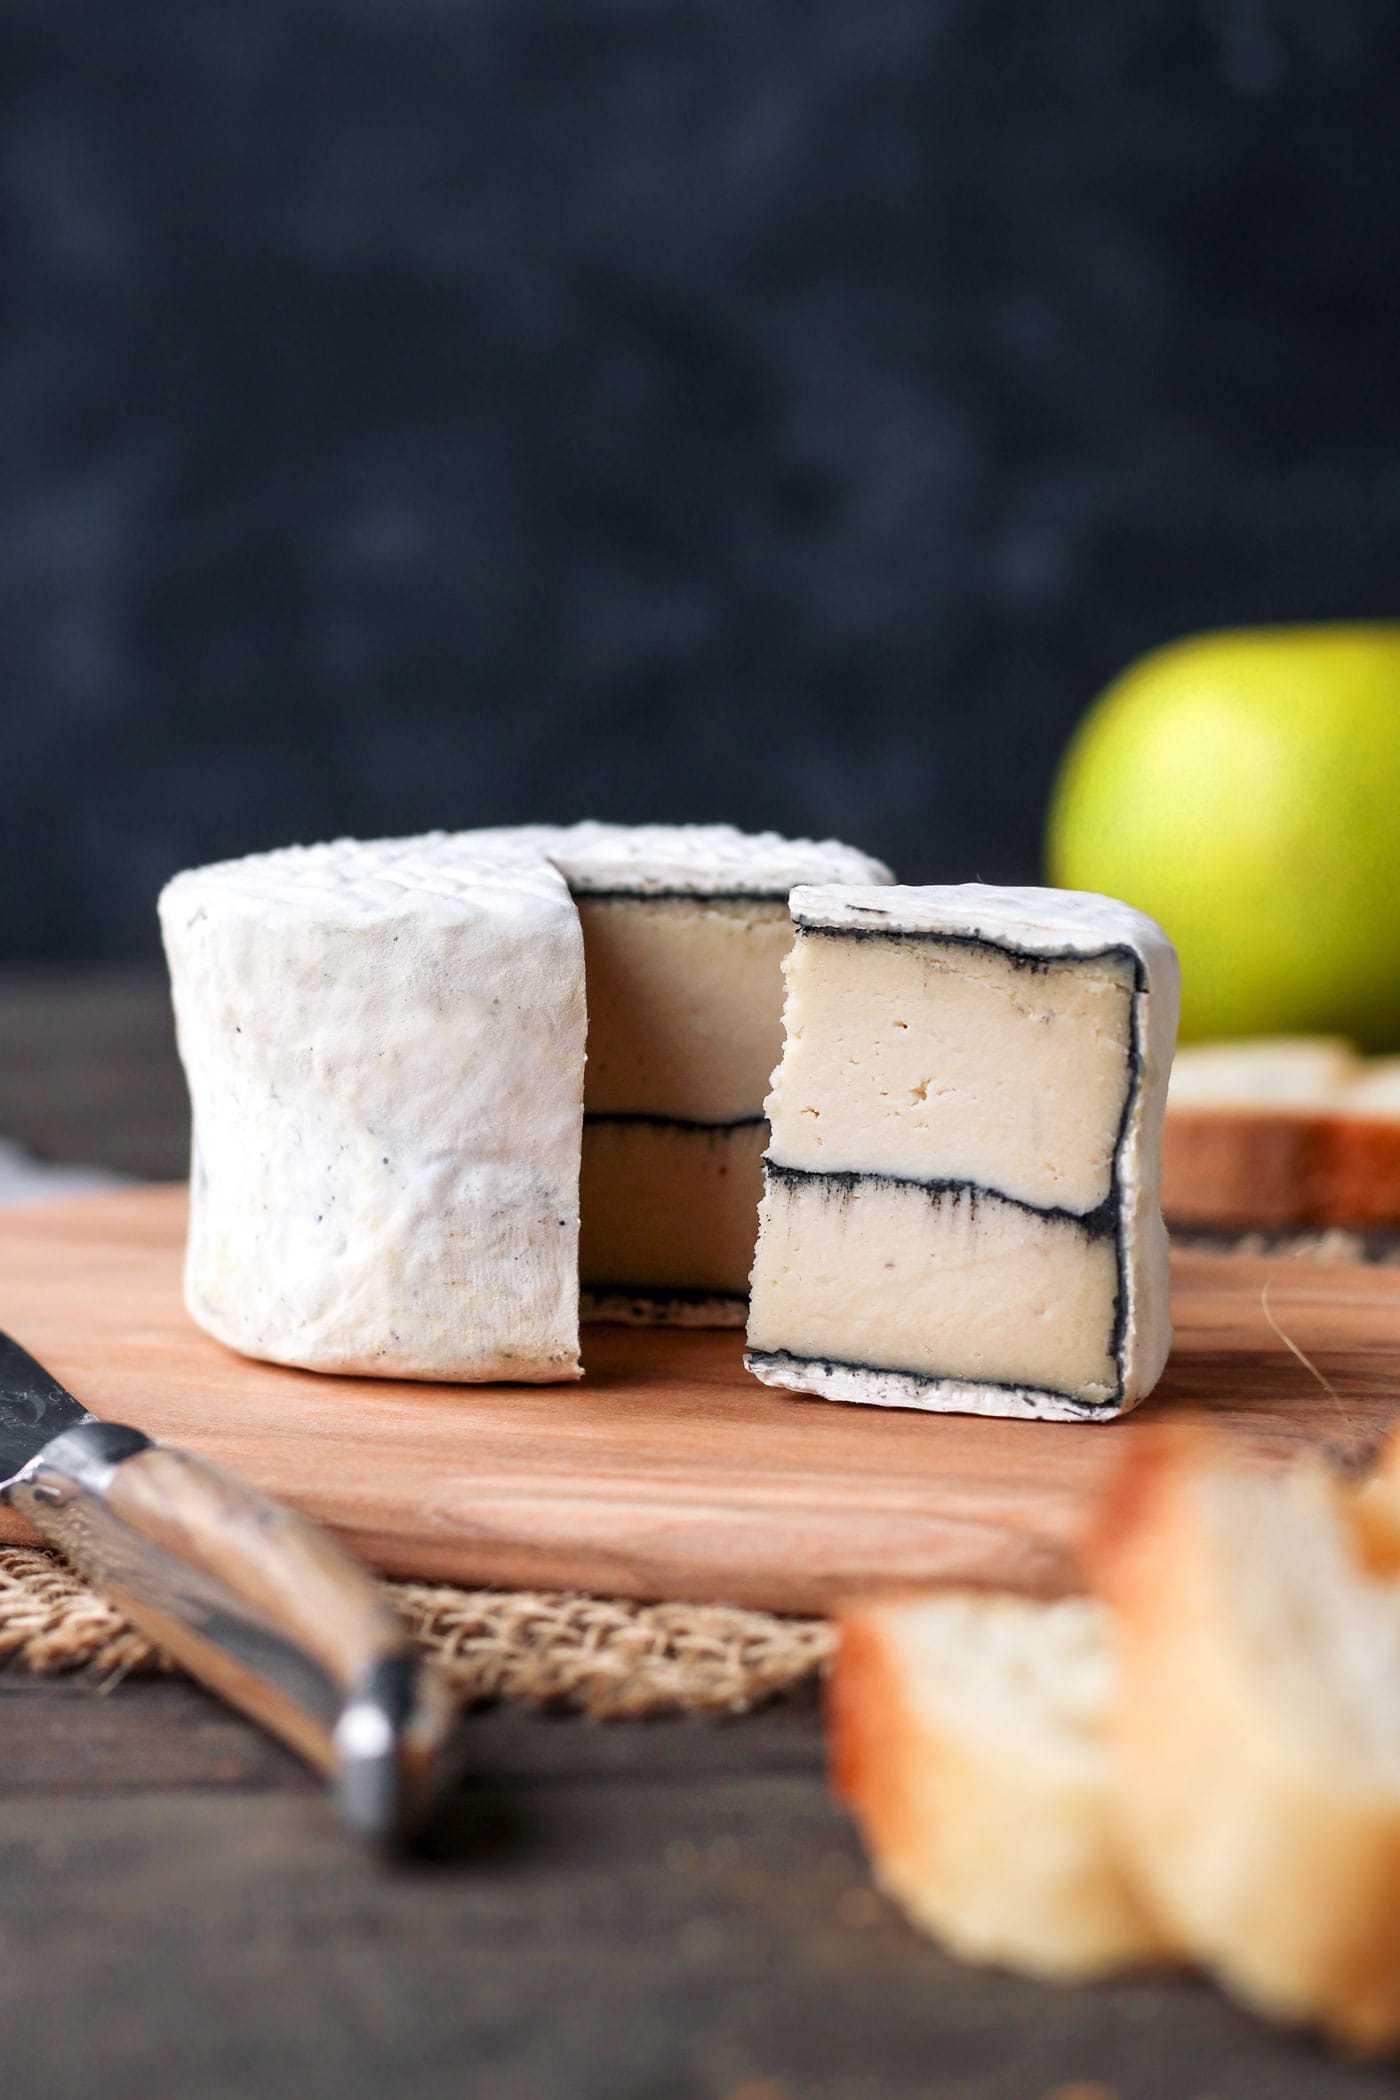
Back at it with another vegan cheese! Vegan Ash-Ripened Camembert!
As explained in the post last year, I was disappointed to see many people making my cheese recipes and not giving any credit, or even worse, claiming they created the recipe themselves. Some people went even further, trying to sell it through their business to customers. I can say that because they used the same “scramble” technique I created to have large blue veins inside the blue cheese.
Many of you sent me support emails at this time, and I really appreciate it. I figured you guys should not be deprived of new recipes just because of a few people. I realized there is no copyright on vegan cheese making; it doesn’t belong to anyone. Ultimately, the goal is to promote veganism, and the more experiments we share, the further we can go. That’s why I’m working on new cheese recipes I will publish here soon. There are three in the works, so stay tuned!
In the meantime, I thought I would share a recent experiment. This is more like an alternative version of my aged vegan camembert than a whole new recipe. However, I thought I would still share it because the taste is a bit different. And doesn’t it look cool? And it contains only 6 ingredients!
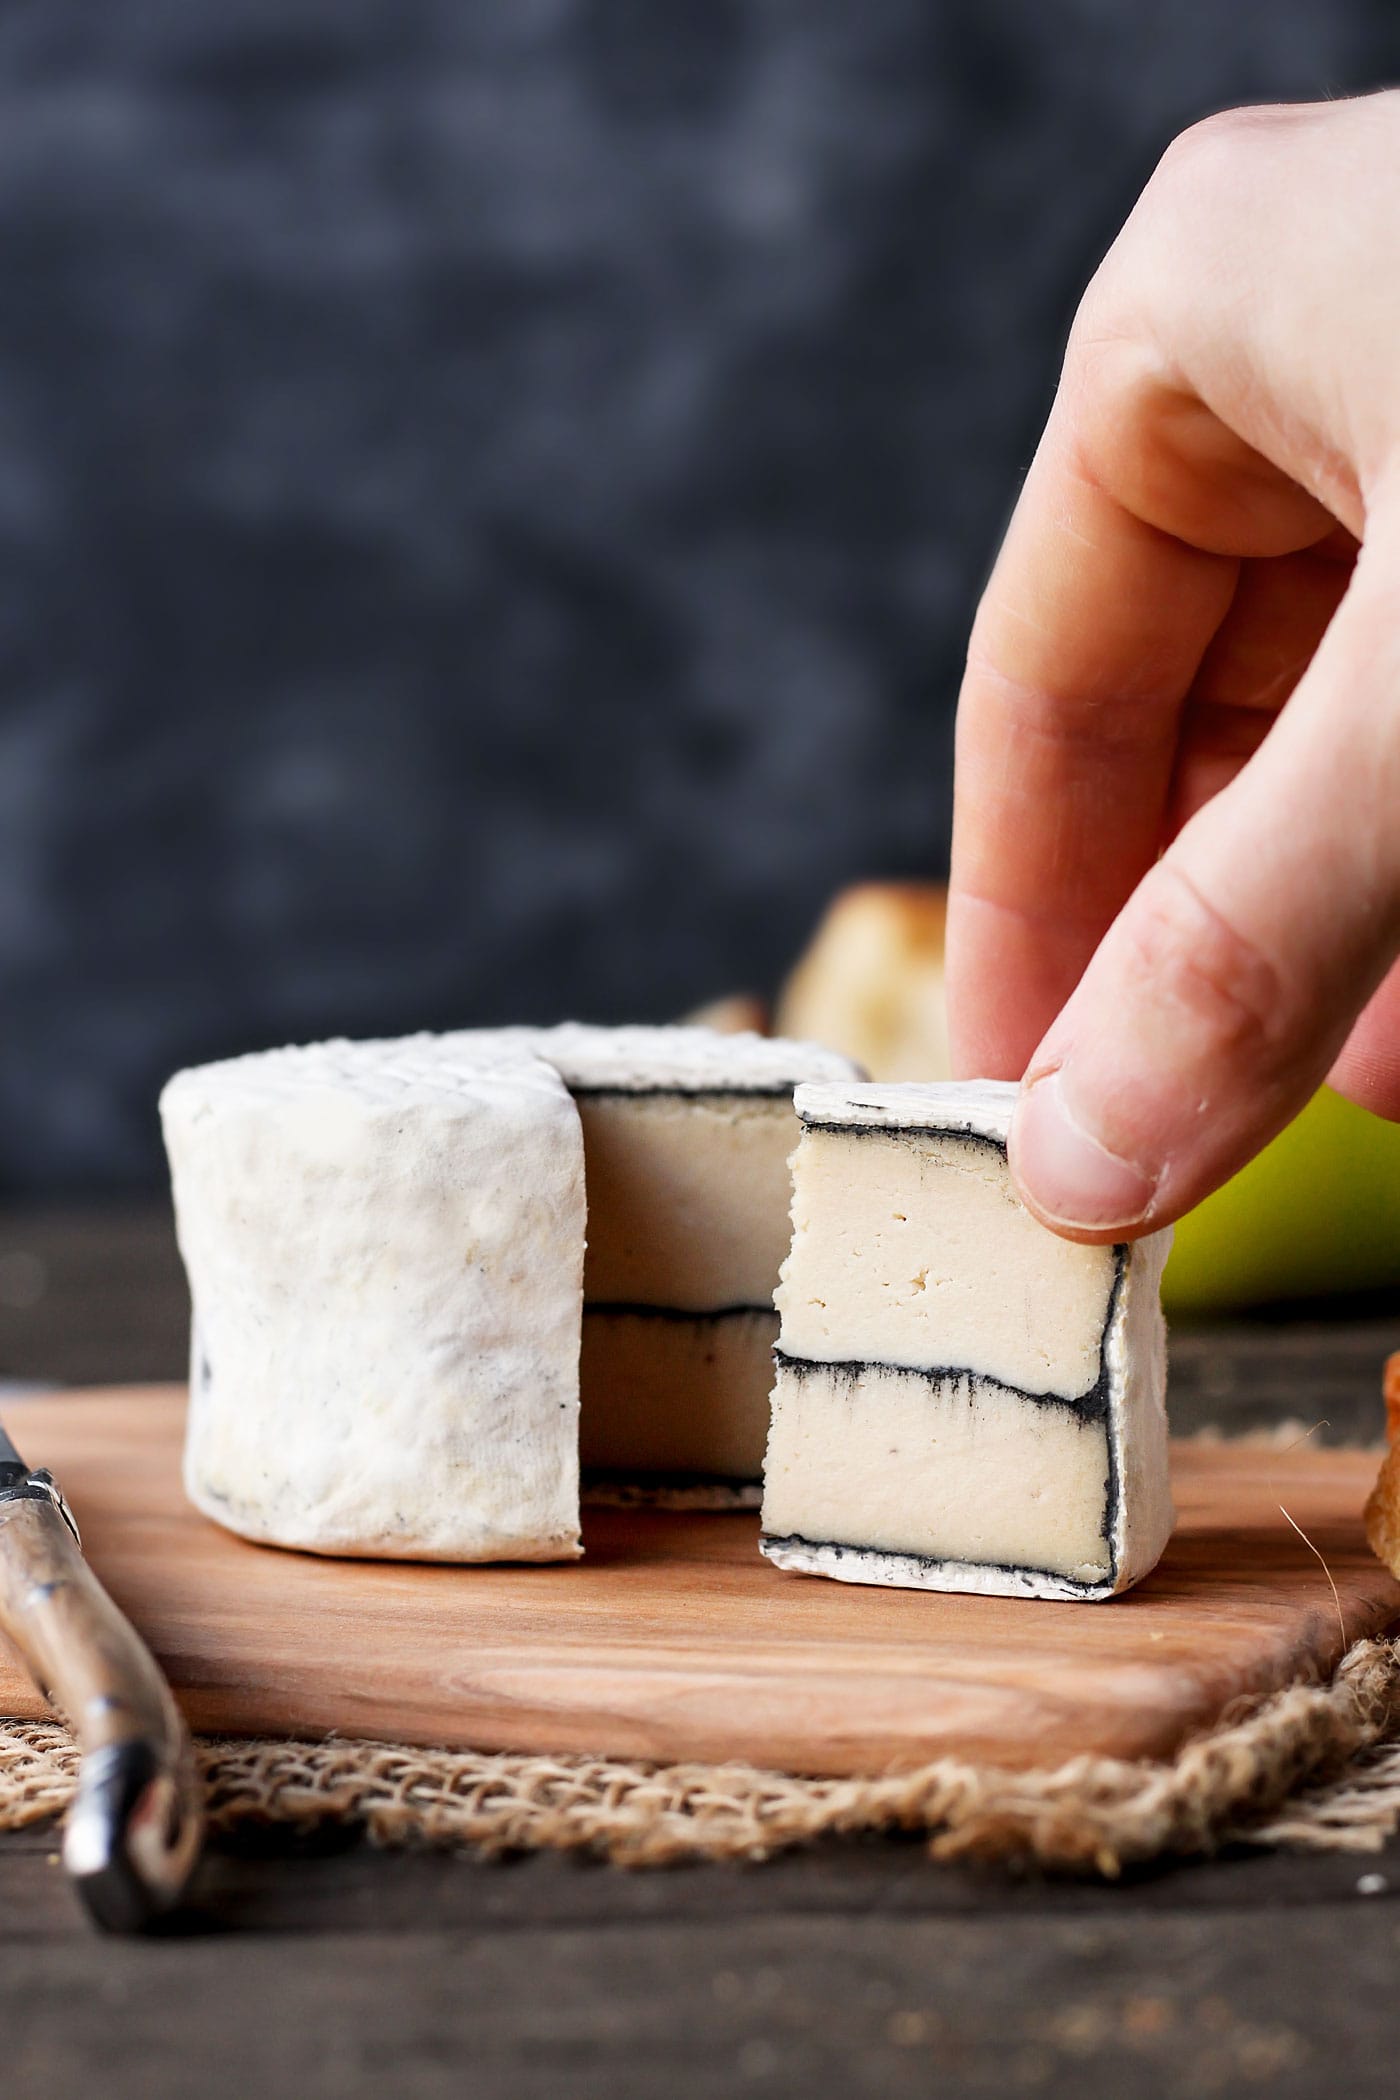
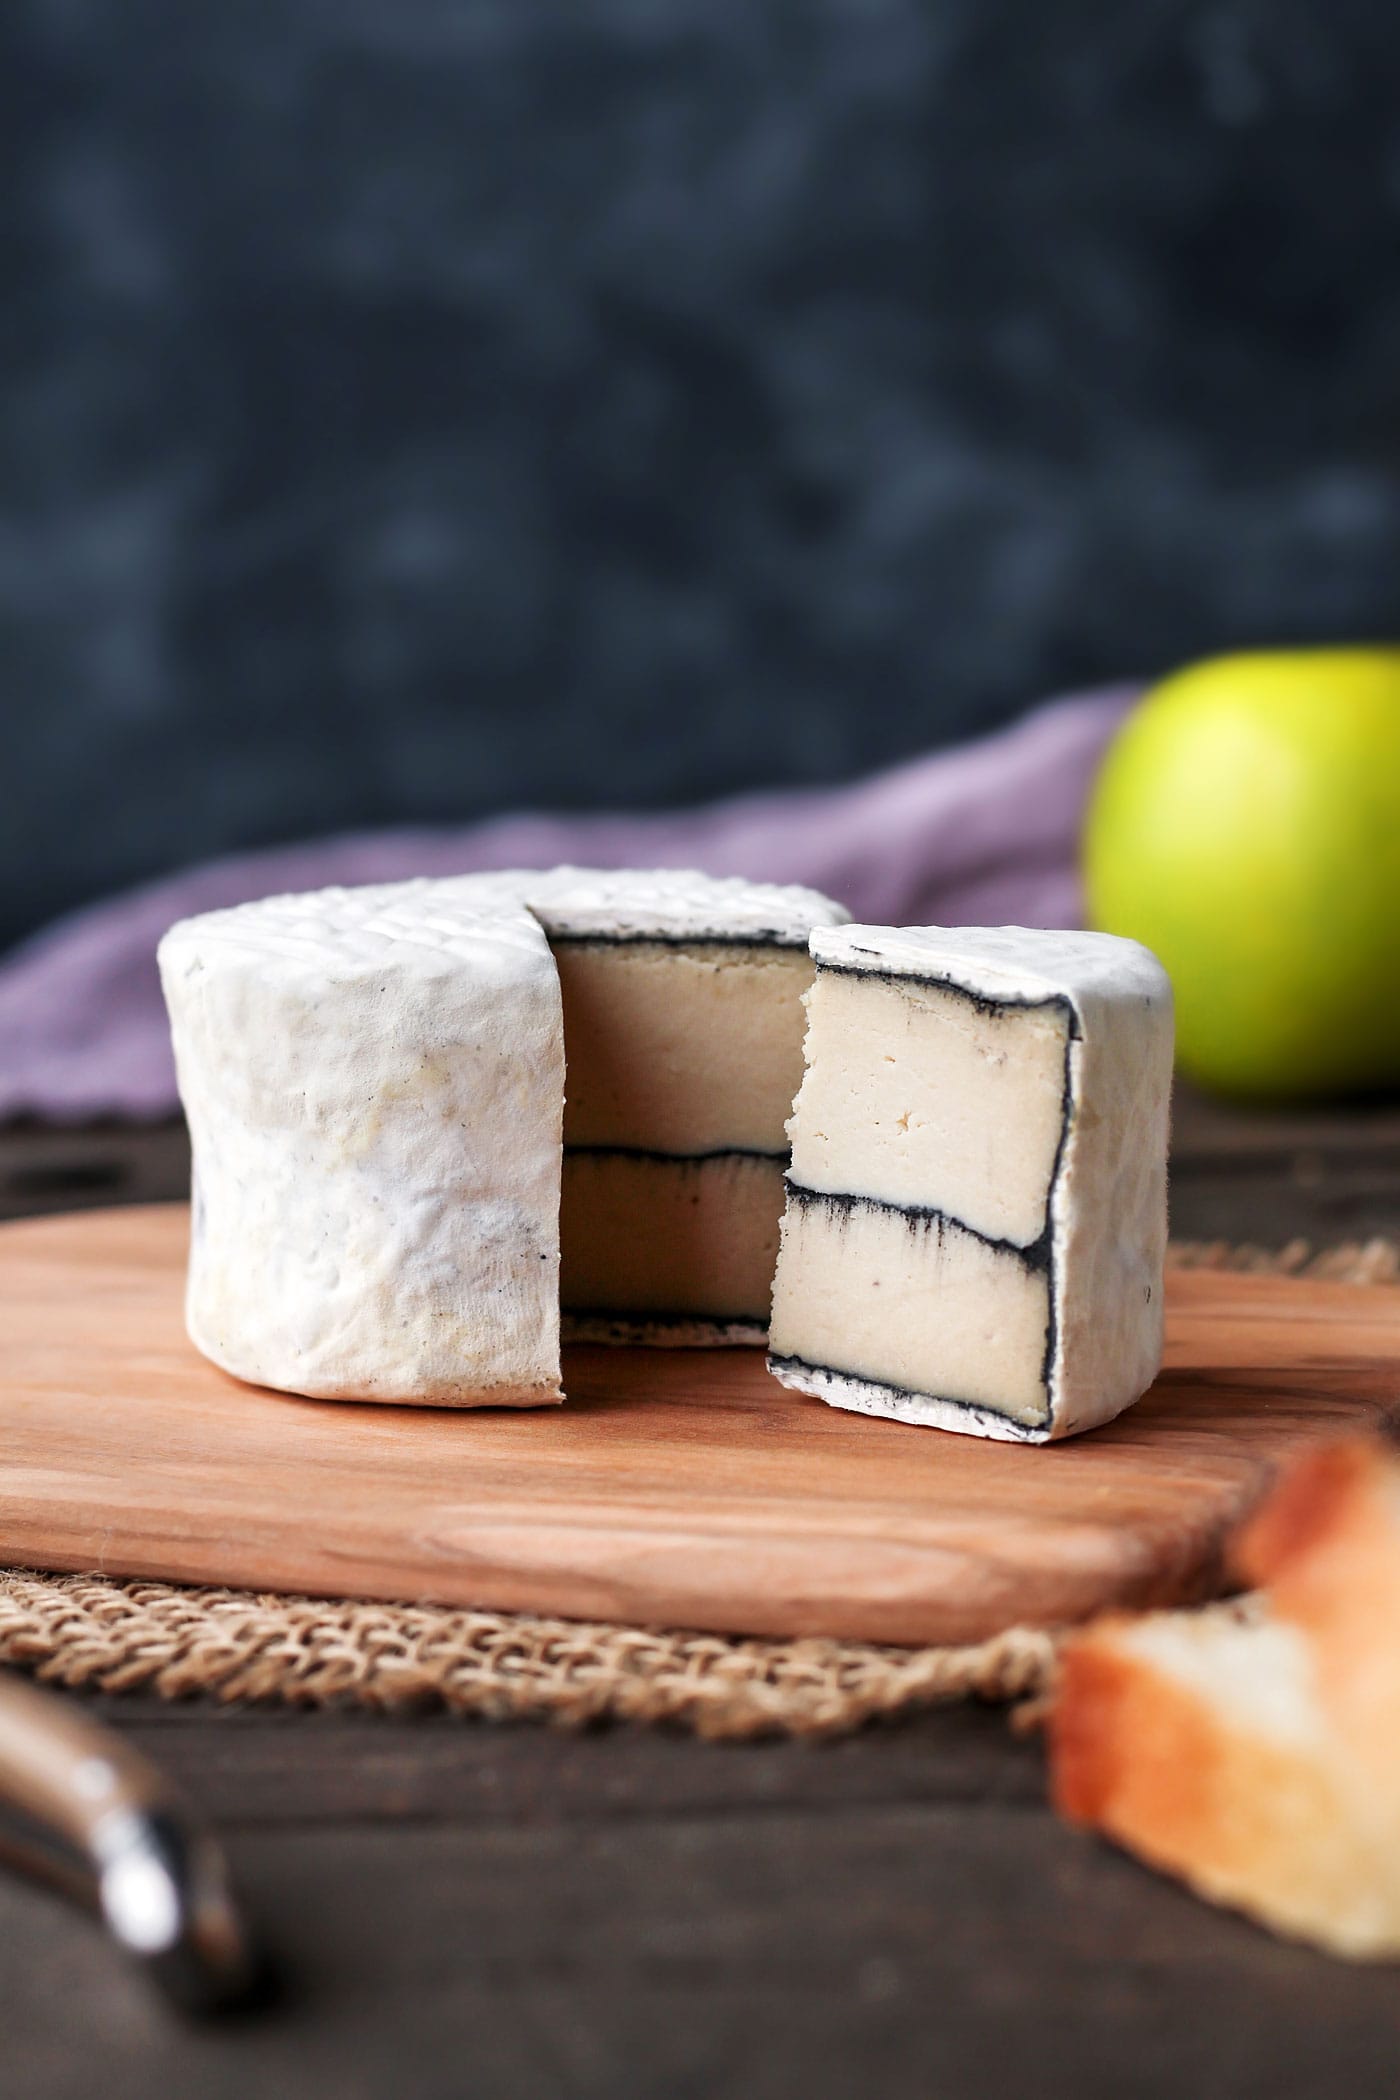
This camembert is first coated with vegetable ash and then naturally covered by a white mold (Penicillium camemberti). It also has a thin black line in the middle to make it look even cooler, a bit like Morbier cheese.
Vegetable ash (also called activated charcoal) is mostly used for aesthetics here, but it also helps lower the cheese’s acidity, giving it a milder flavor. The other advantage of using ash is that the white mold will grow quicker on the outside and prevent other bad molds from appearing.
I added some white miso to make the cheese a bit different taste-wise. It creates a more buttery flavor. Make sure to use a light one. Otherwise, it will be too salty.
Please check the links in the recipe regarding where to find the mold, cultures, and vegetable ash. If you are located in Europe, I recommend checking out cashewbert.com. They have everything you need to make all sorts of vegan cheeses, from cultures to supplies.
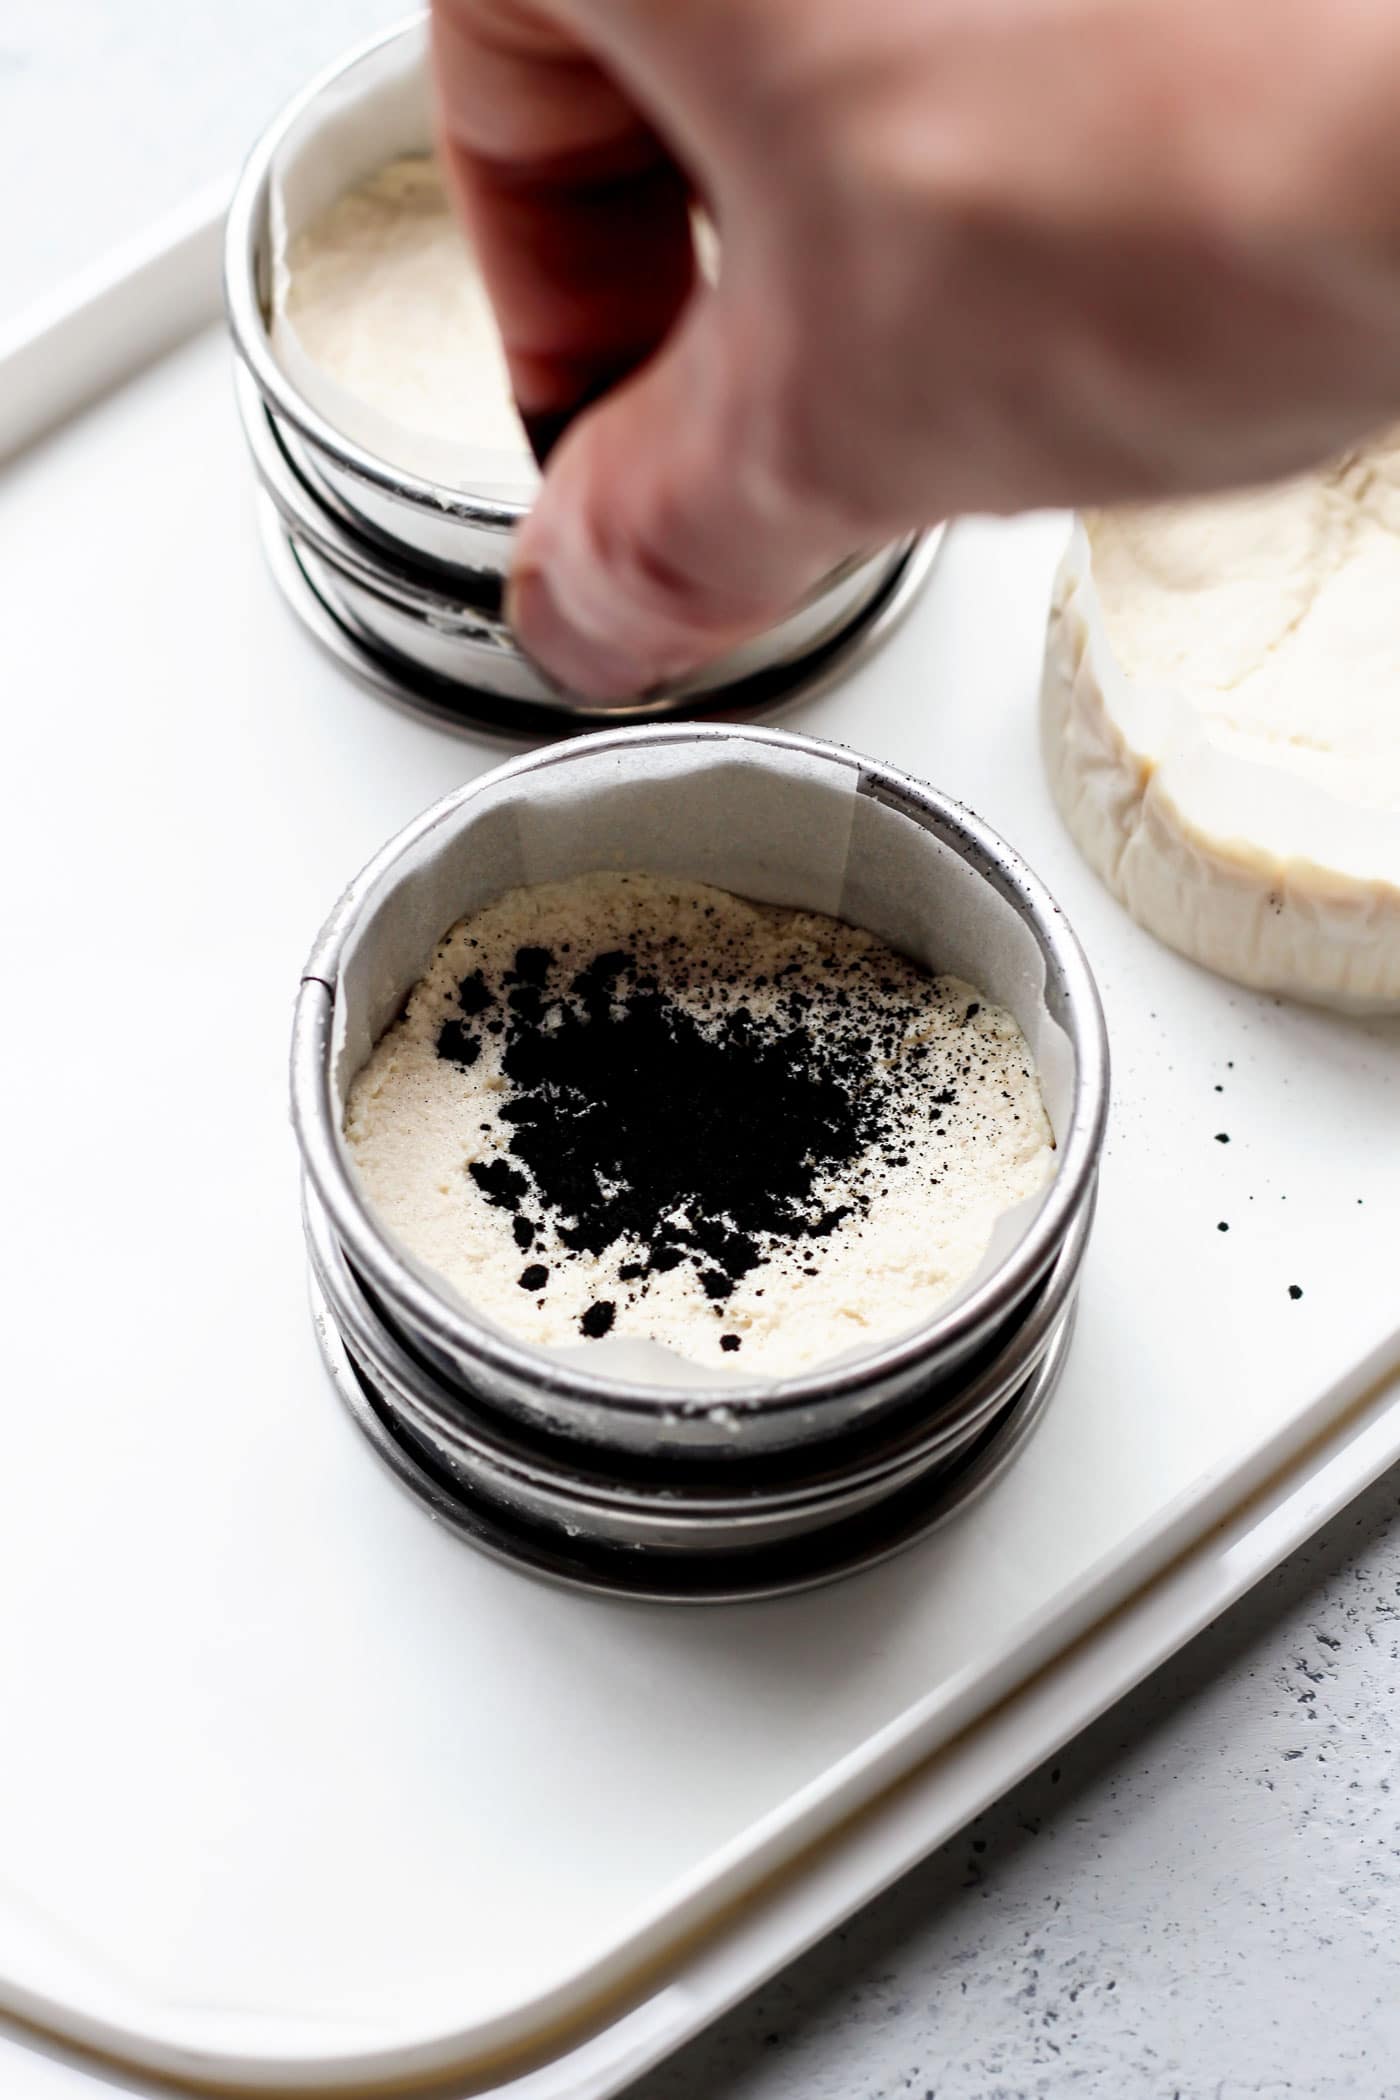
The technique is very similar to the one used in camembert cheese making, except you fill half of the molds with the cashew cream, sprinkle some vegetable ash, and cover with the rest of the cream. This creates a thin line in the center. For the exterior, you will use a mix of salt and ash. Salt will help the mold grow, penetrate the cheese, and add flavor.
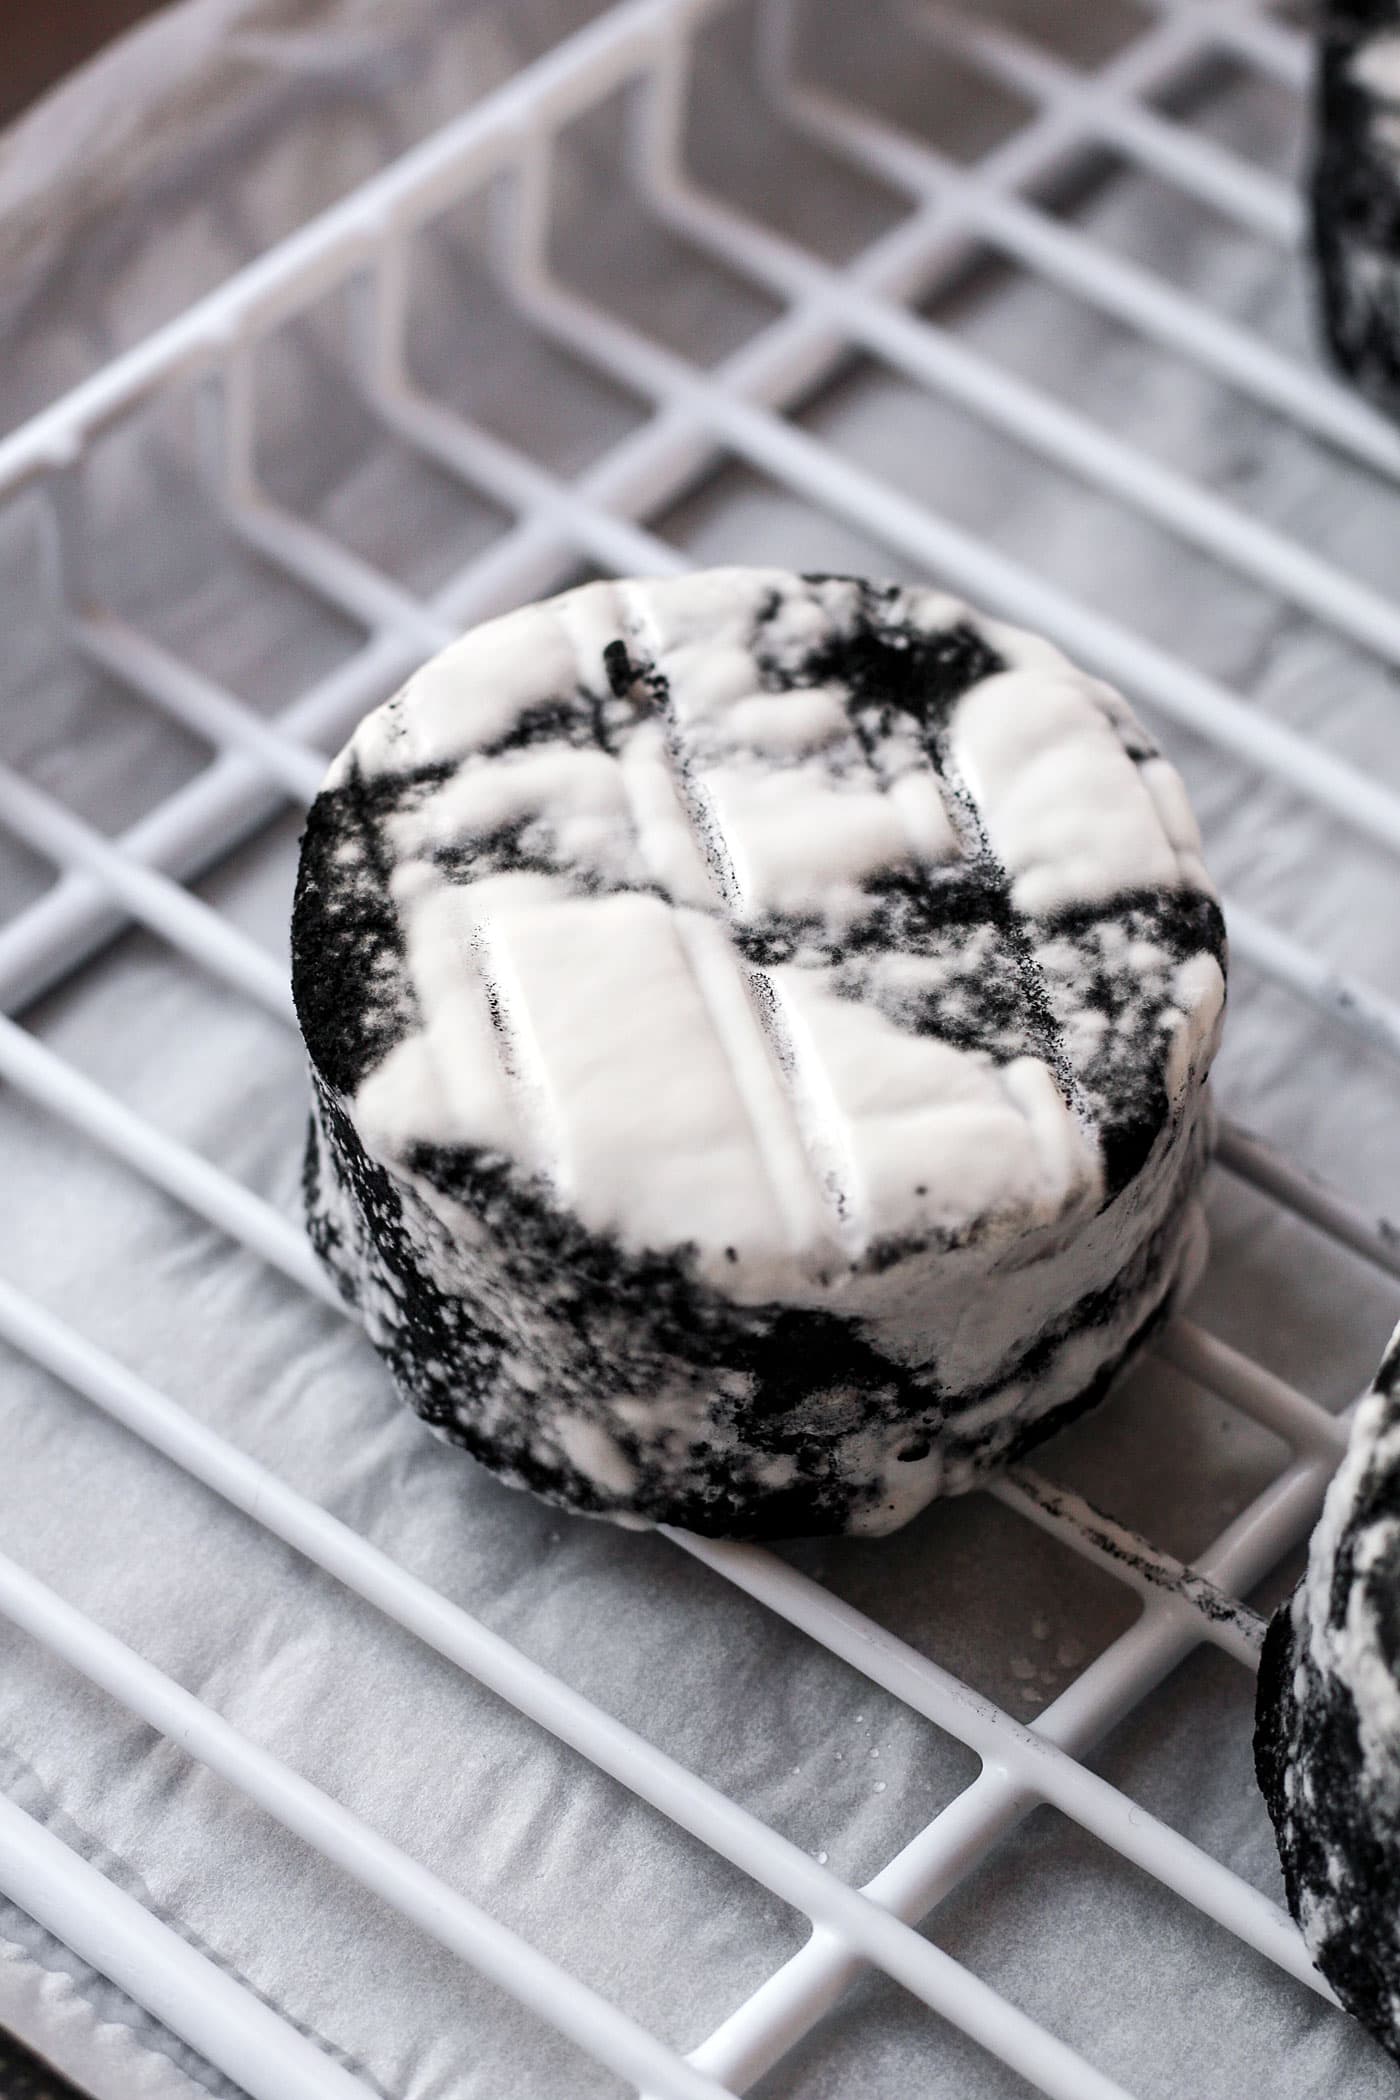
After about 5-7 days, you should start to see some white mold growing on top of the ash. Now things are getting exciting! As you continue to flip it once a day, the mold will slowly cover the whole surface of the cheese and completely cover the black ash.
Once fully coated, you can wrap it in cheese paper and let it age for at least one additional week in the refrigerator. Complex flavors will develop, and the cheese will be then ready to eat.

The ash makes this cheese unique and will definitely surprise your guests once they cut through it and take a slice!
This vegan ash-ripened camembert would make a great addition to a vegan cheese platter with camembert, blue cheese, and hickory smoked vegan cheese!
If you have questions, please check out the comments on the vegan camembert post before. There is a lot of useful info, and questions answered.
As always, let me know in the comments if you try this recipe!
Save this recipe!
Enter your email below and I’ll send it to your inbox!
Plus, you will receive new recipes every week!

Vegan Ash-Ripened Camembert
Ingredients
- 3 cups raw cashews
- 2-3 tbsp filtered water or bottled water
- 1 tbsp light sweet miso
- 1/8 tsp mesophilic culture or 6 capsules acidophilus
- 1/16 tsp penicillium candidum
- 2 tbsp vegetable ash activated charcoal
- 2 tsp sea salt
Instructions
Cashews
- Soak the cashews in filtered water for at least 5 hours or overnight.
Making The Cheeses
- Drain the cashews and place them in a large bowl. Bring a large pot of water to a boil, transfer the boiling water to the cashew bowl, and let sit for 1-2 minutes. This step will help kill viable bacteria.
- Drain the cashews and place them in the bowl of the blender (or food processor) with the miso and 2 tbsp water.
- Blend on high speed, scraping down the sides from time to time, this step might take about 10 minutes depending on your blender. You want a very smooth yet thick texture. If needed, add 1 tablespoon of water at a time until smooth. Do not add too much water, you want to use as least as possible otherwise the cheese will be too soft.
- Open the probiotic capsules and add the powder to the bowl. You can use a mesophilic culture starter instead if you prefer. Both will work. Blend for a few seconds.
- Add the penicillium candidum and blend for another 10-15 seconds. If your penicillium candidum is in liquid form, use about one drop.
- Transfer the mixture to a cheesecloth and pull it tight. Add a weight above it and let it sit at room temperature for 10-12 hours. I placed the cheesecloth in a colander on top of a bowl. This step is important to start the fermentation of the cashew cream and drain possible excess water.
- After about 12 hours, the cashew cream should have a slightly sour taste, like fresh cream cheese. Transfer to a clean bowl, cover with plastic film to touch and place in the refrigerator for about 4 hours. It will make the cashew cream easier to work with.
- Cut strips of parchment paper and lay them in 3 small springform pans (I used two 3-inch cookie cutter rounds, stacked to make it taller). You want to cover the sides and bottom of the springform pans. You can also use plastic film if you prefer. The goal is to prevent the cheese from touching the metal. Fill half the pans with the mixture and press it down using plastic film so it doesn't stick to your hands. Make sure the surface is flat.
- Sprinkle a bit less than 1/4 tsp of ash on top of the cashew mixture and spread lightly with your finger. Don't add too much ash, you want a very thin line. Otherwise, the other half of the cashew cream won't stick to the bottom one.
- Finally, top the ash with more cashew cream, filling the pans to the top. Press it down firmly using a plastic film or latex gloves. Cover the pans with plastic film to touch and place in the refrigerator for 24-36 hours.
- After that, prepare the ash mixture: in a small bowl, mix 2 tbsp vegetable ash with 2 tsp sea salt. Carefully remove the cheeses from their springform pans and salt on both sides with about 1/4 tsp of the ash-salt mixture. Do the same for the sides. Shake each cheese a bit to remove excess ash.
- Line a clean baking sheet with parchment paper. Place each cheese on the baking sheet and cover with glass or plastic containers. This is essential to keep enough humidity and allow the mold to grow. Place the baking sheet in the refrigerator. I recommend setting the temperature of your fridge around 48-52°F.
Aging
- Every day for the next 4-5 days, carefully flip the cheeses. The cheeses will still be very soft, like cream cheese. Don't worry. They will be easier to work with after a few days. If droplets form inside the containers, drain them with a paper kitchen towel. If the parchment paper becomes too wet, change it.
- On day 5, move the cheeses to a bamboo mat or clean a thick grid. Keep them covered during the whole process.
- Continue to flip the cheeses daily for the next 7-10 days. Always use clean hands or work with a plastic film to be sure you are not touching the cheese. The mold will start to appear on day 8-10, depending on the humidity and temperature of your fridge. After another week or so, the cheeses should be fully covered with white mold.
- Once they are completely white, wrap the cheeses in parchment paper or cheese paper and place them in the refrigerator for at least 5 days. The longer you let them age in the refrigerator, the stronger the taste.
- Enjoy with French bread, nuts, and/or drizzle with maple syrup!
- The cheese will keep for at least 1 month in the refrigerator.
Notes
Nutrition

About the Author
Thomas Pagot is the founder, photographer, and recipe developer behind Full of Plants. He created the blog in 2016 as a personal cookbook for vegan recipes. Through years of recipe development, Thomas has successfully grown Full of Plants into a trusted resource for plant-based recipes.
Leave a Comment