Vegan Blue Cheese
Vegan blue cheese that tastes like the real one! Made using traditional cheese-making techniques and only 5 ingredients. A creamy, sharp, and strong cheese.
Equipment

Ingredients
- 3 cups (450 g) raw cashews
- 2 tbsp (30 ml) refined coconut oil optional
- 5 tbsp (75 ml) filtered water
- 1/8 tsp mesophilic culture or 6 capsules vegan probiotics (Acidophilus)
- 1/8 tsp penicillium roqueforti in powdered or liquid form
- sea salt
Instructions
The day before
- Start by soaking the cashews in water for at least 5 hours or preferably overnight.
1. Prepare the cashew cream
- Kill bacteria. Drain the cashews and place them in a large glass bowl. Bring a large pot of water to a boil. Once boiling, pour the water directly onto the cashews. Let sit for 1-2 minutes, and drain the cashews again. This step will help kill possible bacteria and prevent bad mold from growing. After draining, allow the cashews to cool down for about 30 minutes.
- Blend into a cream. Transfer the cashews to the bowl of a high-speed blender or food processor. Add the coconut oil and 5 tablespoons of filtered water. Blend on high speed, scraping down the sides from time to time until it forms a smooth and thick cream. This step might take about 10 minutes, depending on your blender.
- Add the cultures. If using Acidophilus, open the probiotic capsules and add the powder to the blender. Otherwise, add the mesophilic powder to the blender. Next, add the Penicillium Roqueforti and blend for another 10-15 seconds.Note: The cashew cream should be smooth but quite thick. If needed, add 1 tablespoon of water at a time until smooth. Do not add too much water, otherwise the mixture will be too liquid.
- Transfer to a bowl. Transfer the cashew cream to a clean bowl and cover it with plastic film, touching the top of the cashew cream (this will prevent the top from drying). Let sit at room temperature in a dark place for about 24h-48h. This step will kick start the fermentation process, giving the cheese its tangy flavor.
2. Shape the cheeses
- Refrigerate the cashew cream. Place the bowl containing the cashew cream in the refrigerator for about 4 hours. This will make the mixture easier to work with.
- Prepare a container. Line the bottom of a food storage container with parchment paper. I use a 12×8 inches (30x20cm) one but any container with a similar size will work. This type of container, for example, works great.
- Line pastry rings. Place four 3×1.75 inches (7.5×4.5cm) pastry rings inside the container. Cut strips of parchment paper measuring 9.5×1.75 inches (24×4.5cm) and arrange them inside the pastry rings to cover the inside sides. Alternatively, you can use plastic film if you prefer. The goal is to prevent the cashew cream from touching the metal.
- Shape the cheeses. Fill each pastry ring to the top with the cashew mixture. Cover the tops with plastic wrap.
- Refrigerate. Close the container and transfer it to the refrigerator. Refrigerate overnight.
3. Salt the cheeses
- The next day, it’s time to remove the cheeses from the pans and salt them. Salt will help with mold growth, so it’s essential.
- Sprinkle salt. The next day, remove the container from the refrigerator. Remove the plastic wrap from the top of the wheels. Sprinkle about 1/4 teaspoon of salt over the top of each wheel. Lightly rub the salt with clean hands to distribute it evenly.
- Flip the wheels. Carefully flip the wheels using a small plate lined with parchment paper. Transfer the wheels back to the container, non-salted side up. Sprinkle another 1/4 teaspoon of salt over the other side of the wheels. Rub some salt on the sides of each wheel as well. Note: The cheeses will still be very soft. This is normal. In a few days, they will firm up and be easier to work with.
4. Age the cheeses
- Refrigerate. Close the container and transfer it to the refrigerator or to a room or cheese cave with a temperature of about 47-52°F (8-11°C). Note: You can age your cheeses at a slightly colder temperature, but the mold will take longer to grow.
- Flip. Every day, carefully flip the cheeses. I recommend using very clean hands or working with gloves (or plastic wrap) to make sure you are not touching the cheeses.
- See the blue mold grow. After 7-10 days, you should start to see some light blue/green mold spots – it’s a good sign! Continue the flipping process for another 7 days. Remember that the mold will be slightly darker or lighter depending on the humidity and temperature of your fridge.
5. Crumble and re-shape
- After a total of 14 days, your cheeses should be a bit firmer and almost completely covered with blue mold! It’s now time to crumble them to create the veins.
- Scramble the cheeses. Using disposable gloves or very clean hands, scramble your cheeses (just like when you scramble tofu) into little pieces of about 1 inch (2.5cm) and transfer them to a clean bowl. The cashew mixture will still be quite soft, it’s normal.
- Re-shape them. Just like you did the first time, place four pastry rings inside a container and line them with parchment paper. Next, fill each pastry ring with the scrambled cheese without pressing too much to leave large holes on the inside. This step is essential to create a nice veining inside the cheese as the mold needs to be in contact with air to grow. You can remove the pastry rings right after shaping the wheels. Place the container back in your refrigerator or aging room.
- Flip. Continue to flip the cheeses every day for the next 3 weeks, always using clean hands or gloves. That’s fine if you miss a day or two.
- Wrap the cheeses. After a total of 5 weeks, the inside and the outside of your cheeses will be covered with blue mold. They will be ready to eat soon! Wrap each cheese in cheese paper or aluminum foil and wait another 3-7 days. The longer you let them age in the refrigerator, the stronger the taste!
- You can store this cheese for about 1 month in the refrigerator. It will become firmer and sharper.
Notes
Age the cheeses in a container during the whole aging process.
Mold needs humidity to grow. That’s why you need to keep the cheeses in a small box or container in your refrigerator. If you were to let the cheeses uncovered, they would dry out before the mold gets a chance to grow.Do not omit any ingredient.
This recipe is not versatile, so I do not recommend substituting or omitting any ingredient.Use disposable gloves.
By using gloves each time you handle the cheeses, you reduce your chances of seeing bad mold growing. Disposable gloves are pretty cheap and come in large boxes, so do not hesitate to get yourself a box.If you are making vegan camembert at the same time:
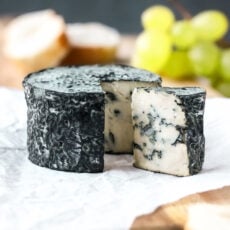
I recommend you keep them in two separate boxes. Mold can transfer very easily, and you could end up with white mold on your blue cheese or blue mold on your camembert.Regarding the appearance of the cheese.
The rind of this blue cheese is dark blue because I didn’t scrape the sides. Be aware the rind is edible, but if you prefer the exterior to be white, you can gently scrape the mold using a clean knife every two weeks. I prefer to leave the rind because it looks cooler, and after about a month, it will become a little bit firmer. Creamy inside + firm rind = perfect cheese to me.Nutrition
Serving: 1 /4 of a cheese (about 1 oz) | Calories: 95 kcal | Carbohydrates: 5 g | Protein: 3.2 g | Fat: 8.5 g | Fiber: 0.6 g | Sugar: 1 g
